
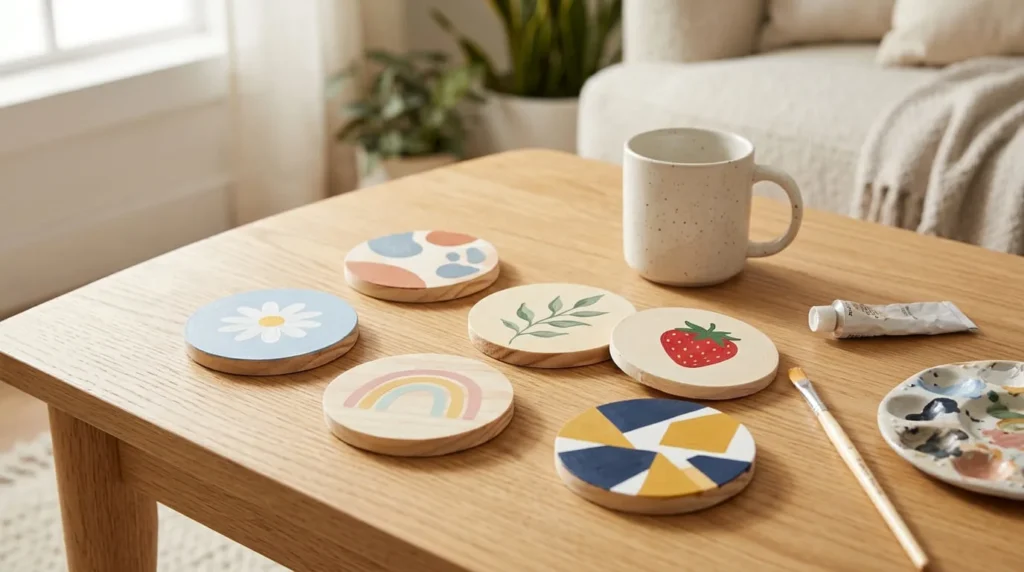
DIY painted coasters with acrylic paint are a fun and simple way to create beautiful decorations for your home. With plain coaster blanks, a few paint colors, and basic brushes, you can turn ordinary coasters into colorful handmade pieces.
You do not need advanced painting skills to get started. Simple flowers, leaves, abstract shapes, and geometric patterns can make your coasters look attractive without requiring complicated techniques.
Painted coasters can also make thoughtful handmade gifts for friends and family.
However, coasters are different from ordinary decorative paintings. They may come into contact with drink condensation, spills, and warm cups, so choosing suitable materials and a protective finish is important.
In this guide, you will learn how to prepare and paint wooden coasters step by step, explore 10 easy coaster painting ideas, and understand how to protect your finished designs for their intended use.
Can You Paint Coasters with Acrylic Paint?
Yes, you can paint many types of coaster blanks with acrylic paint.
Acrylic paint is available in many colors and works well for creating flowers, simple patterns, and decorative artwork.
However, the results depend on the coaster material, surface preparation, and paint you choose.
Wooden coasters are a practical starting point for beginners, while cork and ceramic may need different painting methods.
Why Acrylic Paint Works Well for Coaster Designs
Acrylic paint is useful for coaster painting because it can create bright colors, simple shapes, and attractive decorative patterns.
You can use a flat brush to cover the background and a smaller brush to add details.
For example, you might paint a cream background with pink flowers or create an abstract pattern using blue and terracotta shapes.
Acrylic colors can also be mixed to create new shades.
You do not need a large paint collection. A few basic colors are enough for many beginner coaster designs.
Remember that acrylic paint alone does not guarantee protection from moisture, repeated handling, or hot cups.
Which Coaster Materials Can You Paint?
Several coaster materials can be decorated with acrylic paint, but they do not all behave the same way.
Wooden coasters are a popular option because their surfaces are usually easy to prepare and paint.
Unfinished wood may absorb paint, so some projects benefit from a suitable primer or background coat.
Cork coasters are lightweight and have a porous surface. They may absorb paint differently and need careful application to avoid excessive buildup.
Ceramic coasters can also be painted, but smooth glazed surfaces may require special preparation and paints designed to adhere to that material.
For your first project, unfinished wooden coaster blanks are a sensible choice.
Do Painted Coasters Need a Protective Finish?
Painted coasters often benefit from a suitable protective finish, especially when they are intended for regular use.
Cold drinks can leave condensation on a coaster, while accidental spills may expose the painted surface to moisture.
Warm cups can also affect certain paints and protective coatings.
A compatible finish may help protect the design, but not every varnish or sealer is suitable for drink coasters.
Before choosing a product, check whether the manufacturer recommends it for your coaster material, expected moisture exposure, and cup temperatures.
For decorative coasters that will not hold drinks, the finishing requirements may be different.
What Supplies Do You Need to Make Painted Coasters?
You can make attractive painted coasters with a small collection of basic craft supplies.
The most important items are suitable coaster blanks, acrylic paint, and brushes.
You may also need preparation materials and a protective finish, depending on how you plan to use the coasters.
Choosing Wooden Coaster Blanks
Start with unfinished wooden coaster blanks that have a reasonably smooth surface.
You can choose round, square, or other simple shapes.
Round coasters work well for flowers, fruits, and circular patterns.
Square coasters are useful for geometric shapes, stripes, and abstract artwork.
Check that the wood is solid, flat, and stable.
Avoid pieces with large cracks, splinters, loose layers, or uneven surfaces that could make them difficult to use.
A coaster should rest securely on a table without wobbling.
If your wooden blanks already have a finish, check whether the surface can be prepared for acrylic paint.
Best Acrylic Paint for DIY Coasters
Acrylic craft paint or suitable artist acrylic paint can be used for many wooden coaster projects.
Choose paint recommended for the surface you are decorating.
For beginners, a practical color collection includes white, black, red, yellow, blue, and green.
You can mix these colors to create additional shades.
For example, red and white can create pink, while blue and yellow can produce green.
Earthy shades such as cream, sage green, terracotta, and muted blue also look attractive on handmade coasters.
Avoid buying too many colors before trying your first project.
Start with a small palette that matches your chosen design.
Essential Paintbrushes and Painting Tools
You do not need many brushes to paint wooden coasters.
A small flat brush is useful for applying background colors evenly.
A medium round brush can help create flower petals, leaves, and curved shapes.
A fine detail brush is useful for flower centers, thin stems, small dots, and decorative lines.
Other helpful tools include a pencil for sketching, painter’s tape for simple geometric patterns, and a palette for mixing colors.
Keep a container of clean water nearby for rinsing water-based acrylic paint from your brushes.
A soft cloth or paper towel is also useful for removing excess water.
Sandpaper, Primer, and Base Coat
Some unfinished wooden coasters have rough areas that need light sanding before painting.
Choose sandpaper suitable for smoothing the wood without damaging it.
After sanding, remove the dust carefully.
Depending on the type of wood and paint, you may also need a compatible primer.
Primer can help create more even coverage on some surfaces, but not every acrylic paint system requires one.
A background coat is different from a primer.
For example, cream acrylic paint can be used as a decorative background after the wood has been prepared correctly.
Always check the instructions for the products you choose.
Protective Finish and Coaster Backing

If you want to use your painted coasters with drinks, choose a protective finishing system suitable for the coaster material.
Check the manufacturer’s guidance for moisture resistance, heat tolerance, application, and curing.
Do not assume that ordinary craft varnish is automatically suitable for hot mugs or repeated spills.
You can also add felt pads or suitable cork backing to the underside of wooden coasters.
These materials may help reduce scratching and provide a softer contact surface on tables.
Choose backing materials and adhesives that are compatible with the finished coasters.
Make sure the coasters remain flat and stable after adding any backing.
How to Prepare Wooden Coasters Before Painting
Preparing wooden coasters properly can help you achieve a cleaner painted design.
Wood may contain dust, rough patches, or an existing finish that affects paint application.
Taking a little time to check and prepare the surface makes the painting process easier.
Check the Wooden Surface
Begin by examining each wooden coaster blank.
Look for rough patches, splinters, cracks, and loose material.
Place the coaster on a flat table to make sure it sits securely.
Check both the upper surface and the edges.
If the wood already has a glossy coating, confirm whether your chosen paint can adhere to that surface.
You may need to follow a different preparation process for previously finished wood.
Sand Rough Areas Gently

If the coaster has small rough patches, smooth them using suitable fine-grit sandpaper.
Move the sandpaper gently across the surface, following the wood grain when possible.
Pay attention to rough edges that might be uncomfortable to handle.
Avoid sanding excessively because you do not want to change the shape or make the coaster uneven.
The goal is to create a comfortable, clean surface for painting.
If your coaster blanks are already smooth and ready for paint, additional sanding may not be necessary.
Remove Dust and Let the Wood Dry
After sanding, remove loose wood dust using a clean, soft cloth or another suitable cleaning method.
Check the edges and corners for remaining particles.
If you use a slightly damp cloth, allow the wood to dry thoroughly before applying paint or primer.
Do not begin painting while the surface is dusty or damp.
A properly prepared surface helps reduce problems with uneven paint application.
Decide Whether to Apply Primer
Some wooden coaster projects benefit from primer, especially when the wood absorbs paint unevenly.
However, primer is not always required.
Check whether your chosen acrylic paint is suitable for direct application to unfinished wood.
If a primer is recommended, apply a compatible product according to its instructions.
Allow the primer to dry or cure as directed before adding your background color.
If you are unsure how the paint will look, test it on a spare coaster blank.
How to Make DIY Painted Coasters with Acrylic Paint Step by Step
Now that your supplies are ready, you can begin your first painted coaster project.
For this tutorial, we will create a simple matching set of wooden coasters with soft cream backgrounds, pink flowers, yellow centers, and small green leaves.
This design is beginner-friendly because it uses basic shapes and only a few colors.
You can paint one coaster first and then repeat the process to create a complete set.
The steps below focus on decorating unfinished wooden coasters and preparing them for suitable finishing.
Step 1: Prepare Your Workspace and Supplies
Choose a clean, comfortable table with good lighting.
Cover the work surface with protective paper or a reusable craft mat.
Gather your wooden coaster blanks, acrylic paints, brushes, water container, palette, and soft cloth.
For the floral design, prepare cream, pink, yellow, and green acrylic paint.
Keep a small amount of each color on your palette.
You do not need to squeeze out large amounts because acrylic paint can begin drying while you work.
Place your coaster on a stable surface where it will not slide around.
Make sure you have enough room to move your brush comfortably.
Step 2: Prepare the Wooden Coasters
Check that your coaster blanks are clean, dry, and smooth.
If necessary, gently sand rough areas using suitable sandpaper.
Remove sanding dust with a clean cloth.
If your paint system requires a primer, apply it according to the manufacturer’s instructions.
Allow any primer to dry or cure before continuing.
Do not begin painting until the surface is ready.
Preparing several coaster blanks at the same time can make it easier to create a matching set.
Step 3: Paint a Simple Background Color
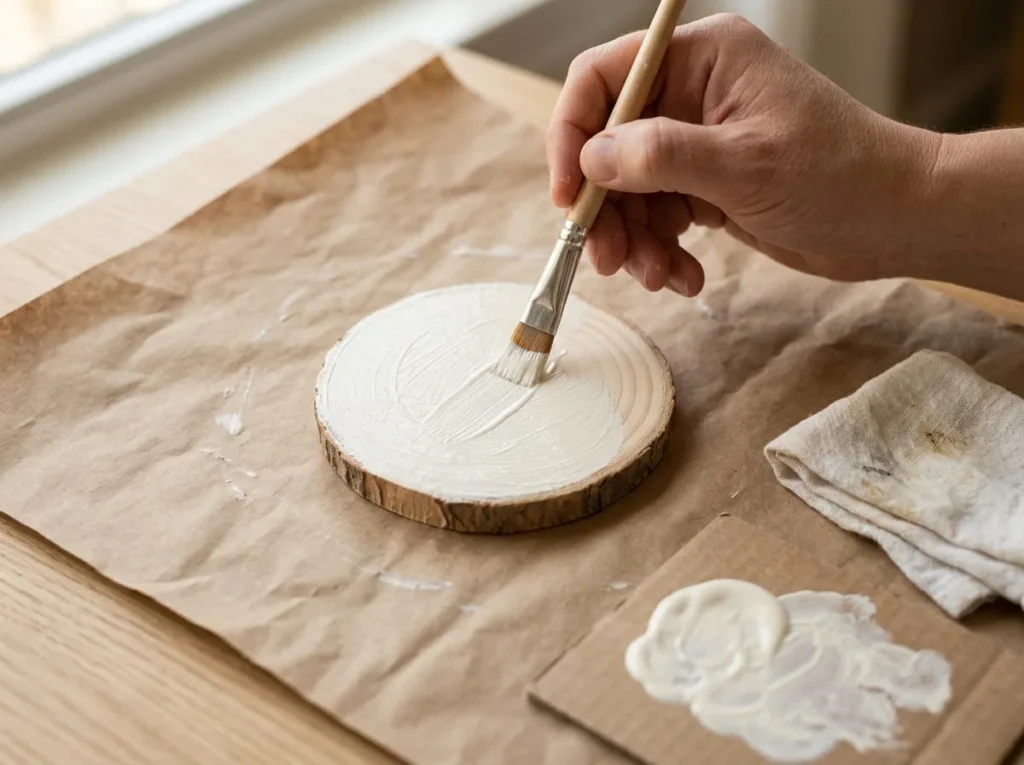
For this design, we will use a soft cream background.
Dip a small flat brush into the cream acrylic paint.
Apply a thin, even layer across the upper surface of the wooden coaster.
Work carefully near the edges to avoid unwanted paint buildup.
If the wood grain remains visible and you want more solid coverage, allow the first layer to dry before applying another suitable coat.
Repeat the process on the other coaster blanks.
Try to keep the background color consistent across the set.
Allow the painted surfaces to dry sufficiently before adding the flower designs.
Step 4: Sketch Your Flower Design
Once the background is dry, lightly sketch a simple flower near the center of the first coaster.
Draw a small circle for the flower center.
Add five or six rounded petals around the circle.
You can include one short stem and two small leaves if there is enough space.
Avoid drawing complicated floral patterns.
Leave a little background visible around the flower so the design does not feel crowded.
For a matching set, you can keep the same general flower style while changing the position slightly on each coaster.
Keep your pencil marks light so they are easier to cover with paint.
Step 5: Paint the Flower Petals and Centers

Use a small round brush and pink acrylic paint to fill the flower petals.
Start with one petal and work around the center.
Try to keep the petals similar in size, but do not worry if they are slightly uneven.
Small differences can make the flowers look naturally handmade.
Allow the pink paint to dry before painting the yellow center if the colors might mix.
Use a detail brush to fill the flower center with yellow acrylic paint.
Next, use green paint to add a short stem and one or two simple leaves.
Keep your brush movements controlled, especially when working near the edges of the coaster.
Repeat the flower design on the remaining coasters.
Step 6: Add the Final Decorative Details
After the main flower shapes have dried, check whether your coasters need any small finishing details.
You might add a lighter pink accent to a petal or a darker green line to one leaf.
If you want a simple decorative border, paint a thin line near the outer edge of the coaster.
However, avoid adding too many details.
Coasters have limited painting space, and a simple design is often easier to recognize.
If you accidentally paint outside a petal, allow the area to dry before correcting it with the appropriate background color.
Try to keep your floral coasters coordinated without making every flower exactly identical.
Step 7: Allow the Paint to Dry Properly
Place the painted coasters somewhere clean and protected.
Allow the acrylic paint to dry according to the manufacturer’s instructions.
Avoid touching the flower details while they are still wet.
Remember that paint can feel dry on the surface before it is fully ready for another coating.
Drying and curing times can vary depending on the paint formulation, the thickness of the layers, and the surrounding conditions.
Do not rush this step.
Check that the background, flowers, and other decorative details are ready before applying a protective finish.
Step 8: Apply a Suitable Protective Finish
If you intend to use your coasters with drinks, choose a finish recommended for your coaster material and expected conditions.
Cold beverages may create condensation, while warm mugs can expose the surface to heat.
Not every clear acrylic varnish or ordinary craft sealer is suitable for these uses.
Check the finishing product’s moisture resistance, heat tolerance, compatibility with the paint, and recommended curing time.
Test the finish on a spare painted coaster when possible.
Apply the protective coating according to the manufacturer’s instructions.
Use the recommended application method and avoid unnecessarily thick layers.
If additional coats are required, allow the correct waiting time between applications.
Do not use the coasters with hot drinks unless the complete finished system is suitable for the temperatures involved.
Should You Seal the Edges and Underside?
The edges and underside of wooden coasters may also come into contact with moisture.
For some finishing systems, protecting these areas may help reduce moisture entering the wood.
However, the correct method depends on the coating product and the construction of the coaster.
Check whether the manufacturer recommends coating all sides.
If you plan to add felt or cork backing, follow the instructions for both the protective finish and the adhesive.
Avoid attaching backing materials before the coating is ready.
Step 9: Add Felt or Cork Backing if Needed
Once the protective coating has cured sufficiently for handling and further assembly, you can add optional backing.
Small felt pads or suitable cork sheets may help protect furniture from scratches.
Turn the coaster over carefully and check that the underside is clean and ready.
Attach the backing using an adhesive suitable for the coaster and finishing materials.
Follow the adhesive manufacturer’s instructions for application and curing.
Make sure the backing lies flat and does not create an unstable surface.
You can also leave the underside without additional backing if the coaster is designed to rest safely on furniture.
Step 10: Let Your Coasters Cure Before Using Them
After painting, finishing, and adding any backing, allow the complete coaster set to become ready for its intended use.
A protective finish may feel dry before it has fully cured.
Using the coasters too early could cause cup marks, sticking, scratches, or other surface damage.
Follow the manufacturer’s recommended curing period rather than guessing how long the finish needs.
Before using the coasters, confirm that the surface is suitable for the moisture and temperature exposure you expect.
If your coating is only suitable for decorative use, keep the finished coasters as decorative pieces rather than using them under drinks.
Your handmade floral coaster set is now complete and ready for display or use once all selected materials have fully cured and are suitable for the intended purpose.
10 Easy DIY Painted Coaster Ideas to Try
Once you have learned how to paint a simple floral coaster, you can experiment with different colors, patterns, and designs.
Acrylic paint gives you plenty of options for decorating plain wooden coasters. You can create cheerful flowers, colorful fruit, modern abstract shapes, or simple patterns that match your home.
The best coaster painting ideas are easy to recognize and do not require complicated details.
For each design, start with clean, properly prepared coaster blanks. Allow the paint to dry as directed, and use a protective finishing system suitable for your coaster material and intended use.
Here are 10 beginner-friendly ideas to help you create your own handmade coaster collection.
1. Simple Daisy Flower Coasters
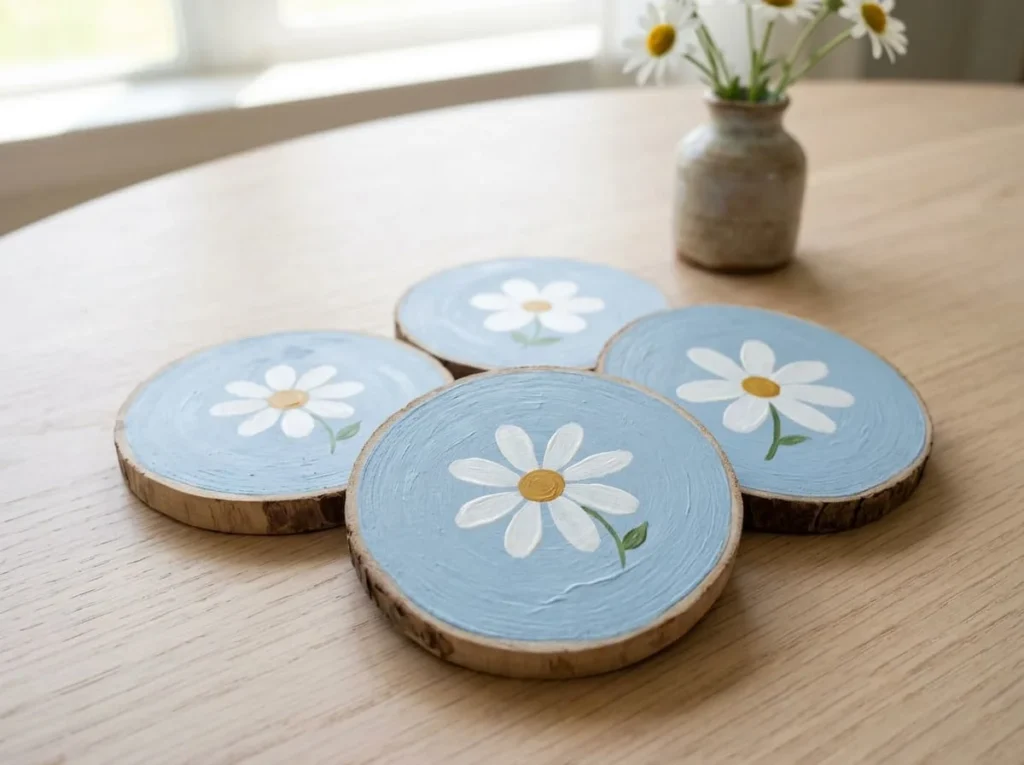
Suggested colors: White, yellow, soft blue, and green.
Daisy flower coasters are a cheerful choice for beginners who enjoy simple floral designs.
A single white daisy with a bright yellow center can look beautiful against a soft blue background.
This design works well on both round and square wooden coasters because the flower can be placed near the center.
You do not need to paint realistic petals or complicated flower details.
How to Paint Daisies on Wooden Coasters
1. Prepare a clean wooden coaster and apply a suitable primer if required.
2. Paint the upper surface soft blue using a small flat brush.
3. Allow the background to dry before adding the flower.
4. Lightly sketch a small circle near the center of the coaster.
5. Use white acrylic paint and a round brush to create five or six rounded petals around the circle.
6. Allow the petals to dry before filling the center with yellow paint.
7. Add a small green leaf or short stem if there is enough room.
8. Let the design dry and apply a compatible protective finish according to its instructions.
You can create a matching set by painting one daisy on each coaster while slightly changing the flower’s position.
Beginner tip: Start with one large daisy rather than several tiny flowers. A simple flower is easier to paint and remains clearly visible when the coaster is displayed.
2. Minimalist Abstract Shape Coasters

Suggested colors: Cream, terracotta, muted blue, and sage green.
Abstract painted coasters are a good option if you prefer modern and simple home decorations.
You can combine curved shapes, circles, and color blocks without drawing realistic objects.
A coordinated set can look attractive even when every coaster has a slightly different pattern.
The important thing is to use a limited color palette and leave enough space between the shapes.
How to Paint Abstract Coaster Designs
1. Start with clean, properly prepared wooden coaster blanks.
2. Apply a soft cream background and allow it to dry.
3. Lightly sketch two or three simple shapes on the first coaster.
4. Paint a large terracotta curved shape near one side.
5. Add a muted blue circle or rounded block near the center.
6. Use sage green for one smaller accent shape.
7. Allow neighboring colors to dry when necessary to keep the edges clear.
8. Repeat the process on the remaining coasters, changing the placement of the shapes.
9. Let the paint dry and complete the appropriate protective finishing process.
You can arrange the colors differently on each coaster while keeping the same overall style.
Beginner tip: Use the same three or four colors throughout the set. This helps your coasters look coordinated without making every design identical.
3. Easy Geometric Pattern Coasters
Suggested colors: White, navy blue, mustard, and gray.
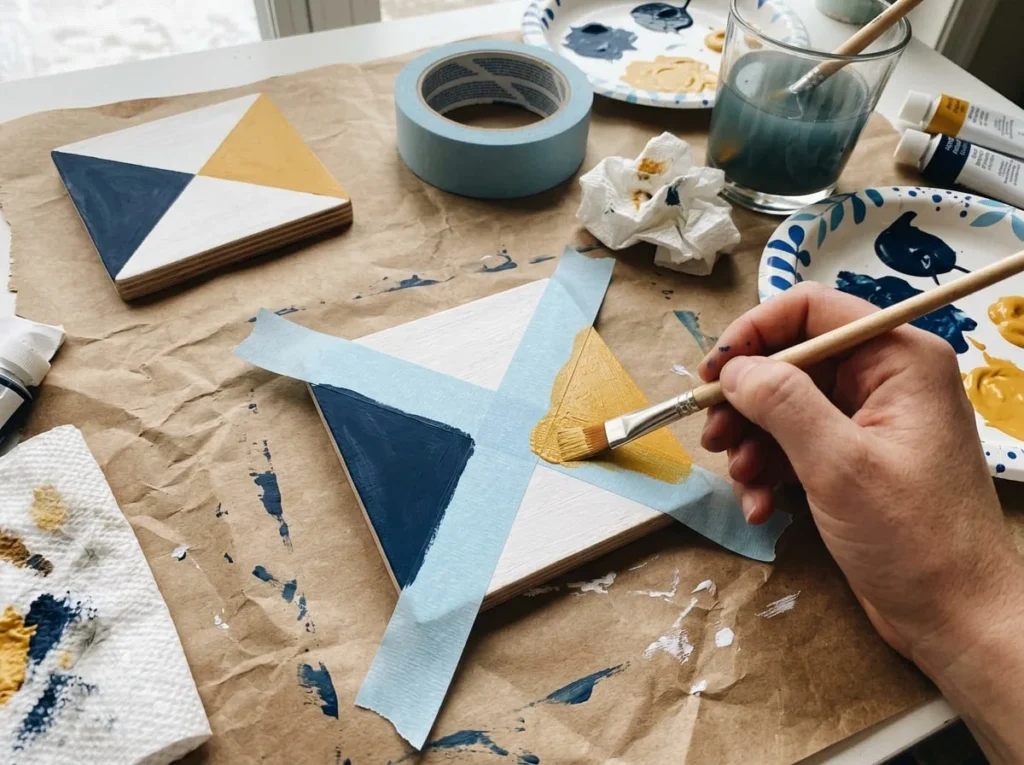
Geometric coasters are a fun way to create clean, decorative patterns using straight lines and simple shapes.
You can paint triangles, diagonal sections, wide stripes, or basic color blocks.
Painter’s tape can help you create clearer boundaries between the colors.
Square wooden coasters are especially convenient for this design because their straight edges make it easier to plan the pattern.
How to Paint Geometric Coasters with Tape
1. Prepare the wooden coaster and paint it white.
2. Allow the background to dry sufficiently before applying tape.
3. Choose a simple geometric design, such as two diagonal color sections.
4. Apply suitable low-tack painter’s tape to create a straight boundary.
5. Press the tape down gently without damaging the existing paint.
6. Paint one section navy blue using a small flat brush.
7. Add mustard or gray to another section when the design allows.
8. Remove the tape according to the tape and paint manufacturers’ instructions.
9. Allow the painted sections to dry before correcting any uneven edges.
10. Apply a suitable protective finish after the paint is ready.
If you want more variety, try painting one coaster with a diagonal stripe and another with a simple triangle.
Beginner tip: Choose large geometric sections rather than several tiny shapes. This makes the painting process easier and gives the design a cleaner appearance.
4. Cute Strawberry Painted Coasters

Suggested colors: Red, green, yellow, and cream.
Strawberry-painted coasters are colorful and playful.
A bright red strawberry against a cream background can create a cheerful design for a kitchen or dining area.
You only need to paint one fruit, a few leaves, and small seed marks.
This project is a good choice for practicing rounded shapes and decorative dots.
How to Paint a Strawberry on a Coaster
1. Prepare the coaster surface and apply a cream background.
2. Allow the background to dry.
3. Lightly sketch a large strawberry near the center of the coaster.
4. Make the upper part wider and the bottom gently pointed.
5. Fill the strawberry with red acrylic paint using a small round brush.
6. Allow the red paint to dry before adding details.
7. Paint several small green leaves at the top of the fruit.
8. Add a short green stem.
9. Use a fine detail brush to create small yellow seed marks across the red surface.
10. Let the completed painting dry before applying the suitable finishing system.
You can paint the strawberries in slightly different positions on each coaster.
Beginner tip: Keep the strawberry large and leave some cream background visible around it. This helps the fruit stand out without requiring complicated shading.
5. Simple Botanical Leaf Coasters

Suggested colors: Warm white, sage green, and dark green.
Botanical leaf designs are a lovely option for handmade coasters with a calm, natural appearance.
A single leafy branch can create an attractive pattern without covering the entire coaster.
These designs work especially well with soft green shades and neutral backgrounds.
You can use the same basic branch shape on every coaster or change the direction slightly.
How to Paint Leaf Patterns on Coasters
1. Prepare your coaster blanks and paint the surfaces warm white.
2. Allow the background to dry before sketching the design.
3. Draw one gently curved stem across the center of the coaster.
4. Use dark green acrylic paint and a fine brush to paint the stem.
5. Add small oval leaves along both sides using sage green.
6. Leave a little space between the leaves so they remain easy to recognize.
7. If desired, add a few darker green accents after the first leaf layer dries.
8. Repeat the design on the other coasters, changing the direction of the branch slightly.
9. Let the paint dry and finish the coasters according to the selected product instructions.
You can also use a natural wood background if your paint and finishing system are suitable for that appearance.
Beginner tip: Paint one leafy branch instead of a dense botanical pattern. A simple design often looks more attractive on a small coaster surface.
6. Colorful Polka Dot Coasters
Suggested colors: Cream, pink, yellow, blue, and green.
Polka dot coasters are among the easiest acrylic painting projects for beginners.
You do not need to draw complicated shapes or use advanced painting techniques.
A few colorful dots can turn a plain wooden coaster into a cheerful handmade decoration.
You can create matching patterns or use different color arrangements across the set.
How to Paint Easy Polka Dot Designs
1. Start with a clean and properly prepared wooden coaster.
2. Paint the background cream and allow it to dry.
3. Choose three or four colors for your polka dot pattern.
4. Lightly plan where you want the dots to appear.
5. Use a small round brush or suitable dotting tool to create the first dot.
6. Continue adding dots across the coaster, leaving comfortable space between them.
7. Alternate pink, yellow, blue, and green to create a colorful pattern.
8. Allow the dots to dry before adding another layer if needed.
9. Check the overall pattern and avoid adding too many extra dots.
10. Complete the appropriate protective finishing process once the paint is ready.
You can make one coaster with large dots and another with a smaller number of medium-sized dots.
Beginner tip: Start with larger dots and generous spacing. Small, closely packed dots can be harder to paint neatly.
7. Coffee Cup Painted Coasters
Suggested colors: Beige, brown, cream, and muted pink.
Coffee cup designs are a charming choice for anyone who enjoys cozy kitchen decorations.
You can paint a simple cup with a rounded body, a curved handle, and a little steam rising above it.
The design fits naturally with the purpose of a coaster without needing realistic details.
A muted pink or cream cup against a beige background can create a soft decorative appearance.
How to Paint a Simple Coffee Cup Design
1. Prepare the coaster and apply a light beige background.
2. Allow the background to dry.
3. Lightly sketch a rounded coffee cup near the center.
4. Draw a simple curved handle on one side.
5. Fill the cup with muted pink or cream acrylic paint.
6. Allow the cup color to dry before painting the smaller details.
7. Use brown paint to create a narrow oval near the upper opening to represent coffee.
8. Add one or two short curved steam lines above the cup.
9. Paint a small highlight along the cup if desired.
10. Allow the artwork to dry and apply a compatible protective finish as directed.
Keep the cup large enough to remain visible when the coaster is placed on a table.
Beginner tip: Use one simple cup with a clear handle and a few steam lines. Avoid detailed ceramic patterns that may overcrowd the coaster.
8. Rainbow Arch Painted Coasters
Suggested colors: Peach, yellow, sage green, muted blue, and cream.
Rainbow arch coasters are colorful without being difficult to paint.
Instead of creating a traditional bright rainbow with many narrow stripes, you can use a few broad arches in soft colors.
This creates a simple decorative design that works well on round or square coasters.
A cream background can help the rainbow colors look balanced.
How to Paint a Rainbow on a Coaster
1. Prepare the wooden coaster and paint the background cream.
2. Allow the background to dry.
3. Lightly sketch one large arch near the center.
4. Draw two or three smaller curved guidelines inside the first arch.
5. Paint the outer band peach using a small round brush.
6. Add yellow to the next band.
7. Paint the inner sections sage green and muted blue if there is enough space.
8. Allow neighboring colors to dry when necessary to prevent unwanted mixing.
9. Use a detail brush to correct uneven edges after the paint dries.
10. Finish the coaster with a suitable protective system according to its instructions.
You can create a matching rainbow set by changing the order of the colors slightly.
Beginner tip: Use three or four broad color bands. Narrow rainbow stripes can become difficult to control on a small wooden surface.
9. Ocean Wave Acrylic Coasters
Suggested colors: Turquoise, blue, white, and beige.
Ocean wave coasters can bring a fresh coastal feeling to your home.
You can create a simple wave pattern using one large curved shape and a few white highlights.
There is no need to paint realistic sea foam, complicated reflections, or detailed beach scenery.
This project is suitable for beginners who want to practice curved brush strokes and basic color blending.
How to Paint a Simple Wave Design
1. Prepare your wooden coaster and apply a soft beige background.
2. Allow the background to dry.
3. Lightly sketch one broad curved wave across the center.
4. Paint the main wave shape using medium blue acrylic paint.
5. Add a little turquoise along the upper section while the paint remains workable.
6. Gently blend the neighboring colors if you want a softer transition.
7. Allow the wave to dry before adding white details.
8. Use a fine brush to paint two or three short white curved lines near the upper edge.
9. Add a few small white dots to suggest gentle sea foam.
10. Allow the design to dry and apply the appropriate protective finish.
You can paint several coasters with waves facing different directions while keeping the same colors.
Beginner tip: Focus on one curved wave rather than an entire ocean scene. A simple wave shape is easier to paint and looks clear on a small coaster.
10. Personalized Initial Coasters
Suggested colors: Cream, black, terracotta, and gold-toned yellow.
Personalized initial coasters can make thoughtful handmade gifts.
You can paint one large letter in the center of each coaster and add a simple border or small decorative accent.
These designs work well for a matching set featuring someone’s initials or different letters for family members.
You do not need complicated lettering skills to create an attractive result.
How to Paint Initials on Wooden Coasters
1. Prepare the wooden coaster and apply a cream background.
2. Allow the background to dry completely.
3. Lightly sketch one large uppercase letter near the center.
4. Choose a simple, bold letter style that is easy to paint.
5. Fill the letter using black or terracotta acrylic paint.
6. Allow the first layer to dry before correcting any uneven areas.
7. Add a thin gold-toned yellow border near the outer edge if desired.
8. Paint one small leaf or simple decorative mark beside the letter.
9. Check that the initial remains easy to read.
10. Allow the paint to dry and complete the selected protective finishing process.
For a gift set, you can repeat the same background and letter colors while changing the initials.
Beginner tip: Choose bold, simple letters rather than decorative handwriting. Clear lettering is easier to paint and remains attractive on a coaster.
How to Make a Matching Set of Painted Coasters
Creating a matching coaster set is a lovely way to make your handmade projects look more organized.
The coasters do not need to have identical designs.
You can combine different patterns while using similar colors, backgrounds, and decorative details.
A coordinated set can also make a thoughtful gift for someone who enjoys handmade home accessories.
Choose a Simple Color Palette
Start by selecting two or three main colors that work well together.
For example, cream, sage green, and terracotta can create a calm, natural appearance.
Pink, blue, and yellow can make a brighter and more playful collection.
Use the same main colors throughout the set to help the designs feel connected.
You can add white or black for small details when needed.
Keep the Same Background Across the Set
Using the same background color is an easy way to make different coaster designs look coordinated.
For example, you could paint every wooden coaster cream and then decorate them with different flowers or abstract shapes.
The shared background helps the set look consistent even when the artwork changes.
Allow each background coat to dry properly before adding your designs.
Try Different Designs with Matching Colors
You do not need to paint the same flower or pattern on every coaster.
Try creating one daisy coaster, one leafy branch coaster, and two simple abstract coasters.
Use the same colors across all four pieces.
You can also create a fruit-themed collection with strawberries, lemons, cherries, and other simple designs.
Keep the artwork clear and avoid overcrowding each coaster.
Make Coasters for Handmade Gifts
Painted coaster sets can make thoughtful gifts for birthdays, housewarming celebrations, and other special occasions.
Choose colors and designs that match the recipient’s interests or home style.
For example, botanical designs may suit someone who enjoys plants, while coffee cup coasters can be a nice choice for a coffee lover.
Before packaging the coasters, make sure the paint, protective finish, and any backing adhesive have fully cured according to their instructions.
Use suitable protective wrapping to prevent the painted surfaces from rubbing together.
If the coating system is intended only for decorative use, explain that the coasters should not be used with drinks.
Can You Paint Cork and Ceramic Coasters with Acrylic Paint?
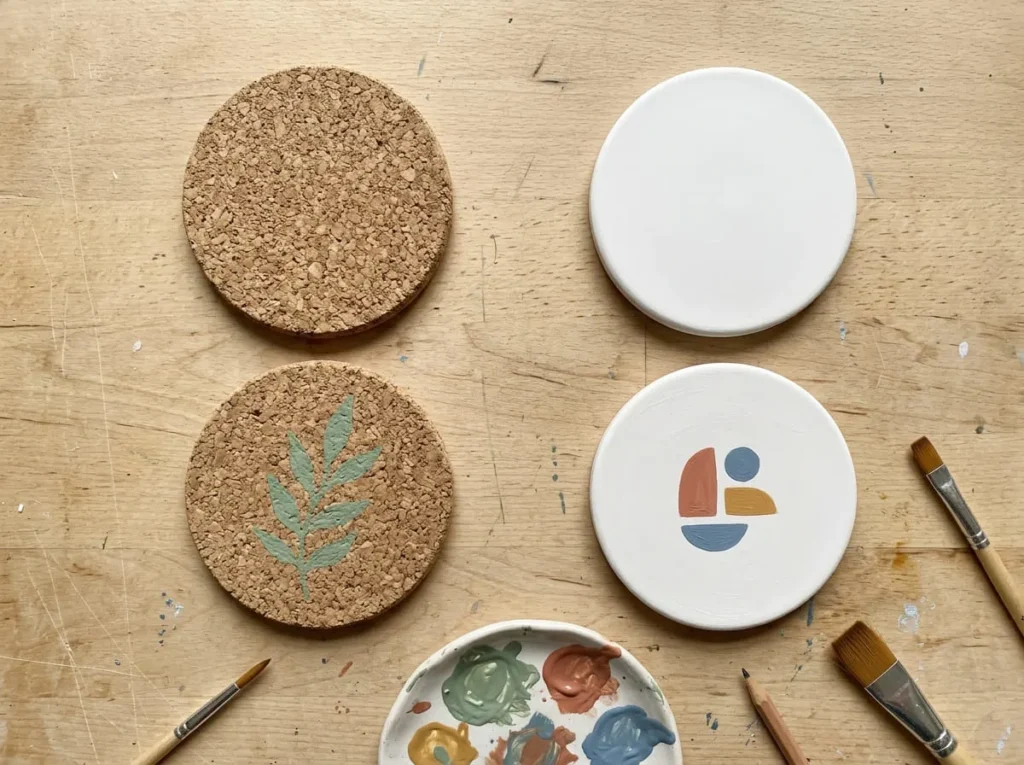
Wooden coasters are a good starting point for beginners, but they are not the only option for acrylic painting projects.
You can also decorate cork and ceramic coaster blanks. However, these materials have different surfaces, so they may require different preparation methods, paints, and protective finishes.
Before painting, check whether your chosen acrylic paint is suitable for the material you want to decorate.
Painting Cork Coasters with Acrylic Paint
Cork coasters are lightweight and have a natural texture that can look attractive with simple painted designs.
However, cork is porous, which means it may absorb some of the paint you apply.
This can make the first coat appear uneven or less colorful than expected.
Start by choosing clean, dry cork coaster blanks.
If necessary, apply a primer recommended for cork and compatible with your acrylic paint.
Use a soft brush and apply thin layers of paint.
Avoid loading the brush with excessive paint because this can create thick patches or collect inside the surface texture.
Simple flowers, leaves, and geometric shapes usually work better than complicated designs with tiny details.
Keep in mind that cork may bend slightly during normal handling. A thick, rigid coating could crack if the material flexes.
Choose paints and protective finishes recommended for cork and the coaster’s intended use.
Painting Ceramic Coasters with Acrylic Paint
Ceramic coasters can also be decorated with acrylic paint, but their surfaces need careful consideration.
Unglazed ceramic and glazed ceramic behave differently.
Unglazed ceramic may absorb paint, while a smooth glazed surface can make it harder for ordinary acrylic paint to adhere.
For glazed ceramic, you may need a specially formulated paint or compatible primer.
Start by cleaning the coaster according to the product instructions.
Make sure the surface is free from dust, grease, and moisture.
Choose a simple design and apply the appropriate paint in controlled layers.
Do not assume that ordinary acrylic craft paint will remain attached to a glossy ceramic tile during regular use.
Follow the paint manufacturer’s instructions for preparation, application, drying, and curing.
How Material Choice Affects the Protective Finish
The protective finish you choose should match your coaster material.
A product that works on unfinished wood may not adhere properly to glazed ceramic.
Similarly, a hard coating may not be appropriate for flexible cork.
Before choosing a clear finish, check the manufacturer’s recommended surfaces.
Also consider whether your coasters will hold cold drinks, warm cups, or serve only as decorations.
The finished coating system should be suitable for both the material and the intended use.
How to Seal Acrylic Painted Coasters for Everyday Use
Sealing is an important part of making painted coasters that will be used with drinks.
Acrylic paint can create beautiful designs, but the painted surface may still be affected by moisture, repeated handling, and contact with cups.
Choosing a suitable protective finish can help reduce these problems.
However, not every sealer provides the same level of protection, and some finishes are intended only for decorative projects.
Why Acrylic Paint Alone May Not Be Enough
Acrylic paint forms a film as it dries, but this does not mean every acrylic paint is suitable for regular exposure to water and heat.
Cold drinks can leave condensation on the coaster.
Small spills may also reach the painted surface or unfinished wooden edges.
Over time, repeated contact with cups can cause scratches or wear.
Some acrylic paints may become marked or damaged under these conditions.
If you want functional drink coasters, choose a paint and protective finishing system recommended for that purpose.
Choose a Finish Suitable for Your Coaster Material
Before buying a protective finish, check whether it can be applied over your acrylic paint.
The finish should also be suitable for the coaster material.
For example, wooden coasters may require different products from glazed ceramic tiles.
Look for manufacturer information about moisture resistance, adhesion, intended indoor use, and expected exposure.
Do not assume that every product labeled clear varnish or craft sealer is suitable for functional drink coasters.
If a product does not provide enough information about its intended use, choose another finish with clearer guidance.
Check Heat Resistance Before Using Coasters with Hot Drinks
Heat resistance is especially important if you plan to place hot coffee or tea mugs on your coasters.
Some protective coatings may soften, become sticky, discolor, or develop marks when exposed to heat.
A coating that handles cold drink condensation may not necessarily tolerate hot cups.
Before using painted coasters with warm drinks, check the verified temperature limits and intended use of the complete finishing system.
Remember that hot cookware and pans can reach much higher temperatures than ordinary drink containers.
Do not use handmade acrylic painted coasters as hot pads or trivets unless the entire product is specifically designed and rated for that purpose.
Test the Finish Before Coating Your Entire Set

Testing your protective finish on a spare coaster can help you avoid damaging the complete project.
Prepare and paint the sample using the same materials as your main coasters.
Allow the paint to dry or cure as directed.
Apply the protective finish according to its instructions.
Check whether the coating changes the paint colors, causes unwanted texture, or affects the appearance.
After the finish cures, assess the sample only using testing methods permitted by the manufacturer.
A home test may reveal an obvious problem, but it cannot prove long-term waterproofing or heat resistance.
Apply the Protective Finish According to Its Instructions
Different protective coatings require different application methods.
Some are applied with a brush, while others are sprayed or use a specific mixing and curing process.
Follow the manufacturer’s instructions rather than assuming one application method works for every product.
Make sure your workspace is suitable for the coating you choose.
Avoid Applying Thick Coats
Applying too much finish at once can create drips, uneven coverage, or a cloudy appearance.
Use the amount recommended by the manufacturer.
If several coats are required, follow the product’s instructions for each application.
Do not add extra layers simply because you want the coaster to be more waterproof.
Let Each Coat Dry as Directed
Allow the recommended waiting time between protective coats.
Applying another layer too early may affect the finish.
Drying time depends on the product, coating thickness, temperature, and surrounding humidity.
Follow the specific instructions rather than relying on one general waiting time.
Wait for the Full Recommended Cure
A clear protective finish may feel dry before it has fully cured.
Using the coasters too soon may cause cup marks, sticking, or damage to the coating.
Allow the complete recommended curing period before regular use.
If you added cork or felt backing, make sure the adhesive has also cured properly.
Understand the Difference Between Water-Resistant and Waterproof
Water-resistant and waterproof do not mean the same thing.
A water-resistant finish may tolerate occasional moisture under certain conditions.
A waterproof product is intended to resist water penetration under the conditions specified by its manufacturer.
However, neither description automatically guarantees protection against heat, scratching, or prolonged soaking.
For painted coasters, choose a product suitable for normal drink condensation and cleaning.
Avoid claiming that a handmade coaster is completely waterproof unless the complete material and finishing system is specifically supported for that use.
Common Mistakes When Painting Coasters with Acrylic Paint
Painting coasters is a simple craft, but a few common mistakes can affect the finished appearance and usability.
Most problems involve poor surface preparation, excessive paint, complicated designs, or unsuitable protective finishes.
Painting Without Preparing the Surface
Dust, grease, and existing coatings can interfere with paint adhesion.
Before painting, check whether the coaster is clean, dry, and ready for your selected paint.
For unfinished wooden coasters, light sanding may help smooth rough areas.
For ceramic surfaces, follow the preparation instructions for the paint and primer.
Proper preparation helps reduce problems later.
Using Too Much Paint at Once
Applying a thick layer of acrylic paint may create uneven areas or raised patches.
This can be especially noticeable on a small coaster.
Use a suitable brush and apply controlled amounts of paint.
Allow each layer to dry before adding more coverage when needed.
Thin, even applications can create a neater decorative surface.
Choosing Overly Complicated Designs
Coasters provide a limited painting area.
Trying to include several detailed flowers, tiny objects, and decorative patterns can make the artwork look crowded.
Choose one main subject or a simple repeating design.
For example, a single daisy or a few abstract shapes can be more effective than an intricate landscape.
Keep the design clear and easy to recognize.
Painting Over Layers That Are Still Wet
Adding new colors before the previous layer is ready can cause unwanted blending or smudging.
For example, painting a yellow flower center over wet white petals may cause the colors to mix.
Allow the first layer to dry sufficiently before adding details that need clean edges.
If you make a mistake, it may be easier to wait until the paint dries before correcting it.
Using an Unsuitable Protective Sealer
Not all clear finishes are suitable for coasters.
Some products may provide little moisture protection, while others may not tolerate contact with warm mugs.
A finish can also have poor adhesion if it is not compatible with the paint or coaster material.
Read the manufacturer’s product information carefully before choosing a sealer.
Make sure the complete finishing system is suitable for the intended use.
Using Finished Coasters Before They Have Cured
A coaster may look complete even when the protective coating still needs more time to cure.
Placing cups on the surface too early can cause marks, sticking, or damage.
Follow the recommended curing instructions for the paint, protective finish, and any backing adhesive.
Do not rush to use the coasters simply because the surface feels dry.
How to Clean and Care for Painted Coasters
Taking care of handmade painted coasters can help preserve their appearance.
The correct cleaning method depends on the coaster material and protective finish.
Always follow the manufacturer’s care instructions for your selected products.
Clean Coasters According to the Finish Instructions
For many handmade coasters, gentle cleaning is preferable to aggressive scrubbing.
If the protective finish allows it, use a soft, slightly damp cloth to remove ordinary surface dirt.
Avoid abrasive brushes or harsh cleaners that could scratch the painted design.
Dry the coaster using the method recommended for its coating.
Avoid Soaking Unless the Coating System Allows It
Do not assume that painted wooden or cork coasters can be soaked in water.
Moisture may enter through unfinished edges, damaged coatings, or the backing material.
Unless the complete coaster system is specifically suitable for immersion, avoid soaking it.
Do not place handmade painted coasters in a dishwasher unless the manufacturer confirms that the materials and finish can tolerate that cleaning method.
Keep Coasters Away from Excessive Heat
Even when a protective finish is suitable for ordinary warm mugs, it may not tolerate very hot cookware.
Avoid placing pans, kettles, or other high-temperature items directly on your handmade coasters.
Check the coating manufacturer’s heat limits before use.
If you notice surface softening or marks after contact with a warm cup, stop using the coaster for hot drinks.
Check for Scratches or Damaged Coating
Inspect your painted coasters occasionally.
Look for scratches, peeling, cracks, or worn areas.
If the protective finish becomes damaged, moisture may reach the paint or coaster material.
Remove damaged coasters from regular use until they can be repaired using a compatible method.
If the damage is extensive, replacing the coaster may be the better choice.
Store Coasters Carefully
Store finished coasters somewhere clean and dry.
Avoid stacking freshly finished coasters before the coating has cured.
If the manufacturer recommends separating coated surfaces during storage, use suitable protective materials.
Keep the coasters away from unnecessary pressure and abrasive objects that could scratch the paint.
Frequently Asked Questions
Can You Paint Coasters with Regular Acrylic Paint?
Yes, many wooden coaster blanks can be decorated with suitable acrylic craft paint. However, regular acrylic paint alone may not provide enough protection for daily use with drinks. Choose a compatible finishing system based on the coaster material and expected moisture or heat exposure.
What Is the Best Material for DIY Painted Coasters?
Unfinished wooden coaster blanks are a practical option for beginners because they are generally easy to prepare and decorate. Cork and ceramic can also be painted, but they may require different products and preparation methods. The best choice depends on your design, tools, and intended use.
Do You Need to Sand Wooden Coasters Before Painting?
Light sanding may be helpful if the wooden coaster has rough patches or splinters. However, smooth, ready-to-paint blanks may not need additional sanding. Check the surface and follow the preparation instructions for your chosen paint.
Should You Prime Coasters Before Using Acrylic Paint?
Not every coaster needs primer. Some acrylic paints can be applied directly to properly prepared wood, while other products require a primer. Ceramic and cork may have different requirements. Check the paint manufacturer’s recommendations for your specific material.
What Are the Easiest Painted Coaster Designs for Beginners?
Simple daisies, polka dots, abstract shapes, leaves, and rainbow arches are good beginner designs. These patterns use basic shapes and a limited number of colors. Choose one main design rather than filling the coaster with too many details.
Can You Use Acrylic Paint Pens on Coasters?
Yes, compatible acrylic paint pens can be useful for lettering, outlines, dots, and small decorations. However, the pens must be suitable for the coaster material and protective finish. Allow the paint to dry or cure properly before applying another coating.
How Do You Seal Acrylic Painted Coasters?
Choose a protective finish recommended for your coaster material, acrylic paint, and intended use. Follow the manufacturer’s application and curing instructions. Make sure the coating is suitable for expected moisture exposure and, when relevant, the temperature of the cups you will place on the coasters.
Are Acrylic Painted Coasters Waterproof?
Not automatically. Acrylic paint and ordinary craft varnish do not guarantee waterproof coasters. Water resistance depends on the complete materials and finishing system. Check the manufacturer’s claims and avoid prolonged water exposure unless the finished coaster is specifically designed for it.
Can Acrylic Painted Coasters Hold Hot Coffee Mugs?
They may be suitable for warm or hot coffee mugs if the complete coaster and protective coating system is rated for the temperatures involved. Not every clear finish is heat-resistant. Check the manufacturer’s instructions before using your painted coasters with hot drinks.
How Long Should Painted Coasters Dry Before Use?
Drying and curing times vary by paint, protective finish, coating thickness, temperature, and humidity. A coaster may feel dry before it is ready for regular use. Follow the recommended curing period for the complete finishing system instead of relying on a universal waiting time.
Can You Paint Ceramic Coasters with Acrylic Paint?
Yes, ceramic coasters can be decorated with suitable acrylic paint systems. However, smooth glazed ceramic may require special preparation, primer, or paint designed for that surface. Follow the product instructions and use a compatible protective finish when needed.
Can You Wash Handmade Acrylic Painted Coasters?
Cleaning depends on the coaster material and protective finish. Some finished coasters may allow gentle wiping with a damp cloth, while others require different care. Avoid soaking or dishwashing handmade painted coasters unless the complete finishing system is specifically suitable for those methods.
Final Thoughts
DIY painted coasters with acrylic paint are a simple and creative way to make colorful handmade accessories for your home.
Start with unfinished wooden coaster blanks and choose an easy design such as daisies, botanical leaves, polka dots, or abstract shapes.
Prepare the surface carefully, apply your paint in controlled layers, and allow the artwork to dry properly.
If you want to use your coasters with drinks, choose a protective finish suitable for moisture and expected cup temperatures.
With simple materials and thoughtful finishing, you can create attractive painted coaster sets for home decoration or meaningful handmade gifts.