
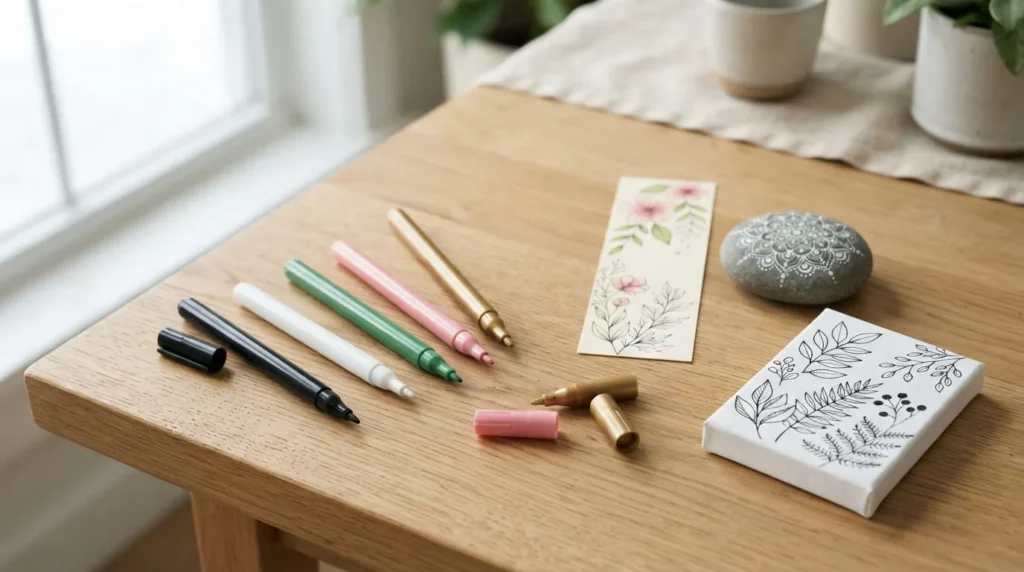
Fine point acrylic paint pens are useful for creating detailed artwork, delicate outlines, and decorative lettering without relying on traditional paintbrushes. Their narrow tips make it easier to work on small designs, whether you’re adding flowers to a bookmark, decorating a wooden ornament, or creating intricate patterns on painted rocks.
However, choosing the right pen involves more than selecting one labelled fine point. Nib size, paint flow, colour opacity, and surface texture all affect how precisely you can draw.
Understanding these features can help you avoid uneven lines, clogged tips, and unnecessary frustration.
In this guide, you’ll learn how fine point acrylic paint pens work, how different tip sizes compare, what to consider when choosing them, and which creative projects benefit most from their precision.
What Are Fine Point Acrylic Paint Pens?
Fine point acrylic paint pens are paint-filled markers designed to create narrow lines, small details, and controlled decorative marks on compatible surfaces. Unlike traditional paintbrushes, which require separate paint containers, these pens hold acrylic-based paint inside a barrel and dispense it through a specially designed nib.
The defining feature is their narrow applicator, which allows greater precision than broader paint markers.
Fine point acrylic paint pens are commonly used for lettering, outlining, miniature illustrations, and adding finishing details to handmade crafts.
Depending on the formulation, they may be suitable for materials such as paper, canvas, prepared wood, smooth stones, and certain other surfaces recommended by the manufacturer.
Many acrylic paint pens contain water-based acrylic formulations, although their exact ingredients and performance characteristics vary between products.
These pens can be especially convenient when you want the appearance of painted details without preparing a brush and palette.
Common applications include:
- Drawing fine outlines around painted shapes.
- Adding small flowers, leaves, and decorative patterns.
- Creating handwritten lettering on craft materials.
- Decorating bookmarks and handmade greeting cards.
- Adding miniature details to wooden ornaments.
- Creating geometric designs on smooth rocks.
- Finishing illustrations with highlights and small accents.
Although fine point pens offer greater control for detailed work, they aren’t necessarily the best choice for every painting task.
Covering large areas with a narrow nib can be time-consuming and may cause uneven paint application.
For bigger shapes and backgrounds, a broader paint marker or traditional brush may be more practical.
How Do Fine Point Acrylic Paint Pens Work?
Fine point acrylic paint pens contain liquid paint inside a reservoir connected to a narrow applicator tip.
Many products use a valve-controlled mechanism that regulates how paint reaches the nib.
Before their first use, certain markers require shaking and priming to distribute the pigments and allow paint to flow into the applicator.
For these products, the manufacturer may instruct you to shake the capped pen and gently press the nib against scrap material until it becomes saturated.
Other pens use different ink-delivery systems and may not require the same preparation.
Always follow the instructions supplied with your particular product.
Once the paint reaches the nib, you can create lines and decorative marks by moving the pen across a suitable surface.
The narrow tip helps control where the paint is deposited, making it useful for small shapes and fine details.
However, the quality of the line depends on several factors.
Paint consistency affects how smoothly the colour flows through the tip.
A nib that releases too little paint may produce faint or interrupted lines. Excessive paint flow can create thick edges, blobs, or uneven marks.
The surface also influences the result.
On smooth cardstock, a compatible fine point pen may produce relatively consistent lines. On rough wood or textured canvas, the applicator may catch on raised areas, making the lines less uniform.
Hand pressure and drawing speed also matter.
For most designs, gentle and steady strokes are more effective than pressing forcefully against the material.
Because narrow nibs are relatively delicate, excessive pressure can damage the applicator or cause unwanted paint buildup.
Practising a few lines on scrap material is a useful way to understand a new pen before beginning detailed artwork.
Fine Point vs. Regular Acrylic Paint Pens
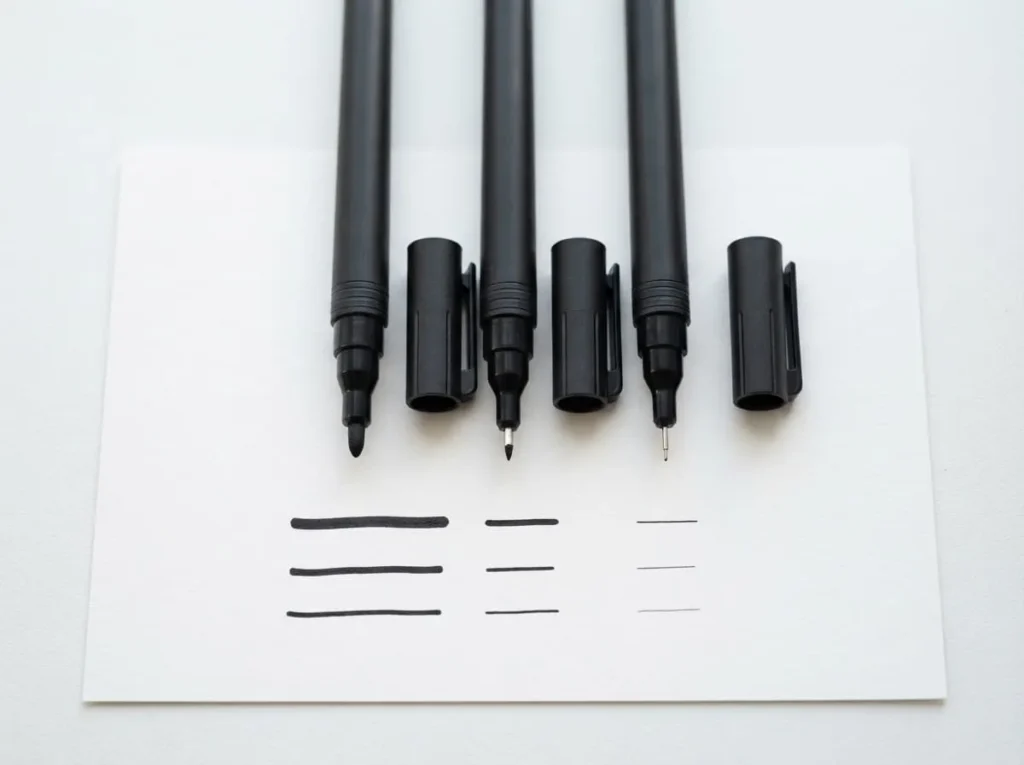
Fine point acrylic paint pens and regular acrylic paint pens typically contain similar types of paint, but their applicator sizes influence how they are used.
Fine point pens are designed for accuracy.
Their narrow nibs help create small lettering, delicate borders, thin outlines, and miniature patterns.
Regular medium or broad paint markers are generally better suited to thicker lines, larger lettering, and filling decorative shapes.
For example, if you’re painting a small flower on a wooden bookmark, a fine point pen may help you draw individual petals and leaves.
If you’re colouring a large background on the same bookmark, a broader marker may cover the area more efficiently.
Another difference is the amount of paint delivered during each stroke.
Fine nibs generally deposit paint across a narrower area, which can help reduce unwanted coverage when working on small details.
Broader nibs can provide more substantial coverage, but they may be harder to control within very small shapes.
| Feature | Fine Point Acrylic Paint Pens | Regular Medium or Broad Paint Pens |
|---|---|---|
| Tip size | Narrow applicator | Wider applicator |
| Main purpose | Detailed drawing and precision | General painting and coverage |
| Line width | Usually thinner | Usually thicker |
| Small lettering | Often more convenient | Better for larger letters |
| Tiny patterns | Greater control | Less suitable for very small details |
| Filling large shapes | Less efficient | Generally more efficient |
| Textured surfaces | Fine nib may catch on rough areas | Broader nib may handle some textures better |
| Typical projects | Mini illustrations, outlines, fine details | Signs, bold designs, decorative painting |
Neither type is automatically better.
The most suitable choice depends on the size of your artwork and the amount of detail required.
For many craft projects, combining fine and medium paint pens can provide greater flexibility than relying on only one tip size.
Fine Point vs. Extra-Fine and Ultra-Fine Paint Pens
Fine point, extra-fine, and ultra-fine are common descriptions used by paint marker manufacturers.
However, these terms aren’t standardized across the entire industry.
A pen described as extra-fine by one brand may produce a line similar to a fine point pen from another manufacturer.
For this reason, the actual nib specification is often more useful than the category printed on the packaging.
Some precision markers list their nib widths in millimetres, while others describe only the general tip type.
Even when a manufacturer provides a numerical nib measurement, the finished line may be wider or narrower depending on the paint formulation, writing pressure, and surface.
Fine point pens are generally intended for everyday detailed artwork, including lettering, outlines, and small decorative shapes.
Extra-fine pens may be suitable for smaller details, compact lettering, and more intricate illustrations.
Ultra-fine pens are designed for particularly delicate marks, although their performance depends on the applicator and paint-delivery system.
| Tip Classification | General Purpose | Typical Applications |
|---|---|---|
| Fine point | Controlled everyday detail work | Outlines, lettering, small decorations |
| Extra-fine | More intricate designs | Miniature flowers, detailed patterns |
| Ultra-fine | Very delicate marks | Tiny accents, precision illustrations |
The table describes general positioning rather than fixed line-width ranges.
Extremely narrow nibs also have practical limitations.
They can be more sensitive to rough surfaces, dried paint, and excessive pressure.
When working on textured wood or canvas, a slightly broader fine point nib may produce more consistent results than an ultra-fine tip.
If you’re choosing between sizes, consider the smallest detail you actually need to create.
For most beginner projects, a reliable fine point pen can be more versatile than an extremely narrow nib that requires careful handling.
How to Choose Fine Point Acrylic Paint Pens
Choosing fine point acrylic paint pens involves balancing precision, paint performance, comfort, and surface compatibility.
A pen with a very narrow nib may seem ideal for detailed artwork, but it won’t necessarily produce better results if the paint flow is inconsistent or the applicator struggles with your chosen material.
Before purchasing a set, think about the types of projects you plan to create.
Someone decorating small paper bookmarks may have different requirements from an artist adding details to textured canvas or painted stones.
The following features are worth considering.
Choose the Right Nib Size for Your Project
Nib size is one of the most important factors when selecting fine point acrylic paint pens.
A narrower tip generally provides better access to small spaces, making it useful for tiny patterns, fine lettering, and decorative outlines.
However, an extremely narrow applicator isn’t always necessary.
For example, simple floral designs on bookmarks may only require a standard fine point pen.
Highly detailed geometric patterns or miniature illustrations may benefit from a smaller nib.
The overall size of your project should guide your decision.
If you’re decorating a small wooden keychain, choose a tip that can create readable details without producing thick lines that crowd the surface.
For larger canvas artwork, a slightly broader nib may provide clearer outlines and more consistent coverage.
You should also consider how comfortable you feel using precision tools.
Beginners may find a standard fine point pen easier to control than an ultra-fine marker that requires slower movements.
If possible, review the manufacturer’s line-width examples before buying.
Remember that nib dimensions don’t guarantee an identical finished line on every surface.
Consider Paint Flow and Colour Opacity
Consistent paint flow is essential when working with narrow applicators.
A fine point pen needs to release enough colour to create visible marks without flooding the surface.
If too little paint reaches the nib, lines may appear broken or faded.
If too much paint is released, delicate details can become blurred or thicker than intended.
When comparing products, look for information about their paint-delivery system and any recurring user feedback about leaking, clogging, or inconsistent flow.
Colour opacity is another important consideration.
Some acrylic paint pens produce highly visible marks in a single application, while others are more translucent.
For dark surfaces, choose products specifically designed to provide strong coverage.
White, gold, silver, and other contrasting colours can be useful for decorative details on dark paper, painted wood, or stone.
However, opacity varies between formulations.
A pen that looks vibrant on white paper may appear less visible on a black background.
For detailed artwork, test each colour on the intended material before starting.
If the coverage is weak, avoid repeatedly pressing the nib to release more paint.
A more suitable formulation or a carefully applied additional layer, where supported by the manufacturer, may produce a better result.
Look for Suitable Nib Materials and Shapes
Fine point acrylic paint pens use different applicator materials and shapes.
Common designs include fibre or felt-style nibs, firmer precision tips, and other specialized applicators.
The construction of the nib influences how it moves across a surface.
Fibre-style tips can provide smooth paint application on suitable materials, but very narrow versions may be vulnerable to wear when used on rough textures.
Firmer tips may offer a different writing feel and can be useful for certain controlled marks.
However, durability and line consistency depend on the complete marker design, not just the nib material.
The tip shape also matters.
Rounded fine tips are often convenient for outlining and everyday lettering.
More specialized narrow applicators may be better suited to particular illustration techniques.
When selecting a pen, consider whether the manufacturer provides information about replacement or reversible nibs.
Some paint markers allow worn tips to be replaced, but this feature isn’t available on every product.
For beginners, a well-made fine point nib that provides predictable paint flow is generally more useful than a complicated specialty applicator.
Avoid choosing the narrowest option solely because it appears more precise.
Check Surface Compatibility
Fine point acrylic paint pens can be used on many craft materials, but surface suitability varies between products.
Paper, prepared wood, primed canvas, and smooth stones are common materials for compatible acrylic paint markers.
Other surfaces, including glass, ceramic, metal, and plastic, may require specialized formulations or additional preparation.
Always read the manufacturer’s compatibility information before beginning.
For paper crafts, consider whether the paint may bleed through thin sheets.
Thicker drawing paper or suitable cardstock can provide a more stable surface for delicate artwork.
On wooden objects, surface texture and finish affect how smoothly the nib moves.
Rough grain can interrupt thin lines, while some sealed finishes may reduce paint adhesion.
Smooth stones are often easier to decorate with detailed patterns than highly textured rocks.
Canvas can also create challenges because the woven surface may catch a narrow applicator.
For very detailed line art, a smoother primed canvas board may provide better control than coarse canvas.
The important point is to match the pen to the material rather than expecting one product to perform identically on every surface.
If the artwork will be handled frequently or displayed outdoors, also check the manufacturer’s durability recommendations.
Consider Comfort and Ease of Control
Detailed drawing often involves slow movements and repeated small strokes.
A pen that feels comfortable in your hand can make this process easier.
Barrel thickness, grip texture, weight, and balance all influence how naturally you can hold the marker.
Some people prefer slim barrels that feel similar to ordinary writing pens.
Others find slightly thicker barrels more comfortable during longer craft sessions.
Neither style is universally better.
Choose a design that allows you to maintain a relaxed grip without squeezing excessively.
When drawing fine lines, supporting your hand or forearm against a stable work surface can improve control.
Take occasional breaks during detailed projects, especially if you notice hand fatigue.
It’s also useful to consider how easily the cap can be removed and replaced without touching the nib.
For markers that require priming, a predictable paint-delivery mechanism may make the drawing process more convenient.
Ultimately, the best fine point acrylic paint pens are those that match your project, provide consistent paint flow, and feel comfortable to use.
What Are Fine Point Acrylic Paint Pens Best Used For?
Fine point acrylic paint pens are particularly useful when a project requires accuracy rather than broad colour coverage.
Their narrow applicators allow you to add controlled marks in small areas, making them suitable for detailed illustrations, decorative lettering, and finishing touches.
Although they can be used for general crafts, their greatest advantage becomes clear when working on designs that would be difficult to complete with a broad marker.
Fine Lettering and Decorative Writing
Fine point acrylic paint pens are useful for adding small handwritten messages, initials, and decorative lettering to compatible craft materials.
Their narrow nibs allow greater control over letter shapes and spacing.
For example, you might use a fine point pen to personalize a wooden gift tag with a short name or add a delicate message to a handmade card.
Begin with simple lettering styles that are easy to reproduce.
Block capitals, rounded letters, and straightforward handwriting are often more manageable than elaborate calligraphy.
When working on a small surface, plan the wording before applying paint.
A short message with clear spacing usually looks better than squeezing too many words into a limited area.
For highly detailed lettering, practise on scrap material first.
This will help you determine whether the nib produces lines thin enough for your chosen design.
Detailed Illustrations and Outlines
Fine point pens are well suited to illustrations that require thin outlines and carefully placed details.
You can use them to draw small leaves, flowers, stars, geometric shapes, and simple decorative patterns.
For example, a botanical illustration might begin with a thin stem, followed by several small leaves and delicate curved lines.
A geometric design could use repeated triangles, circles, and straight borders.
The narrow nib helps define these shapes without covering too much of the background.
Fine point pens can also be useful for outlining painted areas once the underlying paint is sufficiently dry and compatible with the marker.
When creating detailed illustrations, avoid applying excessive pressure.
Gentle, controlled strokes can help maintain more consistent line widths.
If the surface is rough, work slowly and consider whether a smoother material would provide better results.
Miniature Craft Decorations
Small craft objects often have limited space for decoration.
Fine point acrylic paint pens allow you to create designs that fit within these smaller areas.
Wooden keychains, miniature ornaments, small decorative tags, and tiny canvas boards are examples of projects that can benefit from narrow nibs.
A simple wooden keychain might feature one initial surrounded by a small floral border.
A miniature ornament could be decorated with stars, leaves, or repeated geometric shapes.
Because the working area is small, careful planning is important.
Choose designs with enough space between individual elements to keep them recognizable.
Avoid trying to include too many details in one miniature project.
For small objects that will be handled frequently, choose a paint marker suitable for the material and follow any recommended curing or protective finishing instructions.
Rock Painting and Small Decorative Patterns
Rock painting is another craft activity where fine point acrylic paint pens can be useful.
Smooth stones provide compact surfaces for detailed patterns, tiny illustrations, and decorative lettering.
A fine point pen can help create small dots, thin lines, leaf patterns, and geometric borders.
For example, you might decorate a smooth stone with a simple mandala-inspired arrangement of dots and lines.
Another option is to draw a small flower surrounded by repeated decorative shapes.
Before painting, make sure the rock is clean and completely dry.
If the stone has a rough or uneven surface, the narrow nib may catch on the texture and produce interrupted marks.
Smooth rocks are generally easier for precision work.
When creating repeated patterns, practise the spacing on paper before transferring the design to the stone.
If the finished rock will be displayed outdoors, choose suitable materials and follow the manufacturer’s recommendations for weather resistance and protection.
Adding Finishing Details to Painted Artwork
Fine point acrylic paint pens can be particularly useful during the final stages of an art project.
After completing a larger painting with brushes or broader markers, you may want to add details that require greater precision.
These could include highlights, thin outlines, small textures, decorative borders, or tiny patterns.
For example, a canvas flower painting might benefit from delicate lines inside the petals.
A painted wooden ornament could be finished with thin metallic accents or small decorative dots.
Fine point pens can also help define edges between neighbouring colours.
Before applying the marker, make sure the underlying paint is sufficiently dry or cured and compatible with the new layer.
Test the combination on a spare surface when possible.
Some paint formulations may disturb earlier layers, particularly if the surface isn’t fully dry.
Use the fine point pen sparingly where the additional detail improves the design.
Adding too many outlines or decorative marks can make artwork look crowded.
The purpose of these pens is to give you greater control over small finishing touches without needing to repaint larger areas.
How to Use Fine Point Acrylic Paint Pens Step by Step
Fine point acrylic paint pens make it easier to create delicate artwork, but working with narrow nibs requires a little patience and control. Unlike broader paint markers, which are useful for filling larger areas, fine point pens are designed to apply small amounts of paint precisely.
The way you prepare the surface, activate the pen, and move your hand can affect the appearance of every line. Even simple adjustments, such as using lighter pressure or allowing paint to dry before adding another colour, can improve your results.
The following steps will help you develop a reliable technique for creating detailed illustrations, decorative lettering, and small craft designs.
Step 1: Choose and Prepare Your Surface
Begin by selecting a surface that is compatible with your acrylic paint pens.
Smooth cardstock, prepared wooden objects, primed canvas boards, and clean stones are useful options when supported by the marker manufacturer.
For beginners, smooth drawing paper or cardstock is often the easiest place to practise because the nib can move across the surface without catching on raised textures.
If you’re decorating wood, check whether the surface needs light sanding. Rough grain can interrupt fine lines, while loose dust may affect paint adhesion.
For rocks, remove dirt and allow the stone to dry completely before painting.
Canvas presents a different challenge because its woven texture can make precise drawing more difficult. A smooth, primed canvas board may provide better control than a heavily textured surface.
Whatever material you choose, make sure it is clean, dry, and stable before beginning.
Place a protective covering beneath your work and keep some spare material nearby for testing the paint.
Step 2: Shake and Prime the Pen If Required
Some acrylic paint pens contain pigments that may settle during storage.
Depending on their design, these pens may need shaking or priming before the paint reaches the nib.
Read the manufacturer’s instructions before preparing your marker.
For certain valve-activated pens, the process involves shaking the capped barrel and gently pressing the tip against scrap material until the paint begins flowing.
Other acrylic paint pens have different ink-delivery systems and may be ready to use without pumping.
Avoid repeatedly pressing a narrow nib with excessive force. Fine point applicators can be delicate, and aggressive priming may damage the tip or release more paint than intended.
Once the paint reaches the applicator, test it using a few short lines.
The nib should produce reasonably consistent marks without large blobs or repeated gaps.
If the paint flow remains irregular, follow the manufacturer’s troubleshooting guidance rather than forcing the mechanism.
Step 3: Test the Nib and Paint Flow
Before adding details to your actual project, make a few practice marks on a spare piece of the same material.
Begin with a straight line, followed by a curved line and a small circle.
Observe whether the paint flows evenly and whether the line width remains consistent.
If the marks appear thicker than expected, consider whether you’re pressing too hard or moving too slowly.
Paint buildup around the nib can also cause wider or uneven marks.
On absorbent materials, the paint may spread slightly beyond the original line.
Try a different paper or surface preparation if this makes fine details difficult to control.
Next, test a few small dots and short strokes.
These exercises will help you understand how the pen responds to changes in direction and pressure.
For projects involving multiple colours, test each marker separately. Different pigments and formulations may behave differently even when the pens belong to the same set.
Taking a few moments to practise can prevent mistakes on wooden ornaments, miniature canvases, and other finished craft pieces.
Step 4: Practice Thin Lines and Curves
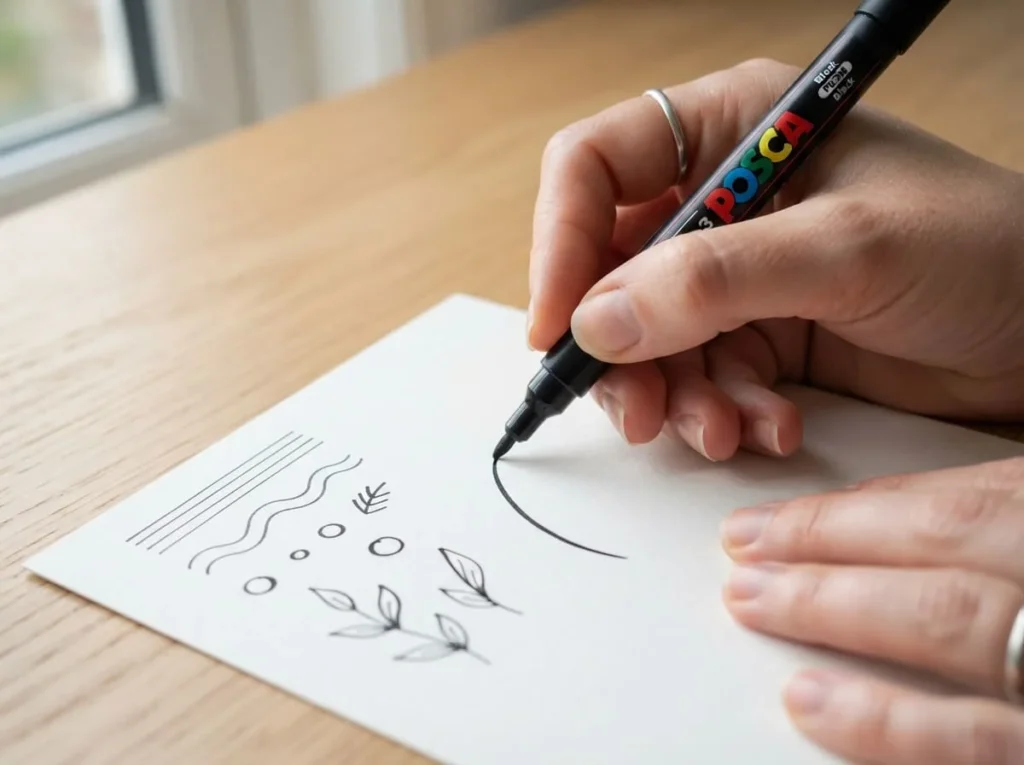
Thin lines are one of the main reasons to choose fine point acrylic paint pens.
Start by drawing several parallel lines on scrap paper.
Keep your wrist relaxed and move the pen steadily across the surface without pressing harder than necessary.
Try to maintain a similar angle throughout each stroke.
For straight lines, you may find it easier to move your hand and forearm together instead of relying entirely on small finger movements.
Next, practise curved lines.
Draw gentle waves, circles, spirals, and simple leaf shapes.
Begin with larger curves before attempting miniature details.
If you’re struggling to make consistent shapes, lightly sketch a guideline with a pencil before adding paint, provided the surface allows it.
You can also rest part of your hand on a clean, dry area of the work surface to improve stability.
Avoid placing your hand directly on freshly painted sections.
With practice, these movements will become easier and help you create more accurate decorative patterns.
Step 5: Add Small Details with Controlled Strokes
Once you’re comfortable drawing basic lines, begin experimenting with smaller decorative elements.
Simple leaves, flower petals, stars, dots, and geometric shapes are useful starting points.
For example, create a tiny flower by drawing five rounded petals around a small centre.
Add a thin stem and two leaves using controlled strokes.
For geometric artwork, try drawing a small triangle and repeating it along a straight guideline.
Work slowly enough to maintain accuracy, but avoid holding the nib against one point for too long.
Excess paint can collect in small areas and cause details to lose their shape.
When drawing tiny dots, touch the nib lightly to the surface and lift it away.
If you need a larger dot, use an appropriate nib rather than forcing more paint out of a delicate tip.
Leave enough space between decorative elements to keep the design readable.
A few clearly defined details often look better than an overcrowded arrangement.
Step 6: Let the Paint Dry Before Layering
Layering allows you to add details over an existing colour, but acrylic paint needs sufficient drying time before additional marks are applied.
For example, you might paint a small blue flower and later add white highlights to its petals.
If the blue paint is still wet, the new colour may mix with it or disturb the original shape.
Allow the first application to dry according to the manufacturer’s instructions.
Before layering on your finished project, test the combination on scrap material.
Some acrylic paint pens work well over dry acrylic backgrounds, while others may produce uneven coverage or react with particular finishes.
Use light, controlled strokes when applying the second colour.
Avoid repeatedly tracing over an area if the underlying paint begins to lift.
When you’re creating several small details, work on one section while another dries.
This can make the process more efficient without rushing the artwork.
Step 7: Allow the Finished Artwork to Cure
After completing your design, allow the paint to dry and cure according to the manufacturer’s recommendations.
Paint may feel dry to the touch before it has developed its intended final properties.
The necessary curing time depends on the formulation, surface, paint thickness, and environmental conditions.
Avoid rubbing, washing, or handling freshly decorated areas before they are ready.
For wooden keychains and other objects that will experience frequent contact, proper curing is especially important.
If your artwork needs a protective coating, confirm that the coating is compatible with both the paint marker and the surface.
Never assume that every acrylic paint pen requires sealing.
Once the finish is ready, your artwork can be displayed, framed, or used according to the marker manufacturer’s care instructions.
Essential Fine Point Paint Pen Techniques
Fine point acrylic paint pens offer several creative possibilities beyond ordinary writing and outlining.
Learning to control thin strokes, curved shapes, repeated dots, and small layered details can help you create more attractive handmade designs.
These techniques are useful for paper crafts, wooden decorations, smooth rock painting, and miniature canvas artwork.
How to Draw Consistent Thin Lines
Consistent thin lines require a combination of steady hand movement, suitable pressure, and reliable paint flow.
Start by placing a sheet of smooth paper on a stable work surface.
Rest your forearm comfortably and hold the pen with a relaxed grip.
Draw a straight line using one continuous movement.
Avoid pressing harder when the line appears faint. If the paint flow becomes inconsistent, stop and check the nib rather than forcing additional paint onto the surface.
Next, practise drawing lines of similar lengths.
You can use faint pencil guidelines to help maintain spacing.
Try arranging several parallel lines into a simple decorative pattern.
For longer strokes, moving your forearm along with your hand may produce a smoother result than relying on finger movements alone.
Pay attention to the speed of your strokes.
Moving too quickly may produce broken lines with certain pens, while moving too slowly can sometimes cause paint to collect in one place.
Experiment on scrap material until you find a comfortable pace.
Creating Sharp Corners and Smooth Curves
Sharp corners and smooth curves help make geometric patterns, decorative lettering, and miniature illustrations look more defined.
For sharp corners, draw one line toward the corner and stop.
Lift the nib briefly before starting the next line from the same point.
This approach can help prevent excessive paint buildup where two strokes meet.
For curves, keep the pen moving steadily while gradually changing direction.
Avoid twisting the applicator sharply against the surface, particularly when using a delicate precision nib.
Begin by drawing larger circles and curved lines.
Once you can create them comfortably, reduce their size.
Try combining straight and curved strokes to make simple shapes such as hearts, leaves, stars, and petals.
If your project requires symmetrical patterns, use light pencil guidelines where appropriate.
These can help you position each element more accurately.
Remember that perfect symmetry isn’t essential for handmade artwork. Small variations often give decorative designs a natural appearance.
Adding Tiny Dots and Repeated Patterns
Fine point acrylic paint pens can create small decorative dots, making them useful for geometric patterns, borders, and miniature illustrations.
Unlike foam-tipped dot paint markers, which produce relatively large circular impressions, fine point acrylic pens allow more precise placement of tiny marks.
To practise, draw a faint pencil line across a suitable piece of paper.
Touch the pen tip lightly to the surface and lift it straight away.
Repeat the movement while maintaining similar spacing between dots.
Once you’re comfortable, try arranging the marks into different patterns.
A circular arrangement can create a simple floral centre, while evenly spaced rows can form decorative borders.
You can also combine dots with thin lines to produce more complex designs.
For example, draw a small circle and surround it with evenly spaced dots.
Add short lines between selected dots to create a geometric motif.
When working on rocks or wooden objects, choose a smooth area so the nib can make consistent contact.
Avoid repeatedly pressing the same spot to enlarge a dot.
If you want noticeably larger circles, switch to a suitable broader nib or dotting tool.
Layering Fine Details over Background Colours
Adding fine details over a painted background is a useful way to finish decorative artwork.
You might use a white paint pen to create highlights on a dark canvas or add gold accents to a painted wooden ornament.
Before applying the fine point pen, make sure the underlying paint is sufficiently dry or cured.
A soft or partially wet background can cause the marker to drag, smear, or lift the earlier colour.
Test the combination on a spare piece if you’re using unfamiliar materials.
Begin with a small decorative detail, such as a short line or tiny dot.
Check whether the new colour appears clearly against the background.
If the line looks faint, consider whether a more opaque marker would work better.
Avoid pressing excessively hard to increase coverage.
For a simple layered design, paint a dark blue background on a mini canvas and allow it to dry.
Then use a compatible white or metallic paint pen to add stars, curved lines, or delicate floral outlines.
Keep the details balanced and avoid covering the entire background.
This technique works particularly well when the fine marks provide contrast and make the main design more noticeable.
5 Creative Projects Using Fine Point Acrylic Paint Pens
Fine point acrylic paint pens are particularly useful for projects that require small illustrations, neat lettering, and carefully placed decorative marks.
The following five ideas demonstrate how narrow nibs can be used on different craft materials.
Each project is suitable for beginners who are comfortable making basic lines and shapes. You can simplify the designs or add more details as your confidence improves.
Before starting, check that your markers are compatible with the selected material and follow the manufacturer’s preparation and drying instructions.
1. Mini Floral Bookmark Designs
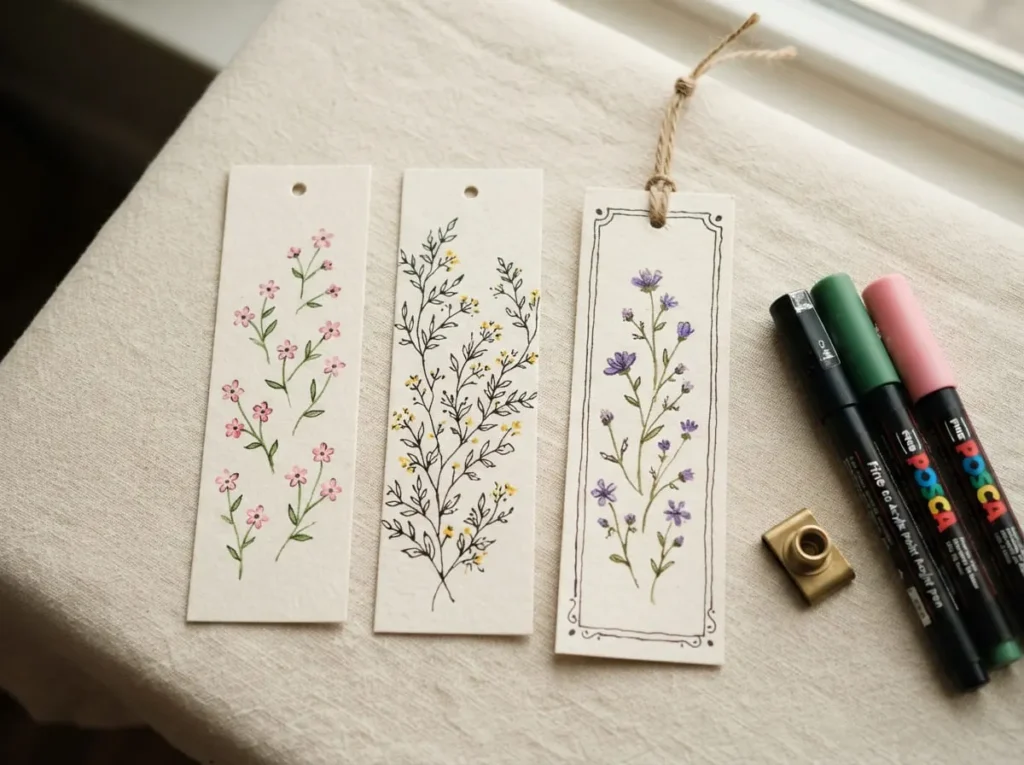
Handmade floral bookmarks are an easy way to practise detailed drawing while creating something useful.
Their narrow shape encourages simple layouts, delicate borders, and miniature illustrations.
Materials Needed
- Thick white or coloured cardstock.
- Fine point acrylic paint pens.
- Pencil and ruler.
- Scissors or paper trimmer.
- Optional hole punch and ribbon.
How to Decorate a Bookmark with Fine Point Paint Pens
- Cut a narrow rectangle from thick cardstock using scissors or a paper trimmer.
- Choose two or three colours for your floral design.
- Lightly sketch a small flower near the bottom of the bookmark.
- Use a fine point paint pen to draw the flower’s petals and centre.
- Add a thin stem with two or three small leaves.
- Repeat the design with a few smaller flowers, leaving space between them.
- Draw a delicate border along one side of the bookmark if desired.
- Allow the paint to dry completely before handling or decorating the reverse side.
- If you want to add a ribbon, punch a hole near the top after the artwork is ready.
For a simple botanical appearance, use green stems with white, pink, or yellow flowers.
You can also create a repeating pattern of tiny leaves along the edge.
Avoid making the design too crowded. A few carefully placed flowers can look more attractive than covering every part of the bookmark.
If the paint causes the cardstock to curl, try using a thicker, more suitable paper for your next project.
2. Detailed Geometric Rock Art
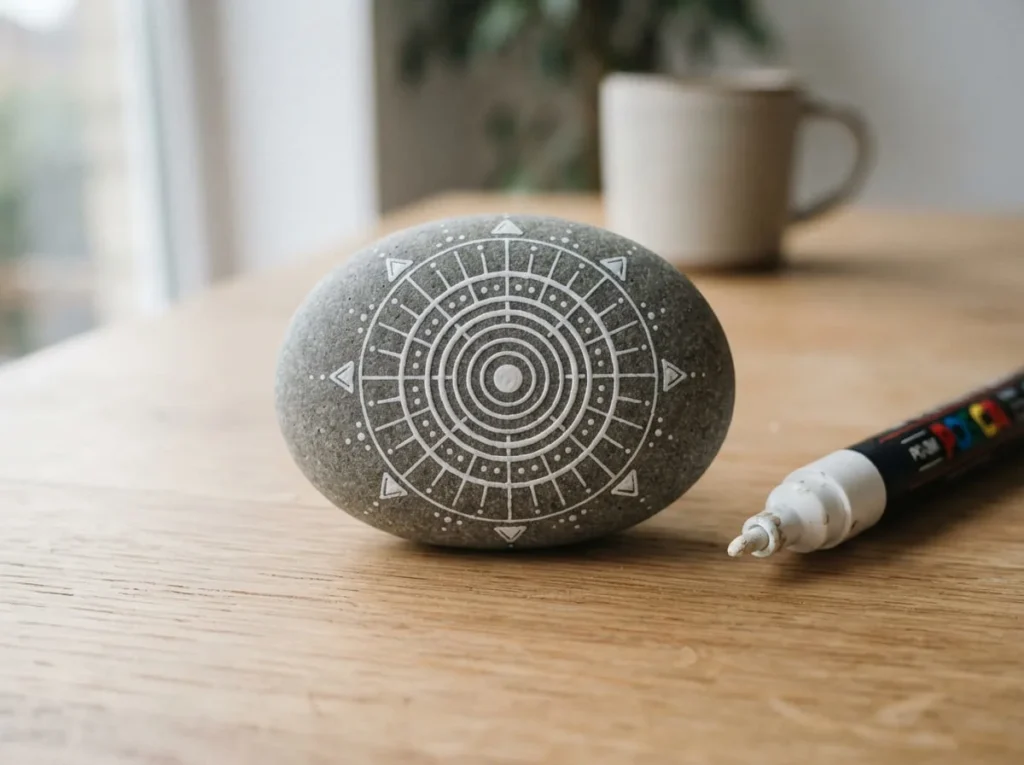
Smooth rocks provide small surfaces for practising fine lines, dots, and repeated geometric patterns.
This project is especially useful for exploring symmetry and controlled spacing.
Materials Needed
- Smooth, clean rock or river stone.
- Fine point acrylic paint pens suitable for stone.
- Pencil, if appropriate for the surface.
- Clean cloth.
- Optional compatible protective finish.
How to Create Geometric Rock Patterns
- Choose a smooth stone with a relatively flat painting area.
- Remove dust and dirt, then allow the rock to dry completely.
- Decide on a simple pattern, such as concentric circles, triangles, or repeated curved lines.
- Mark a small central point if the surface allows.
- Begin drawing your main shape using a fine point paint pen.
- Add smaller shapes around the centre, keeping the spacing reasonably consistent.
- Use a contrasting colour to create tiny dots between selected lines.
- Continue until the design feels balanced without overcrowding the stone.
- Allow the paint to dry and cure according to the manufacturer’s instructions.
- Apply a compatible protective finish only if recommended for the intended use.
For a beginner-friendly design, create a central circle and surround it with a ring of small dots.
Add several short lines extending outward to form a simple decorative pattern.
You can also experiment with alternating black and white details on a suitable painted background.
If the rock will be displayed outdoors, make sure the paint marker and any protective coating are intended for outdoor exposure.
The small scale of this project makes it ideal for practising precision without requiring a large amount of material.
3. Personalized Wooden Keychain Art
Wooden keychains are compact craft objects that can be personalized with initials, tiny flowers, and decorative borders.
Fine point paint pens are useful because they allow you to work within the limited space without creating overly thick lines.
Materials Needed
- Smooth wooden keychain blank.
- Fine point acrylic paint pens suitable for wood.
- Fine-grit sandpaper, if needed.
- Clean cloth.
- Pencil.
- Keyring hardware, if not already attached.
How to Decorate a Wooden Keychain
- Select a wooden keychain blank with a smooth surface.
- If necessary, lightly sand rough areas and remove all dust.
- Check that the wood is dry and suitable for your paint pens.
- Plan a simple design featuring one initial or a short decorative symbol.
- Lightly sketch the placement if appropriate.
- Draw the main initial using a fine point paint pen.
- Add a small leaf branch or floral pattern beside the letter.
- Use a contrasting colour for a few tiny decorative accents.
- Allow the paint to dry and cure fully.
- Attach or reattach the keyring hardware once the decoration is ready for handling.
For a minimalist design, use one dark colour for the initial and a metallic or lighter shade for the border.
Another option is to create a small wreath of leaves around the letter.
Keep the design simple enough to remain recognizable when viewed at normal keychain size.
Because keychains experience frequent handling and friction, choose a suitable paint formulation and check whether a compatible protective finish is recommended.
Even a protected design may gradually wear with everyday use.
4. Mini Canvas Line Art
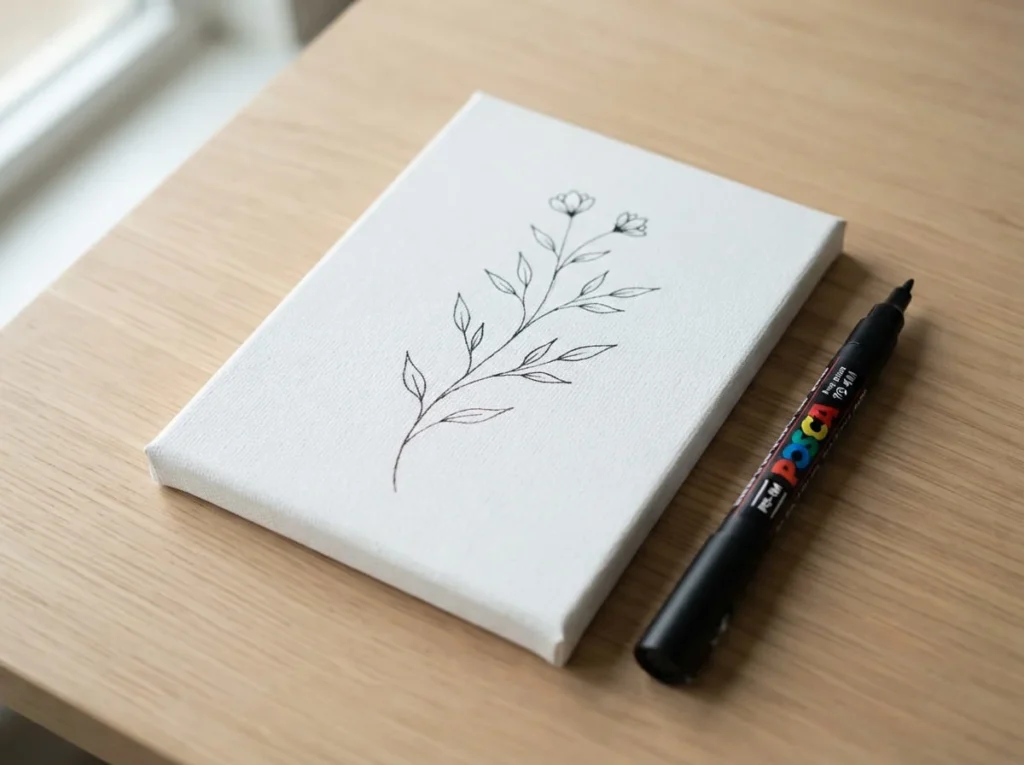
Mini canvas line art is a good project for practising controlled outlines and creating simple decorative artwork.
Botanical illustrations, abstract shapes, and minimal geometric drawings work particularly well on small canvases.
Materials Needed
- Small primed canvas board.
- Fine point acrylic paint pens compatible with canvas.
- Pencil.
- Paper for planning.
- Optional ruler.
How to Create Mini Canvas Line Art
- Choose a small canvas board with a relatively smooth prepared surface.
- Make sure the canvas is clean and dry.
- Sketch a simple design on paper before transferring it to the canvas.
- Lightly draw the main guidelines on the canvas if appropriate.
- Use a fine point paint pen to draw the central outline.
- Add small details such as leaves, curved stems, or geometric shapes.
- Allow the first colour to dry before adding contrasting highlights.
- Keep some areas of the canvas blank to create a balanced composition.
- Let the finished artwork dry and cure according to the marker instructions.
A simple botanical illustration is a good starting point.
Draw one curved stem rising from the bottom of the canvas, then add several small leaves along its length.
You can also create an abstract design using intersecting lines, circles, and small dots.
If the canvas texture causes interrupted lines, try using a smoother primed board or a slightly broader precision nib.
For a variation, apply a compatible background colour first and let it dry fully before adding fine white or metallic outlines.
This creates contrast while keeping the artwork manageable for beginners.
5. Decorative Lettering on Gift Tags
Decorative gift tags are practical projects for experimenting with small lettering and simple borders.
They can be personalized for birthdays, holidays, handmade gifts, or everyday celebrations.
Fine point acrylic paint pens allow you to write neatly within a limited area and add details that would be difficult to create with broad markers.
Materials Needed
- Thick cardstock gift tags or suitable pre-cut tags.
- Fine point acrylic paint pens.
- Pencil and ruler.
- Optional ribbon or twine.
- Scrap paper for practising lettering.
How to Make Hand-Lettered Gift Tags
- Select a gift tag with enough room for a short message or name.
- Choose a lettering style that suits the size of the tag.
- Practise the wording on scrap paper before applying paint.
- Lightly mark the lettering position on the tag if needed.
- Use a fine point paint pen to write the name or message in controlled strokes.
- Allow the main lettering to dry before adding other colours.
- Decorate the edges with tiny dots, stars, leaves, or a thin border.
- Keep sufficient space around the words so the message remains easy to read.
- Allow the artwork to dry completely before attaching the tag to a gift.
For an elegant appearance, use black lettering with small gold accents.
For a more colourful design, combine two complementary shades and a simple floral border.
You can also create matching tags for several gifts by using the same lettering style and changing only the names.
If you’re preparing tags for a particular celebration, adjust the colours and decorations to match the occasion.
The most important part is maintaining clear, readable lettering while using decorative details sparingly.
Common Fine Point Acrylic Paint Pen Problems and Solutions
Fine point acrylic paint pens are designed for precision, but their narrow nibs can sometimes make them more sensitive to paint flow problems, surface texture, and handling pressure. Uneven lines, clogged tips, smudging, and paint buildup can make detailed artwork difficult, especially when you’re working on miniature designs.
Fortunately, many of these problems can be reduced with proper preparation and careful technique. Understanding what causes them will help you achieve cleaner lines and protect delicate applicators from unnecessary damage.
Before attempting any troubleshooting method, check the instructions supplied with your particular paint pens. Different brands use different nib materials, paint formulations, and delivery systems.
Why Is My Fine Point Paint Pen Not Working?
A fine point acrylic paint pen may stop producing colour because the nib isn’t receiving enough paint, the applicator has dried out, or the internal reservoir is nearly empty.
Some new markers also require preparation before their first use.
If your pen uses a valve-activated system, the manufacturer may recommend shaking the capped barrel and gently pressing the nib against scrap material until paint reaches the tip.
However, not every fine point pen uses this mechanism. Always follow the product’s preparation instructions rather than repeatedly pumping the applicator.
Excessive pressure can damage a narrow nib or cause too much paint to collect around it.
If the pen previously worked but now produces faint or interrupted lines, inspect the tip for dried paint or visible damage.
Dried pigment can interfere with paint flow, particularly when the cap hasn’t been replaced securely after use.
Try testing the marker on smooth paper or another compatible practice surface.
If the paint flows on smooth paper but not on rough wood or canvas, the surface texture may be contributing to the problem.
You can troubleshoot the issue by checking a few things:
- Confirm that the pen has been prepared according to its instructions.
- Check whether the cap was properly closed after previous use.
- Inspect the nib for dried paint or visible damage.
- Test the paint flow on a smooth, compatible surface.
- Avoid forcing the nib against the material.
- Check whether the reservoir may be empty.
If the marker continues to produce inconsistent marks despite following the recommended instructions, replacing the pen or an approved replaceable nib may be necessary.
Why Are My Fine Lines Uneven or Too Thick?
Fine point acrylic paint pens are intended to produce narrow marks, but the finished line width can vary depending on how the pen is used.
One common cause of overly thick lines is excessive pressure.
Pressing harder may flatten or distort certain nibs, increasing the amount of paint transferred to the surface.
Paint buildup can also make lines appear wider than expected.
If too much paint collects around the applicator, a single stroke may leave an irregular mark or small blob.
Another factor is the drawing surface.
On absorbent paper or unfinished wood, liquid paint may spread slightly beyond the original stroke.
Rough surfaces can produce interrupted lines because the nib doesn’t maintain consistent contact with the material.
For better results, hold the pen comfortably and use gentle, steady movements.
Test the marker before beginning a detailed design.
If you’re working on paper, choose a suitable drawing surface that resists excessive bleeding.
For wooden projects, make sure the material is properly prepared and reasonably smooth.
When creating tiny lettering or geometric patterns, leave enough space between individual strokes to prevent them from merging.
If a line consistently appears too wide despite correct handling, consider using a narrower nib rather than applying less and less pressure.
The goal is to use an applicator that naturally produces the level of detail your project requires.
How to Prevent Smudging and Bleeding
Smudging happens when wet paint is disturbed before it has dried sufficiently.
Bleeding occurs when paint spreads beyond the intended lines, often because of absorbent materials or excessive application.
Both problems can affect the appearance of delicate illustrations.
When working with fine point acrylic paint pens, begin with a clean and dry surface.
Test the paint on a spare piece of the same material to see whether it spreads.
For paper crafts, thicker drawing paper or compatible cardstock may provide better results than very thin sheets.
When decorating wood, a rough or highly absorbent grain may cause fine lines to appear less defined.
If your marker requires a prepared or sealed surface, follow the manufacturer’s recommendations.
Avoid pressing the nib repeatedly into the same area.
Too much paint can collect around small details and cause neighbouring marks to merge.
When using multiple colours, allow the first application to dry before adding additional details.
You should also plan your working direction so your hand doesn’t drag across freshly painted sections.
For example, right-handed artists may find it easier to work from left to right, while left-handed artists may prefer the opposite direction.
If you’re adding fine outlines over an existing acrylic painting, make sure the underlying layer is sufficiently dry or cured.
Careful layering and controlled paint application can help preserve the clarity of small designs.
How to Avoid Clogged or Damaged Fine Tips
Fine point nibs can be more delicate than broader marker tips.
Their narrow applicators may collect dried pigment, paper fibres, or loose particles during use.
This can interfere with paint flow or produce irregular lines.
To reduce clogging, use the pen on surfaces recommended by the manufacturer.
Avoid dragging delicate nibs across rough stone, unfinished wood, or heavily textured canvas unless the product is suitable for those materials.
If the tip begins collecting debris, stop and inspect it.
Follow the manufacturer’s cleaning instructions rather than scraping the nib with sharp objects.
Avoid soaking the tip in water or solvents unless the product specifically recommends that method.
Excessive moisture may interfere with the paint formulation or applicator mechanism.
When drawing, use gentle pressure and avoid twisting the nib sharply against the surface.
If the marker has a replaceable tip, follow the manufacturer’s directions for replacing it.
After completing your artwork, close the cap securely to limit unnecessary exposure to air.
Proper handling can help maintain the nib’s shape and allow more consistent paint application during future projects.
How to Make Fine Point Acrylic Paint Pen Artwork Last
Fine point acrylic paint pens can produce attractive decorative details, but the durability of those details depends on the paint formulation, surface preparation, and conditions in which the artwork is used.
Thin lines may be especially vulnerable to wear when placed on frequently handled objects such as wooden keychains or gift accessories.
Choosing compatible materials and allowing enough curing time can help protect your work.
Allow Enough Drying and Curing Time
Drying and curing are important stages in the development of acrylic paint marker artwork.
A design may feel dry to the touch before the paint has developed its intended final adhesion and durability.
The required time varies depending on the marker formulation, working surface, paint thickness, and environmental conditions.
For example, a small illustration on absorbent paper may behave differently from fine lettering applied to a sealed wooden object.
Always follow the manufacturer’s drying and curing recommendations.
Avoid rubbing or handling freshly decorated areas before they are ready.
If you’re planning to add another colour, make sure the previous layer is sufficiently dry.
For objects that will be used regularly, allow the full recommended curing period before exposing the design to friction or cleaning.
Proper curing is particularly important for miniature details because small scratches or lifted lines can noticeably affect the finished appearance.
When Should You Seal Fine Detail Artwork?
Sealing can provide additional protection for certain craft projects, but it isn’t always necessary.
Some acrylic paint markers are designed to remain durable on approved surfaces without a separate protective coating.
Other projects may benefit from a compatible finish, particularly when the artwork is handled frequently or exposed to moisture.
For example, a decorative wooden keychain may require different protection from a bookmark stored inside a book.
Before applying any sealer, confirm that it is suitable for both the paint marker and the underlying surface.
Certain coatings can cause fine lines to bleed, smear, soften, or change appearance.
This is particularly noticeable in detailed artwork where even a small amount of colour movement can affect the design.
Allow the paint to cure according to the manufacturer’s instructions before applying a protective finish.
Test the coating on a spare piece containing similar fine lines and colours.
If the test is successful, follow the sealer manufacturer’s application and curing directions.
Avoid applying unnecessarily thick coats, which may create uneven coverage or unwanted texture.
For framed paper artwork or decorative canvas pieces that receive little handling, sealing may offer limited benefit.
Choose protection based on the requirements of the finished project rather than assuming every design needs an additional coating.
Protecting Small Designs from Scratches and Wear
Detailed artwork can be vulnerable to scratches and abrasion, particularly when applied to objects that are handled regularly.
Fine lettering on wooden keychains, small ornaments, and decorative accessories may gradually wear if the paint is repeatedly rubbed against other surfaces.
To reduce this risk, begin with a suitable paint marker and properly prepared material.
Avoid decorating areas that experience constant friction, such as the underside of objects or surfaces that slide against other materials.
Allow the design to cure fully before use.
If the manufacturer recommends a compatible protective finish, follow the instructions carefully.
For paper crafts, store finished bookmarks and decorative cards somewhere dry and protected from unnecessary bending or moisture.
Canvas artwork should be handled by its edges whenever practical.
Avoid placing heavy objects directly against painted details.
For frequently used craft items, remember that no decorative paint finish is guaranteed to resist unlimited wear.
Appropriate materials, careful handling, and realistic expectations are the best ways to preserve detailed artwork.
How to Clean and Store Fine Point Acrylic Paint Pens
Proper cleaning and storage help maintain consistent paint flow and protect delicate applicator tips.
Fine point pens can become difficult to use when dried paint accumulates around the nib or when the cap is left loose for extended periods.
However, cleaning requirements vary between products, so always follow the manufacturer’s instructions.
Cleaning Fine Tips After Use
Fine point nibs can collect small amounts of dried paint, paper fibres, and other debris during use.
These materials may affect the shape and consistency of future strokes.
To reduce buildup, work on clean surfaces and avoid dragging the nib through dust or loose particles.
If you notice paint accumulating around the applicator, inspect the tip before continuing.
Some manufacturers provide specific instructions for cleaning or maintaining their nibs.
Follow those directions rather than applying unfamiliar solvents or soaking the tip.
Avoid pulling or scraping the applicator unless the marker is specifically designed for nib removal.
A damaged fine point tip may no longer produce the narrow, consistent lines expected from the pen.
When you’ve finished working, replace the cap securely.
Keeping the tip protected is one of the simplest ways to reduce drying and contamination.
Preventing Fine Point Pens from Drying Out
Acrylic paint can begin drying when exposed to air, which makes proper cap closure important.
After each painting session, check that the cap is firmly attached.
Avoid leaving uncapped markers on your desk while working with other colours.
If you’re switching between several pens, replace each cap as soon as you finish using that colour.
Store markers away from excessive heat, direct sunlight, and freezing conditions unless the manufacturer provides different guidance.
If a pen hasn’t been used for a long time, review the manufacturer’s preparation instructions before attempting to reactivate it.
Avoid adding water or other liquids directly to the barrel unless the product is specifically designed for refilling or dilution.
Introducing an unsuitable liquid could affect the paint formulation or damage the internal mechanism.
Storing Pens According to Manufacturer Instructions
The correct storage position depends on the marker’s construction.
Some acrylic paint pen manufacturers recommend horizontal storage, while others specify different positions for particular products.
Always follow the instructions supplied with your pens rather than assuming that every marker should be kept upright.
A suitable storage case can help protect narrow nibs and prevent caps from becoming loose.
Keep the pens away from heavy objects that could damage their barrels or applicators.
If you own several fine point pens, organizing them by colour or nib size can make it easier to find the right tool during detailed projects.
Before storing your markers, check for loose caps, leaking paint, or visibly damaged tips.
These small habits can help preserve your supplies and reduce interruptions during future craft sessions.
Common Mistakes to Avoid with Fine Point Acrylic Paint Pens
Fine point acrylic paint pens are designed for detailed work, but using them for unsuitable tasks can make painting more difficult.
A few common mistakes can also cause unnecessary nib wear, inconsistent coverage, or disappointing results.
One mistake is using an extremely narrow tip to fill large areas.
Fine point pens dispense paint across a relatively small space, making them inefficient for backgrounds and broad shapes. A medium or broad marker, or a suitable paintbrush, is usually more practical for these tasks.
Another common problem is pressing too hard.
Excessive pressure may damage the applicator or release more paint than intended. Gentle, controlled strokes generally provide better results.
Working over wet paint can also cause problems.
Applying new details before the previous layer has dried may create smudging, colour mixing, or unwanted paint transfer.
Surface texture is another important consideration.
Very rough wood, coarse canvas, and uneven stone can interrupt thin lines or wear down delicate nibs. Preparing the surface appropriately or choosing a different applicator can make the process easier.
Finally, avoid choosing the narrowest available nib without considering your project.
Ultra-fine tips may be useful for miniature details, but a standard fine point pen can offer better control for many everyday craft activities.
The best results usually come from matching the tip size, paint formulation, and working surface to the design you want to create.
Frequently Asked Questions
What Is the Difference Between Fine Point and Ultra-Fine Acrylic Paint Pens?
The main difference is the intended line width.
Fine point acrylic paint pens are generally designed for controlled lettering, outlines, and small decorative details.
Ultra-fine pens are intended for even narrower marks and more intricate artwork.
However, these labels are not standardized across manufacturers.
When comparing products, check the actual nib specifications and example strokes rather than relying only on the words fine or ultra-fine.
Can Fine Point Acrylic Paint Pens Be Used on Wood?
Yes, many fine point acrylic paint pens can be used on wood when the formulation is suitable for the surface.
Smooth, properly prepared wooden objects are often easier to decorate than rough, unfinished materials.
Wood grain, surface coatings, and absorbency can affect how precisely the pen draws.
Always check the manufacturer’s compatibility information and test the marker before beginning your finished project.
Are Fine Point Acrylic Paint Pens Good for Rock Painting?
Fine point acrylic paint pens can be useful for detailed rock painting, particularly when creating tiny dots, outlines, lettering, and geometric patterns.
Smooth stones generally provide better control than highly textured rocks.
Clean the stone thoroughly and allow it to dry before painting.
If the finished rock will be displayed outdoors, choose suitable markers and follow any recommended protective finishing instructions.
Can You Use Fine Point Acrylic Paint Pens on Canvas?
Many fine point acrylic paint pens can be used on appropriately prepared canvas.
However, the woven texture may make very narrow lines harder to control.
A smoother primed canvas board can be useful for detailed illustrations and lettering.
Choose markers compatible with the canvas preparation and test them before beginning a large project.
Do Fine Point Acrylic Paint Pens Work on Glass?
Some fine point acrylic paint pens are suitable for glass, but not every product is designed to adhere reliably to smooth, non-porous surfaces.
Glass may require specialized paint formulations, preparation, or product-specific curing instructions.
Always check the manufacturer’s compatibility guidance.
Avoid decorating food-contact areas unless the product is specifically approved for that purpose.
Are Fine Point Acrylic Paint Pens Waterproof?
Some acrylic paint pens develop water-resistant or waterproof finishes under specified conditions, but this isn’t guaranteed for every product.
Water resistance depends on the paint formulation, working surface, and drying or curing requirements.
A pen suitable for indoor paper artwork may not withstand washing or outdoor exposure.
Choose products with durability claims appropriate for your intended use.
How Do You Keep Fine Paint Pen Lines from Smudging?
To reduce smudging, work on a clean, compatible surface and avoid applying excessive paint.
Allow each colour to dry sufficiently before adding nearby details or overlapping strokes.
Keep your hand away from freshly painted areas and use steady, controlled movements.
If you’re layering colours, test the combination first to make sure the new application doesn’t disturb the underlying paint.
Final Thoughts
Fine point acrylic paint pens are useful tools for creating detailed illustrations, delicate lettering, small decorative patterns, and finishing touches on handmade artwork.
Their narrow nibs provide greater control than broader markers when working in limited spaces or adding precise details.
However, choosing the right pen involves more than selecting the smallest available tip.
Paint flow, nib construction, colour opacity, surface texture, and comfort all influence how easily you can create clean, consistent marks.
For beginners, a reliable fine point pen and a smooth, compatible surface are a practical starting combination.
Simple projects such as floral bookmarks, hand-lettered gift tags, and miniature canvas illustrations provide opportunities to develop line control without requiring complicated materials.
As your confidence grows, you can experiment with geometric rock art, personalized wooden accessories, and more intricate decorative designs.
Remember to prepare your surface properly, follow the manufacturer’s instructions, and allow enough drying or curing time before handling the finished artwork.
With suitable materials and a little practice, fine point acrylic paint pens can help you add attractive details that make even simple craft projects feel more personalized and complete.