
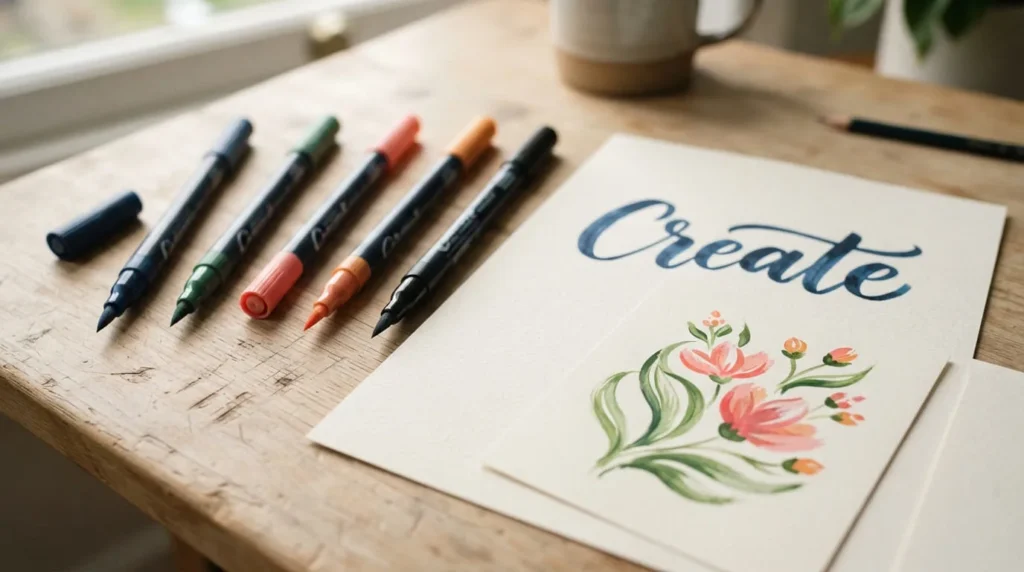
Brush tip paint markers offer a creative way to make beautiful lettering, flowing lines, and expressive artwork without using traditional paintbrushes. Their brush-shaped tips allow you to change the width of your strokes, making them useful for everything from delicate curves to bold decorative designs.
However, getting smooth results takes a little practice. The flexibility of the nib, consistency of the paint, and amount of pressure you apply can all affect your artwork.
Choosing the right marker is equally important because different products contain different paint formulations and work best on specific surfaces.
In this guide, you’ll discover how brush tip paint markers work, how to choose suitable ones, and how to use their unique tips for lettering, painting techniques, and creative craft projects.
What Are Brush Tip Paint Markers?
Brush tip paint markers are paint-filled drawing tools that use a brush-shaped applicator instead of a traditional round or chisel nib. Their distinctive tips are designed to create flowing lines, curved shapes, and expressive marks.
Many brush tips are flexible, allowing their contact area to change when you adjust the pressure against a surface.
With a suitable flexible nib, light pressure can produce a narrow line, while increased pressure can create a broader stroke.
This makes brush tip paint markers particularly useful for decorative lettering, floral illustrations, abstract designs, and handmade craft projects.
Unlike conventional paintbrushes, these markers contain their own supply of colour inside the barrel. You can work without regularly dipping a brush into a separate container of paint.
However, not every marker with a brush-shaped applicator contains acrylic paint. Some products use acrylic-based paint, while others contain different paint formulations or conventional marker ink.
The colour medium influences opacity, drying behaviour, surface compatibility, and durability.
Common uses for brush tip paint markers include:
- Creating decorative brush lettering and handwritten cards.
- Painting curved leaves, flowers, and botanical illustrations.
- Adding expressive lines to canvas artwork.
- Decorating suitable wooden ornaments.
- Creating borders and patterns on handmade stationery.
- Adding variable-width details to mixed-media projects.
- Making colourful abstract designs using flowing strokes.
The main advantage of brush tip paint markers is their ability to combine controlled drawing with brush-like expression.
Instead of switching between multiple brush sizes, you may be able to create different stroke widths using one flexible applicator.
However, the amount of variation depends on the nib’s construction.
Some brush-shaped tips are relatively firm and produce only modest changes in line width, while softer tips offer more noticeable variation.
Understanding these differences will help you choose markers that match your preferred craft projects.
How Do Brush Tip Paint Markers Work?
Brush tip paint markers contain liquid colour inside a barrel and deliver it through a brush-shaped applicator.
The exact paint-delivery mechanism varies between products.
Some markers use valve-controlled systems that require preparation before their first use. Others use different reservoir designs that supply colour to the tip without repeated pumping.
Always follow the manufacturer’s instructions for shaking, activating, or preparing a marker.
Once the applicator contains enough paint, you can begin creating strokes on a compatible surface.
The brush tip changes shape slightly as it moves across the material.
When you apply light pressure, only a small portion of a flexible nib may touch the surface, allowing a narrow line.
Increasing pressure within the nib’s intended working range can bring more of the applicator into contact with the material and create a broader mark.
As you reduce pressure, the tip returns toward its original shape, allowing the stroke to become narrower again.
This changing contact area is what makes flexible brush tips useful for expressive lettering.
For example, when drawing a curved leaf, you can begin with a narrow line, gradually widen the stroke, and reduce pressure toward the end to create a tapered shape.
However, pressure isn’t the only factor affecting the result.
Paint flow also matters.
A marker that releases too much paint may create blobs or uneven edges, while insufficient flow can produce broken strokes.
The working surface influences the appearance of the line as well.
Smooth paper often provides more predictable results than rough wood or heavily textured canvas.
The flexibility and shape of the applicator determine how easily it responds to changes in pressure.
For beginners, practising a few strokes on scrap material is a useful way to understand how a new brush tip behaves.
Avoid pressing excessively hard in an attempt to create thicker lines. Too much pressure can deform or damage the applicator.
Brush Tip Paint Markers vs. Regular Paint Markers
Brush tip paint markers differ from regular paint markers mainly in the shape and behaviour of their applicators.
Traditional paint markers commonly feature bullet, fine-point, or chisel-shaped nibs.
These applicators are useful for creating predictable line widths, outlining shapes, and filling decorative areas.
Brush tips are designed to provide a more flowing painting experience.
On markers with flexible nibs, the line width can change naturally during a single stroke.
This makes them useful for techniques that involve thick and thin lines, curved lettering, and tapered shapes.
For example, a regular medium-tip paint marker may produce a relatively consistent line when drawing a decorative letter.
A flexible brush tip can create a narrow beginning, a wider middle, and a tapered ending without lifting the pen.
However, fixed-width applicators may provide better control for geometric patterns, small lettering, and precise outlines.
Brush tips can require more practice because changing pressure affects the appearance of each stroke.
The following table compares their typical uses.
| Feature | Brush Tip Paint Markers | Regular Paint Markers |
|---|---|---|
| Applicator shape | Brush-shaped nib | Bullet, fine, or chisel nib |
| Line variation | Often variable with pressure | Usually more consistent |
| Brush lettering | Well suited when nib is flexible | Better for simple lettering |
| Curved strokes | Useful for flowing shapes | Suitable but often less expressive |
| Fine details | Depends on tip size and control | Fine-point nibs can offer greater precision |
| Filling large areas | Depends on brush size and paint flow | Medium or broad nibs may be more efficient |
| Pressure sensitivity | Often an important feature | Usually less pronounced |
| Learning curve | Requires practice with pressure | Often easier for consistent lines |
Neither type is automatically better.
A brush tip is useful when you want expressive, variable-width strokes.
A fine-point or medium-tip marker may be more appropriate when your project requires consistent lines or carefully measured details.
For some craft projects, combining brush tips with regular paint markers can provide greater flexibility.
You might use a brush tip to paint floral shapes and a fine-point pen to add delicate outlines afterward.
Brush Tip Paint Markers vs. Brush Pens
Brush tip paint markers and brush pens are sometimes described using similar names, but they don’t always contain the same type of colour.
Brush pen is a broad term referring to a pen with a brush-shaped applicator.
Many brush pens contain water-based dye or pigment ink, while others use alcohol-based ink or specialized formulations.
Brush tip paint markers, by contrast, are specifically intended to deliver a paint-based medium through a brush-shaped nib.
Acrylic brush markers are one example.
They contain acrylic-based paint rather than conventional writing ink.
The distinction matters because paint and ink can behave differently on a surface.
Some ink-based brush pens are designed for smooth lettering paper and may produce transparent or translucent marks.
Paint-based brush markers may offer greater opacity, depending on the formulation, and some can be used on materials beyond paper.
However, opacity, permanence, and surface compatibility vary between individual products.
Another difference involves blending.
Certain water-based brush pens are designed to produce watercolour-like effects, particularly on suitable paper.
This doesn’t mean every acrylic brush tip paint marker can be blended with water in the same way.
Acrylic formulations may dry to form a paint film, and their behaviour during layering or blending depends on the specific product.
Before choosing a marker, consider whether you want traditional brush lettering on paper or paint-based decoration on different craft materials.
If you’re primarily interested in practising calligraphy on smooth paper, an ink-based brush pen may meet your needs.
If you want opaque decorative strokes on compatible canvas or wooden objects, a suitable paint-based brush marker may be more appropriate.
The important point is to check the actual colour formulation rather than assuming every brush-shaped marker works identically.
Types of Brush Tip Paint Markers
Brush tip paint markers are available in different formulations and applicator designs.
These differences affect how the paint flows, how the nib responds to pressure, and which surfaces can be decorated successfully.
Understanding the main categories will help you select markers that suit your preferred techniques.
Acrylic Brush Tip Paint Markers
Acrylic brush tip paint markers contain acrylic-based paint and use a brush-shaped applicator to create decorative strokes.
Many acrylic paint markers use water-based formulations, although the ingredients and performance characteristics vary between manufacturers.
These markers may be suitable for painting on paper, prepared canvas, wood, and other manufacturer-approved materials.
Acrylic brush markers can be particularly useful for decorative artwork that combines opaque colour with variable-width lines.
For example, you might use a brush tip to paint curved leaves on a small canvas board or create bold lettering on a suitable wooden ornament.
Depending on the formulation, acrylic paint may provide more visible coverage than certain transparent inks.
However, not every acrylic brush marker is fully opaque.
Some colours or products may require additional applications for stronger coverage.
Drying and layering behaviour also varies.
Some acrylic brush markers allow colours to overlap after the previous application has dried, while others may react differently when additional paint is applied.
Always test unfamiliar colour combinations before using them on a finished project.
Acrylic brush markers are useful when you want brush-like strokes without handling separate paintbrushes and palettes.
However, their performance depends on both the paint formulation and the flexibility of the nib.
Choose products that clearly describe their intended surfaces and application methods.
Other Paint-Based Brush Markers
Although acrylic formulations are commonly associated with craft paint markers, other paint-based brush markers may use different binding systems or specialized formulations.
These products are designed for particular applications, and their handling characteristics can vary considerably.
Some may focus on decorative artwork, while others are intended for specific surfaces or professional uses.
The most important consideration is whether the product contains a genuine paint-based medium and whether its applicator is designed to support brush-like movement.
Different formulations can vary in opacity, flexibility, adhesion, drying time, and resistance to handling.
For example, a paint marker designed for paper-based illustrations may not be suitable for decorating smooth plastic or glass.
Similarly, a marker intended for durable surface decoration may have different blending characteristics from a product developed for expressive artwork.
If a marker contains solvents, check its safety information and ventilation requirements.
Do not assume that a solvent-based formulation automatically provides better results or greater permanence.
When comparing products, look for clear manufacturer descriptions of the medium, intended surfaces, and care instructions.
If those details are missing, it may be difficult to predict how well the marker will perform.
For beginners, a clearly labelled acrylic brush marker intended for the selected craft material is often a practical starting point.
Soft Brush Tips vs. Firm Brush Tips
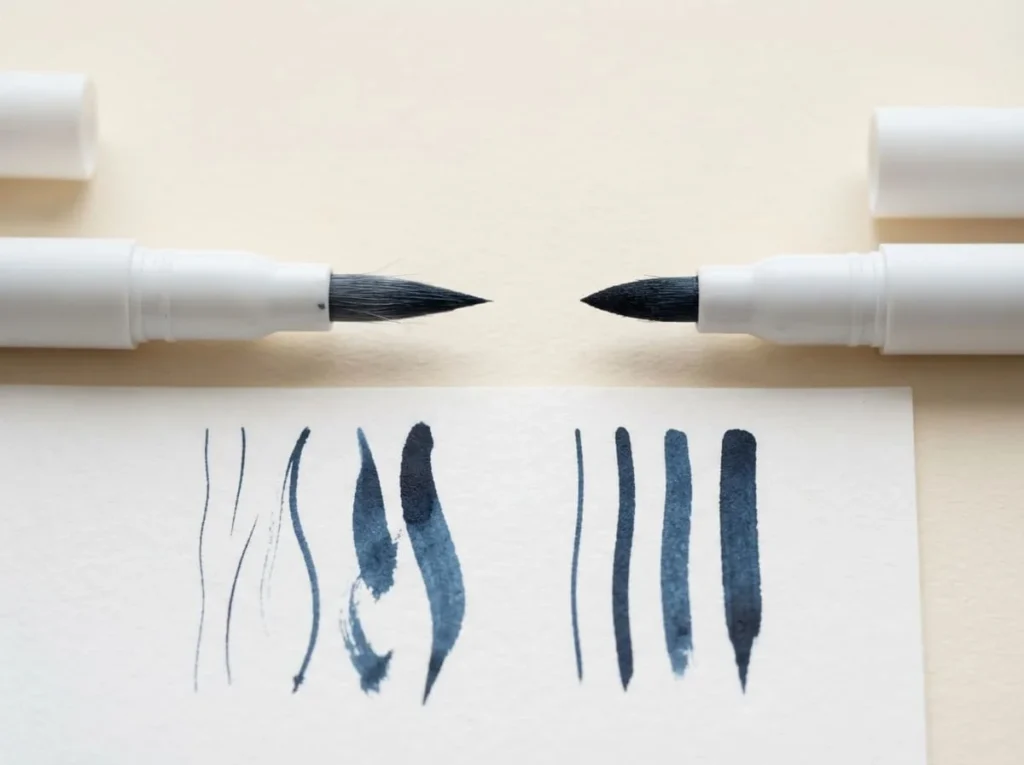
Brush tip flexibility has a major influence on how a marker feels and responds during use.
Soft brush tips bend more readily when pressure is applied.
This can make it easier to produce noticeable differences between thin and thick strokes.
They are particularly useful for expressive lettering, flowing curves, and tapered botanical shapes.
However, softer nibs may require greater control.
Beginners sometimes apply too much pressure, causing strokes to become wider than intended.
A flexible tip may also feel less predictable when creating small, carefully positioned details.
Firm brush tips provide greater resistance to bending.
They may feel easier to control for smaller letters, short decorative strokes, and simple outlines.
However, their line-width variation can be more limited.
Neither option is universally better.
A soft brush tip may be suitable for larger expressive lettering, while a firmer tip may be more comfortable for compact designs.
| Feature | Soft Brush Tip | Firm Brush Tip |
|---|---|---|
| Flexibility | Bends more easily | Resists bending |
| Stroke variation | Often more pronounced | Usually more controlled |
| Large brush lettering | Well suited | Depends on nib size |
| Small lettering | May require more practice | Often easier to manage |
| Curved botanical strokes | Useful for flowing shapes | Useful for controlled shapes |
| Pressure control | Requires a lighter touch | May feel more predictable |
| Best for beginners | Depends on comfort and practice | Often a manageable starting option |
When choosing between the two, think about the size and style of artwork you want to create.
For large decorative cards with expressive lettering, a softer brush tip may provide the variation you need.
For small gift tags or carefully controlled patterns, a firmer brush tip may be more convenient.
Remember that nib flexibility varies between individual products, even when they use similar descriptions.
If possible, examine the manufacturer’s sample strokes before purchasing.
How to Choose Brush Tip Paint Markers
Choosing the right brush tip paint markers involves more than selecting attractive colours.
Tip flexibility, paint delivery, surface compatibility, and handling comfort all influence the results you can achieve.
A marker that works well for broad brush lettering may be less suitable for miniature illustrations or detailed craft decorations.
Before purchasing a set, consider which techniques and materials you plan to use most often.
Choose the Right Brush Tip Size and Flexibility
Brush tip size determines how much space you can cover during a stroke.
Smaller tips are generally more suitable for compact lettering, delicate curves, and decorative details.
Larger tips allow broader strokes, making them useful for bold lettering and expressive artwork.
Flexibility influences how easily the tip changes shape under pressure.
A soft, flexible nib may create a noticeable difference between thin and thick lines.
A firmer nib may offer more predictable control, particularly for beginners.
However, tip classifications are not standardized across manufacturers.
A medium brush tip from one brand may behave differently from a similarly labelled marker from another.
When comparing products, look for sample strokes and descriptions of nib flexibility.
Consider the scale of your projects.
If you mainly decorate small greeting cards, a compact brush tip may be sufficient.
If you want to create large decorative lettering or flowing abstract shapes, a broader nib may be more useful.
Avoid choosing the largest or softest brush tip simply because it produces dramatic strokes.
The best choice is one that feels manageable and suits the size of your artwork.
Check Paint Flow and Colour Opacity
Consistent paint flow is important when using brush tip markers because uneven delivery can interrupt the natural appearance of a stroke.
A marker that releases too little paint may leave faint or broken areas.
Excessive paint flow can create blobs, especially when the nib remains in contact with one area for too long.
For smooth lettering, look for a marker designed to maintain reasonably consistent colour delivery as the tip changes pressure.
If you’re comparing products, pay attention to manufacturer demonstrations and credible user feedback about paint flow.
Colour opacity is another factor to consider.
Some paint markers produce strong coverage on dark surfaces, while others appear more translucent.
If you want to create white lettering on a dark wooden ornament, choose a formulation specifically intended to provide visible coverage on that material.
For paper artwork, you may prefer softer, partially translucent colours for layered decorative effects.
However, not every paint-based brush marker supports blending or transparent washes.
Check the product’s formulation and intended use before attempting those techniques.
Testing a new marker on the actual working surface is the most reliable way to understand how its colour appears.
Consider the Surfaces You Want to Decorate
Brush tip paint markers can be useful on several craft materials, but their performance depends on the paint formulation and the surface.
Smooth paper and suitable cardstock are common starting points for brush lettering and decorative illustrations.
These materials allow the applicator to move relatively freely, making it easier to practise pressure changes.
Prepared canvas can also be used with compatible markers.
However, coarse canvas texture may interfere with smooth brush strokes or contribute to nib wear.
Wooden objects can be decorated with brush tip paint markers when the formulation is suitable for the wood and its finish.
Rough grain may make curved strokes more difficult, so a smooth prepared surface is generally preferable for detailed lettering.
Other materials, such as glass, plastic, and metal, may require specialized markers and preparation.
Never assume that a paint-based brush marker works permanently on every material.
Before starting, check the manufacturer’s compatibility information and test the paint on a spare piece or inconspicuous area.
For projects that will be handled frequently or displayed outdoors, consider the product’s durability recommendations as well.
Look for Comfortable Handling and Durable Nibs
Brush lettering and detailed painting can involve repeated strokes and gradual pressure changes.
A comfortable marker makes these movements easier to control.
Barrel size, grip shape, weight, and balance all affect the way a pen feels during use.
Some people prefer slim markers that resemble ordinary writing pens.
Others find slightly thicker barrels easier to hold during longer craft sessions.
Choose a marker that allows you to maintain a relaxed grip.
Avoid squeezing the barrel unnecessarily, as this can contribute to hand fatigue.
Nib durability is also important.
Flexible brush tips should be able to bend within their intended range and return toward their original shape.
However, excessive pressure and abrasive surfaces can cause fraying, deformation, or other damage.
Look for clear manufacturer guidance about suitable working surfaces and nib care.
Some products offer replaceable tips, although this feature isn’t universal.
For beginners, a durable brush tip with predictable flexibility can be more useful than a highly specialized applicator that requires advanced control.
Consider Safety and Ease of Cleaning
Safety and maintenance are worth considering before buying any paint marker.
Different paint formulations have different handling requirements.
Some acrylic-based markers contain water-based paint, while other paint markers may contain solvents or additional ingredients that require specific precautions.
Read the manufacturer’s safety information and follow any ventilation recommendations.
If children will participate in craft activities, check the product’s recommended age range and provide appropriate supervision.
A non-toxic label should not be interpreted as permission to apply paint to skin, ingest it, or decorate food-contact surfaces.
Cleaning requirements also vary.
Some markers may have nibs that can be maintained using manufacturer-approved methods, while others aren’t designed to be disassembled or washed.
Avoid soaking brush tips in water or solvents without specific instructions.
Consider storage recommendations as well.
Some manufacturers recommend horizontal storage, while others provide different directions for their marker systems.
Keeping the cap securely closed after use helps reduce unnecessary drying.
When choosing brush tip paint markers, prioritize products with clear instructions, suitable safety information, and care requirements that fit your workspace.
How to Use Brush Tip Paint Markers Step by Step
Learning to use brush tip paint markers begins with understanding how the applicator responds to movement and pressure. Unlike ordinary markers that produce relatively consistent lines, flexible brush tips allow you to create narrow and broad strokes using the same pen.
This makes them useful for decorative lettering, flowing shapes, and expressive artwork. However, controlling the nib takes practice, particularly if you’re using brush markers for the first time.
The following steps will help you develop a comfortable technique while protecting your markers from unnecessary wear.
Step 1: Select a Suitable Surface
Begin with a smooth surface that is compatible with your brush tip paint markers.
For beginners, suitable drawing paper or smooth cardstock is often easier to work with than textured canvas or unfinished wood.
The smoother surface allows the brush nib to move freely, helping you practise thin and thick strokes without catching on raised fibres.
Choose paper that can handle the marker’s paint formulation without excessive bleeding, feathering, or warping.
If you’re planning to decorate canvas, check whether the marker is suitable for primed canvas surfaces. A smoother canvas board may offer better control than heavily textured fabric.
For wooden crafts, make sure the material is appropriately prepared and free from loose dust.
Place your paper or craft object on a stable work surface.
Keep a spare piece of the same material nearby so you can test paint flow before beginning your final design.
Step 2: Prepare and Test the Marker
Before using a brush tip paint marker, read the manufacturer’s preparation instructions.
Some paint-based markers require shaking or priming before colour reaches the applicator, while others use delivery systems that don’t need these steps.
If shaking is required, follow the directions with the cap securely attached.
For markers that need priming, use the manufacturer-approved method. Avoid pressing a delicate brush tip forcefully against the paper.
Excessive pressure can deform the nib or release more paint than intended.
Once the marker is ready, draw several short lines on scrap material.
Check whether the paint flows smoothly and the brush tip returns to its original shape after each stroke.
Try a light line, followed by a slightly broader stroke.
If the paint appears uneven, inspect the nib and follow the manufacturer’s troubleshooting guidance.
Starting with a properly prepared marker makes it easier to focus on controlling your strokes.
Step 3: Practice Light Upstrokes
Light upstrokes are an important foundation of traditional brush lettering.
An upstroke is a line drawn upward, usually with relatively light pressure.
When using a suitably flexible brush tip, light pressure allows a smaller portion of the nib to touch the surface, creating a narrower mark.
Place your marker near the bottom of a sheet of practice paper.
Move the tip upward in a smooth motion while maintaining gentle contact with the surface.
Repeat the stroke several times, leaving enough space between each line.
Focus on producing consistent marks rather than drawing quickly.
Avoid lifting the marker repeatedly during a single stroke unless the design requires it.
Next, practise slightly curved upstrokes.
These movements will help you create the beginnings of letters, decorative flourishes, and botanical shapes.
Remember that not every brush-shaped applicator is equally flexible. A firm brush tip may produce less variation between light and heavy pressure.
If the line remains wider than expected, check the nib’s design rather than trying to reduce pressure until the marker barely touches the paper.
Step 4: Create Thicker Downstrokes
Downstrokes are drawn downward and commonly form the thicker portions of brush lettering.
With a flexible brush tip, gradually increasing pressure can bring more of the nib into contact with the surface and produce a wider line.
Begin near the top of your practice paper.
Move the marker downward while applying slightly more pressure than you used for the upstrokes.
The goal is to create a smooth, broader mark without flattening or damaging the applicator.
Avoid pushing the nib beyond its natural flexibility.
If the tip bends sharply or feels difficult to control, reduce the pressure.
Practise several downstrokes until you become comfortable with the movement.
Next, experiment with changing pressure during a stroke.
Begin with light contact, gradually increase pressure through the middle, and release it toward the end.
This can produce a tapered shape that is useful for leaves, petals, and expressive decorative marks.
Use the flexibility of the nib rather than force to create line variation.
Step 5: Combine Thin and Thick Lines
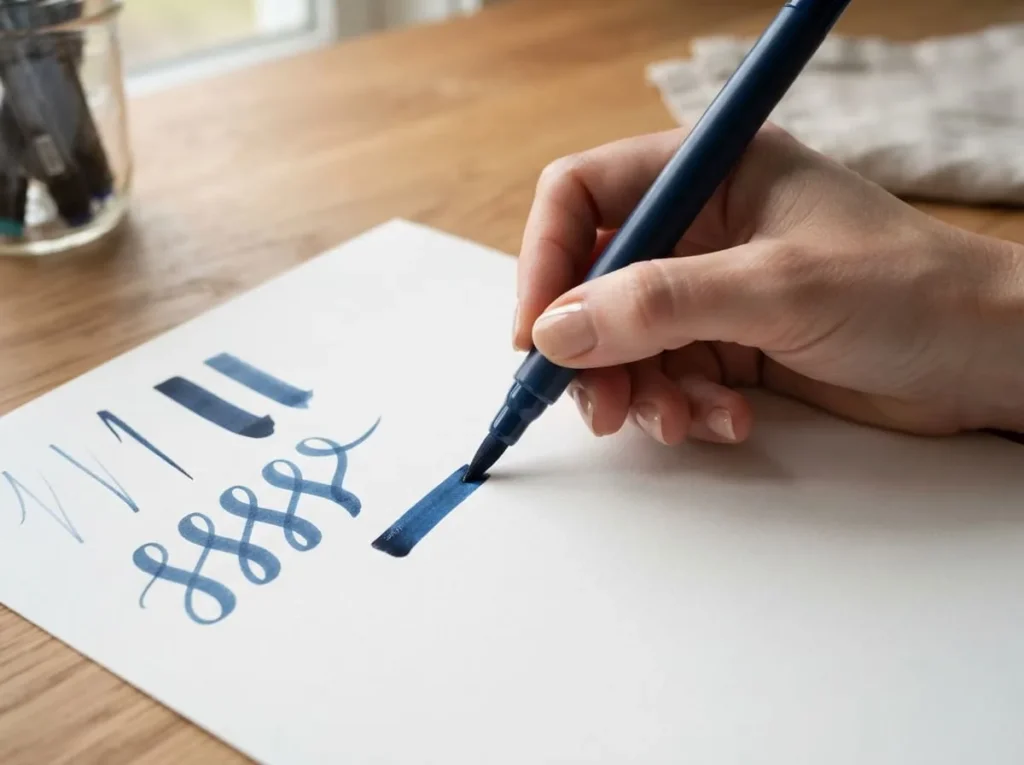
Once you’re comfortable with individual upstrokes and downstrokes, begin connecting them.
This is where the expressive qualities of brush tip paint markers become more noticeable.
Start by drawing a simple wave pattern.
Use light pressure as the line moves upward and gradually increase pressure as it curves downward.
Continue alternating between thin and thick sections.
Keep your movements steady and avoid stopping abruptly where the pressure changes.
Next, practise simple letter-like shapes.
A lowercase-style curve or repeated arch pattern can help you understand how different strokes connect.
Don’t worry about creating perfect calligraphy immediately.
Focus on developing a comfortable rhythm.
If the transitions appear uneven, slow your movements slightly and practise the same shape several times.
Some brush tips respond more gradually to pressure changes than others, so adapt your technique to the marker you’re using.
With regular practice, these combined strokes can form attractive lettering, borders, and decorative patterns.
Step 6: Paint Curves and Simple Shapes
Brush tip markers are useful for creating curved designs because their applicators can follow changes in direction while producing varied line widths.
Begin by practising a simple leaf shape.
Touch the nib lightly to the paper and move it in a curved direction.
Increase pressure gradually to widen the middle of the leaf.
Reduce pressure as you approach the end, creating a tapered point.
Repeat the movement to make several leaves of different sizes.
Next, try painting simple flower petals.
Use a similar movement, beginning with a narrow point and increasing pressure through the centre.
Experiment with curved strokes to produce rounded or slightly pointed petals.
You can also practise decorative waves, spirals, and curved borders.
Avoid twisting the nib forcefully against the surface, especially when changing direction.
If a shape requires a sharp turn, lift the marker and begin another stroke rather than bending the applicator unnaturally.
These exercises provide useful preparation for more detailed craft projects.
Step 7: Let the Artwork Dry and Cure
After completing your painting, allow the colour to dry according to the marker manufacturer’s instructions.
Paint-based brush markers may behave differently from ordinary ink brush pens.
Some acrylic formulations form a paint layer as they dry, while other products have different drying characteristics.
The time needed depends on the formulation, surface, thickness of the strokes, and environmental conditions.
Avoid touching or rubbing freshly painted areas.
If you plan to add more colours, make sure the previous application has dried sufficiently before layering, unless the product specifically supports wet blending.
For objects that will be handled frequently, follow any recommended curing period before use.
If your project requires additional protection, check whether a compatible sealer is recommended.
Never assume that all brush tip paint markers become waterproof or permanent after the same amount of time.
Essential Brush Tip Paint Marker Techniques
Once you’ve practised the basic strokes, you can begin exploring more creative techniques.
Flexible brush tips allow you to vary line width, build decorative shapes, and add expressive details without switching between several paintbrushes.
The techniques below are particularly useful for lettering, handmade cards, botanical illustrations, and decorative craft projects.
How to Control Thin and Thick Brush Strokes
Controlling line width is one of the most useful skills when working with flexible brush tip paint markers.
The key is learning how changes in pressure affect the contact between the nib and the surface.
For narrow lines, use gentle pressure and allow only a small part of the tip to touch the material.
For wider strokes, gradually increase pressure within the applicator’s intended range.
Avoid sudden changes that cause the paint to pool or the nib to bend excessively.
The angle of the pen also matters.
Holding the marker at a comfortable, consistent angle can help maintain smoother contact with the surface.
Experiment with slight adjustments during practice rather than forcing the nib into an uncomfortable position.
Try drawing a series of lines that begin thin, become wider, and return to a narrow point.
Repeat this exercise using curved strokes.
If the lines become irregular, check whether you’re changing pressure too quickly.
Paint flow can also affect stroke width. Excess paint may create broader edges even when the nib pressure remains light.
Practising on smooth, compatible material will help you understand the relationship between pressure, movement, and paint delivery.
Basic Brush Lettering for Beginners
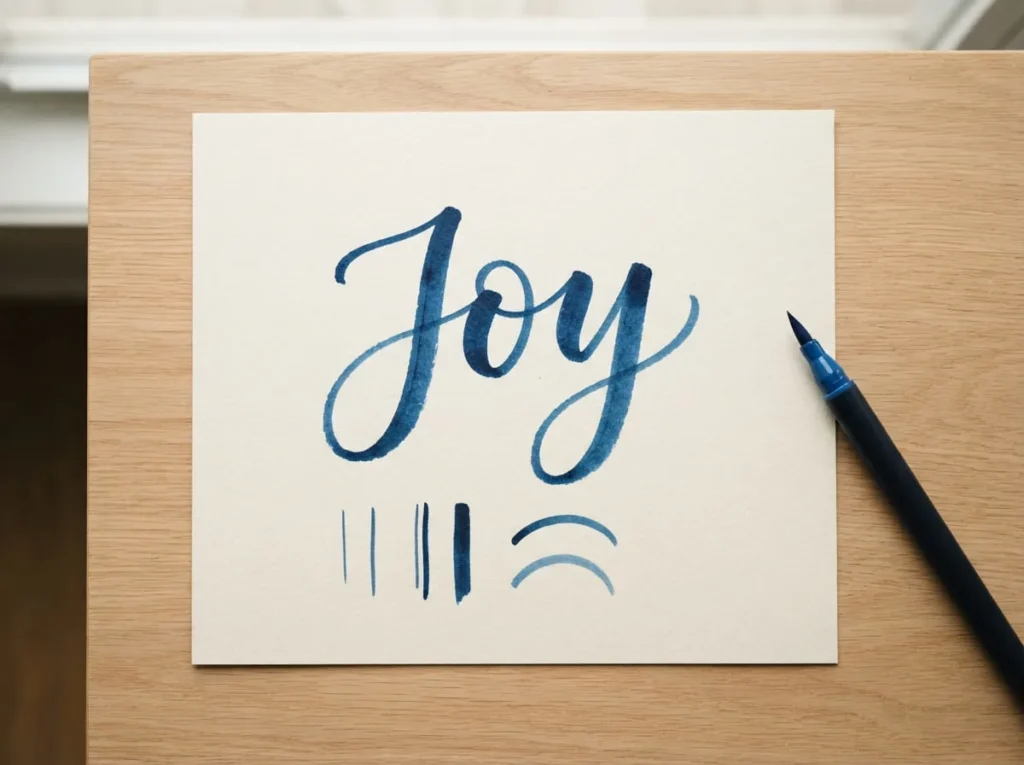
Brush lettering uses variations in stroke thickness to create expressive handwritten letters.
Flexible brush tip markers are useful for this technique because they allow you to combine narrow upstrokes with broader downstrokes.
Begin by practising a few simple movements rather than writing complete words immediately.
Draw repeated upward lines with light pressure.
Then practise downward lines using slightly more pressure.
Once these movements feel comfortable, combine them into simple arches and curved shapes.
Try creating lowercase letters such as l, i, u, and n.
These shapes can help you practise transitions between thin and thick strokes without complicated letterforms.
When you’re ready, choose a short word for your first lettering project.
Words such as Joy, Love, or Smile are manageable starting points.
Sketch the word lightly on suitable paper if you need help with spacing.
Then use your brush marker to form each letter with controlled movements.
Leave enough room between letters so the thicker strokes don’t overlap unintentionally.
If you’re using an acrylic paint-based marker, allow the lettering to dry before adding nearby decorative elements.
For beginners, consistent pressure control is more important than elaborate calligraphy styles.
Blending and Layering Colours
Blending and layering are two ways to combine colours, but they don’t produce identical effects.
Blending generally involves creating a transition between colours while the medium remains workable.
Layering involves applying one colour over another, often after the previous application has dried.
Some water-based brush pens are designed for wet blending and watercolour-like effects.
However, not every paint-based brush marker supports these techniques.
Acrylic brush tip paint markers may dry to form a paint film, and their behaviour depends on the formulation.
Before attempting to blend colours, check the manufacturer’s instructions.
If blending is supported, practise on spare material using the recommended method.
Avoid applying water or solvents to markers unless the product specifically permits it.
For layering, begin with a simple painted shape.
Allow it to dry sufficiently, then add another colour using controlled strokes.
For example, you might paint a broad green leaf and add a thin darker line once the base colour is ready.
If the second application lifts or smears the first layer, stop and check compatibility.
You can also create attractive designs by placing contrasting colours next to each other without overlapping them.
This approach works well for decorative cards and botanical patterns.
Painting Leaves, Petals, and Curved Shapes
Brush tip paint markers are especially useful for botanical designs because flexible nibs can create tapered strokes.
A simple leaf can often be painted with one controlled movement.
Begin with light pressure near the stem.
Gradually increase pressure as you move outward to widen the leaf.
Reduce pressure near the end to create a pointed tip.
Repeat the process on the opposite side of a drawn stem to create a small leafy branch.
For flower petals, begin near the centre of the flower.
Move the marker outward while gradually widening the stroke.
Release pressure as you approach the edge.
Depending on your chosen flower shape, you can use one or several strokes to create each petal.
Try painting a simple five-petal flower before moving on to more elaborate designs.
You can also make decorative vines using a thin curved line with small tapered leaves on either side.
Keep your designs manageable.
A few well-placed leaves or petals can create an attractive botanical illustration without requiring advanced drawing skills.
Creating Decorative Borders and Patterns
Brush tip paint markers can turn simple lines into decorative borders by introducing changes in width and direction.
A flowing wave pattern is a useful starting point.
Move the marker across the surface using light pressure on upward curves and slightly more pressure on downward sections.
Repeat the movement to create a consistent border.
Another idea is to draw a thin curved vine and add small leaves at regular intervals.
You can also create repeated petal shapes, short flourishes, and curved ribbons.
For greeting cards, place a decorative border along one edge while leaving enough blank space for the main message.
On gift wrap, larger sweeping patterns can create a handmade appearance without requiring complicated illustrations.
When working on repeated designs, plan the spacing before applying paint.
Light pencil guidelines may be useful on suitable surfaces.
Avoid adding too many decorative elements close together, especially when using broad brush tips.
Leaving some empty space can make the overall pattern look more balanced.
5 Creative Projects Using Brush Tip Paint Markers
Brush tip paint markers can be used for projects that combine expressive lettering, smooth curves, and decorative painting.
The following five ideas are designed to help beginners practise the main advantages of brush-shaped nibs while creating useful handmade items.
Each project focuses on simple materials and manageable techniques.
Before starting, check that your paint markers are suitable for the chosen surface and follow the manufacturer’s preparation and drying instructions.
1. Hand-Lettered Inspirational Cards
Hand-lettered cards are a useful starting project because they allow you to practise brush strokes while creating something personal.
Short words and simple decorative flourishes work particularly well with flexible brush tip markers.
Materials Needed
- Thick cardstock or suitable blank greeting cards.
- Brush tip paint markers compatible with paper.
- Pencil and eraser.
- Ruler, if needed.
- Scrap paper for practising.
How to Create Brush-Lettered Cards
- Choose a blank card with a smooth surface suitable for your markers.
- Select a short word or message, such as Joy, Smile, or Thank You.
- Practise the lettering on scrap paper before beginning.
- Lightly sketch the placement of the words on your card if needed.
- Use gentle pressure for upward strokes and slightly more pressure for downward strokes.
- Complete the main lettering using slow, controlled movements.
- Allow the paint to dry before adding decorative details.
- Add a small flourish, curved line, or leafy border around the message.
- Let the finished card dry completely before folding or placing it in an envelope.
For a simple design, use one dark colour for the lettering and a contrasting shade for the decorations.
If you’re new to brush lettering, begin with large letters rather than trying to write a long message in a small space.
A short phrase with clear spacing can create an attractive result without complicated calligraphy.
2. Floral Bookmark Painting
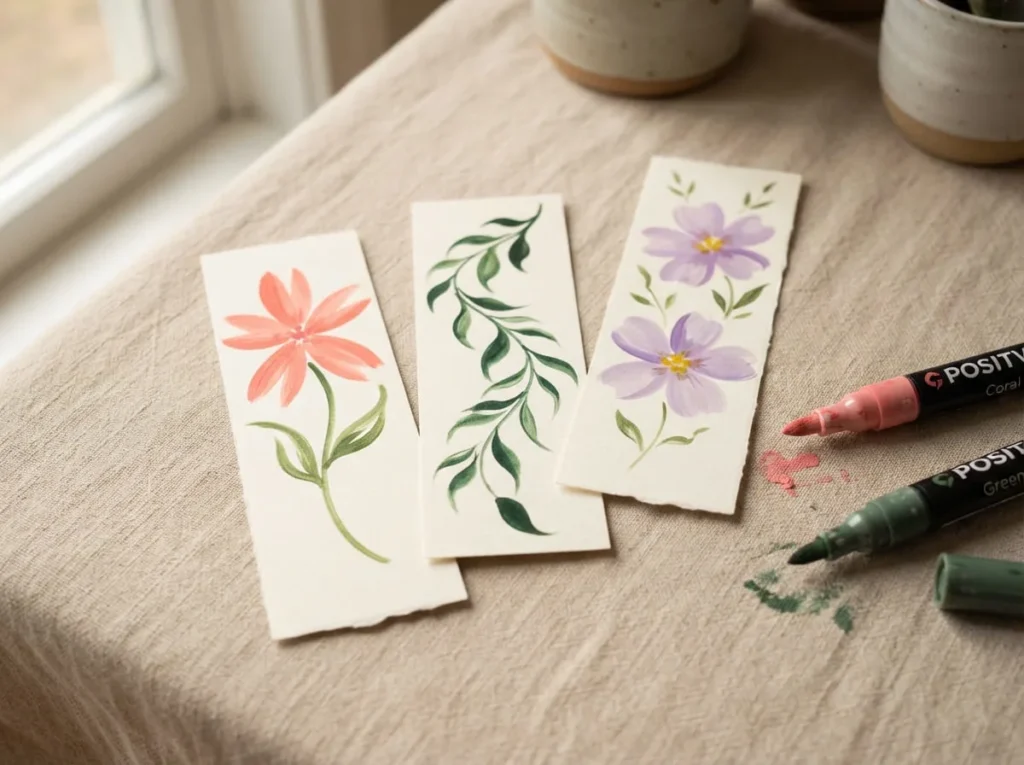
Floral bookmarks are ideal for practising broader petals and expressive leaf strokes.
Unlike miniature floral outlines made with fine-point pens, this project uses the brush tip itself to create the shape and movement of each petal.
Materials Needed
- Thick cardstock suitable for paint markers.
- Brush tip paint markers in floral colours.
- Pencil.
- Scissors or paper trimmer.
- Optional hole punch and ribbon.
How to Paint Floral Bookmarks
- Cut a narrow bookmark from thick cardstock.
- Choose two or three colours for your floral design.
- Lightly plan the position of one large flower and a few leaves.
- Use a flexible brush tip to paint the first petal with a tapered stroke.
- Repeat the movement to create four or five petals around the flower’s centre.
- Add a thin curved stem using light pressure.
- Paint small leaves by gradually increasing and releasing pressure.
- Allow the floral design to dry before adding any overlapping details.
- Add a simple border or a few decorative curves if desired.
- Let the finished bookmark dry fully before use.
For a beginner-friendly design, paint one flower near the lower end of the bookmark and extend a leafy stem upward.
You can also experiment with different petal shapes by changing the direction and width of your strokes.
Avoid overcrowding the narrow surface.
Leaving some blank space will help the brush-painted flower remain the focus.
3. Abstract Mini Canvas Art
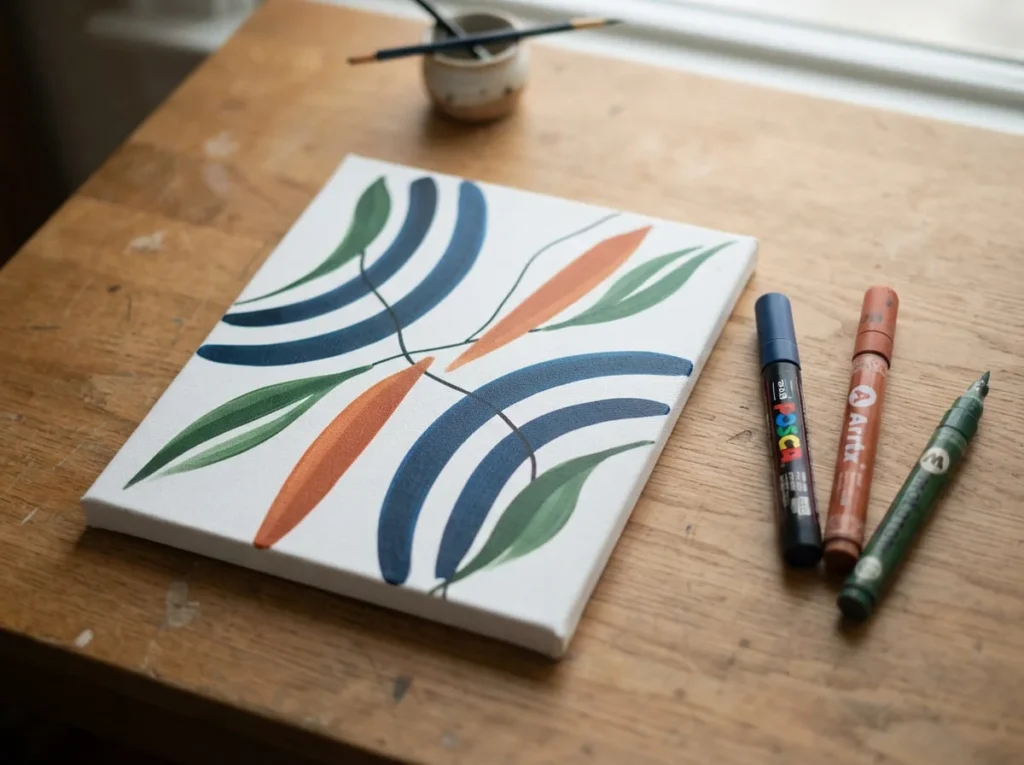
Abstract artwork is a good way to explore the expressive qualities of brush tip paint markers.
Instead of concentrating on precise outlines, you can experiment with sweeping curves, broad strokes, and simple arrangements of colour.
Materials Needed
- Small primed canvas board.
- Brush tip paint markers suitable for canvas.
- Pencil, if needed.
- Protective work covering.
- Scrap material for testing colours.
How to Paint Abstract Brush Strokes on Canvas
- Choose a smooth, primed canvas board compatible with your markers.
- Select three or four colours that work well together.
- Test each colour on a spare surface.
- Begin with one broad curved stroke near the centre of the canvas.
- Add a second sweeping stroke in a contrasting colour.
- Vary the pressure to create sections that are narrow and wide.
- Leave some white space between the larger painted areas.
- Allow the first colours to dry before adding overlapping details, unless the product supports wet blending.
- Add a few thinner curves or decorative marks to balance the composition.
- Let the completed artwork dry and cure according to the manufacturer’s instructions.
For a modern decorative appearance, try combining muted blue, warm orange, and dark green.
You can create a flowing arrangement of curved shapes without attempting to represent a specific object.
If the canvas texture makes the strokes difficult to control, use a smoother board or adjust your design to accommodate the material.
The aim is to explore movement and line variation rather than produce perfectly uniform shapes.
4. Decorative Wooden Ornament Lettering
Wooden ornaments provide compact surfaces for practising short words, initials, and expressive lettering.
A brush tip can create decorative strokes that look more fluid than those made with an ordinary fixed-width marker.
Materials Needed
- Smooth wooden ornament blanks.
- Brush tip paint markers suitable for wood.
- Fine-grit sandpaper, if required.
- Clean cloth.
- Pencil.
- Optional ribbon or twine.
How to Letter Wooden Ornaments
- Choose a wooden ornament with a smooth, accessible surface.
- If needed, gently sand rough areas and remove the dust.
- Make sure the wood is clean and dry.
- Practise a short word or single initial on scrap material.
- Lightly mark the lettering position on the ornament if appropriate.
- Use controlled brush strokes to create the chosen letter or word.
- Apply lighter pressure for narrow sections and slightly more pressure for broader strokes.
- Allow the main lettering to dry before adding decorative elements.
- Paint one or two small leaves or curved flourishes around the design.
- Let the paint dry and cure before attaching ribbon or displaying the ornament.
For a simple ornament, decorate the centre with one large initial.
Add a small botanical branch along the lower edge for a balanced appearance.
Metallic or white paint may provide attractive contrast on darker wood, provided the chosen markers offer sufficient opacity.
Because wood finishes vary, always test the marker before beginning.
If the ornament will be handled regularly, check whether the manufacturer recommends a compatible protective coating.
5. Handmade Gift Wrap Decorations
Plain gift wrap can be transformed into decorative packaging using flowing brush strokes and repeating patterns.
This project works well with suitable heavyweight paper and allows you to practise larger movements without concentrating on tiny details.
Materials Needed
- Plain heavyweight wrapping paper or kraft paper compatible with the markers.
- Brush tip paint markers.
- Pencil, if needed.
- Protective work covering.
- Ribbon or twine for wrapping.
How to Decorate Gift Wrap with Brush Markers
- Cut a sheet of wrapping paper large enough for your gift.
- Place it flat on a protected work surface.
- Test your markers on a spare piece of the same paper.
- Choose a simple repeating design, such as leafy branches or curved ribbons.
- Begin with a thin sweeping line across one section of the paper.
- Add tapered leaves along the line using controlled changes in pressure.
- Repeat the pattern across the paper while leaving comfortable spaces between designs.
- Introduce a second colour for a few decorative accents.
- Allow the paint to dry fully before folding or wrapping the paper around the gift.
- Finish the package with ribbon or twine if desired.
For a natural style, use dark green brush strokes on kraft paper.
You could also create broad blue curves with small gold accents for a more decorative appearance.
Avoid applying excessive paint because heavy application may cause thin paper to warp or become difficult to fold.
If your markers bleed through the paper, use a thicker material or a more suitable formulation.
Keep the pattern relatively simple so the finished wrapping remains attractive without becoming visually crowded.
Common Brush Tip Paint Marker Problems and Solutions
Brush tip paint markers are useful for expressive lettering and decorative artwork, but flexible nibs can sometimes be challenging to control. Uneven strokes, inconsistent paint flow, frayed tips, and unwanted smudging are common problems, especially when you’re learning to vary pressure during painting.
Fortunately, many of these issues can be reduced by using suitable materials, preparing the marker correctly, and developing a lighter, more consistent drawing technique.
Before attempting any repairs or cleaning methods, check the instructions supplied with your paint markers. Different products use different paint formulations and applicator systems.
Why Is My Brush Tip Marker Not Working?
A brush tip paint marker may stop producing colour because the applicator isn’t receiving enough paint, the nib has dried out, or the reservoir is nearly empty.
Some new markers also require activation before their first use.
If your marker uses a valve-controlled system, the manufacturer may recommend shaking the capped barrel or following a specific priming procedure.
However, not every brush tip marker requires pumping or repeated pressing.
Avoid applying excessive pressure to a flexible nib, as this can permanently change its shape or release too much paint.
If your marker worked previously but now produces faint or interrupted strokes, inspect the brush tip for dried paint or visible damage.
A poorly fitted cap may allow paint to dry around the applicator during storage.
Try making a few gentle strokes on smooth, compatible scrap material.
If the paint flows normally on smooth paper but struggles on rough canvas or unfinished wood, the surface texture may be contributing to the problem.
Check whether the nib is bent, frayed, or clogged with loose fibres.
If cleaning is necessary, follow the manufacturer’s recommended method rather than soaking the applicator in an unfamiliar liquid.
If the pen remains unusable after the recommended preparation and maintenance steps, replacing the marker or an approved replacement nib may be necessary.
Why Are My Thick and Thin Strokes Uneven?
Uneven thick and thin strokes often result from inconsistent pressure, changing nib angles, or irregular paint flow.
Flexible brush tips respond to the amount of pressure applied during each movement.
If you suddenly press harder in the middle of a stroke, the line may become wider than intended.
Similarly, releasing pressure too quickly can create an abrupt change instead of a smooth taper.
Begin by practising slow strokes on smooth paper.
Draw a thin upward line using light pressure.
Then create a downward stroke using slightly more pressure, staying within the nib’s natural flexibility.
Try to keep the marker at a comfortable, consistent angle.
Avoid gripping the barrel too tightly because tension can make gradual pressure changes more difficult.
You can also practise strokes that begin narrow, widen through the middle, and taper toward the end.
If your lines remain inconsistent, inspect the nib.
A damaged or permanently bent brush tip may no longer respond predictably.
Remember that some brush-shaped applicators are relatively firm and naturally produce less variation in line width.
The goal is to develop control that suits your particular marker rather than forcing it to behave like a softer brush.
How to Prevent Frayed or Damaged Brush Tips
Flexible brush tips can become frayed or misshapen when used with excessive pressure or unsuitable surfaces.
Rough paper, coarse canvas, and unfinished wood may create friction that damages delicate applicator fibres.
To protect your markers, choose smooth surfaces whenever possible, particularly when practising brush lettering.
Use materials recommended by the marker manufacturer.
Avoid forcing the nib into rough textures or repeatedly dragging it across abrasive areas.
When creating broad downstrokes, increase pressure gently rather than flattening the entire applicator against the surface.
The tip should bend within its intended working range and return toward its original shape.
Be especially careful when creating sharp corners.
Instead of twisting the nib forcefully against the paper, lift the marker and begin another stroke.
If the brush tip begins separating or losing its shape, stop using excessive pressure.
Some markers have replaceable applicators, but this feature isn’t universal.
Follow the manufacturer’s guidance if replacement is possible.
Keeping the cap securely attached after use can also help prevent dried paint from affecting the nib.
With appropriate handling, brush tips can maintain their shape and provide more consistent strokes over time.
How to Avoid Smudging and Blotchy Paint
Smudging occurs when wet paint is disturbed before it has dried sufficiently.
Blotchy marks can result from excessive paint flow, uneven application, or unsuitable surfaces.
These problems are particularly noticeable in brush lettering because changes in paint thickness can affect the appearance of each letter.
Begin by checking that your working surface is clean and dry.
Test your marker on a spare piece of the same material.
If the paint spreads into paper fibres, try a more suitable paper designed to handle the marker’s formulation.
For acrylic paint-based markers, avoid repeatedly brushing over wet areas unless the product specifically supports that technique.
Excessive paint application can create raised blobs or slow the drying process.
Use steady movements and avoid holding the brush tip against one area for too long.
When lettering, plan your working direction so your hand doesn’t pass over freshly painted strokes.
Allow each colour to dry sufficiently before adding overlapping details.
If you’re using several colours, consider completing one section while another dries.
This approach can help you work efficiently without rushing the paint.
How to Make Brush Tip Paint Marker Artwork Last
The durability of brush tip paint marker artwork depends on the paint formulation, working surface, drying conditions, and how the finished object is used.
A decorative card kept indoors has different requirements from a wooden ornament that is handled frequently.
Understanding these differences can help you protect your artwork without applying unnecessary coatings or treatments.
Drying and Curing Your Artwork Properly
Drying and curing are important stages in paint marker artwork.
Drying generally describes the point when the paint no longer feels wet, while curing refers to the development of its intended final properties.
Depending on the formulation, the paint may continue developing adhesion or durability after becoming touch-dry.
The required time varies between products.
Acrylic paint-based brush markers may have different drying and curing instructions from other paint formulations.
Surface characteristics also matter.
Paper, canvas, wood, and other materials can affect how the paint behaves during application and drying.
Follow the manufacturer’s recommendations before handling your finished project.
Avoid touching or rubbing freshly painted areas.
If you’re creating layered artwork, allow the underlying colour to dry sufficiently before applying another stroke.
For decorations that will experience frequent handling, wait until the recommended curing period has passed before use.
Never assume that all brush tip paint markers become waterproof or fully durable within the same amount of time.
Proper drying and curing can help preserve the appearance of expressive strokes and delicate lettering.
When Should You Seal Brush Marker Designs?
Sealing may provide additional protection for certain craft projects, but not every brush marker design requires a protective coating.
Some paint-based markers are formulated to provide suitable durability on compatible surfaces without additional treatment.
Other projects, particularly frequently handled decorations, may benefit from a compatible finish.
For example, a wooden ornament may require different protection from a hand-lettered card that will be stored in an envelope.
Before applying a sealer, confirm that it is compatible with both the marker formulation and the working surface.
Some protective coatings can cause paint to bleed, smear, soften, or change appearance.
This is particularly important for brush lettering because delicate strokes and colour transitions may be affected by even slight paint movement.
Allow the marker artwork to dry or cure as required before applying any coating.
Test the protective finish on a spare piece containing similar strokes and colours.
If the combination works successfully, follow the coating manufacturer’s application and curing instructions.
Avoid applying unnecessarily thick layers.
More coating doesn’t automatically mean better durability, and excessive application may alter the appearance of your artwork.
For paper-based lettering and framed decorative pieces, appropriate storage and display conditions may be more useful than adding a sealer.
Protecting Lettering and Brush Strokes from Wear
Brush lettering and decorative strokes can experience wear when the finished object is repeatedly handled, rubbed, or exposed to unsuitable conditions.
Thin parts of letters and tapered botanical details may be particularly noticeable when damaged.
To reduce unnecessary wear, choose markers intended for the surface being decorated.
Prepare the material correctly and allow the paint to cure fully.
For wooden ornaments or other frequently handled objects, avoid placing important decorative details in areas that experience constant friction.
If a compatible protective finish is recommended, apply it according to the product instructions.
For handmade cards and paper artwork, store the finished pieces somewhere dry and protected from excessive bending.
Avoid stacking heavy objects directly on painted surfaces before the artwork is ready.
Canvas decorations should be handled carefully around their painted areas.
If the artwork will be displayed near direct sunlight, consider whether the marker manufacturer provides information about colour fading or lightfastness.
A marker described as permanent isn’t necessarily resistant to every type of wear.
Matching the paint formulation to the intended use remains the most reliable approach.
How to Clean and Store Brush Tip Paint Markers
Proper maintenance helps protect flexible nibs and maintain consistent paint flow.
Brush tip markers can become difficult to use when dried paint builds up around the applicator or the nib becomes damaged during storage.
However, cleaning and storage requirements vary between manufacturers.
The safest approach is to follow the instructions supplied with your particular markers.
Cleaning Flexible Brush Nibs
Flexible brush nibs can collect dried paint, paper fibres, and other loose particles during use.
These materials may affect the shape of the applicator or interrupt paint flow.
To reduce buildup, work on clean surfaces and avoid dragging the tip through dust or rough fibres.
If you notice debris around the nib, inspect it carefully.
Some manufacturers provide specific cleaning methods for their applicators.
Follow those instructions rather than attempting to clean every brush marker using water or solvents.
Do not scrape the nib with sharp objects or pull apart its fibres.
Aggressive cleaning can permanently damage the flexible tip and affect its ability to create tapered strokes.
If your marker has a removable or replaceable nib, use only the manufacturer-approved procedure.
After finishing your artwork, close the cap securely to limit air exposure.
Preventing Paint Buildup and Drying
Paint buildup can interfere with the smooth movement of a brush tip.
If too much paint collects around the applicator, strokes may appear thicker or less controlled.
During use, avoid repeatedly priming the marker unless the manufacturer instructs you to do so.
Excessive activation can sometimes release more paint than necessary.
When switching between colours, replace the cap on each marker promptly.
Leaving the applicator exposed to air may allow paint to dry around the tip.
Store markers away from excessive heat and direct sunlight.
If a marker hasn’t been used for an extended period, follow the recommended preparation instructions before attempting to reactivate it.
Avoid adding water, alcohol, or other liquids directly to the barrel unless the product is specifically designed for refilling or dilution.
Introducing an unsuitable liquid may damage the paint formulation or internal mechanism.
Maintaining appropriate paint flow is especially important for brush tips because uneven delivery can interfere with smooth transitions between narrow and broad strokes.
Storing Brush Markers Correctly
The correct storage position depends on the marker’s reservoir and applicator design.
Some manufacturers recommend storing their markers horizontally, while others provide different directions.
Always follow the product’s specific storage instructions.
Keep the caps securely attached and avoid placing heavy objects on top of the markers.
A dedicated pen case or storage box can help protect the barrels and prevent accidental damage.
If you own several brush markers, organizing them by colour or formulation may make your craft sessions more convenient.
Before putting the markers away, check for leaking paint, loose caps, or visibly damaged nibs.
Store them in a location that is dry and protected from extreme temperatures.
These simple habits can help keep your brush tip paint markers ready for future projects.
Common Mistakes to Avoid with Brush Tip Paint Markers
Learning to use brush tip paint markers involves developing control over pressure, movement, and paint application.
Several common mistakes can make this process more difficult.
One of the biggest mistakes is applying excessive pressure during downstrokes.
Although flexible brush tips are designed to bend, forcing them too firmly against the surface can cause fraying or permanent deformation.
Use only enough pressure to create the desired line width.
Another mistake is working on unsuitable rough surfaces.
Coarse paper, unfinished wood, and heavily textured canvas can catch delicate nibs and make smooth lettering difficult.
When practising, begin with a smooth material compatible with your markers.
Choosing the wrong nib flexibility can also affect your results.
A very soft brush tip may feel difficult to control when creating small letters, while a firm tip may produce less variation than expected.
Select the applicator according to your preferred artwork and experience level.
Trying to blend incompatible paint formulations is another common problem.
Not every paint-based brush marker supports wet blending, and applying water or another liquid without manufacturer approval may damage the artwork or marker.
If you want to layer colours, check the recommended drying requirements first.
Finally, avoid rushing your designs.
Moving too quickly or repeatedly painting over wet strokes can create uneven lines, smudging, and unwanted colour mixing.
Practising a few simple strokes before starting a finished project can improve your control and reduce mistakes.
Frequently Asked Questions
What Are Brush Tip Paint Markers Used For?
Brush tip paint markers are commonly used for decorative lettering, flowing illustrations, botanical artwork, handmade cards, and expressive craft designs.
Their brush-shaped applicators can create curved strokes and, when sufficiently flexible, variable line widths.
They are particularly useful for projects involving tapered leaves, flower petals, decorative borders, and brush-style writing.
The exact applications depend on the marker’s paint formulation and surface compatibility.
What Is the Difference Between Brush Tip and Fine Tip Paint Markers?
Brush tip paint markers use brush-shaped applicators that may flex under pressure, allowing different line widths during a single stroke.
Fine tip paint markers generally use narrow applicators designed for controlled, relatively consistent lines.
Brush tips are useful for expressive lettering and curved shapes, while fine tips are often better suited to small outlines, miniature patterns, and precise details.
The best choice depends on your artwork and preferred technique.
Are Brush Tip Paint Markers Good for Beginners?
Yes, brush tip paint markers can be suitable for beginners, particularly when used on smooth, compatible surfaces.
However, flexible nibs require practice because changes in pressure affect line width.
Starting with basic upstrokes, downstrokes, and simple curves can help develop control.
A brush tip with manageable flexibility and consistent paint flow may be easier for beginners than an extremely soft or oversized applicator.
Can You Use Brush Tip Paint Markers on Canvas?
Some brush tip paint markers can be used on canvas when their formulation is compatible with the prepared surface.
Smooth, primed canvas boards are often easier for controlled brush strokes than heavily textured canvas.
Coarse fabric texture may interrupt paint flow or contribute to nib wear.
Check the manufacturer’s surface recommendations before beginning and test the marker on a spare area.
Can Brush Tip Paint Markers Be Used on Wood?
Yes, certain brush tip paint markers are suitable for wooden craft projects.
The surface should be properly prepared and compatible with the paint formulation.
Smooth wood is generally easier for brush lettering than rough, unfinished material.
For decorative ornaments, test the marker before applying the final design and follow the recommended drying or curing instructions.
If the object will be handled frequently, consider whether a compatible protective finish is appropriate.
Are Brush Tip Paint Markers Waterproof?
Some paint-based brush markers offer water resistance after drying or curing, but this isn’t guaranteed for every product.
Waterproof performance depends on the formulation, working surface, and environmental conditions.
A marker suitable for indoor paper artwork may not withstand outdoor exposure or frequent washing.
Choose products with durability claims that match how your finished artwork will be used.
How Do You Keep Brush Tips from Fraying?
To reduce fraying, avoid pressing the brush tip harder than necessary and use smooth, compatible surfaces.
Don’t twist the applicator forcefully or drag it across abrasive materials.
Keep the nib free from loose debris using manufacturer-approved care methods.
Replace the cap securely after use and store the marker according to its instructions.
If the tip becomes permanently damaged, check whether the product supports nib replacement.
Final Thoughts
Brush tip paint markers are versatile tools for creating decorative lettering, flowing lines, botanical illustrations, and expressive artwork without traditional paintbrushes.
Their greatest advantage is the ability to produce different stroke shapes using a brush-shaped applicator.
With a sufficiently flexible nib, you can move between narrow upstrokes and broader downstrokes, creating natural-looking curves and tapered designs.
However, successful results depend on choosing the right marker for your project.
Nib size, flexibility, paint formulation, surface compatibility, and paint flow all influence how the marker behaves.
For beginners, smooth paper and simple practice strokes are a practical starting point.
Learning to control light and heavier pressure can make it easier to create brush lettering, floral patterns, and decorative borders.
Once you’re comfortable with the basic movements, experiment with handmade cards, floral bookmarks, mini canvas artwork, wooden ornaments, and gift wrap decorations.
Always follow the manufacturer’s preparation, drying, and care instructions, particularly when working with different paint formulations or unfamiliar surfaces.
With suitable materials and regular practice, brush tip paint markers can help you develop a more expressive painting style and add attractive handmade details to everyday craft projects.