
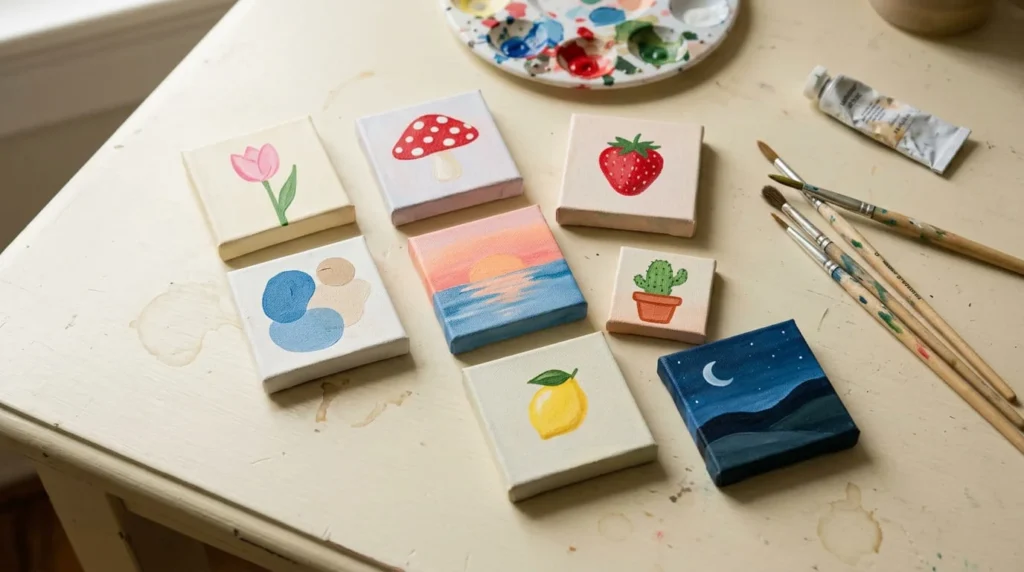
Acrylic painting ideas for small canvas are perfect for beginners who want to create beautiful artwork without needing a large workspace or expensive painting supplies. A small canvas gives you enough room to experiment with colors, simple shapes, and creative designs while keeping the painting process manageable.
You can paint a tiny pink tulip, a cute mushroom, a peaceful sunset, or a colorful abstract design using only a few basic acrylic paints and brushes.
Small canvas paintings also make lovely handmade gifts, desk decorations, and miniature wall art.
The best approach is to choose a simple subject and avoid adding too many details.
In this guide, you will discover 18 easy acrylic painting ideas for small canvas, along with suggested colors, simple step-by-step instructions, and practical beginner tips. You will also learn how to choose suitable supplies and plan attractive compositions that work well on smaller painting surfaces.
Why Are Small Canvases Good for Beginner Acrylic Painting?
Small canvases are a great starting point for beginners because they encourage you to focus on simple designs rather than complicated artwork.
You can practice basic painting techniques, experiment with different color combinations, and complete manageable projects without needing a large painting area.
They are also convenient for anyone who enjoys creating small handmade decorations.
Small Canvases Are Easier to Manage
A small canvas provides a limited painting area, which can make choosing and arranging your subject easier.
Instead of painting a large landscape with many objects, you can focus on one flower, a small fruit, or a simple silhouette.
This helps you practice important skills such as brush control, color placement, and painting basic shapes.
Small canvases are also easy to move around your workspace.
However, painting tiny details can sometimes be challenging, so choose designs with clear shapes and limited decoration.
You Can Practice Without Using Much Paint
Mini canvas projects usually require smaller amounts of acrylic paint than larger paintings.
You can often complete a simple design using just a few colors.
For example, a strawberry painting may only need red, green, yellow, and a light background color.
Place small amounts of paint on your palette and add more when needed.
This helps reduce wasted paint, especially because acrylic colors can dry on the palette while you work.
You can also use leftover paint from other craft projects when it is still suitable for painting.
Mini Paintings Make Lovely Handmade Decorations
Small acrylic paintings can be displayed in many creative ways.
You can place a finished mini canvas on a small tabletop easel, arrange several paintings together on a shelf, or create a collection of miniature wall art.
A small flower painting can brighten a desk, while a simple landscape may look attractive on a bookshelf.
Mini paintings can also make thoughtful handmade gifts.
You can personalize them with favorite colors, flowers, or small designs that match someone’s interests.
What Supplies Do You Need for Small Canvas Painting?
You do not need a large collection of professional art supplies to start painting on small canvases.
A few basic acrylic colors, suitable brushes, and a ready-to-paint canvas are enough for most beginner projects.
The most important thing is to choose tools that help you work comfortably in a smaller area.
Choosing the Right Mini Canvas
Mini canvases are available in different shapes and sizes.
Two common options are small stretched canvases and canvas panels.
A stretched mini canvas has fabric attached to a wooden frame, while a canvas panel has canvas attached to a firm backing.
Both can work well with acrylic paint when properly prepared.
For beginners, choose a pre-primed canvas that is suitable for acrylic painting.
This allows you to begin painting without needing to prepare raw canvas yourself.
A small canvas with enough room for one main subject is usually easier to manage than an extremely tiny surface.
Best Acrylic Paints for Small Canvas Projects
You can use suitable acrylic craft paints or student-grade acrylic paints for many small canvas projects.
Acrylic paint is useful because it can create colorful shapes, simple backgrounds, and decorative details.
You do not need a separate paint color for every project.
A practical beginner collection may include:
- Red or magenta
- Yellow
- Blue
- White
- Black
- Green
- Brown
You can mix these colors to create additional shades.
For example, blue and yellow can produce green, while red and white can create pink.
Start with a limited color palette for each painting.
This makes the design easier to manage and helps avoid unnecessary color mixing.
Essential Brushes for Mini Acrylic Paintings

The right brushes can make small canvas painting more comfortable.
A small round brush is useful for general shapes, curved lines, and flower petals.
A fine detail brush helps with tiny dots, thin stems, outlines, and small highlights.
A modest flat brush is useful for painting backgrounds and filling larger sections.
You do not need to use the smallest brush for every part of the painting.
A slightly larger brush may create smoother background coverage, while a detail brush provides better control for the finishing touches.
Choose brushes that feel comfortable in your hand and suit the size of your design.
Other Helpful Painting Supplies
Along with your paints, brushes, and mini canvas, gather a few basic accessories.
You will need a palette or suitable plate for mixing colors, a container of clean water for rinsing brushes, and a soft cloth or paper towel.
A pencil is helpful for sketching simple shapes before painting.
Protect your worktable with paper or a reusable craft mat.
You may also want a small tabletop easel, although painting with the canvas placed flat on a stable surface is perfectly suitable for beginners.
Keep your materials nearby so you can concentrate on creating your artwork.
How to Plan a Painting on a Small Canvas
Planning is especially important when painting on a small surface.
A design that looks simple on a large canvas may become difficult when reduced to a miniature version.
The goal is to create a clear composition with enough room for the main subject.
You can achieve this by following a few simple principles.
Choose One Main Subject
Start by deciding what you want people to notice first.
For example, you might choose one pink tulip, a red mushroom, or a bright yellow lemon.
Making one object the main focus helps your painting look organized.
Avoid adding several unrelated objects to a small canvas.
A single recognizable subject can create an attractive painting without requiring complicated details.
Keep the Background Simple
A simple background helps your main subject stand out.
For example, you can paint a cream background behind a strawberry or a pale blue background behind a flower.
You can also leave the prepared white canvas visible if that suits your design.
Try using one main background color rather than several competing shades.
This keeps the painting easy to understand and gives you more freedom to focus on the central subject.
Sketch Large Shapes Before Tiny Details
Before painting, lightly sketch the main shapes with a pencil.
If you are painting a mushroom, draw the cap and stem first.
For a small landscape, mark the horizon and larger hill shapes.
Avoid drawing every tiny detail during the planning stage.
Once the main shapes are positioned correctly, you can add smaller features with paint.
Keep pencil marks light so they are easier to cover.
Leave Some Empty Space Around Your Design
Empty space is especially useful in small canvas compositions.
If your subject touches every edge, the painting may feel crowded.
Leave some background visible around flowers, fruits, or other central objects.
For example, a single tulip can look beautiful when surrounded by a soft cream background.
You do not need to fill every corner with decoration.
A balanced composition often looks more attractive than one containing too many small details.
18 Acrylic Painting Ideas for Small Canvas
Small canvases offer plenty of opportunities to experiment with colorful artwork.
You can create simple flowers, cute objects, miniature landscapes, and decorative designs using basic acrylic painting techniques.
The following ideas are suitable for beginners and focus on subjects that work well within a limited painting area.
Each project includes suggested colors, easy instructions, and a practical tip to help you create your miniature artwork.
1. Tiny Pink Tulip Painting
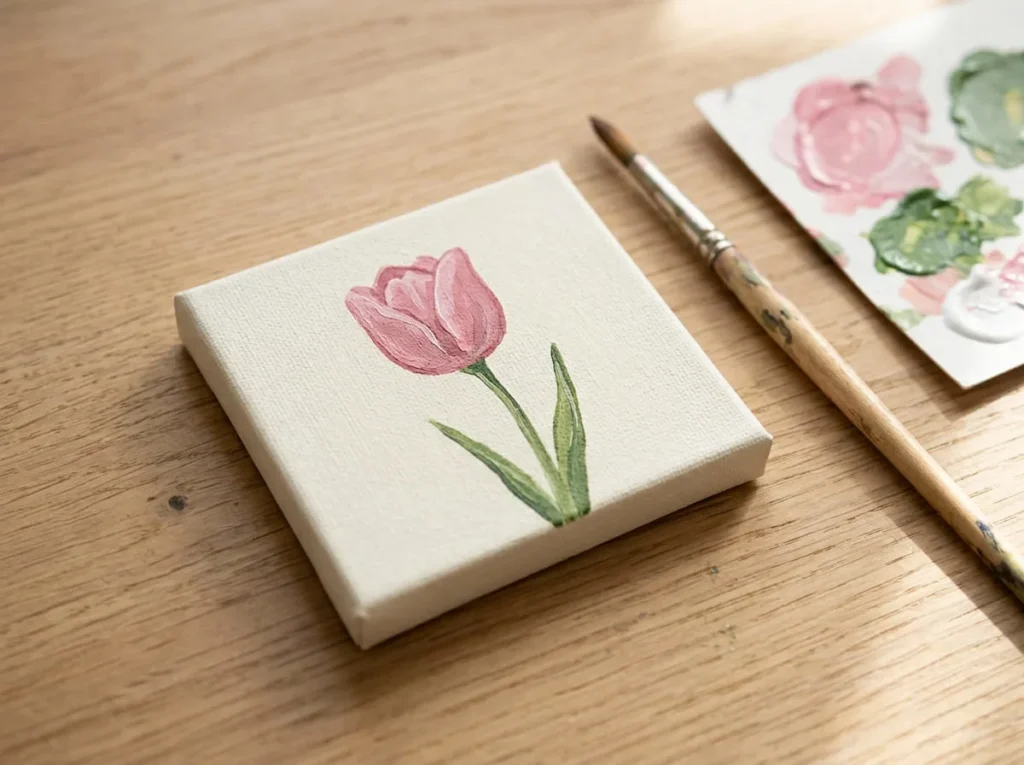
Difficulty: Very easy | Suggested colors: Warm white, pink, green, and yellow
A tiny pink tulip is one of the easiest acrylic painting ideas for a small canvas.
The design uses one flower, a slender stem, and a few simple leaves.
You do not need to paint a realistic flower or create complicated shading.
A single tulip against a light background can make a lovely miniature decoration.
How to Paint a Simple Tulip on a Mini Canvas
1. Start with a pre-primed mini canvas and paint the background warm white if desired.
2. Allow the background to dry before sketching your design.
3. Use a pencil to draw a gently curved stem near the center of the canvas.
4. Sketch a simple cup-shaped tulip flower at the top of the stem.
5. Use pink acrylic paint and a small round brush to fill the flower shape.
6. Add two small curved pink sections near the upper edges to suggest overlapping petals.
7. Paint the stem using green acrylic paint and a fine brush.
8. Add one or two long, narrow leaves near the lower part of the stem.
9. If you want a little more color variation, add a small amount of lighter pink after the first flower layer dries.
Keep the flower large enough to remain clearly visible on the small canvas.
Beginner tip: Paint one large tulip instead of several tiny flowers. A single flower creates a simple composition and gives you more room to control your brush.
2. Cute Mini Mushroom Painting
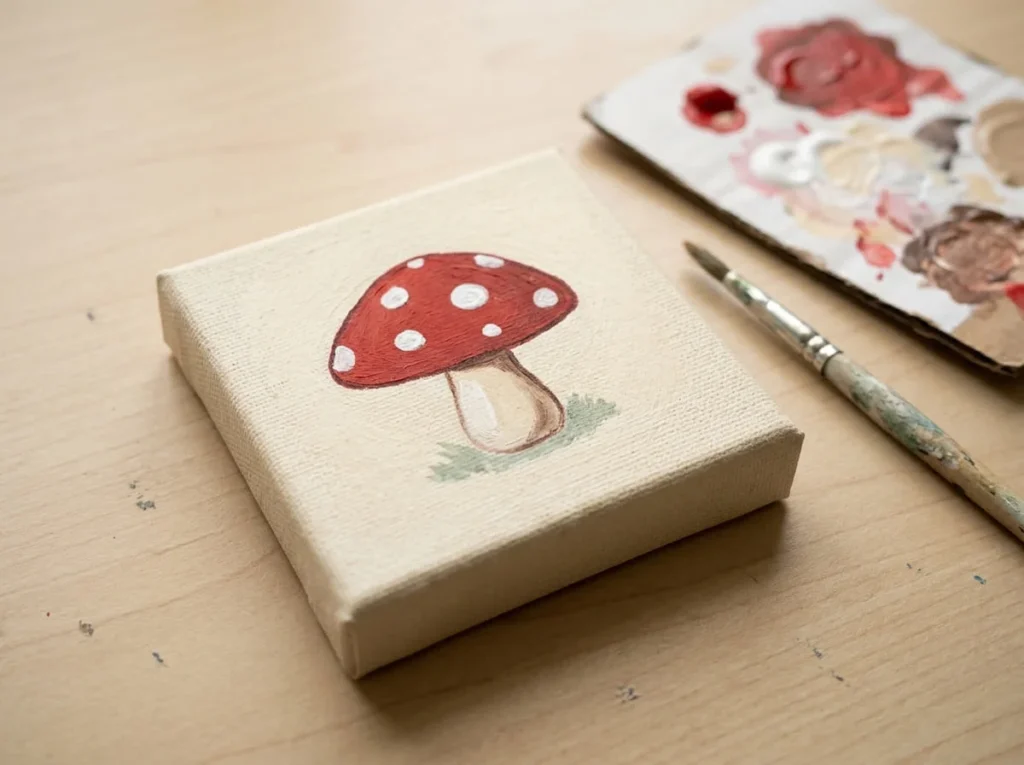
Difficulty: Very easy | Suggested colors: Cream, red, white, and soft brown
A small red mushroom with white spots makes a cheerful miniature acrylic painting.
The design is easy to recognize and uses only a few basic shapes.
You can create the mushroom using a rounded red cap and a short cream-colored stem.
This project is a good choice for practicing curved outlines, filling shapes, and adding small dots.
How to Paint a Mushroom with Acrylic Paint
1. Paint your mini canvas with a light cream background and allow it to dry.
2. Lightly sketch a short mushroom stem near the lower center of the canvas.
3. Draw a wide rounded mushroom cap above the stem.
4. Use soft brown or warm white acrylic paint to fill the stem.
5. Paint the cap with bright red acrylic paint using a small round brush.
6. Allow the red paint to dry before adding white spots.
7. Use a detail brush to paint a few small white dots across the mushroom cap.
8. Add a short curved line beneath the cap if you want to suggest its underside.
9. Check the outline and carefully correct any uneven sections after the paint dries.
You can leave the background plain or add a small patch of green ground beneath the mushroom.
Avoid adding too many details to the design.
Beginner tip: Build the mushroom using a rounded cap and a simple stem. You do not need realistic textures or complicated shading to make it look attractive.
3. Small Canvas Sunset Over Water
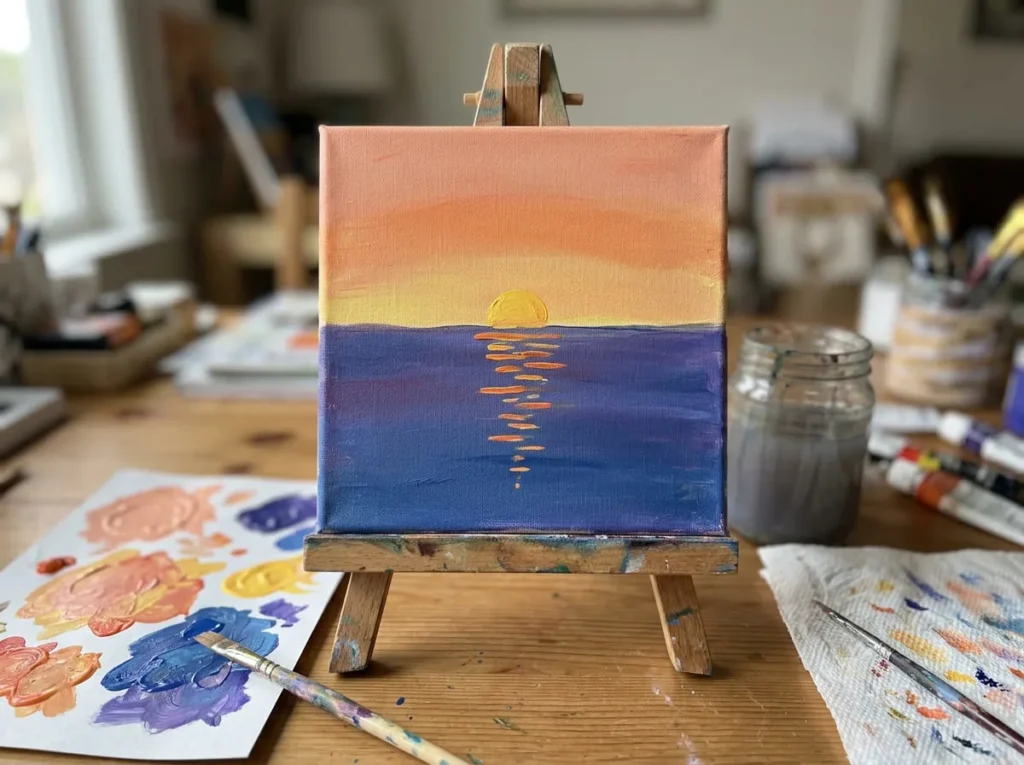
Difficulty: Easy | Suggested colors: Peach, orange, yellow, blue, and dark purple
A miniature sunset over water can create a peaceful landscape using only a few colors and simple brush strokes.
Unlike a larger sunset painting, this design focuses on a small glowing sky and a few reflections on the water.
You do not need to paint realistic waves, detailed clouds, or complicated scenery.
The main goal is to create a warm sky above a darker water surface.
How to Paint a Mini Sunset Reflection
1. Begin with a clean, pre-primed small canvas.
2. Lightly mark a horizontal line slightly below the center to separate the sky and water.
3. Paint the sky using yellow near the horizon, orange above it, and soft peach toward the top.
4. Gently blend the neighboring colors while the paint remains workable.
5. Paint a small yellow sun near the horizon if you want a clear focal point.
6. Allow the sky to dry before painting the water.
7. Use blue mixed with a little dark purple to create a simple water surface below the horizon.
8. Add short horizontal yellow and orange strokes directly beneath the sun to suggest its reflection.
9. Use a fine brush to add a few lighter blue lines across the water.
Keep the reflection narrow and centered beneath the sun.
You can leave the rest of the painting simple to avoid overcrowding the small surface.
Beginner tip: Use short horizontal strokes to suggest reflected light. You do not need to create detailed waves for the scene to look recognizable.
4. Minimalist Blue and Beige Abstract Painting
Difficulty: Very easy | Suggested colors: Beige, muted blue, white, and terracotta
Abstract painting is a good choice for beginners because you do not need to draw realistic objects.
On a small canvas, a few carefully placed shapes can create attractive modern artwork.
You can combine soft blue, beige, and terracotta colors to make a simple decorative painting.
This project is useful for practicing smooth paint application and arranging shapes in a limited space.
How to Paint Abstract Shapes on a Small Canvas
1. Paint the mini canvas with a light beige background using a suitable flat brush.
2. Allow the background to dry before adding other colors.
3. Lightly sketch two or three large shapes using a pencil.
4. Paint a muted blue curved shape along one side of the canvas.
5. Add a small terracotta circle or rounded shape near the center.
6. Leave some beige background visible between the shapes.
7. Use white acrylic paint to create one simple accent if needed.
8. Allow the painted sections to dry before correcting the edges.
9. Check the overall composition and avoid adding unnecessary details.
The final painting should feel balanced rather than crowded.
You can experiment with different color combinations while keeping the shapes simple.
Beginner tip: Use only two or three large shapes. Small canvases often look better with a limited design than with many overlapping patterns.
5. Mini Moon Over Rolling Hills

Difficulty: Easy | Suggested colors: Dark blue, lavender, pale gray, and white
A moon over rolling hills is a simple landscape idea that works beautifully on a small canvas.
The painting uses a dark sky, one bright moon, and two overlapping hill shapes.
You can create a peaceful nighttime scene without adding trees, stars, or complicated details.
This project also helps you practice layering and creating contrast between light and dark colors.
H4: How to Paint a Mini Moonlit Landscape
1. Start by covering your mini canvas with dark blue acrylic paint.
2. Add a little lavender to part of the sky if you want subtle color variation.
3. Allow the background to dry before adding the moon.
4. Lightly sketch a small circle near the upper part of the canvas.
5. Use white or pale gray acrylic paint to fill the moon shape.
6. Paint a gently curved distant hill across the lower section using a muted lavender-gray color.
7. Allow that layer to dry before adding a darker hill in the foreground.
8. Use dark blue or a deeper purple to paint the second hill.
9. Add one small highlight to the moon if desired, but keep the rest of the scene simple.
The contrast between the moon and dark sky will help the design stand out.
Avoid adding too many tiny details because they may become difficult to control on a small canvas.
Beginner tip: Use two broad hill silhouettes instead of detailed scenery. Simple overlapping shapes create depth without requiring advanced painting techniques.
6. Simple Strawberry Acrylic Painting

Difficulty: Very easy | Suggested colors: Cream, red, green, and yellow
A bright red strawberry is a cute subject for a miniature acrylic painting.
Its recognizable shape and cheerful colors make it suitable for beginners who enjoy painting small decorative objects.
You can create the strawberry using one large red shape, a few green leaves, and tiny yellow seed marks.
The design is simple enough to complete without complicated drawing skills.
How to Paint a Cute Strawberry on Canvas
1. Paint the mini canvas with a soft cream background and allow it to dry.
2. Use a pencil to sketch a large rounded strawberry shape near the center.
3. Make the upper part slightly wider and the lower part gently pointed.
4. Fill the strawberry shape using red acrylic paint and a small round brush.
5. Allow the red paint to dry before adding details.
6. Use green acrylic paint to create several small pointed leaves across the top of the strawberry.
7. Add a short green stem above the leaves.
8. Dip a fine detail brush into yellow paint and carefully add a few tiny seed-shaped marks across the red surface.
9. If you want a little depth, add a small amount of lighter red or pink along one side after the main paint has dried.
Keep the strawberry large enough for the seed marks to remain visible.
You can leave the background plain so the bright red fruit becomes the main focus.
Beginner tip: Paint the strawberry as one large central shape before adding the leaves and seeds. This makes the miniature design easier to control and recognize.
7. Tiny Cactus in a Flowerpot

Difficulty: Very easy | Suggested colors: Cream, green, terracotta, and dark green
A tiny cactus in a flowerpot is a cute and simple acrylic painting idea for a small canvas.
The design uses basic shapes, making it suitable for beginners who want to practice painting everyday objects.
You can create a cactus using one rounded green shape, a small terracotta flowerpot, and a few short lines to represent the spines.
This miniature painting can look lovely on a desk, bookshelf, or small tabletop easel.
How to Paint a Mini Cactus
1. Start with a pre-primed mini canvas and paint the background with a soft cream color.
2. Allow the background to dry before sketching your design.
3. Lightly draw a small flowerpot near the lower center of the canvas.
4. Make the flowerpot slightly wider at the top and narrower at the bottom.
5. Use terracotta acrylic paint and a small round brush to fill the flowerpot shape.
6. Once the flowerpot has dried, paint a simple upright oval cactus above it using medium green acrylic paint.
7. Add a slightly darker green line along one side of the cactus to create a little color variation.
8. Use a fine detail brush to paint a few short dark green spine marks across the cactus.
9. If you want, add a small light green highlight after the main green paint has dried.
Keep the cactus shape large enough to remain easy to recognize.
You can also add a thin horizontal line beneath the flowerpot to suggest a tabletop, but this is optional.
Beginner tip: Start with one simple cactus instead of several branches. A rounded shape with a few small details is easier to paint on a limited surface.
8. Simple Cherry Pair Painting
Difficulty: Very easy | Suggested colors: White, red, dark green, and light pink
Two bright red cherries can create a cheerful miniature acrylic painting.
The design is especially suitable for a small canvas because it uses two simple round shapes and a few thin lines.
You do not need advanced shading or realistic fruit textures.
A clean white background helps the red cherries stand out and keeps the composition simple.
This project is useful for practicing circles, curved stems, and small highlights.
How to Paint Cherries on a Small Canvas
1. Begin with a clean, pre-primed mini canvas.
2. Keep the white background or apply another light background color if you prefer.
3. Lightly sketch two circles near the lower middle of the canvas.
4. Position the circles close together, with one slightly higher than the other.
5. Use red acrylic paint and a small round brush to fill both cherry shapes.
6. Allow the red paint to dry before adding the smaller details.
7. Use a fine brush and dark green paint to draw two thin stems rising from the cherries.
8. Connect the stems near the upper part of the painting.
9. Add one small green leaf near the point where the stems meet.
10. Use a little light pink paint to create a small curved highlight on each cherry.
Keep the highlights simple so the fruit retains its handmade appearance.
You can leave plenty of white space around the cherries to make the red color more noticeable.
Beginner tip: Paint the two cherries first, then add the stems and leaf. Starting with simple circles makes the miniature design easier to plan.
9. Mini Cottage Silhouette Painting
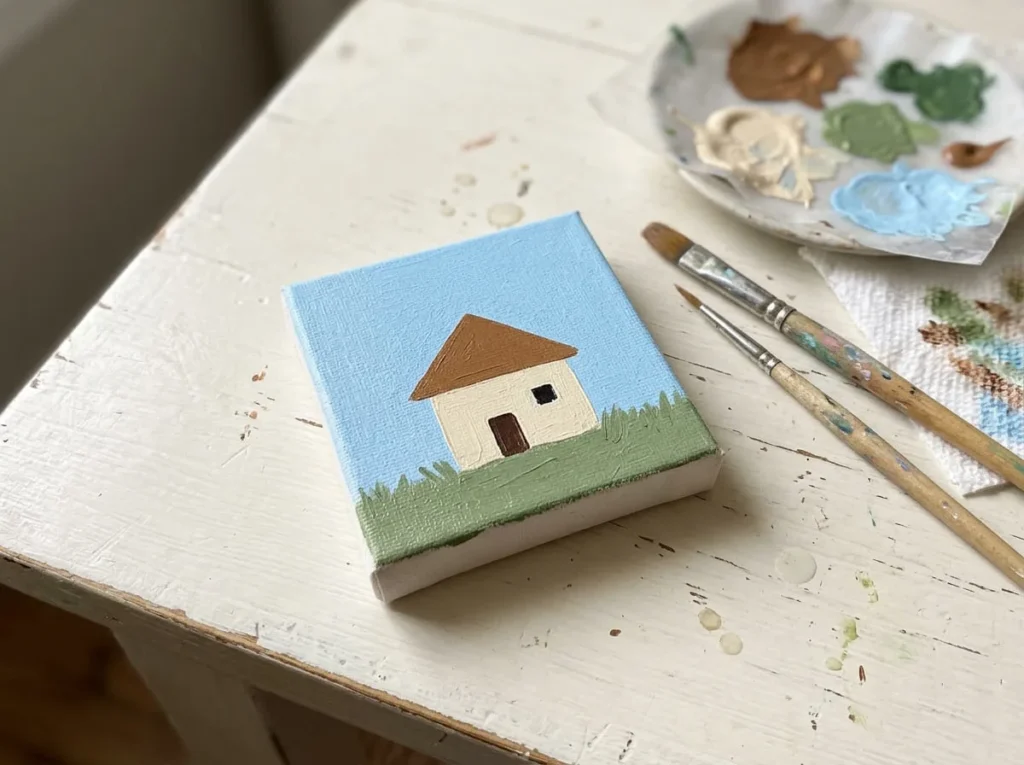
Difficulty: Easy | Suggested colors: Light blue, cream, brown, and dark green
A tiny cottage can make a charming miniature landscape painting.
You can create a recognizable house using a rectangular body, a triangular roof, and one small doorway.
There is no need to paint detailed bricks, roof tiles, or complicated windows.
The goal is to create a simple cottage surrounded by a little greenery.
This project helps you practice straight lines, basic shapes, and simple color placement.
How to Paint an Easy Mini Cottage
1. Paint the background of your mini canvas with a soft light blue color.
2. Allow the background to dry before sketching the cottage.
3. Lightly draw a small rectangle near the center of the canvas to represent the house.
4. Add a triangular roof above the rectangle.
5. Use cream acrylic paint to fill the main house shape.
6. Paint the roof with a warm brown color.
7. Allow the main shapes to dry before adding the doorway.
8. Use a small detail brush to paint a simple dark brown door near the lower center of the cottage.
9. Add a short strip of dark green grass along the bottom of the canvas.
10. If you want a little more detail, paint one small window using a few controlled brush strokes.
You can leave the rest of the landscape simple.
Avoid adding fences, pathways, trees, and other objects during your first attempt.
Beginner tip: Focus on the cottage’s main shapes before painting small details. A rectangle, triangle, and doorway are enough to create a recognizable miniature house.
10. Small Daisy in a Colorful Vase
Difficulty: Easy | Suggested colors: Pale pink, white, yellow, green, and blue
A daisy in a colorful vase is a lovely subject for small canvas artwork.
Unlike a flower painting that fills the entire canvas, this design features one simple flower standing inside a small vase.
The combination of a bright vase and delicate flower creates an attractive miniature decoration.
This project also helps you practice arranging two main shapes without overcrowding your painting.
How to Paint a Flower Vase on Mini Canvas
1. Start by painting the canvas with a soft pale pink background.
2. Allow the background to dry completely.
3. Lightly sketch a small rounded vase near the bottom center of the canvas.
4. Draw a thin flower stem rising from the opening of the vase.
5. Use medium blue acrylic paint and a small round brush to fill the vase shape.
6. Paint the flower stem using green acrylic paint and a fine brush.
7. Near the top of the stem, lightly mark a small circle for the flower center.
8. Use white acrylic paint to create simple rounded petals around the circle.
9. Once the petals are ready for another layer, paint the center bright yellow.
10. Add one small green leaf along the stem if there is enough space.
Keep the vase and flower large enough to remain clearly visible.
You do not need to add complicated patterns to the vase.
Beginner tip: Choose one flower and one vase for your first miniature floral painting. This gives both objects enough space and keeps the design balanced.
11. Cute Mini Coffee Cup Painting
Difficulty: Very easy | Suggested colors: Cream, brown, white, and muted pink
A tiny coffee cup is a cozy and beginner-friendly subject for acrylic painting.
You can create the design using a rounded cup, a simple handle, and a few curved lines above it.
The painting does not require realistic reflections, complicated shadows, or detailed patterns.
A muted pink coffee cup against a cream background can create a soft decorative appearance.
This is also a useful project for practicing curved shapes and controlled brush strokes.
How to Paint a Simple Coffee Cup
1. Begin with a pre-primed mini canvas and paint the background cream.
2. Allow the background to dry before sketching the coffee cup.
3. Lightly draw a rounded cup shape near the center of the canvas.
4. Make the top slightly wider than the bottom.
5. Add a simple curved handle on one side of the cup.
6. Use muted pink acrylic paint to fill the cup body.
7. Carefully outline or fill the handle with the same color.
8. Once the cup is dry, use dark brown paint to create a narrow oval near the upper opening to suggest coffee inside.
9. Add one or two small white highlights along the cup if you want subtle decoration.
10. Use a fine detail brush to paint two short curved steam lines rising above the cup.
You can also add a small horizontal line beneath the cup to suggest a tabletop.
Keep the design simple and leave plenty of background space around it.
Beginner tip: Start with a basic rounded cup and one curved handle. You do not need realistic ceramic shading to make the painting recognizable.
12. Mini Hot Air Balloon Painting
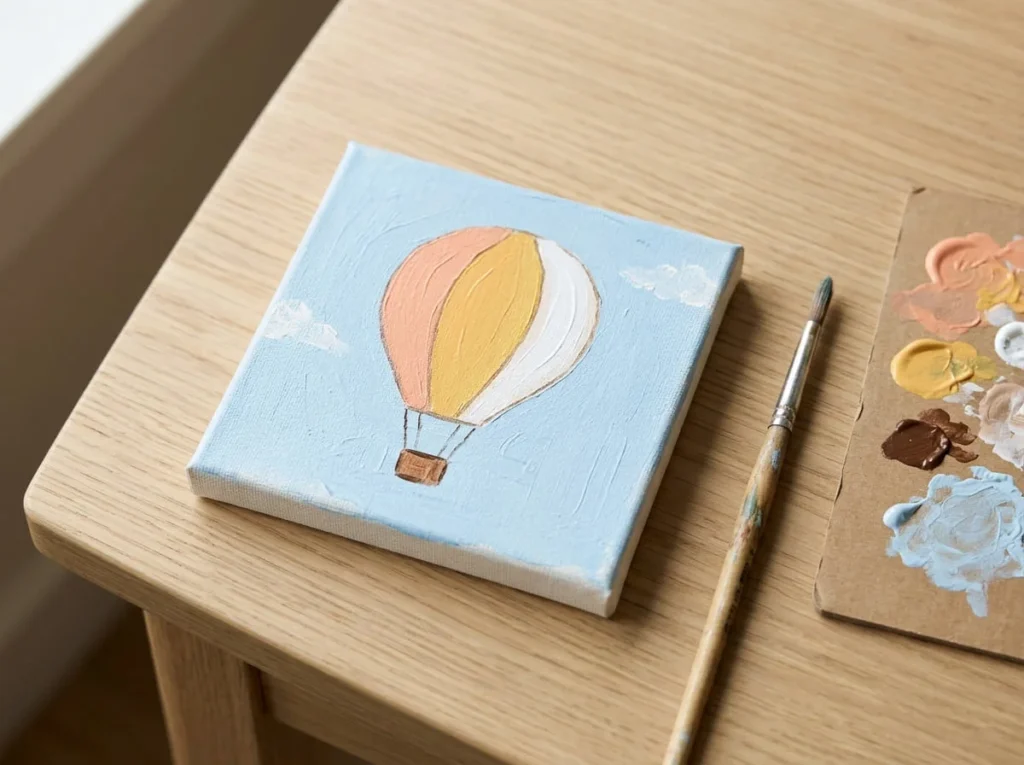
Difficulty: Easy | Suggested colors: Sky blue, peach, yellow, white, and brown
A hot air balloon is a colorful miniature painting idea that works well on a small canvas.
The balloon becomes the main subject, while the open sky provides a simple background.
You can create the design using one large rounded balloon shape, a tiny basket, and two connecting ropes.
This project is useful for practicing curved outlines and painting separate sections of color.
How to Paint a Hot Air Balloon on a Small Canvas
1. Paint your mini canvas with a soft sky-blue background.
2. Allow the background to dry before sketching the balloon.
3. Lightly draw a large rounded balloon shape near the upper center of the canvas.
4. Make the bottom of the balloon slightly narrower than the top.
5. Draw a small rectangular basket beneath the balloon.
6. Add two thin connecting lines between the balloon and the basket.
7. Use peach acrylic paint to fill one section of the balloon.
8. Add yellow and white sections to create a colorful but simple pattern.
9. Allow neighboring sections to dry when needed so the colors do not mix unintentionally.
10. Paint the basket with warm brown acrylic paint.
11. Use a fine detail brush to paint the connecting ropes.
12. If you want, add one or two small white cloud shapes in the background.
Keep the balloon large enough to show the colored sections clearly.
Avoid adding complicated ropes, basket textures, or distant landscapes.
Beginner tip: Make the balloon the main focus of your painting. A large simple balloon with a small basket is easier to paint than a scene containing several balloons.
13. Small Heart and Wildflower Painting
Difficulty: Easy | Suggested colors: Cream, dusty pink, green, and lavender
A small heart decorated with wildflowers is a sweet acrylic painting idea for a mini canvas.
The design combines one recognizable shape with a few delicate floral details.
You can use it to create handmade gifts, desk decorations, or simple miniature wall art.
This project is also a good way to practice adding small details without covering the entire canvas.
The key is to keep the flowers limited and let the heart remain the main subject.
How to Paint a Floral Heart on Mini Canvas
1. Start with a pre-primed mini canvas and apply a soft cream background if desired.
2. Allow the background to dry before sketching your design.
3. Lightly draw one large heart near the center of the canvas.
4. Use dusty pink acrylic paint and a small round brush to fill the heart.
5. Allow the pink paint to dry before adding flower details.
6. Choose one side of the heart for a small decorative flower arrangement.
7. Use a fine detail brush and green acrylic paint to create two or three short stems along that side.
8. Add tiny lavender flower dots near the ends of the stems.
9. Paint a few small green leaves around the flowers.
10. If needed, use a small amount of cream paint to correct any uneven areas around the heart.
You can keep the wildflowers gathered near the lower right side of the heart or arrange them along a small section of its outline.
Avoid covering the entire heart with tiny flowers.
Beginner tip: Decorate only one side of the heart with a few wildflowers. This creates a balanced miniature composition and leaves enough space for the main shape to remain clearly visible.
14. Easy Tiny Ocean Wave Painting
Difficulty: Easy | Suggested colors: Blue, turquoise, white, and cream
A tiny ocean wave is a beautiful acrylic painting idea for a small canvas because you can create it using just one curved shape and a few simple brush strokes.
Unlike a full beach landscape, this design focuses on a single wave against a clean background.
You do not need to paint realistic water reflections, complicated foam patterns, or detailed ocean scenery.
This project is a good way to practice painting curves, adding color variation, and using white highlights.
How to Paint a Simple Ocean Wave
1. Start with a pre-primed mini canvas and paint the background with a soft cream color.
2. Allow the background to dry before sketching your wave.
3. Use a pencil to draw one broad curved wave shape across the middle of the canvas.
4. Make one end of the wave slightly higher, creating a gentle curling appearance.
5. Use medium blue acrylic paint and a small round brush to fill the main wave shape.
6. Add a little turquoise paint along the upper section while the blue remains workable, gently blending the two colors.
7. Allow the main wave to dry before adding white details.
8. Use a fine detail brush and white acrylic paint to create two or three short curved lines near the top of the wave.
9. Add a few small white dots along the curling edge to suggest sea foam.
10. Check the overall shape and carefully correct any uneven areas after the paint dries.
Keep most of the background clear so the blue wave remains the main focus.
Beginner tip: Concentrate on painting one recognizable curved wave. A few white highlights are enough to suggest movement without adding complicated water details.
15. Mini Lemon Painting
Difficulty: Very easy | Suggested colors: Warm white, yellow, green, and pale orange
A bright yellow lemon is a cheerful subject for miniature acrylic artwork.
Its simple oval shape makes it easy to paint, while a small green leaf adds a natural decorative detail.
You can create a lovely painting without using complicated shading or realistic fruit textures.
This idea works particularly well on a small canvas because one large lemon can fill the composition without making it crowded.
How to Paint a Lemon on Small Canvas
1. Begin with a clean, pre-primed mini canvas.
2. Paint the background warm white if you prefer a softer appearance.
3. Allow the background to dry before sketching your lemon.
4. Lightly draw a large oval shape near the center of the canvas, with slightly pointed ends.
5. Use bright yellow acrylic paint and a small round brush to fill the lemon shape.
6. Allow the first layer to dry before applying another thin coat if necessary.
7. Mix a little pale orange or a darker yellow and apply a small curved shadow along the lower side of the lemon.
8. Use green acrylic paint to add one simple leaf near the upper end.
9. Paint a short green stem connecting the leaf to the fruit.
10. Add a small white or pale yellow highlight if you want to give the lemon more dimension.
Leave some background visible around the fruit to maintain a clean composition.
Beginner tip: Keep the lemon large and use only one leaf. A simple recognizable shape usually looks better on a small canvas than a design filled with tiny fruit details.
16. Simple Black Cat Silhouette

Difficulty: Easy | Suggested colors: Muted lavender, black, cream, and pale yellow
A black cat silhouette is a cute miniature painting idea that uses simple shapes and strong color contrast.
You can create a recognizable cat using a rounded body, pointed ears, and a curved tail.
The dark silhouette stands out beautifully against a light lavender background.
You do not need to paint realistic fur, whiskers, or complicated facial features.
This project is useful for learning how to build a recognizable subject from a few basic shapes.
How to Paint a Cute Cat Silhouette
1. Start by painting your mini canvas with a muted lavender background.
2. Allow the background to dry before drawing the cat.
3. Lightly sketch a rounded sitting body near the lower middle of the canvas.
4. Add a smaller round head above the body.
5. Draw two pointed triangular ears at the top of the head.
6. Sketch a curved tail extending from one side of the body.
7. Use black acrylic paint and a small round brush to fill the complete cat shape.
8. Check that the head, body, and tail connect naturally.
9. Allow the black paint to dry before adding any optional facial details.
10. If you want the cat to have eyes, add two tiny pale yellow dots using a fine detail brush.
You can leave the cat as a solid black silhouette for a cleaner appearance.
Avoid adding unnecessary background objects that might distract from its shape.
Beginner tip: Make the cat recognizable through its pointed ears, sitting body, and curved tail before painting any details. A clear silhouette is more important than realistic features.
17. Mini Rainbow with Simple Clouds
Difficulty: Very easy | Suggested colors: Pale blue, peach, yellow, green, and white
A miniature rainbow with clouds is a colorful and cheerful painting that works well on a small canvas.
Unlike a large rainbow painting with many narrow bands, this design uses only a few broad curved sections.
Two simple white clouds complete the scene without making the painting complicated.
It is a good project for practicing curved lines, controlled brush strokes, and simple layering.
How to Paint a Rainbow and Clouds
1. Paint your mini canvas with a soft pale blue background.
2. Allow the background to dry before sketching the rainbow.
3. Lightly draw a simple arch across the middle of the canvas.
4. Add two or three curved guidelines inside the arch to separate the color bands.
5. Use peach acrylic paint to fill the outer rainbow band.
6. Paint the next band yellow and the inner band green.
7. Allow neighboring colors to dry when necessary to prevent unwanted blending.
8. Once the rainbow is dry, use white acrylic paint to create a small cloud at each lower end.
9. Paint each cloud using two or three connected rounded shapes.
10. Use a detail brush to correct uneven edges after the colors have dried.
You can leave the rest of the sky plain or add one small white dot if you want a little more decoration.
Beginner tip: Use three broad rainbow bands instead of many narrow ones. Larger color sections are easier to control on a tiny canvas.
18. Tiny Mountain and Pine Tree Painting
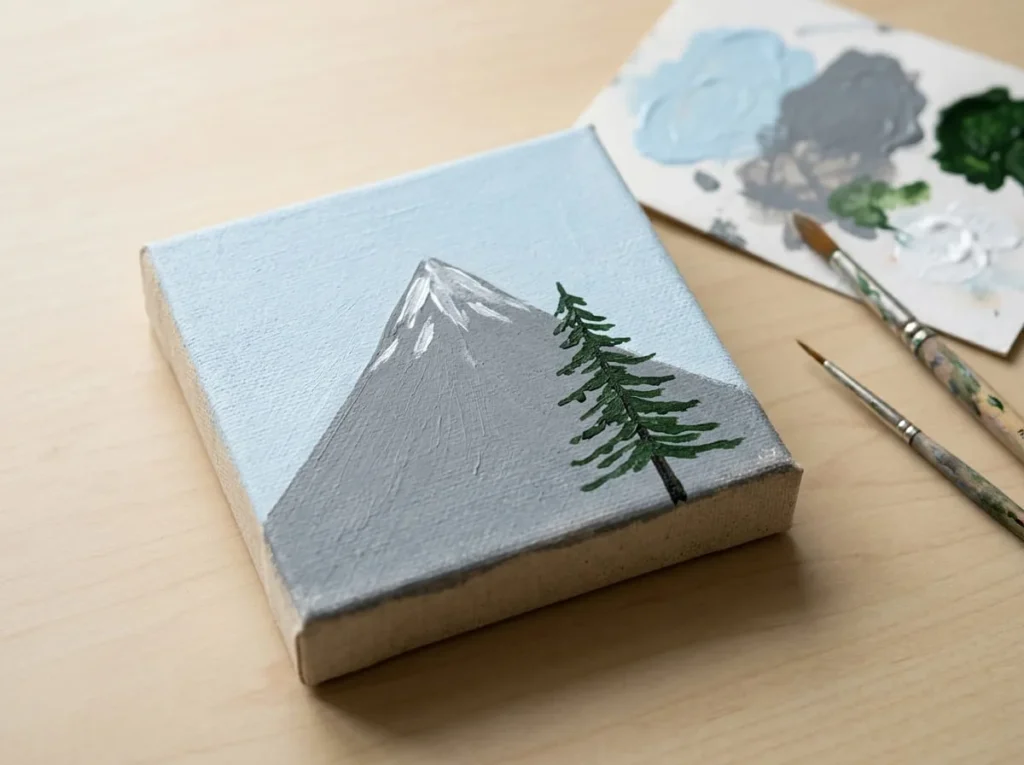
Difficulty: Easy | Suggested colors: Pale blue, gray, dark green, and white
A miniature mountain and pine tree painting is a peaceful landscape idea for beginners.
The design combines a simple distant mountain with one dark tree in the foreground.
You do not need to paint an entire forest, detailed rocks, or a complicated mountain range.
This project helps you practice layering and creating depth with light and dark colors.
How to Paint a Mini Mountain and Pine Tree Scene
1. Start with a pre-primed mini canvas and paint the background pale blue.
2. Allow the sky to dry before adding the mountain.
3. Lightly sketch one large triangular mountain shape near the center.
4. Use gray acrylic paint to fill the mountain, leaving some sky visible above it.
5. Allow the gray paint to dry before adding foreground details.
6. Use dark green acrylic paint and a fine brush to create one vertical tree trunk near the lower edge of the canvas.
7. Add short branches extending outward from the trunk.
8. Make the branches longer near the bottom and shorter toward the top to form a simple pine tree silhouette.
9. Fill the tree shape with short dark green brush strokes.
10. If you want a snowy mountain effect, add a few small white strokes near the mountain peak after the gray paint dries.
Keep the pine tree slightly to one side so the mountain remains visible behind it.
Beginner tip: Paint only one foreground tree. A clear mountain shape and a simple pine tree can create an attractive miniature landscape without unnecessary details.
Simple Acrylic Painting Techniques for Small Canvases
Painting on a small canvas requires slightly different planning from working on a larger surface.
There is less room for detailed brush movements, so simple shapes and controlled paint application become especially important.
Learning a few basic techniques can help you create cleaner and more balanced miniature artwork.
Use Small Brushes Without Overworking the Paint
Small round and detail brushes are useful for miniature painting, but you do not need to use them for every section.
A modest flat brush can help cover the background quickly and evenly.
Use smaller brushes when adding thin stems, flower centers, outlines, and highlights.
Avoid repeatedly brushing the same area after acrylic paint begins drying.
This can create unwanted texture or disturb the partly dried layer.
Choose a brush that matches the shape you are painting rather than always selecting the smallest available tool.
Paint the Background Before Adding Small Details
For most miniature acrylic paintings, begin with the background.
For example, paint the pale blue sky before adding a mountain or the cream background before painting a strawberry.
Allow the background to dry sufficiently before adding shapes that need clean edges.
Once the main subject is complete, add smaller decorations and highlights.
Working in this order helps keep colors separate and reduces accidental smudging.
Make Small Subjects Stand Out with Color Contrast
Good color contrast is especially useful on a small canvas because the main subject needs to remain recognizable.
A red strawberry looks clear against a cream background, while a dark cat silhouette stands out against pale lavender.
If your subject and background are too similar in color, the design may be difficult to notice.
Choose one main color for the subject and a contrasting background.
You can add small accent colors after the main shapes are complete.
Blend Acrylic Paint in Small Areas
Blending can help create simple sunsets, skies, and other colorful backgrounds.
However, acrylic paint may dry quickly when spread thinly across a small surface.
Work with neighboring colors while they are still workable.
Use a clean, slightly damp brush to gently soften the edges where the colors meet.
Avoid adding too many colors to one area because excessive mixing can produce muddy results.
For beginners, blending two colors is often easier than trying to create a complicated gradient.
Create Details with Dots and Short Brush Strokes
Tiny details can make a miniature painting more interesting without requiring advanced drawing skills.
You can use small dots for strawberry seeds, mushroom spots, flower centers, or cat eyes.
Short brush strokes are useful for pine tree branches, flower petals, grass, and water reflections.
Load a detail brush with a small amount of paint and practice your marks on scrap paper before working on the canvas.
Keep the details large enough to remain visible without filling the entire painting.
Common Mistakes When Painting on a Mini Canvas
Mini canvas painting can be enjoyable, but working in a small area sometimes creates challenges.
Many beginners try to include too many objects or use more paint than the surface can comfortably hold.
Understanding these common mistakes can help you create cleaner miniature designs.
Choosing a Design with Too Many Details
A design that looks beautiful on a large canvas may become difficult when reduced to a tiny painting.
Too many objects can overlap or make the subject hard to recognize.
Choose one main subject and limit the decorative details.
For example, paint one mushroom rather than a forest filled with miniature mushrooms.
Using Brushes That Are Too Large
A large brush may be useful for backgrounds, but it can make tiny shapes difficult to control.
If you are painting small petals, thin branches, or fruit seeds, switch to a suitable detail brush.
Use gentle pressure and small amounts of paint.
This helps you create finer marks without accidentally covering nearby sections.
Adding Too Much Paint to a Small Area
Applying excessive paint can create thick patches, raised edges, or unwanted pooling.
Start with a small amount of acrylic paint on your brush.
Add more as needed rather than loading the brush heavily.
For simple backgrounds, apply controlled layers and allow them to dry according to the manufacturer’s instructions.
Trying to Fix Paint Before It Dries
When a mistake happens, it can be tempting to keep brushing over the area immediately.
However, this may spread wet paint into nearby colors or create a muddy patch.
For many small mistakes, allow the unwanted paint to dry before covering it with a suitable acrylic color.
Some areas may require more than one thin coat.
Ignoring the Background and Empty Space
A small canvas can look crowded when the main subject fills every corner.
Leave enough open background around your design.
This helps the subject stand out and makes the composition easier to understand.
A single flower, fruit, or silhouette can look attractive without additional decorations.
Using Too Many Colors
Using too many colors can make a miniature painting feel visually confusing.
Start with two or three main colors and add white, black, or another accent when necessary.
A limited color palette can make the artwork look more coordinated.
You can experiment with additional colors as you become more comfortable with painting.
How to Display Small Acrylic Canvas Paintings
Once your miniature acrylic paintings are dry and ready to handle, you can turn them into lovely handmade decorations.
Small canvases are easy to arrange and can fit into spaces where larger artwork might not be practical.
Display Mini Canvas Paintings on Small Easels
A small tabletop easel is a convenient way to display a mini canvas.
You can place it on a desk, shelf, or suitable side table.
Choose an easel that supports the canvas securely without covering the main artwork.
A simple wooden easel can complement colorful miniature paintings.
Create a Mini Canvas Gallery Wall
Several small paintings can be arranged together to create a miniature gallery wall.
For example, you could display a tulip, strawberry, mushroom, and lemon painting as a coordinated collection.
Try keeping consistent spacing between the canvases.
Use hanging hardware appropriate for the weight of each painting and the wall surface.
Decorate a Desk or Bookshelf
Small canvases work well as decorations for desks and bookshelves.
You can place one painting beside a small plant, notebook, or another simple accessory.
Avoid overcrowding the display area.
Choose a stable position where the canvas will not easily fall or become damaged.
Give Mini Canvas Paintings as Handmade Gifts
Miniature acrylic paintings can make thoughtful handmade gifts for friends and family.
You can choose subjects based on someone’s favorite colors, flowers, animals, or hobbies.
Allow the paint and any protective finish to cure appropriately before wrapping the artwork.
Use suitable protective packaging to avoid pressure or scratches on the painted surface.
How to Protect Finished Small Canvas Paintings
Taking care of your finished mini canvas paintings can help preserve their appearance.
You do not need complicated finishing equipment for ordinary decorative artwork, but proper drying and handling are important.
Allow the Acrylic Paint to Dry Properly
Place your finished canvas somewhere clean and protected while the paint dries.
Drying time depends on paint thickness, product formulation, temperature, and humidity.
Thin layers may become touch-dry relatively quickly, while thicker areas can take longer.
Follow the paint manufacturer’s drying and curing instructions before handling, sealing, or packaging your artwork.
Do Small Acrylic Paintings Need Varnish?
Not every small acrylic painting needs varnish.
For simple indoor decorative artwork, an additional protective finish may be optional.
If you choose to varnish your painting, use a product compatible with your acrylic paint and canvas.
Test the varnish on a separate painted sample when possible.
Follow the manufacturer’s instructions for application, drying, and curing.
Store and Handle Mini Canvas Art Carefully
Avoid placing heavy objects directly on painted canvas surfaces.
Protect the artwork from scratches, unnecessary moisture, and excessive handling.
When storing several mini paintings, use suitable protective materials so painted surfaces do not rub against each other.
Do not wrap freshly painted artwork before it is ready.
Frequently Asked Questions
What Can Beginners Paint on a Small Canvas?
Beginners can paint simple subjects such as flowers, fruits, mushrooms, hearts, coffee cups, and small landscapes. Designs with one main subject are usually easier to manage. Start with clear shapes and a few colors rather than complicated artwork containing many tiny details.
What Are the Easiest Acrylic Painting Ideas for Small Canvas?
Some of the easiest ideas include a pink tulip, red mushroom, strawberry, lemon, and simple abstract shapes. These projects use basic outlines and require only a small collection of paint colors. They are good choices for practicing brush control and filling shapes.
What Is the Best Small Canvas Size for Beginners?
There is no single best canvas size for every beginner. A canvas with enough room for one flower, fruit, or simple landscape is usually easier to paint than an extremely tiny surface. Choose a size that allows you to move your brush comfortably without struggling to fit the details.
Can You Use Regular Acrylic Paint on Mini Canvases?
Yes, acrylic paint suitable for canvas can be used on mini canvases that have been properly prepared. Many acrylic craft paints and student-grade acrylics work for simple decorative projects. Check the manufacturer’s surface recommendations because paint formulations and coverage can vary.
Do Small Canvases Need Gesso Before Painting?
Many ready-to-paint mini canvases are already primed and do not require another layer of gesso. However, raw or unprimed canvas generally needs an appropriate painting ground before acrylic paint is applied. Check the canvas packaging to confirm whether it is ready for painting.
What Brushes Are Best for Small Acrylic Paintings?
Small round brushes and fine detail brushes are useful for miniature acrylic paintings. They can help with curved shapes, thin stems, small dots, and outlines. A modest flat brush is also helpful for painting backgrounds. Choose brush sizes based on the design rather than using only tiny brushes.
How Do You Paint Tiny Details with Acrylic Paint?
Use a fine detail brush with a small amount of acrylic paint. Rest your painting hand comfortably when possible and work with controlled movements. Practice dots and short lines on scrap paper or a spare painting surface before adding them to your canvas. Avoid excessive pressure that may create thick marks.
How Do You Make a Small Canvas Painting Look Good?
Choose one recognizable subject, use a simple background, and leave some empty space around the design. Good contrast between the subject and background can help the painting stand out. Keep your colors coordinated and avoid adding too many small details.
Can You Paint Over Mistakes on a Mini Canvas?
Yes, you can often cover acrylic painting mistakes after the unwanted paint has dried. Use a suitable acrylic color and apply a controlled layer over the affected area. Some mistakes may require more than one coat, particularly when covering dark colors with lighter paint.
How Long Does Acrylic Paint Take to Dry on a Small Canvas?
Drying time depends on the paint formulation, thickness, temperature, and humidity rather than canvas size alone. Thin layers may dry relatively quickly, while thick paint can take longer. Follow the manufacturer’s instructions and allow additional time when the painting needs to be handled, sealed, or packaged.
Do You Need to Seal Small Acrylic Canvas Paintings?
Not every miniature acrylic painting needs a protective sealer. A small decorative painting displayed indoors may be suitable without varnish, depending on the materials and intended use. If additional protection is desired, use a compatible acrylic varnish and allow the painting to dry or cure properly before application.
Are Mini Canvas Paintings Good for Handmade Gifts?
Yes, mini canvas paintings can make lovely handmade gifts because they are easy to personalize. You can paint someone’s favorite flower, animal, fruit, or a simple landscape. Make sure the artwork is completely ready for handling before packaging it to help prevent surface damage.
Final Thoughts
Acrylic painting ideas for small canvas offer an enjoyable way to create colorful artwork without needing a large workspace or advanced painting skills.
Start with simple designs such as a pink tulip, mushroom, strawberry, or minimalist abstract painting. These projects help you practice basic shapes, brush control, and color placement.
As your confidence grows, try miniature landscapes, ocean waves, or other slightly more detailed ideas.
Remember that small paintings often look best when they have one clear subject, a limited color palette, and enough empty space around the design.
With patience and practice, you can create beautiful miniature acrylic paintings for your home or thoughtful handmade gifts.