
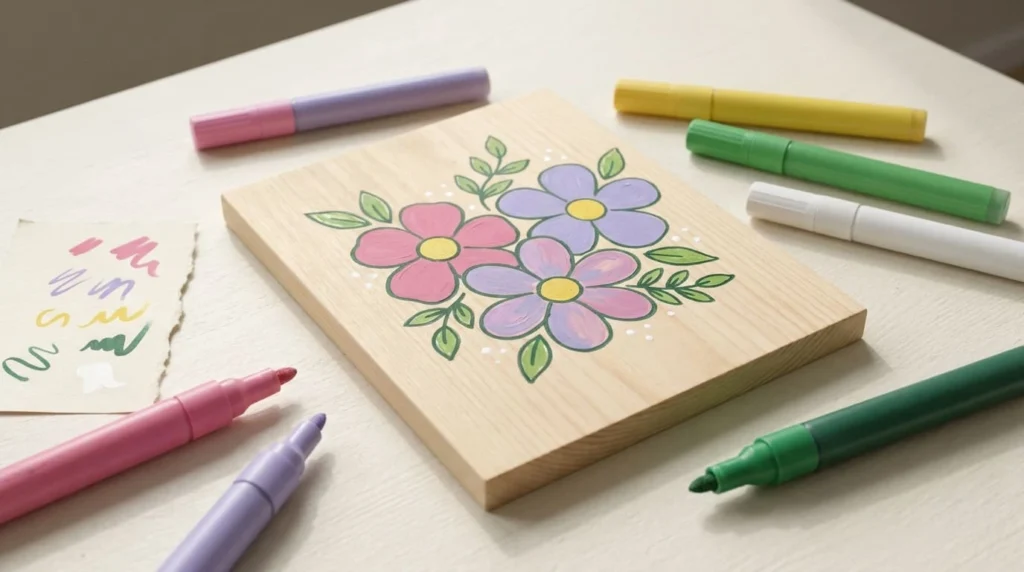
Acrylic paint pens on wood make it easy to create colorful designs without using paintbrushes or mixing different paints. You can use them to decorate wooden signs, picture frames, ornaments, gift tags, and many other handmade crafts. They are especially useful for beginners who want to draw neat lines, simple patterns, and small details.
However, painting on wood is a little different from painting on paper. Wood has natural grain and tiny pores that can absorb paint, sometimes making colors look uneven or causing lines to spread. The surface may also feel rough, which can make drawing more difficult.
The good news is that a little preparation can make a big difference. In this guide, you will learn how to prepare wooden surfaces, apply acrylic paint pens correctly, prevent common problems, and create beautiful wooden decorations that last longer.
Can You Use Acrylic Paint Pens on Wood?
Yes, you can use acrylic paint pens on many types of wood, including unfinished wooden pieces, painted wood, plywood, and wooden craft boards. They work well for drawing letters, adding colorful patterns, decorating small objects, and creating detailed designs.
However, the results depend on the type of wood, its surface condition, and the acrylic paint pens you use.
Some wooden surfaces absorb paint quickly, while others have coatings that make it harder for paint to stick. Choosing suitable markers and preparing the surface correctly can help you achieve better results.
Do Acrylic Paint Pens Work on Unfinished Wood?
Acrylic paint pens can work directly on unfinished wood, especially when the surface is smooth, clean, and dry.
Unfinished wood has natural pores that can absorb liquid paint. Because of this, colors may look lighter than expected, and some lines may spread slightly along the grain.
The amount of paint absorption depends on the type of wood and how smooth the surface is.
For small decorative projects, you may be able to paint directly onto a prepared piece of unfinished wood. However, very porous wood may benefit from a suitable primer or base coat.
Testing the paint on a small area first helps you decide whether additional preparation is necessary.
Do Acrylic Paint Pens Work on Painted or Sealed Wood?
Acrylic paint pens can also work on painted or previously sealed wood, but the existing finish makes a difference.
A clean, matte painted surface may provide a suitable base if the marker is compatible with the paint underneath.
Glossy or varnished wood can be more challenging because the smooth coating may prevent the paint from gripping properly.
Some finishes may require light sanding or a compatible primer before painting. However, you should follow the recommendations for the existing coating and your paint pens.
Always test the marker on an inconspicuous area before decorating the entire piece.
What Type of Wood Is Best for Acrylic Paint Pens?
Choosing the right wood can make your painting experience much easier.
For beginners, a smooth wooden surface is usually the best starting point because it allows the pen tip to move without catching on rough fibers.
You can decorate several types of wood, but each one may require slightly different preparation.
Smooth Unfinished Wood
Smooth unfinished wood is a practical option for beginner craft projects.
You can find unfinished wooden shapes, small boxes, ornaments, and craft blanks in many hobby stores.
These items are often convenient because they do not have old paint or varnish that needs to be removed.
However, unfinished wood may absorb paint unevenly, depending on its grain and porosity.
If the surface feels rough, gently sanding it can help create a smoother area for drawing.
You can also test a small design to see whether the paint spreads or needs a base coat.
Plywood and Wooden Craft Boards
Plywood and wooden craft boards are useful for making signs, wall decorations, and other flat projects.
They provide relatively large surfaces where you can draw letters, flowers, or decorative patterns.
However, not all plywood has the same finish.
Some boards have smooth outer layers, while others contain visible grain, rough patches, or small imperfections.
Choose a board with a clean, smooth surface whenever possible.
If necessary, sand the painting area gently and remove the dust before using acrylic paint pens.
Wood Slices and Natural Wood Pieces
Wood slices are popular for rustic decorations, handmade ornaments, and personalized gifts.
They often have interesting natural grain patterns and irregular edges that give each project a unique appearance.
However, natural wood slices may contain rough areas, cracks, or uneven surfaces.
Choose a dry, stable piece with a relatively smooth painting area.
You may need to sand the surface before drawing detailed designs.
If you want the natural wood grain to remain visible, test your paint directly on the prepared surface before deciding whether to add a transparent or opaque base coat.
Previously Painted or Varnished Wood
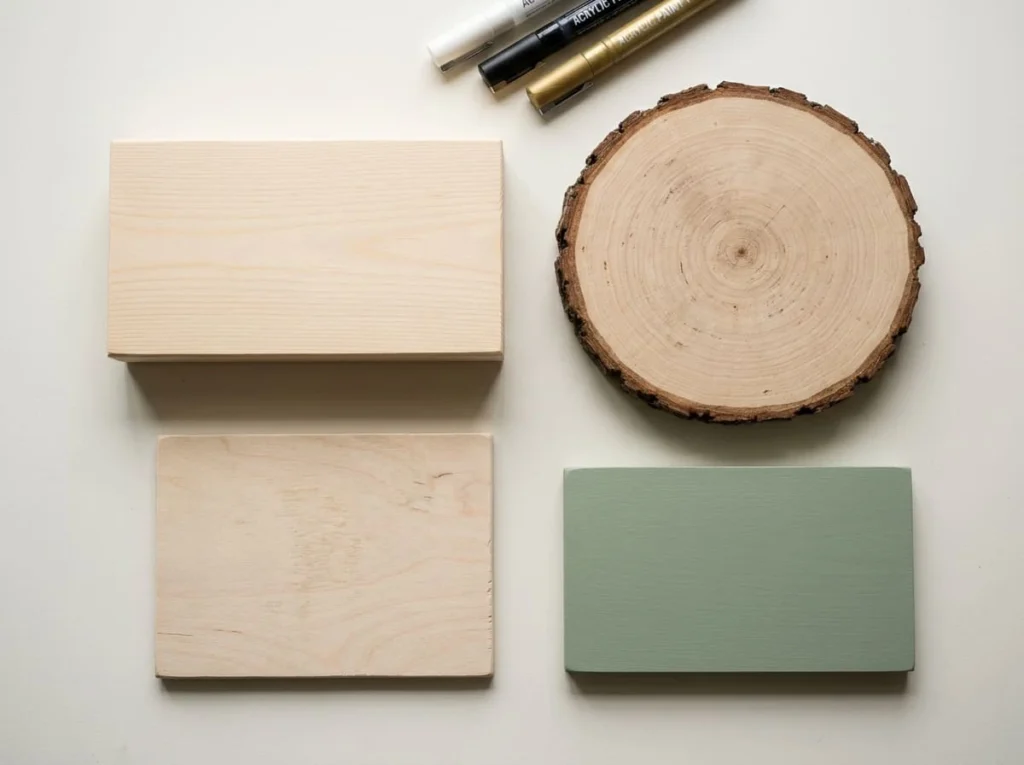
You can sometimes reuse painted or varnished wooden objects for new craft projects.
For example, you might decorate an old wooden frame, a painted storage box, or a finished wooden sign.
First, inspect the existing coating.
If the paint is peeling, cracking, or loose, it may not provide a reliable base for new artwork.
Glossy finishes can also make adhesion difficult.
Clean the surface and follow appropriate preparation instructions for the existing coating before painting.
Test your acrylic paint pen on a small area to check whether the new paint adheres properly.
Supplies You Need for Using Acrylic Paint Pens on Wood
You do not need an expensive collection of painting supplies to decorate wood with acrylic paint pens.
A few basic materials are enough for most beginner projects.
Having everything ready before starting will also make the painting process easier.
Choosing Acrylic Paint Pens for Wooden Crafts
Start with acrylic paint pens that the manufacturer recommends for use on wood.
Different pens have different tip sizes and paint coverage.
Fine-tip pens are useful for small letters, outlines, dots, and detailed patterns.
Medium-tip pens work well for general drawing and coloring smaller shapes.
Broad-tip pens can make filling larger areas easier, especially on flat wooden boards.
If you are working with dark wood, consider markers with good opacity so the colors remain visible.
You do not need to buy a large marker set immediately. A few suitable colors are enough to practice.
If you are completely new to paint markers, our article How to Use Acrylic Paint Pens explains the basic activation and handling process in more detail.
Basic Wood Preparation Supplies
Keep these materials nearby before starting your project:
- A clean wooden craft piece
- Acrylic paint pens suitable for wood
- Fine or appropriately graded sandpaper
- A soft, clean cloth
- Scrap paper for testing markers
- A pencil for sketching designs
- Protective paper for your workspace
- A compatible primer or base coat if needed
- A suitable protective sealer if your project requires one
Not every project needs sanding, priming, or sealing.
For example, a smooth wooden ornament used only as an indoor decoration may need less preparation than a rough wooden sign intended for regular handling.
Choose supplies based on the wood, the markers, and how you plan to use the finished item.
How to Prepare Wood for Acrylic Paint Pens
Preparing wood is one of the most important steps when using acrylic paint pens.
Even a good quality paint marker may produce uneven lines if the surface is rough, dusty, or too absorbent.
Proper preparation helps the pen move more smoothly and can improve how well the paint stays on the wood.
You do not need complicated tools. Most small wooden craft projects only require a few simple steps.
Step 1: Clean the Wooden Surface
Start by checking your wooden piece for dust, dirt, grease, or other unwanted materials.
For unfinished wood, a clean, dry cloth may be enough to remove loose dust.
If the object is previously painted or coated, use a cleaning method suitable for its existing finish.
Avoid soaking unfinished wood because excess moisture can cause swelling or raise the grain.
If you use a damp cloth or an appropriate cleaning product, allow the wood to dry completely before continuing.
A clean surface helps the paint make better contact with the wood instead of sitting on a layer of dust or dirt.
Step 2: Sand Rough Areas Smooth
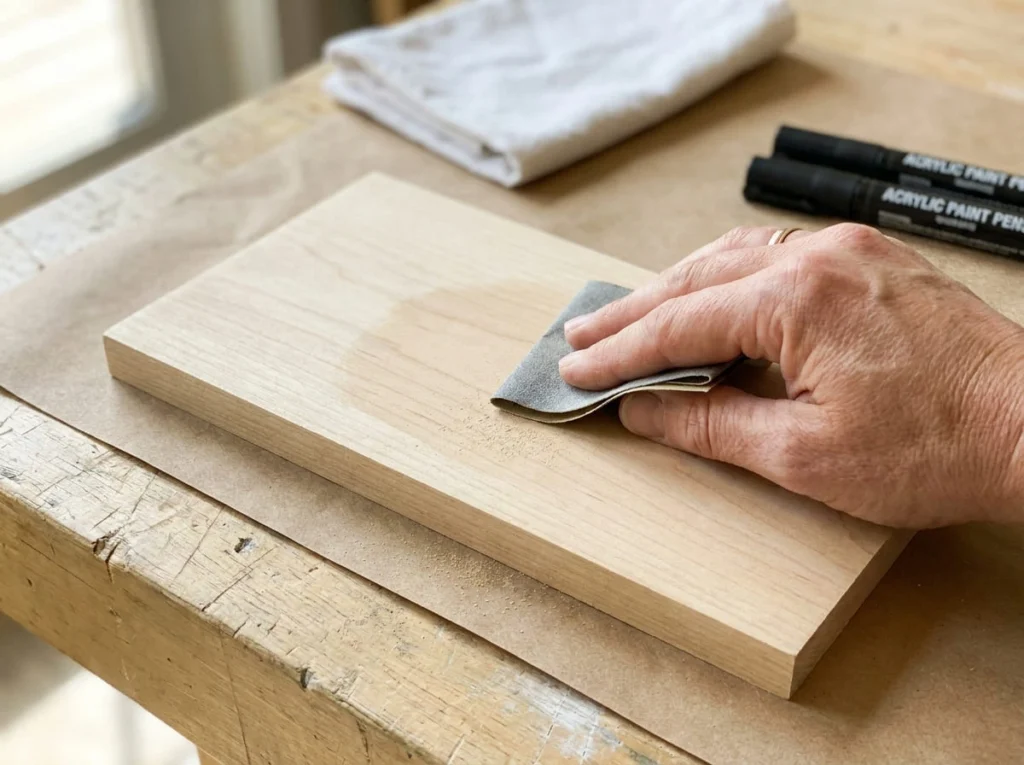
Run your hand carefully across the wooden surface to check for rough spots.
If the wood feels uneven, gentle sanding may help create a smoother area for drawing.
Use sandpaper suitable for the type of wood and finish you are working with.
Move the sandpaper gently along the direction of the wood grain whenever practical.
Pay extra attention to rough areas where a paint pen tip might catch.
You do not need to remove a large amount of wood. The goal is to create a comfortable painting surface.
Be careful around sharp edges, splinters, and decorative details.
How Much Sanding Does Wood Need?
The amount of sanding depends on the condition of the wooden piece.
A smooth craft blank may need very little sanding, while rough wood may require more preparation.
For many unfinished craft pieces, fine sandpaper can help smooth minor imperfections.
If the wood has an existing varnish or coating, the preparation may be different.
Avoid sanding unknown old finishes without checking their safety and handling requirements. Older painted surfaces may contain hazardous materials.
Stop sanding once the surface is appropriately smooth for your project.
Step 3: Remove Sanding Dust
After sanding, remove the dust from the wooden surface.
You can use a clean, soft cloth or another suitable dust removal method.
Pay attention to corners, grooves, and areas around decorative edges.
Tiny particles of sanding dust can interfere with paint application and make the finished design look uneven.
If you use a slightly damp cloth on suitable wood, let the surface dry fully before painting.
Check the surface again under good lighting to make sure no visible dust remains.
Step 4: Decide Whether to Prime or Seal the Wood First
Not every wooden craft needs primer before using acrylic paint pens.
If you are working on smooth wood and your markers provide good coverage, you may be able to paint directly onto the surface.
However, very porous wood can absorb paint and cause lines to spread.
A suitable primer or base coat may help reduce absorption and create a more even painting surface.
For example, a compatible acrylic primer or painted base can be useful when you want bright colors on dark or highly absorbent wood.
Choose a product intended for the surface and compatible with your markers.
Allow the preparation coat to dry or cure as instructed before adding your design.
Remember that preparing wood before painting is different from applying a protective sealer after the artwork is complete.
The first helps create a suitable painting surface, while the second may help protect the finished design.
Step 5: Test the Paint Pen on a Small Area
Before decorating the entire wooden piece, test your acrylic paint pen on a small, less visible area or a spare piece of similarly prepared wood.
Draw a short line, a small circle, and a filled shape.
Check whether the paint flows smoothly and whether the lines keep their shape.
Look for signs of paint spreading along the grain or soaking into the surface.
Allow the test marks to dry according to the manufacturer’s instructions.
If the lines appear blurry, the wood may need additional preparation.
If the paint does not adhere properly, check whether the marker is compatible with the existing finish.
A small test can help you avoid problems before starting a larger design.
How to Use Acrylic Paint Pens on Wood Step by Step
Once your wood is prepared, you can start decorating it with acrylic paint pens.
The process is simple, but working carefully will help you achieve cleaner lines and more even colors.
For your first project, choose a small wooden ornament or flat craft piece with a simple design.
These steps will help you move from a blank wooden surface to a finished decoration.
H3: Step 1: Choose a Simple Wooden Design
Start with a design that is easy to draw.
Flowers, hearts, stars, leaves, dots, and geometric patterns are good choices for beginners.
If you want to create a personalized wooden decoration, you could also draw a short name or a few simple letters.
Think about the size of your wooden piece before choosing the design.
A small wooden ornament may look better with one central flower, while a larger board gives you more room for additional shapes and details.
Avoid making your first design too complicated.
A simple idea allows you to focus on controlling the pen and applying the paint correctly.
Step 2: Sketch the Design Lightly
Once you have chosen your design, sketch it lightly on the prepared wooden surface.
Use a pencil that makes marks you can see without pressing deeply into the wood.
For example, if you are drawing a flower, begin with a small circle for the center and add a few rounded petals around it.
You can also sketch leaves, stems, or a simple border.
Keep the lines light so they do not remain visible underneath lighter paint colors.
On some painted or sealed surfaces, pencil marks may not work well. In those cases, use a compatible removable guide or practice the layout on paper first.
The sketch is only a guide, so it does not need to look perfect.
Step 3: Prepare and Test Your Paint Pens
Before painting on wood, prepare your acrylic paint pens according to the manufacturer’s instructions.
Some markers require shaking and gentle priming, while others are ready to use.
Keep a sheet of scrap paper nearby for testing each color.
Draw a few short lines to confirm that the paint flows evenly.
If the marker releases too much paint, avoid using it directly on your wooden project until the flow becomes manageable.
Do not repeatedly press a pump-action nib onto your wood because excess paint may collect in the grain.
Once the marker is working correctly, you can begin painting your design.
Step 4: Draw the Main Outlines
Start by drawing the main shapes of your design.
Hold the acrylic paint pen comfortably and apply gentle, steady pressure.
Move the tip slowly along your pencil guidelines.
Wood grain may create slight resistance, especially if the surface is not completely smooth.
If the pen catches on a rough area, avoid forcing it.
Instead, check the surface and adjust your technique if necessary.
For small details, a fine-tip marker can provide better control.
If your design includes large shapes, draw their outlines first so you know where to apply the main colors.
Remember that natural wooden crafts do not need perfectly straight or identical lines.
Step 5: Fill the Design with Color
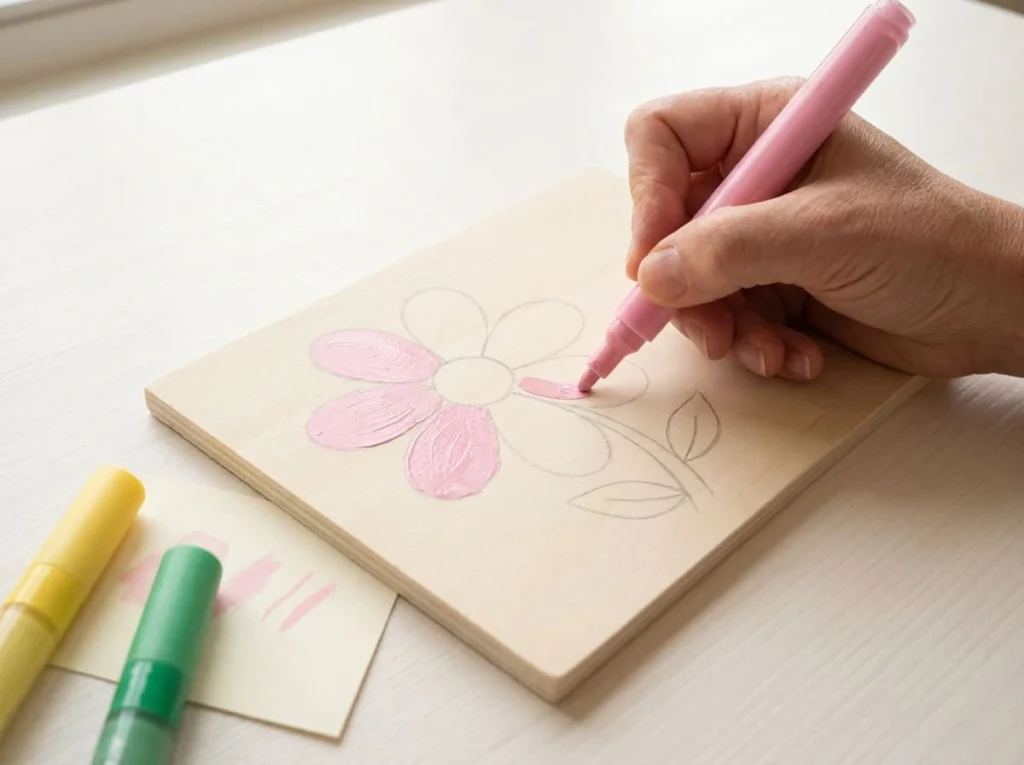
After drawing the main shapes, begin filling them with your chosen colors.
Work in small sections using short, controlled strokes.
Try to maintain a consistent direction as you apply the paint.
For example, when coloring flower petals, move your pen from the center of each petal toward the outer edge.
Avoid pressing too hard or repeatedly rubbing the nib across wet paint.
Wood may absorb some of the color, particularly if it is unfinished.
If you notice areas that look lighter than others, allow the first layer to dry before deciding whether another coat is needed.
For larger sections, a medium or broad-tip pen may make the process easier.
Step 6: Allow the First Layer to Dry
Once you finish applying the first colors, place the wooden piece somewhere safe and allow the paint to dry.
Avoid touching painted areas during this time.
Wood texture, paint thickness, temperature, and humidity can all affect drying time.
A thin line may become touch-dry sooner than a heavily colored area.
Follow the instructions provided with your paint pens rather than relying on one drying time for every product.
If you plan to add another color over the first layer, wait until the paint is ready for additional coats.
This helps prevent unwanted smudging and color mixing.
Step 7: Add Another Layer if Needed
After the first layer has dried, check your design.
Some areas may look slightly uneven because the wood absorbed more paint in certain places.
If your paint pens allow layering, apply another thin coat where additional coverage is needed.
For example, a yellow flower painted on dark wood may look brighter after a second application of suitable opaque paint.
Use light pressure so you do not disturb the previous layer.
Avoid applying too much paint at once because thick buildup may create uneven texture.
You may not need a second layer if the first coat already looks smooth and colorful.
Step 8: Add Small Details and Finishing Touches
Once the main colors are dry, you can add smaller details.
Use a fine-tip acrylic paint pen to draw outlines, small dots, highlights, or decorative patterns.
For example, you could add white dots around a flower, dark outlines around leaves, or tiny stars beside a painted name.
Keep these details simple and balanced.
Too many small decorations can make a wooden craft look crowded, especially on a small surface.
If you want to combine different colors, test them first to see how they look together.
Small finishing touches can make your design feel more complete without requiring advanced painting skills.
Step 9: Let the Finished Artwork Dry Completely
After adding the final details, allow the artwork to dry fully.
Place the wooden piece on a clean, protected surface where it will not be disturbed.
Avoid stacking painted objects or wrapping them while the paint is still drying.
Keep in mind that paint can feel dry to the touch before it has fully cured.
If you plan to add a protective sealer, wait for the time recommended by the paint manufacturer.
Applying a protective coating too early may cause smudging, lifting, or other unwanted changes.
Once the artwork is properly dry, you can decide whether it needs additional protection based on how the wooden item will be used.
How to Use Acrylic Paint Pens on Different Wood Finishes
Acrylic paint pens can produce different results depending on the finish of the wood. Some surfaces absorb paint quickly, while others have a smooth coating that makes it harder for the color to stick.
Understanding these differences can help you choose the right preparation method and avoid wasting time on a project that needs extra attention.
Painting on Raw or Unfinished Wood
Raw wood has natural pores that absorb liquid paint. This can make acrylic paint pen colors look lighter or cause thin lines to spread slightly along the grain.
For small decorative projects, you may be able to paint directly on smooth, unfinished wood.
However, if the wood absorbs too much paint, a compatible primer or base coat may help create a more even surface.
Lightly sand rough areas, remove dust, and test a few strokes before starting your design.
If you want to keep the natural wood grain visible, choose a preparation method that does not completely hide the wood’s appearance.
Painting on Primed Wood
Primed wood can provide a more consistent surface for acrylic paint pens.
A suitable primer helps reduce uneven paint absorption and may make colors appear brighter.
This can be especially helpful when working with dark wood or creating designs that need clear outlines.
Before using your markers, make sure the primer is compatible with the paint and has dried or cured according to its instructions.
Test a small area first to check whether the paint flows smoothly and stays in place.
Painting on Already Painted Wood
You can use compatible acrylic paint pens to add details to wooden objects that have already been painted.
For example, you might add small flowers to a painted wooden box or decorate a picture frame with colorful patterns.
First, check that the existing paint is clean, dry, and firmly attached.
If the old paint is peeling or cracking, adding new artwork over it may not produce a lasting result.
A matte painted surface may be easier to work on than a glossy one, depending on the coating.
Always test your marker before decorating the entire piece.
Painting on Varnished or Glossy Wood
Varnished wood often has a smooth protective coating that can make acrylic paint adhesion more difficult.
The marker may produce clear lines at first, but the paint could scratch or peel if it does not bond properly with the finish.
Some glossy surfaces need careful cleaning, light abrasion, or a compatible bonding primer before painting.
However, sanding may permanently change the appearance of the original finish.
If you want to preserve an existing wooden object, test the marker in a hidden area first and avoid making irreversible changes without checking the coating requirements.
Choose acrylic paint pens recommended for the surface whenever possible.
How to Stop Acrylic Paint Pens from Bleeding on Wood
One common problem when using acrylic paint pens on wood is paint bleeding.
Instead of creating a sharp line, the paint spreads slightly into the surrounding wood fibers. This can make letters, outlines, and small details look blurry.
Fortunately, proper surface preparation and controlled paint application can help reduce this problem.
Why Paint Spreads Along Wood Grain
Wood contains tiny spaces and fibers that can absorb liquid.
When acrylic paint from a marker touches porous wood, some of the liquid may move into these spaces before the paint dries.
This can cause the color to spread beyond the original line.
The amount of bleeding depends on the wood species, grain, surface condition, and paint formulation.
Rough or highly absorbent wood may show more bleeding than a properly prepared surface.
Fine lines can make this problem more noticeable because even a small amount of spreading changes their appearance.
How to Prevent Blurry Lines
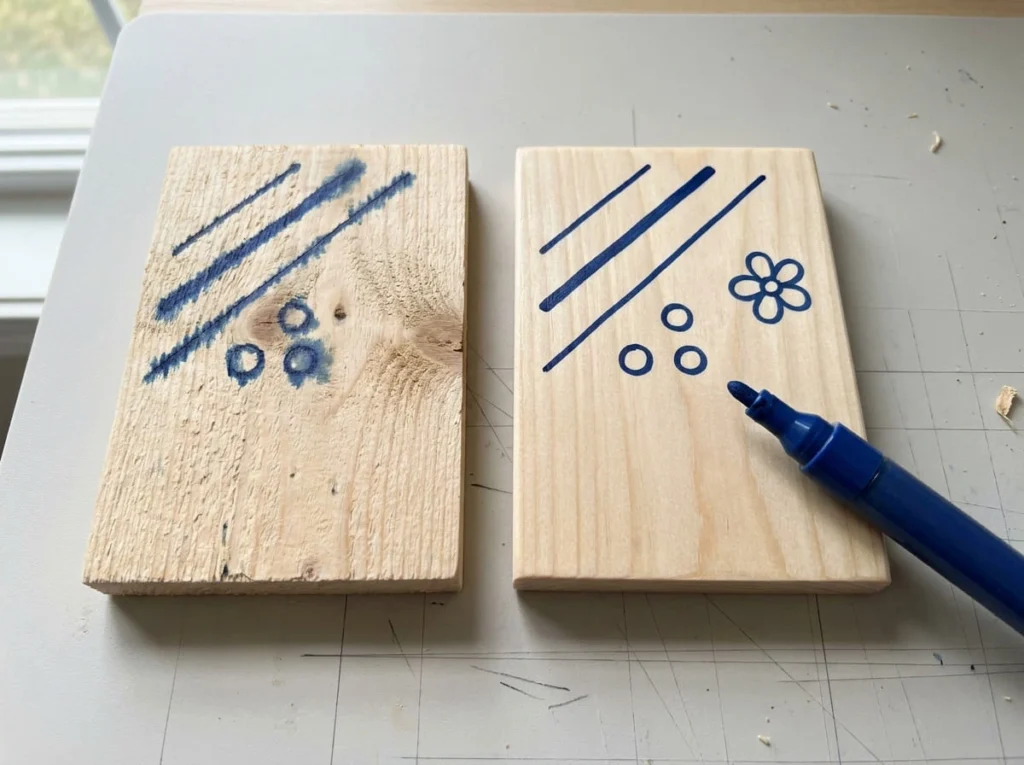
Start with a smooth, clean wooden surface.
If your wood is very porous, consider applying a compatible primer or base coat to help reduce uneven absorption.
Allow the preparation coat to dry properly before using acrylic paint pens.
Always test your marker on a spare piece of similarly prepared wood.
Make sure the paint is flowing correctly, but avoid pumping too much paint into the nib.
When drawing, use gentle pressure and steady movements.
A marker that releases large amounts of paint may cause more spreading on absorbent wood.
For small letters or detailed patterns, choose a suitable fine-tip pen and test whether it produces clean lines on your particular surface.
What to Do if Your Paint Has Already Bled
If paint spreads beyond your design, avoid immediately rubbing the area.
On unfinished wood, liquid paint may already have entered the fibers, making it difficult to remove without changing the surface.
Allow the paint to dry before deciding how to correct the mistake.
Depending on the project, you may be able to cover the affected area with a compatible opaque base coat and redraw the design.
On some previously coated surfaces, a small amount of fresh paint may be removable using a manufacturer-approved cleaning method.
Always test the correction method in an inconspicuous area first.
If the paint has spread deeply into unfinished wood, completely removing the mark may not be possible.
For future projects, testing the surface before painting can help prevent the same problem.
How to Seal Acrylic Paint Pens on Wood
Sealing is an important consideration when decorating wooden crafts with acrylic paint pens.
A compatible protective coating may help reduce scratches, wear, and damage from occasional handling.
However, not every wooden project requires sealing, and the wrong protective product can affect the appearance of your artwork.
The best approach depends on the markers, the type of wood, and how you plan to use the finished item.
Do Acrylic Paint Pens Need to Be Sealed on Wood?
Acrylic paint pen artwork does not always need an additional protective coating.
For example, a decorative wooden ornament displayed indoors and rarely touched may remain suitable without sealing, depending on the marker’s durability.
However, wooden items that are handled regularly may benefit from extra protection.
A painted wooden box, picture frame, or frequently used decoration may experience rubbing and minor scratches over time.
Outdoor projects have additional challenges because sunlight, rain, and temperature changes can affect both the paint and wood.
If you are unsure whether sealing is necessary, check the manufacturer’s recommendations for your acrylic paint pens.
What Type of Sealer Can You Use?
Several types of protective finishes are available for wooden crafts, but not every product is compatible with acrylic paint pens.
Some manufacturers recommend suitable water-based clear varnishes for their paint markers.
Depending on the products involved, other clear finishes may also be appropriate.
You may find protective coatings with different appearances, including:
- Matte finishes that create a low-shine appearance
- Satin finishes that provide a gentle sheen
- Glossy finishes that create a more reflective surface
Choose the appearance that suits your project, but prioritize compatibility over appearance.
A clear coating may still change the color or shine of the wood and painted design.
Avoid assuming that a product labeled as clear will produce an invisible finish.
Read the sealer instructions carefully and test it on a separate painted sample before using it on your finished craft.
How to Apply a Protective Sealer
Applying a protective coating requires patience and careful preparation.
The following steps provide a general approach, but the exact application method depends on the product you choose.
Step 1: Allow the Paint to Dry or Cure
Before sealing your wooden craft, allow the acrylic paint to dry or cure for the time recommended by the marker manufacturer.
Paint may feel dry to the touch before it is ready for another coating.
Applying sealer too early can sometimes disturb the color or affect adhesion.
Place the project somewhere clean and protected while it dries.
Step 2: Test the Sealer on a Sample Piece
Before coating your finished artwork, test the sealer on a spare piece of wood painted with the same acrylic paint pens.
Ideally, the sample should have the same preparation and finish as your actual project.
Apply the sealer according to its instructions and check whether the paint smears, changes color, or develops an unwanted shine.
Allow the sample to dry fully before judging the result.
This test can help you avoid damaging a project that took time to complete.
Step 3: Apply the Coating According to Its Instructions
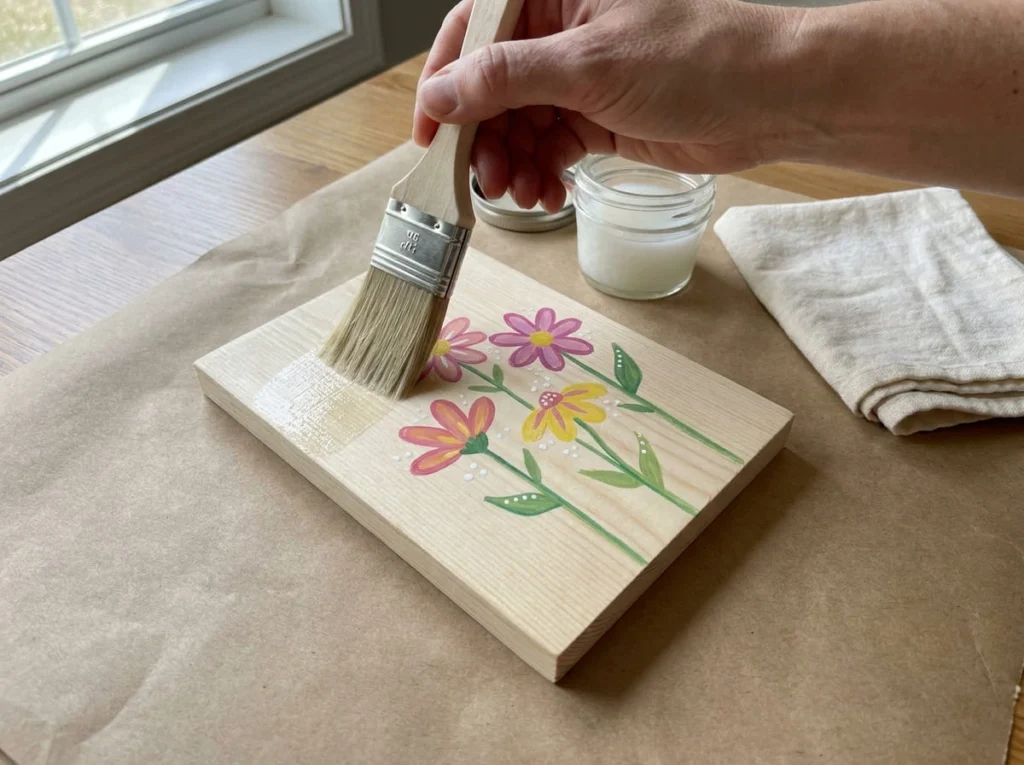
Once you have confirmed compatibility, apply the protective finish using the manufacturer’s recommended method.
Some products require a brush, while others are supplied as sprays.
Follow all application and safety instructions, including ventilation requirements and any necessary protective equipment.
If the product requires multiple coats, allow the recommended time between applications.
Avoid applying an unnecessarily thick coating because this can create drips, uneven coverage, or other finishing problems.
Step 4: Allow the Protective Finish to Cure
After applying the sealer, place the wooden item somewhere clean and safe.
Allow the coating to dry and cure according to the product instructions.
Avoid stacking, wrapping, or heavily handling the item before the protective finish is ready.
Drying and curing times can vary depending on the coating, temperature, humidity, and application thickness.
A properly cured finish is generally better prepared for normal handling than one that is still soft or tacky.
Can Sealing Make Painted Wood Waterproof?
Sealing may improve a wooden item’s resistance to moisture, but it does not automatically make the project completely waterproof.
Some protective coatings are intended for indoor decoration, while others are formulated for outdoor wood.
Water can still enter through unprotected edges, cracks, or areas where the finish has worn away.
Wood can also expand and contract as environmental conditions change.
If your project will be displayed outdoors, choose paint and a protective system specifically suitable for exterior use.
Follow the manufacturer’s instructions for surface preparation, coating coverage, and ongoing maintenance.
Even a protected outdoor wooden decoration may need occasional inspection and refinishing.
Easy Wood Craft Ideas Using Acrylic Paint Pens
Once you feel comfortable painting on wood, you can use acrylic paint pens to decorate many small handmade projects.
You do not need complicated patterns or expensive supplies to create something attractive.
Start with simple wooden objects that have smooth surfaces and enough space for your design.
Personalized Wooden Gift Tags
Small wooden gift tags are a simple project for beginners.
Choose smooth wooden tags and use acrylic paint pens to add initials, names, hearts, or tiny flowers.
A fine-tip pen can help with lettering, while a medium-tip pen is useful for coloring larger shapes.
You can attach the finished tags to gift bags or use them as keepsake decorations.
Allow the paint to dry before handling or attaching ribbons.
Simple Painted Wood Slice Decorations
Natural wood slices can become attractive handmade decorations.
Choose a smooth, dry wood slice and draw a simple design in the center.
You might paint a small flower, a group of colorful leaves, or a simple geometric pattern.
Leave part of the natural wood visible to create a rustic appearance.
These decorations can be displayed on shelves or used as hanging ornaments when appropriately prepared.
Handmade Wooden Signs
Acrylic paint pens are useful for adding lettering and small decorative details to wooden signs.
For a beginner project, choose a small, smooth wooden board.
Sketch a short word or simple design before outlining it with a suitable pen.
You can add flowers, stars, leaves, or dots around the lettering.
Keep the design easy to read and avoid crowding the board with too many decorations.
Decorated Wooden Picture Frames
A plain wooden picture frame can become more personal with a few painted details.
Try drawing small flowers in the corners or adding colorful dots around the outer edges.
You can also paint simple patterns that match the colors of the room where the frame will be displayed.
Remove the glass and photograph before decorating whenever the frame’s construction allows it.
This helps protect the picture and makes the wooden surface easier to work on.
Small Wooden Ornaments
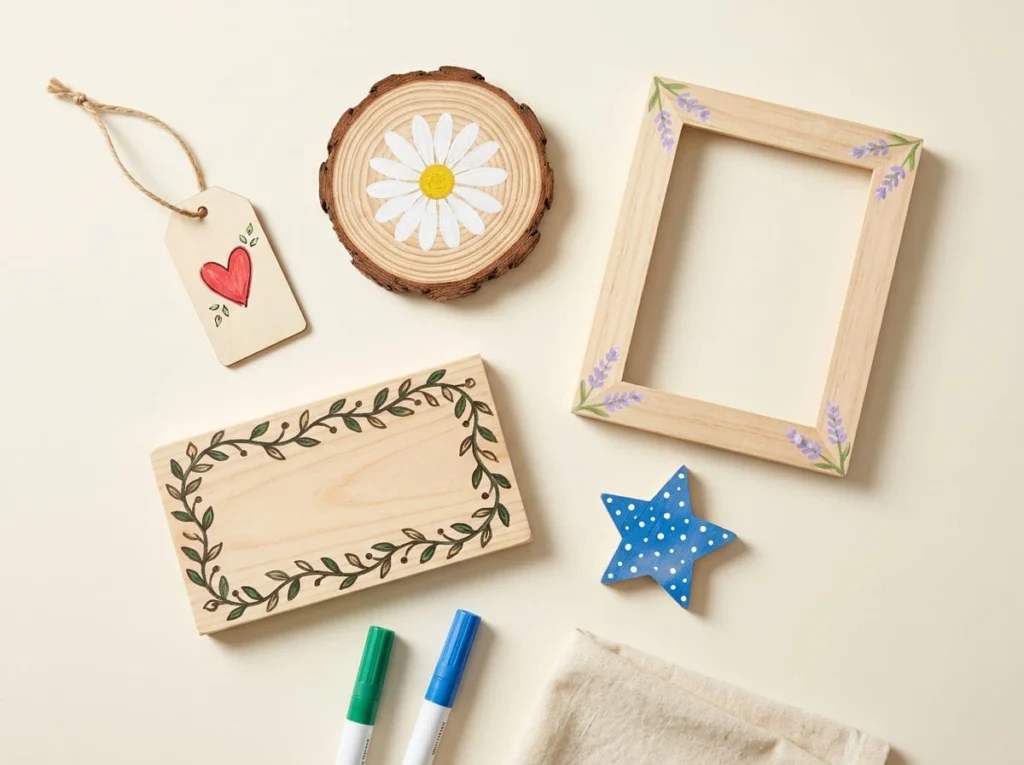
Wooden ornaments are convenient for practicing acrylic paint pen designs.
You can decorate stars, hearts, circles, and other simple wooden shapes.
Try painting seasonal patterns, colorful borders, or small illustrations.
For example, a wooden star could have a blue background with white dots, while a heart-shaped ornament could feature simple pink flowers.
Allow each painted layer to dry before adding details.
These small projects are a practical way to build confidence before decorating larger wooden items.
Common Problems When Using Acrylic Paint Pens on Wood
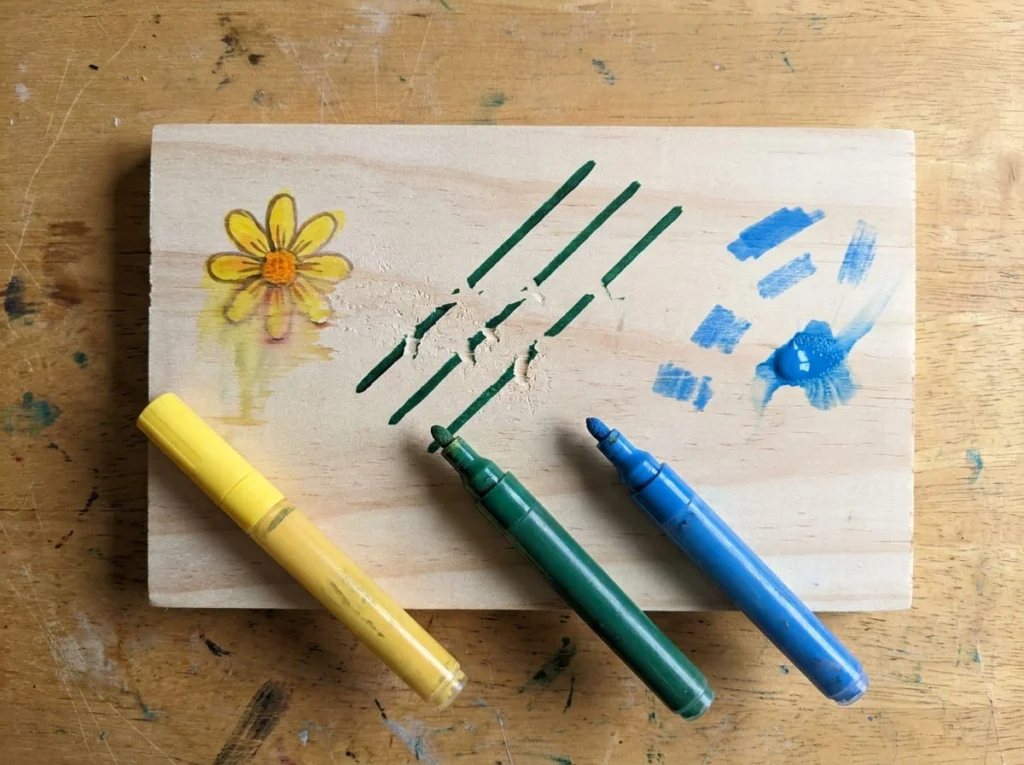
Acrylic paint pens can create beautiful designs on wood, but sometimes the results may not look the way you expected. Colors might appear faded, lines may look uneven, or the paint may not stick properly.
These problems are often related to the wood’s texture, surface preparation, or the way the paint is applied.
Understanding what causes these issues can help you improve your artwork without starting the entire project again.
Acrylic Paint Looks Faded on Wood
If your acrylic paint pen colors look lighter than expected, the wood may be absorbing some of the paint.
Unfinished wood contains natural pores that allow liquid paint to soak into the surface. Dark wood can also make lighter paint colors appear less bright, especially when the markers have limited opacity.
Start by checking whether your paint pens are suitable for wood.
If the surface is very absorbent, consider using a compatible primer or base coat before painting.
You can also allow the first paint layer to dry and apply another thin coat if your markers support layering.
White or light-colored base coats may help bright colors stand out, although they will cover some of the natural wood grain.
Always test the method on a small area before applying it to your entire project.
Acrylic Paint Pen Lines Look Uneven
Uneven lines can make letters, outlines, and detailed patterns difficult to draw.
This often happens when the wooden surface has rough grain, small bumps, or scratches that interrupt the movement of the pen.
Sometimes, the problem comes from inconsistent paint flow or a nib that has collected dried paint.
First, inspect your wooden surface.
If it feels rough, gently sand the area when appropriate and remove the dust before continuing.
Test your pen on scrap paper to check whether the paint flows smoothly.
Use light, steady pressure and avoid forcing the nib across rough wood.
For small details, a suitable fine-tip marker may help you create cleaner lines.
Paint Peels or Scratches Off Wood
Paint that peels or scratches easily may not have adhered properly to the wooden surface.
This can happen when the wood contains dust, grease, or an existing coating that is incompatible with the paint.
Glossy varnished surfaces can be particularly difficult for some acrylic paint pens because the paint may not bond well with the finish.
Another possible cause is handling the project before the paint has fully cured.
If the paint is already peeling, inspect the affected area before applying more color.
Remove loose paint only using a method appropriate for the wood and existing finish. Then clean and prepare the surface before repainting.
For future projects, test paint adhesion on a small sample and follow the manufacturer’s drying recommendations.
A compatible protective coating may improve resistance to handling, but it cannot reliably fix paint that has failed to adhere to the wood underneath.
Acrylic Paint Pens Leave Blobs on Wood
Paint blobs can appear when too much paint reaches the marker tip.
This is particularly common with pump-action markers that have been pressed repeatedly to activate the paint flow.
A large amount of paint can collect in one spot and spread into the wood grain.
To prevent this, prepare and test your marker on scrap paper instead of pumping it directly onto your wooden project.
Once the paint flows evenly, draw using gentle pressure.
If a blob appears, avoid rubbing it across unfinished wood because this may spread the color into the fibers.
Depending on the surface and paint, you may be able to carefully lift some excess wet paint using a suitable method.
If the paint has already absorbed into raw wood, it may be difficult to remove completely.
Paint Smudges When Applying a Sealer
Sometimes, a design looks perfect until a protective coating is applied.
Certain sealers can soften, lift, or disturb acrylic paint pen artwork, especially when the paint has not dried or cured sufficiently.
Compatibility between the paint and protective finish also matters.
Before sealing your project, allow the artwork to dry according to the marker manufacturer’s instructions.
Test your chosen sealer on a separate wooden sample decorated with the same paint pens.
Follow the coating instructions carefully and avoid repeatedly brushing over painted details if the product is not designed for that application.
If the test sample smudges, do not apply the same method to your finished artwork.
Choose a different compatible product or application method instead.
Tips for Better Acrylic Paint Pen Results on Wood
You do not need advanced painting skills to make attractive wooden crafts with acrylic paint pens. A few simple habits can help you create smoother designs and avoid unnecessary mistakes.
Start with a Smooth Wooden Surface
Choose wooden craft pieces with a relatively even surface.
Rough grain can interrupt your pen strokes and make detailed designs harder to draw.
Light sanding may help when the wood and existing finish allow it.
Test Colors Before Painting
Acrylic paint colors can look different on wood than they do on paper.
Test your markers on a spare wooden piece with a similar surface and finish.
This helps you check the color, paint coverage, and line quality before starting your design.
Choose the Right Pen Tip
Fine-tip acrylic paint pens are useful for small letters, outlines, and delicate patterns.
Medium or broader tips can make filling larger wooden shapes easier.
Choose a tip that suits your design and the texture of the wood.
Use Light and Controlled Pressure
Avoid pressing the marker firmly into the wood.
Gentle, steady movements help you control the paint and reduce the risk of damaging the nib.
If the pen stops flowing smoothly, test it separately rather than forcing it against your project.
Let Each Paint Layer Dry
Allow painted areas to dry before adding details or additional coats.
Working over wet paint can cause smudges, uneven coverage, and unwanted color mixing.
Follow the manufacturer’s drying instructions for the markers you are using.
Protect Finished Projects When Necessary
Consider how your wooden decoration will be used.
A small indoor ornament may need less protection than a wooden item that is frequently handled.
When sealing is appropriate, choose a compatible product and test it before applying it to your finished artwork.
Frequently Asked Questions
Can You Use Acrylic Paint Pens on Unfinished Wood?
Yes, many acrylic paint pens can be used directly on unfinished wood. For the best results, choose a smooth, clean, dry surface and test the paint first. Very porous wood may absorb color unevenly, so a compatible primer or base coat can sometimes improve coverage and help prevent bleeding.
Do Acrylic Paint Pens Need Primer on Wood?
Acrylic paint pens do not always need primer on wood. Smooth, unfinished wooden craft pieces may work well without additional preparation. However, highly absorbent wood, dark surfaces, or certain previously coated finishes may benefit from a suitable primer. Always check compatibility before applying one.
Are Acrylic Paint Pens Permanent on Wood?
Some acrylic paint pens create durable marks on properly prepared wood after the paint has fully cured. However, permanence depends on the marker formulation, surface preparation, and how the item is used. Paint may still scratch, fade, or wear away over time, particularly on frequently handled or outdoor objects.
Can You Use Acrylic Paint Pens on Painted Wood?
Yes, compatible acrylic paint pens can be used to decorate painted wooden surfaces. Make sure the existing paint is clean, dry, and firmly attached. Glossy or slippery finishes may require additional preparation because some markers have difficulty adhering to them. Test the paint before decorating the entire object.
Do You Have to Sand Wood Before Using Paint Pens?
You do not always have to sand wood before using acrylic paint pens. If the surface is already smooth and suitable for painting, sanding may be unnecessary. However, rough wood can cause uneven lines and make the nib catch on raised fibers. Gentle sanding can improve the painting surface when appropriate.
How Long Do Acrylic Paint Pens Take to Dry on Wood?
Drying time depends on the acrylic paint pen, the amount of paint applied, the wood’s absorbency, and environmental conditions. Thin marks may become touch-dry relatively quickly, while thicker layers can take longer. Paint may also need additional curing time before sealing or heavy handling. Follow the manufacturer’s instructions for accurate drying and curing times.
What Is the Best Way to Seal Acrylic Paint Pens on Wood?
The best sealing method depends on the marker and wooden surface. Some acrylic paint pen manufacturers recommend compatible water-based clear varnishes for protecting decorated wood. Allow the paint to dry or cure properly, test the sealer on a separate sample, and apply it according to the product instructions. Avoid assuming that every clear finish is suitable.
Can You Use Acrylic Paint Pens on Outdoor Wooden Signs?
You can use certain acrylic paint pens on outdoor wooden signs if the markers and the complete finishing system are suitable for exterior conditions. Wood exposed to sunlight, rain, and changing temperatures needs appropriate preparation and protection. A protective sealer alone does not guarantee that the design will remain waterproof or weatherproof.
Why Do Acrylic Paint Pens Bleed on Wood?
Acrylic paint pens may bleed on wood because the surface contains pores and fibers that absorb liquid paint. The color can spread along the grain, making lines appear blurry. Sanding suitable surfaces, using a compatible primer or base coat, and controlling paint flow can help reduce bleeding. Test the marker before starting a detailed design.
Final Thoughts
Acrylic paint pens on wood offer a simple way to create colorful signs, ornaments, picture frames, and handmade decorations. With suitable markers and a little preparation, even beginners can make attractive designs.
Start with a smooth, clean wooden surface and test your paint before beginning. Use gentle pressure, apply colors patiently, and allow each layer to dry before adding details.
Remember that different types of wood may need different preparation and finishing methods. If your project requires additional protection, choose a compatible sealer and follow the product instructions.
The more you practice on small wooden crafts, the more comfortable you will become creating detailed and colorful artwork.