

A painted rock can look perfect when you finish it, but outdoor weather can slowly damage the design. Rain, sunlight, dirt, moisture, and changes in temperature can all affect painted rocks over time.
Sealing adds a clear protective layer over the artwork. It can help reduce fading, scratching, and damage from normal outdoor conditions. However, sealing works best when the rock is prepared correctly and the paint is completely dry.
If you want to learn how to seal painted rocks outdoors, the most important thing is not to rush. Choose a sealer that is suitable for outdoor use, apply it in light coats, and give each layer enough time to dry.
This guide explains the complete process in simple steps so you can protect your painted rocks without damaging the colours or small details.
Do You Need to Seal Painted Rocks?
Not every painted rock needs to be sealed.
If a rock will stay inside your home on a shelf, desk, or table, it may not face much water, sunlight, or dirt. In this case, sealing may be optional.
Outdoor painted rocks are different.
A rock placed in a garden, near a plant, on a porch, or beside a path can face rain, sunlight, moisture, dust, and changing temperatures.
A clear sealer gives the painted surface an extra layer of protection.
Sealing is especially useful when the rock will be:
Placed outdoors
Handled often
Used as a garden decoration
Placed near soil or plants
Given as a gift that may be kept outside
Exposed to sunlight for long periods
The sealer does not make the rock impossible to damage. It simply gives the paint more protection.
Good preparation is still important.
If you paint over dirt, dust, or a damp surface, the paint may not stick well. Adding sealer on top will not fix that problem.
Think of sealing as the final protective step, not a way to repair poor preparation underneath.
What Happens If You Do Not Seal Painted Rocks?
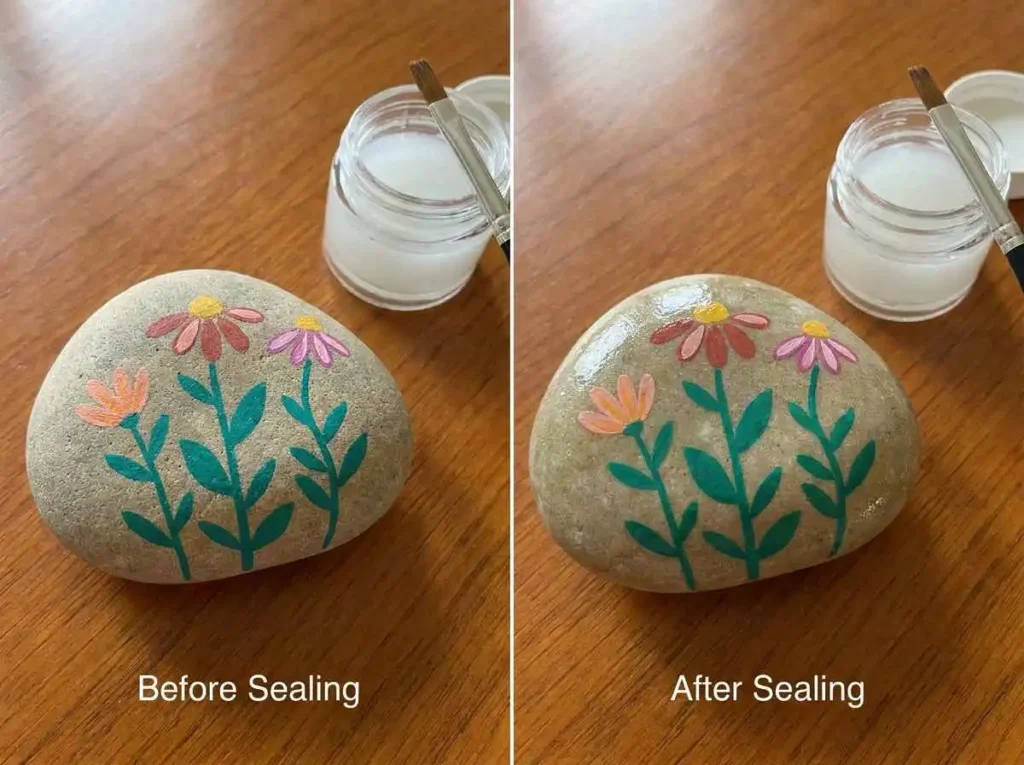
An unsealed painted rock may still last for some time, especially if it stays indoors.
Outside, the result can be different.
Sunlight may slowly make some colours look less bright. Rain and moisture can also affect the painted surface. Dirt may collect on the design, and regular handling can create small scratches.
Over time, you may notice:
Colours becoming dull
Small scratches
Paint wearing away
Edges starting to peel
Marks from dirt or moisture
Loss of small details
This does not mean every unsealed rock will quickly become damaged.
How long the design lasts depends on the paint, the rock surface, the weather, and where the rock is placed.
A rock sitting under a covered porch may stay protected for much longer than a rock lying directly in wet soil.
Sealing simply gives outdoor rock art a better chance of staying attractive for longer.
What You Need Before Sealing Painted Rocks
You do not need many supplies for this step.
First, you need a painted rock that is completely finished.
You will also need a clear sealer that is suitable for the type of paint you used and for outdoor use.
If you are using a spray sealer, place cardboard, paper, or another protective covering under the rock. This helps protect the surface around your work area.
If you are using a brush on sealer, you will also need a clean brush that is suitable for the product.
It can also help to have a small raised surface where the rock can sit while drying. This makes it easier to reach the sides.
Always read the instructions on your sealer before you begin.
Some products need good ventilation. Some should only be used within certain temperature ranges. Others may require gloves or other safety steps.
The product label should always be your main guide.
How Long Should Paint Dry Before Sealing Rocks?
One of the biggest mistakes in rock painting is sealing too soon.
Paint can feel dry on the surface while still being soft underneath.
If you add sealer before the paint is ready, the colours may smear, become cloudy, or react badly with the protective coating.
The drying time depends on several things.
A thin layer of paint may dry faster than a thick layer.
A warm and dry room may also help paint dry faster than a cold or damp space.
The type of paint matters too.
Acrylic paint, paint pens, and other types of craft paint may all have different drying instructions.
There is no single drying time that works for every painted rock.
The safest method is to follow the instructions from the paint maker.
If the surface still feels soft, sticky, or tacky, wait longer.
It is better to give the paint extra time than to seal too early and damage a finished design.
If you are still learning the full painting process, our guide on how to paint rocks with acrylic paint explains how to clean, prepare, paint, and dry your rocks before you reach the sealing stage.
How to Choose a Sealer for Painted Rocks
There are many types of clear sealers, but they do not all work in the same way.
Before choosing one, think about where the rock will be placed and what type of finish you want.
Choose a Clear Finish
For most painted rocks, you want the artwork to stay easy to see.
A clear sealer adds protection without covering the colours with another solid colour.
Check the product information to make sure the finish dries clear.
Some sealers may look slightly cloudy when first applied but become clear as they dry. Others may stay cloudy if they are applied too heavily or under poor drying conditions.
Always follow the product instructions.
Look for Outdoor Suitability
A sealer made only for indoor craft projects may not give enough protection for a rock that will stay outside.
Look for information that says the product can be used outdoors or on exterior projects.
Outdoor suitable sealers are made to handle more difficult conditions than normal indoor finishes.
This is especially important for rocks placed in gardens or other open areas.
Think About Water Resistance
Outdoor rocks will often come into contact with water.
A suitable sealer can help protect the surface from rain and moisture.
However, water resistant does not always mean completely waterproof.
A sealed rock placed in normal rain is very different from a rock that stays underwater or sits constantly in wet soil.
Do not assume that any clear sealer makes a painted rock safe for permanent water exposure.
Look for UV Protection
Sunlight can slowly affect painted colours.
Some outdoor sealers include protection that helps reduce damage from ultraviolet light.
This can be useful for painted rocks placed in sunny areas.
UV protection does not mean the colours can never fade, but it may help them stay brighter for longer.
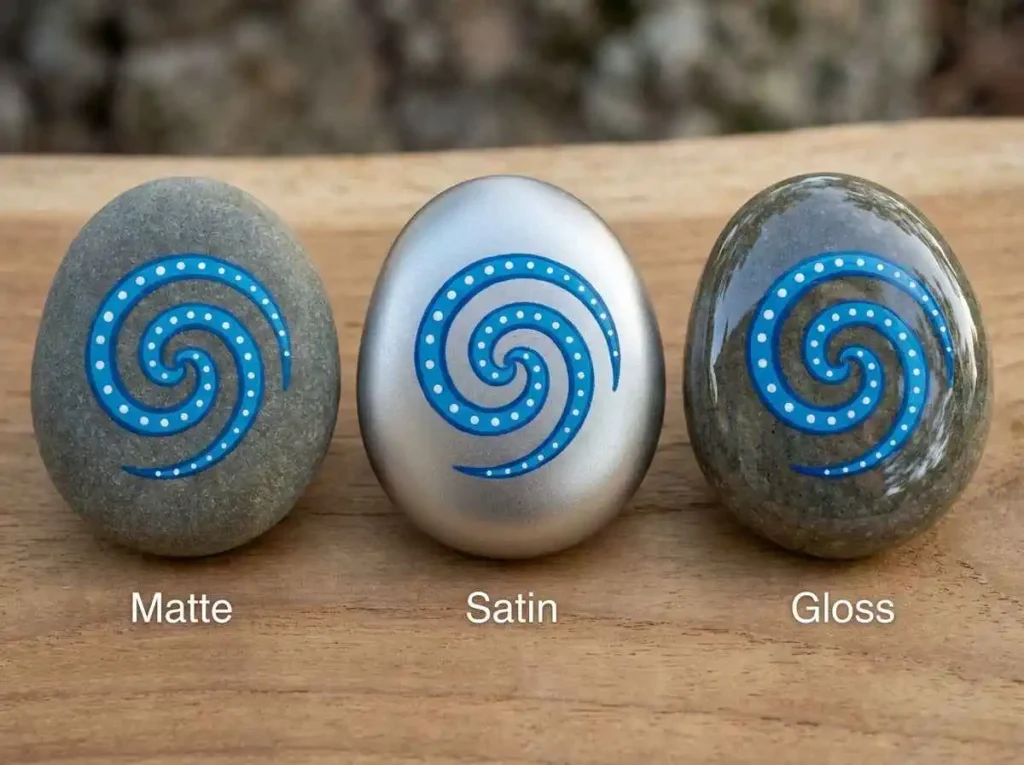
Choose the Finish You Like
Clear sealers can leave different finishes on the surface.
The three common choices are matte, satin, and gloss.
Matte Finish
A matte finish has very little shine.
It gives the rock a more natural appearance and does not reflect much light.
This can work well when you want the artwork to look soft and simple.
Satin Finish
A satin finish has a small amount of shine.
It sits between matte and gloss.
This is a good choice when you want a smooth finish without making the rock look very shiny.
Gloss Finish
A gloss finish gives the rock more shine.
It can make bright colours appear stronger and give the design a polished look.
Gloss finishes may also make reflections more visible, especially in bright sunlight.
There is no single best finish.
Choose the one that matches the look you want.
Check Compatibility With Your Paint
This step is very important.
A sealer should work with the paint that is already on your rock.
Some painted rocks use acrylic paint. Others use paint pens or different types of markers.
A sealer that works well with one paint may behave differently with another.
Read the instructions for both products.
If you are unsure, test the combination on an old painted rock before using it on your favourite design.
Spray Sealer vs Brush On Sealer for Painted Rocks
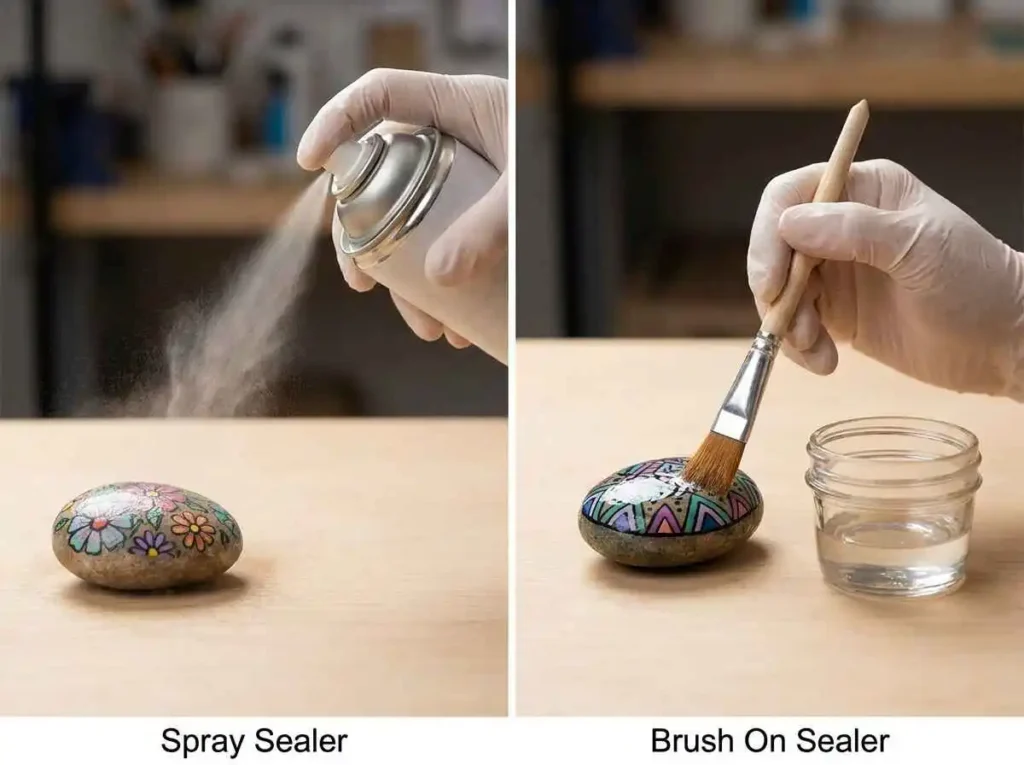
Both spray sealers and brush on sealers can be useful.
The better choice depends on your project and the product you are using.
Spray Sealer
A spray sealer can cover the rock without a brush touching the painted surface.
This can be helpful when your design contains tiny details, dots, or thin lines.
Sprays can also make it easier to cover several rocks in one session.
However, spray products need careful application.
Too much spray in one area can create wet spots, drips, or an uneven finish.
You also need to follow the product instructions about ventilation and where the spray can safely be used.
Brush On Sealer
A brush on sealer gives you more control over exactly where the product goes.
This can be useful for a small project or when you want to cover certain areas carefully.
The main difference is that the brush touches the painted surface.
If the paint is not completely dry, brushing over it may disturb the design.
Brush marks can also appear if the product is applied too thickly or unevenly.
Neither type is automatically better.
A good spray sealer can give an even finish with very little contact.
A good brush on sealer can give excellent control.
Choose the type that suits your paint, your working area, and the finish you want.
How to Seal Painted Rocks Outdoors Step by Step
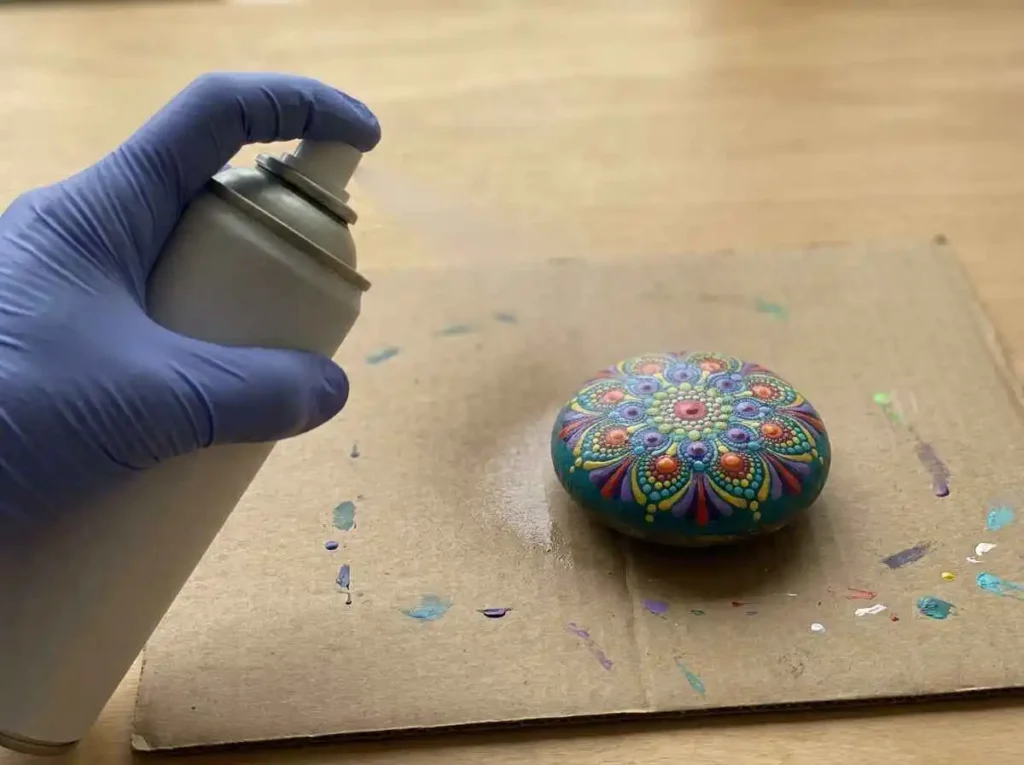
Once your rock is painted and your sealer is ready, you can begin the sealing process.
Take your time.
Trying to finish too quickly is one of the easiest ways to create problems.
Step 1: Make Sure the Rock Is Completely Painted
Check your design carefully before adding sealer.
Look for any missing colour, unfinished outlines, or small details that still need work.
Once the protective coating is applied, making changes may become more difficult.
Finish the artwork first.
Then move to sealing.
Step 2: Let the Paint Dry Properly
Do not seal wet or soft paint.
Give the design enough time to dry according to the instructions for the paint you used.
Check thicker areas carefully because they may need more time than thin lines.
If you are not sure whether the paint is ready, waiting longer is safer than sealing too soon.
Step 3: Remove Dust From the Surface
A painted rock can collect small pieces of dust while it sits and dries.
Remove loose dust gently before sealing.
Do not scrub the surface.
Do not wash a freshly painted rock again.
A soft clean cloth or another gentle method can be enough, depending on the paint.
The goal is simply to prevent dust from becoming trapped under the clear finish.
Step 4: Prepare Your Work Area
Protect the table or surface around you.
If you are using a spray, work in a place that follows the safety and ventilation instructions on the product.
If you are working outside, avoid strong wind because it can blow dust and dirt onto the wet finish.
Place the rock where you can reach it easily without having to keep touching it.
Step 5: Test the Sealer First
This small step can save a finished rock.
Try the sealer on an old painted stone, a practice rock, or another test surface prepared with the same paint.
Let it dry.
Check whether the colours stay clear.
Look for smearing, cloudiness, colour changes, or other unwanted effects.
If everything looks good, move on to your finished rock.
Step 6: Apply a Light First Coat
Start with a light and even coat.
More sealer does not always mean more protection.
A very thick layer can create runs, puddles, bubbles, or long drying times.
If you are using a spray, move it smoothly according to the product instructions.
If you are using a brush on product, apply it gently and evenly.
Do not keep brushing over the same area again and again.
Step 7: Let the First Coat Dry
Allow the first coat to dry before adding more sealer.
Do not touch the surface repeatedly to check it.
Follow the drying time given by the manufacturer.
Different products can need very different amounts of time.
Step 8: Apply Another Coat if Needed
Some projects may need more than one coat.
Several light coats can often give a smoother result than one very heavy coat.
However, the correct number depends on the sealer you are using.
Follow the product directions instead of choosing a fixed number for every rock.
Step 9: Seal the Sides and Back if Needed
Do not think only about the painted front.
An outdoor rock may also contact moisture around the sides and underneath.
Depending on where the rock will be placed, you may want to protect these areas too.
Let one side dry properly before turning the rock over.
Step 10: Let the Rock Cure Before Putting It Outside
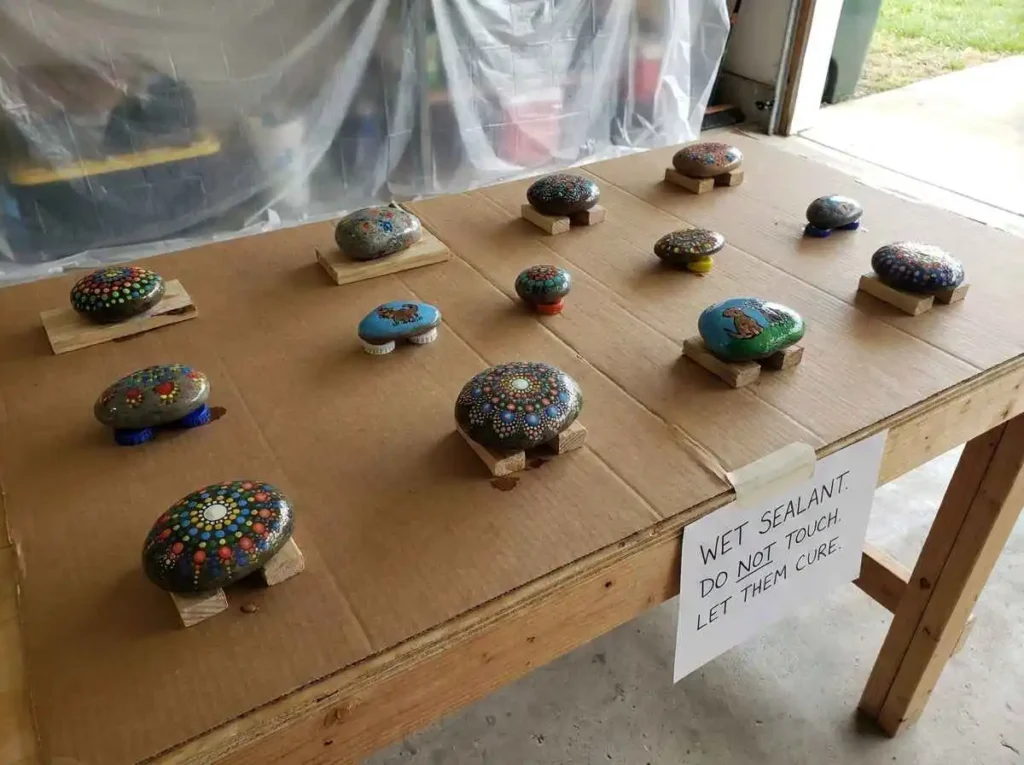
This final step is easy to forget.
A sealer can feel dry before it is fully ready for outdoor conditions.
Dry means the surface may no longer feel wet.
Cured means the protective finish has had enough time to become fully set.
Follow the curing instructions for your sealer before placing the rock outside.
Waiting a little longer at this stage can help protect all the work you have already done.
How Many Coats of Sealer Do Painted Rocks Need?
There is no single number of coats that works for every painted rock.
The right amount depends on the type of sealer, the paint underneath, the rock surface, and where the rock will be placed.
Some sealers may give enough protection with a small number of coats. Others may need additional layers.
The best approach is to follow the instructions on the sealer you are using.
In many cases, several light coats are easier to control than one very thick coat. A heavy layer can collect in small areas, create runs, or take much longer to dry.
Let each coat dry as directed before adding another.
You should also think about where the rock will stay. A stone displayed under a covered porch may need less protection than one placed in an open garden where it faces regular rain and strong sunlight.
More sealer is not always better.
The goal is to create an even protective layer without hiding or damaging the artwork.
How Long Should Sealed Rocks Dry Before Going Outside?
Do not move a freshly sealed rock outdoors as soon as the surface feels dry.
There is an important difference between drying and curing.
A sealer may become dry enough to touch fairly quickly, but the protective coating may still be becoming stronger underneath.
This is called curing.
The curing time can be different for every product. Temperature, moisture in the air, and the thickness of the coating can also affect the process.
Always check the instructions on your sealer.
If the product says to wait before exposing the surface to water or outdoor conditions, follow that advice.
Putting a rock outside too early may expose the fresh finish to rain, dirt, or moisture before it is ready.
If you are unsure, giving the rock extra time in a clean and dry place is usually better than rushing it outdoors.
Patience during this final stage can help protect the painting you spent time creating.
How to Make Painted Rocks Last Longer Outdoors
Sealer is important, but it is only one part of keeping painted rocks in good condition.
Good results begin before the sealing step.
Start With a Clean Rock
Paint sticks better to a surface that is free from dirt, dust, and loose material.
Wash and dry the rock properly before painting.
Use Paint That Works Well on Rocks
Choose paint that is suitable for craft surfaces such as stone.
Acrylic paint and many paint markers are commonly used for rock art.
Using suitable paint gives the sealer a better surface to protect.
Let the Paint Dry Fully
Do not rush from painting straight into sealing.
Paint that is still soft underneath can cause problems later.
Follow the drying guidance for the paint you used.
Choose a Sealer Suitable for Outdoor Use
If your rock will stay outside, choose a clear finish that is made for outdoor conditions.
An indoor craft finish may not give the same level of protection from rain, moisture, and sunlight.
Apply Light and Even Coats
Try to create a smooth protective layer.
Avoid large puddles or very thick areas.
Let each coat dry before adding another.
Allow the Sealer to Cure
Do not place the rock outside until the finish has had enough time to cure.
A surface that feels dry may still need more time before it is ready for outdoor weather.
Avoid Constant Water Exposure
A sealed garden rock can handle normal outdoor conditions better than an unprotected rock, but it should not automatically be treated as something made for permanent water exposure.
Avoid placing painted rocks where they will stay underwater or sit in constantly wet soil unless the materials you used are specifically suitable for those conditions.
Check Your Rocks Over Time
Outdoor finishes do not last forever.
Look at your painted rocks from time to time.
If the clear finish begins to wear, fade, crack, or lose its protective appearance, the rock may eventually need maintenance.
Can You Seal Rocks Painted With Paint Pens?
Yes, many rocks decorated with paint pens can be sealed.
The important thing is making sure the paint pen and the sealer work well together.
Paint pens can contain different types of paint. Some use acrylic paint, while others use different formulas.
Let the design dry properly before applying anything over it.
Then check the instructions for both the paint pen and the sealer.
If you are unsure, test the combination on a practice rock first.
A test is especially useful when your design contains small letters, dots, outlines, or several colours.
These details can be difficult to repair if they smear.
If you are still choosing markers for your projects, our guide to the best paint pens for rock painting explains which tip sizes and paint types are useful for beginners, lettering, dots, and detailed designs.
Once the paint pen design is completely dry and the products are compatible, sealing can add another layer of protection for outdoor display.
Common Mistakes When Sealing Painted Rocks
Most sealing problems happen because the process is rushed.
Avoiding a few common mistakes can make a big difference.
Sealing Paint That Is Still Wet
This is one of the biggest mistakes.
Wet or soft paint may smear, change colour, or react badly when the sealer is applied.
Always let the artwork dry first.
Applying One Very Thick Coat
A thick coat may look like it will give more protection, but it can create problems.
The finish may run, collect around the bottom of the rock, or take much longer to dry.
Light coats are usually easier to control.
Holding a Spray Too Close
Spraying too close can place too much product in one small area.
This may create wet spots or runs.
Follow the distance and application instructions printed on the spray product.
Forgetting to Test the Sealer
A finished rock is not the best place to discover that two products do not work well together.
Use a practice rock first when possible.
Sealing in Poor Conditions
Very damp air, strong wind, dust, or unsuitable temperatures can affect the finish.
Choose a clean working area and follow the conditions recommended by the sealer maker.
Touching the Rock Too Soon
It can be tempting to check whether the surface is dry.
Touching it too soon may leave marks or fingerprints.
Give the finish time to dry without disturbing it.
Assuming Sealed Means Indestructible
A sealed rock can still become damaged.
Sealer helps protect the artwork, but it cannot stop every scratch, weather problem, or change caused by long outdoor exposure.
Why Did My Painted Rock Smear After Sealing?
Smearing can be frustrating, especially when the design looked perfect before the sealer was added.
One common reason is that the paint was not fully dry.
Another possibility is that too much sealer was applied at once.
A brush can also disturb paint if you press too hard or move over the same area repeatedly.
Sometimes the paint and sealer simply do not work well together.
If smearing happens, check the instructions for both products before trying the same combination again.
For your next rock, allow more drying time and test the sealer first.
If you use a brush on finish, apply it gently.
If you use a spray, begin with a light coat instead of soaking the surface.
Testing may take a few extra minutes, but it can protect a design that took much longer to paint.
Why Is My Sealer Cloudy or Sticky?
A clear sealer should normally allow the artwork underneath to remain visible.
If the finish looks cloudy or stays sticky, several things may have gone wrong.
Too much product may have been applied.
The air may have been too damp.
The temperature may not have been suitable.
The previous coat may not have dried enough before another coat was added.
The paint and sealer may also be incompatible.
Do not immediately add another thick layer to try to fix the problem.
Check the product instructions first.
Give the finish enough time to dry under the recommended conditions.
If the problem continues, test the same products on a practice rock before using them again on finished artwork.
Can Painted Rocks Stay Outside All Year?
Painted rocks can stay outdoors for long periods, but how well they last depends on the conditions around them.
A mild climate is different from a place with very hot summers, heavy rain, snow, or freezing temperatures.
A rock sitting under a covered area is also better protected than one lying directly in an open garden.
Outdoor rocks may face:
Strong sunlight
Heavy rain
Snow
Frost
Dirt
Moist soil
Changes between hot and cold weather
Over time, these conditions can affect both the paint and the clear finish.
Sealing can improve protection, but it does not guarantee that the artwork will look new forever.
If you live somewhere with harsh winters or very wet weather, you may choose to bring special painted rocks indoors during the most difficult months.
For normal garden decorations, check the surface from time to time and look for signs of wear.
Frequently Asked Questions
What is the best way to seal painted rocks for outdoors?
Let the paint dry properly first. Choose a clear sealer that is suitable for outdoor use and compatible with your paint. Test it on a practice rock, then apply light and even coats. Allow the finish to dry and cure before placing the rock outside.
Do you need to seal acrylic paint on rocks?
You do not always need to seal acrylic paint on rocks kept indoors.
For outdoor rocks, sealing can provide useful protection from moisture, sunlight, dirt, and handling.
Can I use clear spray sealer on painted rocks?
Yes, if the spray sealer is suitable for your paint and intended for the conditions where the rock will be used.
Always read the product instructions and test it before applying it to an important design.
How many coats of sealer should I put on painted rocks?
There is no single number for every project.
Follow the instructions for the sealer you are using. Light and even coats are usually easier to control than one very heavy coat.
How long should acrylic paint dry before sealing?
Drying time depends on the paint, thickness of the layers, temperature, and other conditions.
Follow the paint maker’s instructions and make sure the surface is no longer soft or tacky before sealing.
Can you seal rocks painted with paint pens?
Yes, many paint pen designs can be sealed.
Make sure the paint is completely dry and check that the sealer is compatible with the type of paint inside the marker.
Testing first is a good idea.
Does sealing painted rocks make them waterproof?
Not always.
A sealer can improve protection from water and moisture, but water resistance is not the same as complete waterproofing.
The final level of protection depends on the paint, sealer, application, and outdoor conditions.
Should I seal the bottom of painted rocks?
It can be useful when the rock will stay outdoors, especially if the bottom may contact damp soil or another wet surface.
Whether you need to seal the whole rock depends on the project and the instructions for the sealer you choose.
Final Thoughts
Learning how to seal painted rocks outdoors is mostly about good preparation and patience.
Let the paint dry fully before you begin. Choose a clear sealer that works with your paint and is suitable for outdoor use. Apply it in light, even coats and allow enough time for drying and curing.
Do not rush the process just because the surface feels dry.
A good sealer can help protect painted rocks from normal rain, sunlight, dirt, moisture, and handling, but it does not make them impossible to damage.
When you prepare the rock carefully, use suitable materials, and give each layer enough time, your painted designs have a much better chance of staying bright and attractive outside.