
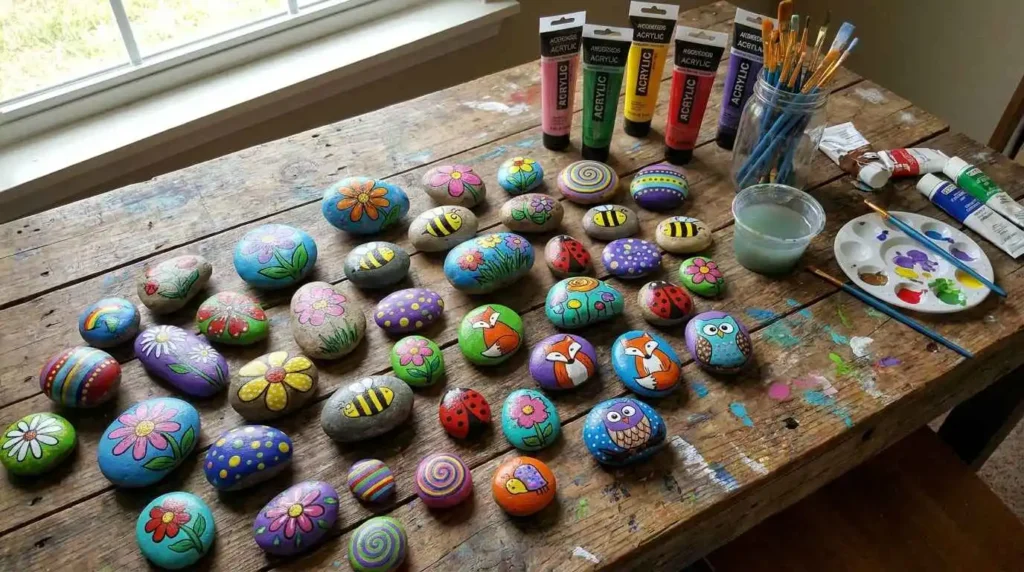
Painting rocks with acrylic paint is a simple and enjoyable craft that anyone can try. You only need a few basic supplies like smooth rocks, acrylic paint, brushes, and a sealer to create beautiful handmade artwork. With the right steps, you can turn ordinary rocks into colorful decorations, garden art, or thoughtful handmade gifts.
In this guide, you will learn how to paint rocks with acrylic paint from start to finish. You will discover how to choose the right rocks, prepare them for painting, create beginner friendly designs, add details, and protect your finished artwork. Whether you are a complete beginner or someone looking for a fun new hobby, rock painting is an easy way to express your creativity.
The best part is that you do not need professional art skills. A little practice, patience, and imagination are enough to create amazing painted rocks.
What You Need to Paint Rocks with Acrylic Paint
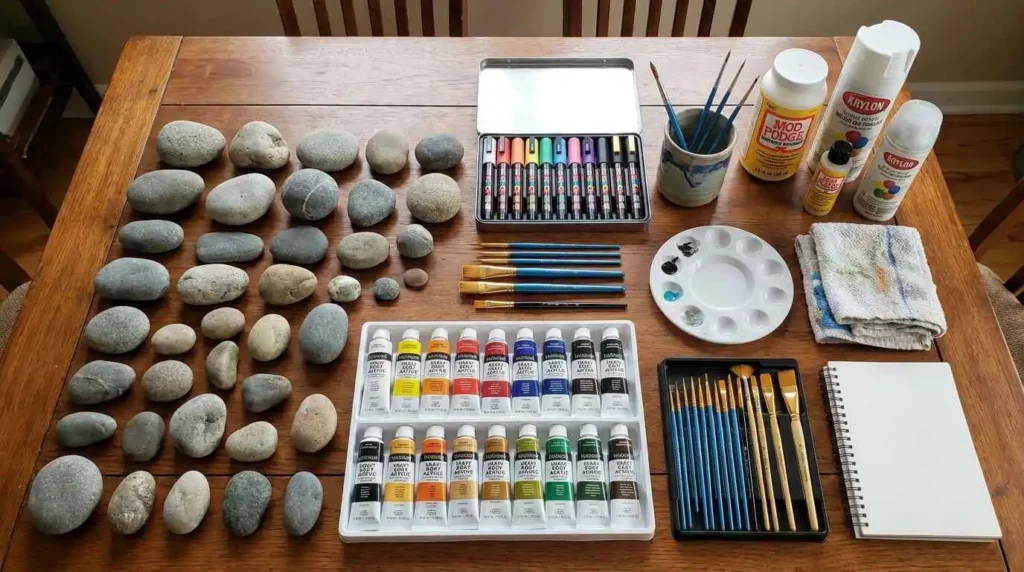
Before starting your project, gather all the necessary supplies. Having the right materials makes the painting process easier and helps your finished design look better.
The basic supplies you need include smooth rocks, acrylic paint, brushes, paint pens, water, paper towels, and a protective sealer.
Smooth Rocks
The first thing you need is a good surface to paint on. Smooth rocks are the best choice because they provide an even area for your acrylic paint. They make it easier to create clean lines, patterns, and detailed designs.
River rocks, beach rocks, and garden stones are often great options because they usually have a smoother texture. Try to choose rocks with flat or slightly rounded surfaces because they give you more space to work.
Avoid rocks with deep cracks or very rough surfaces because they can make painting more difficult. However, small natural textures can also add a unique look to your artwork.
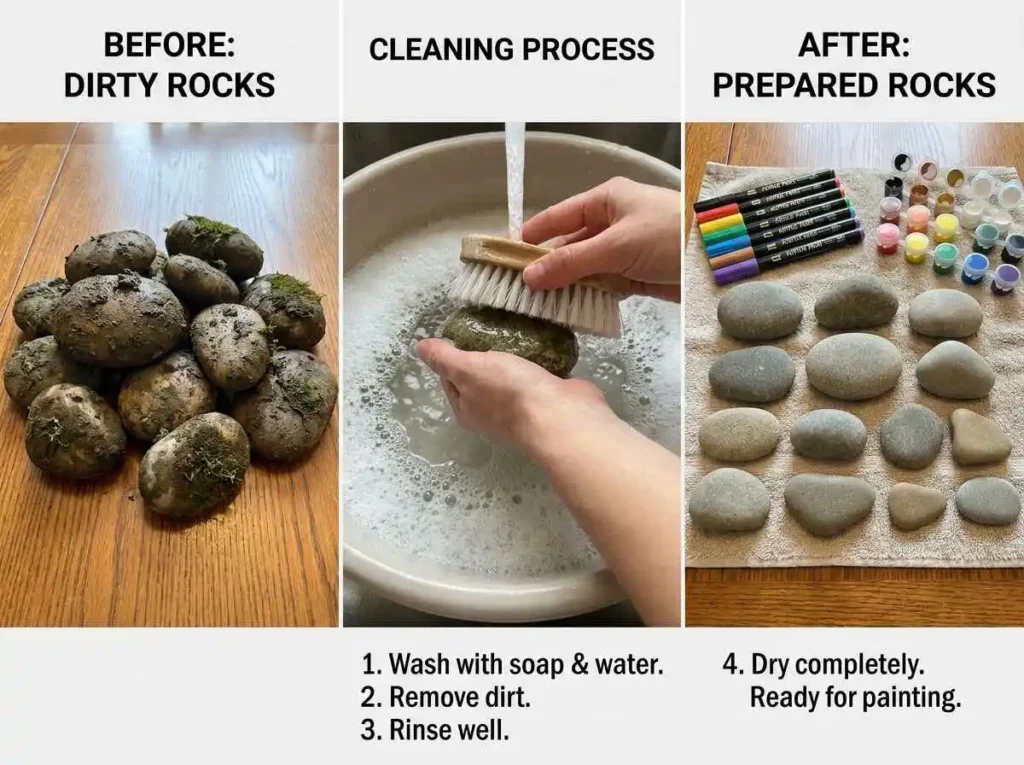
Before painting, clean your rocks with soap and water to remove dirt and dust. Let them dry completely because moisture can prevent acrylic paint from sticking properly.
Acrylic Paint
Acrylic paint is one of the best choices for rock painting because it is easy to use, dries quickly, and comes in many bright colors. It works well on stone surfaces and allows beginners to create both simple and detailed designs.
Good acrylic paint should have:
- Bright colors
- Smooth application
- Good coverage
- Easy layering ability
- Long lasting results
For indoor projects, regular craft acrylic paint is usually enough. If you plan to place your painted rocks outside, choose a stronger paint option that works well in outdoor conditions.
Paint Brushes and Other Tools
The right tools can make your rock painting experience much easier. You do not need a large collection of supplies. A few basic tools are enough to start.
Different brush sizes help you create different effects:
- Large brushes help paint backgrounds
- Medium brushes work well for shapes
- Small brushes help create details
Paint pens are also useful for adding fine lines, small dots, words, and finishing touches.
Other helpful supplies include:
Water container:
Used for cleaning brushes between colors.
Paper towels:
Useful for cleaning brushes and fixing small mistakes.
Pencil:
Helpful for drawing your design before painting.
Palette:
A small surface for mixing colors.
Rock Sealer
A sealer protects your finished artwork and helps your painted rocks last longer. It creates a clear protective layer that helps reduce fading, scratches, and damage from moisture.
Indoor rocks may only need a basic clear finish. Outdoor rocks need a stronger sealer because they are exposed to sunlight and weather changes.
Common sealer options include:
Spray sealer:
Easy to apply and provides an even finish.
Brush on sealer:
Gives you more control when applying protection.
Gloss sealer:
Adds a shiny finish and makes colors appear brighter.
Matte sealer:
Creates a natural finish without shine.
How to Paint Rocks with Acrylic Paint Step by Step
Painting rocks becomes easier when you follow a simple process. Taking your time during each step will help you create cleaner and more attractive designs.
Step 1 Choose and Prepare Your Rocks
Start by selecting rocks that have a smooth surface and enough space for your design. The size of your rock depends on what you want to paint.
Small rocks work well for simple designs like:
• Hearts
• Dots
• Small flowers
Larger rocks are better for:
• Animals
• Detailed patterns
• Landscape designs
After choosing your rocks, clean them properly.
Follow these steps:
- Wash the rocks with soap and water.
- Remove dirt from cracks and rough areas.
- Rinse them well.
- Allow them to dry completely.
A clean surface helps acrylic paint stick better and creates a smoother finish. If your rock has sharp edges or a rough texture, you can lightly sand it. This step is optional but can help create a smoother painting surface.
Step 2 Apply a Base Coat
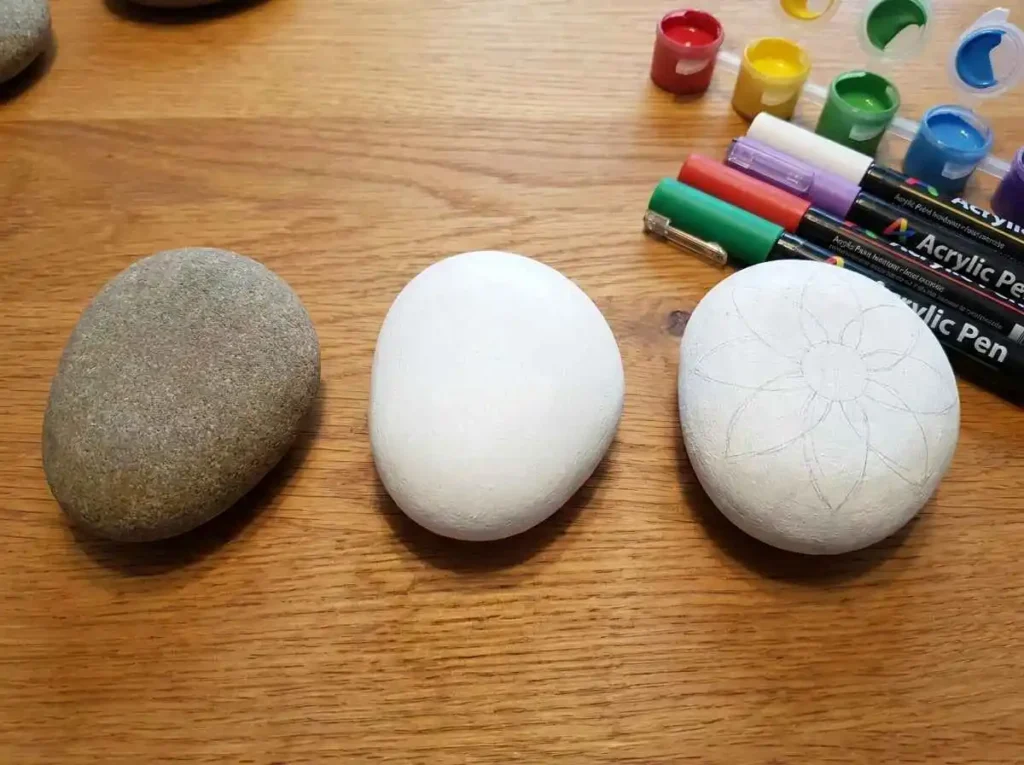
A base coat is the first layer of paint applied before creating your main design. It helps create an even background and allows your colors to appear brighter.
Many beginners use white as a base coat because it makes other colors stand out. However, you can choose any background color depending on your design.
To apply a base coat:
- Choose your background color.
- Apply a thin layer using a medium brush.
- Cover the surface evenly.
- Let it dry completely.
Avoid using too much paint because thick layers take longer to dry and can create an uneven surface. Thin layers usually create better results. If the color does not look strong enough, add another layer after the first one dries.
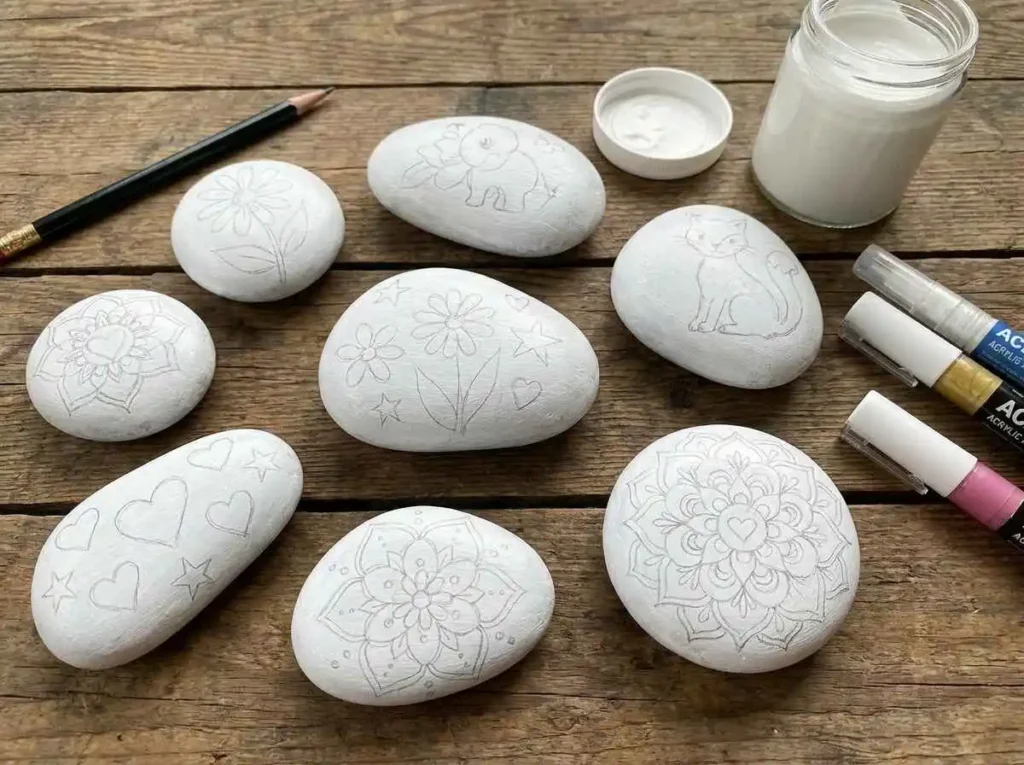
Step 3 Plan Your Rock Painting Design
Before adding colors, decide what you want to create. Planning your design helps you avoid mistakes and makes the painting process easier.
Simple beginner designs include:
• Flowers
• Animals
• Stars
• Hearts
• Mandala patterns
• Nature scenes
You can lightly draw your design with a pencil before painting. This gives you a guide and helps keep your artwork balanced.
Another option is using templates. Templates are useful when creating repeated designs or when you need help with shapes. Remember, your first design does not need to be perfect. Rock painting is about creativity and enjoying the process.
Step 4 Paint Your Rock Design
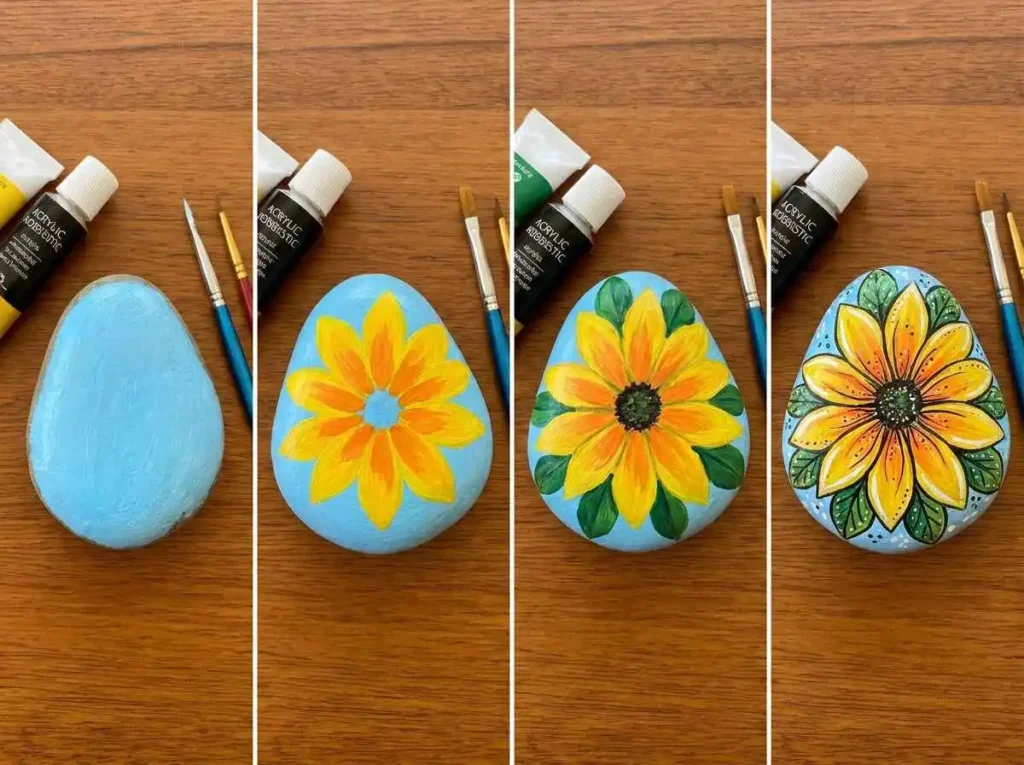
Now it is time to add your colors. Start with larger areas first and add smaller details later.
A simple painting order is:
- Paint the main colors.
- Allow each layer to dry.
- Add smaller shapes and patterns.
- Add final details.
Using multiple thin layers creates better results than applying a thick layer at once.
For example, when painting a flower, start with the background color, add the petals, and then add details like lines or highlights.
If you make a mistake, do not worry. Acrylic paint is easy to correct. Let the area dry and paint over it with your background color.
Step 5 Add Final Details and Highlights
Small details can make a simple rock design look much more professional.
You can use paint pens or small brushes to add:
• Outlines
• Small dots
• Patterns
• Text
• Extra decorations
Adding highlights is another way to improve your artwork. Small touches of lighter colors can create depth and make your design look more interesting.
Take your time during this step because small details often make the biggest difference.
Step 6 Seal Your Painted Rock
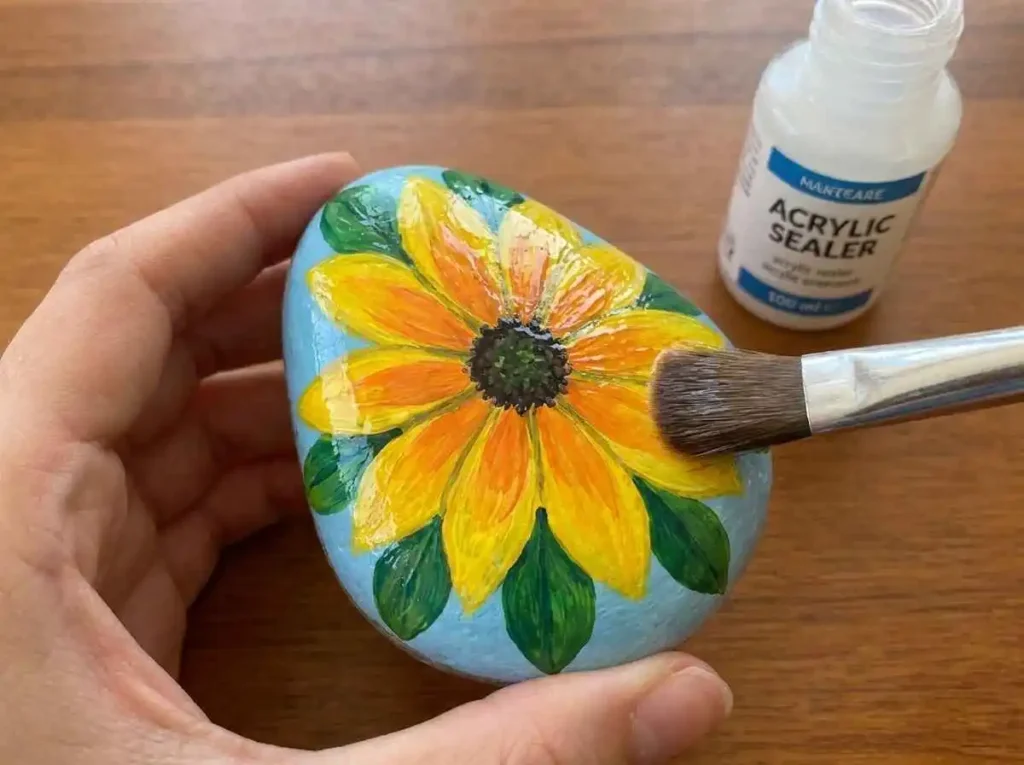
The final step is protecting your artwork with a sealer. Wait until your paint is completely dry before applying any protective coating.
A sealer helps:
• Protect colors
• Reduce scratches
• Prevent moisture damage
• Improve durability
For outdoor rocks, use a weather resistant sealer. Apply thin and even coats according to the product instructions.
A properly sealed painted rock can stay beautiful for a much longer time.
Best Acrylic Paint for Rock Painting
Choosing the right acrylic paint can improve your results. Acrylic paint is popular because it dries quickly, works well on rocks, and allows you to create colorful designs easily.
The best paint depends on your skill level and project type.
What Makes Acrylic Paint Suitable for Rock Painting
Acrylic paint works well because it:
• Sticks well to prepared rock surfaces
• Comes in many colors
• Allows multiple layers
• Dries quickly
• Works for simple and detailed designs
For beginners, acrylic paint is a great choice because it does not require complicated techniques.
Paint Quality Factors to Consider
When choosing acrylic paint, consider these factors:
Color Strength
Strong pigments create brighter and more attractive designs.
Coverage
Good coverage means you need fewer layers to achieve the desired look.
Smooth Texture
A smooth paint texture makes brushing easier and helps create cleaner designs.
Durability
If your rocks will stay outdoors, choose paint that can handle changing weather conditions.
Beginner Friendly Acrylic Paint Options
Beginners can start with affordable acrylic paint sets that include several basic colors.
These paints work well for:
• Simple designs
• Practice projects
• Kids crafts
• Decorative rocks
Professional Acrylic Paint Options
Experienced artists may prefer higher quality acrylic paints because they offer stronger colors and better control.
They are useful for:
• Detailed artwork
• Realistic designs
• Selling handmade painted rocks
Acrylic Paint Types for Rock Painting
| Paint Type | Best For |
| Student acrylic paint | Beginners |
| Artist acrylic paint | Detailed designs |
| Outdoor acrylic paint | Exterior projects |
Student acrylic paint is affordable and beginner friendly.
Artist acrylic paint provides better color quality for detailed work.
Outdoor acrylic paint is designed for projects that need extra protection.
Do You Need to Prime Rocks Before Painting?
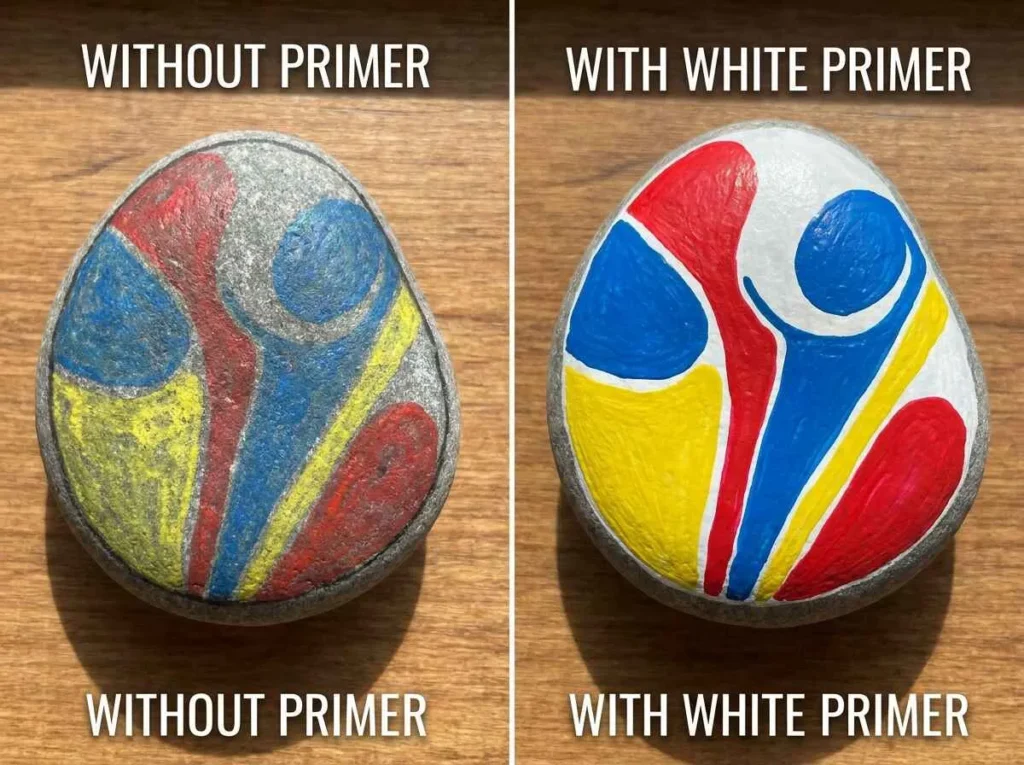
No, you do not always need to prime rocks before painting. Acrylic paint can work well directly on clean and dry rocks. However, using a primer can improve your results by creating a smoother surface and helping your colors look brighter.
Priming is especially helpful when you are painting detailed designs or working with dark colored rocks. It gives your acrylic paint a better background and can make your artwork look more polished.
When Primer Helps
Primer is useful when the natural surface of the rock makes painting more difficult. Some rocks have dark colors, rough textures, or uneven areas that can affect the final design.
A primer can help when:
• You want bright colors to stand out
• The rock has a dark surface
• You are creating detailed artwork
• The rock has a rough texture
• You want a smoother painting area
For example, light colors like yellow, pink, or white may not look as bright on a dark rock. A primer creates a lighter surface that helps these colors appear stronger.
Benefits of White Primer
White primer is a popular choice for rock painting because it creates a clean background that works well with many designs.
Benefits include:
Makes Colors Brighter
A white base helps acrylic colors show their true shades. Bright colors often look stronger when painted over a light background.
Improves Paint Coverage
Primer helps hide the natural color of the rock, which means you may need fewer layers of acrylic paint.
Creates a Smoother Surface
Some rocks have small bumps or uneven areas. A primer layer can make the surface easier to paint.
Helps Detailed Designs Stand Out
If you are creating small patterns, flowers, animals, or mandala designs, a white background can make the details easier to see.
When You Can Skip Priming
Priming is not required for every project. Many beginners create beautiful painted rocks without using primer.
You can skip priming when:
• The rock already has a light color
• You are creating simple designs
• You like the natural look of the stone
• You are making a quick craft project
• You are practicing painting techniques
The most important things are choosing a clean rock and allowing it to dry completely before painting.
Trying both methods is a great way to learn. Some designs may look better with a primer, while others may look more natural when painted directly on the stone.
How Long Does Acrylic Paint Last on Rocks?
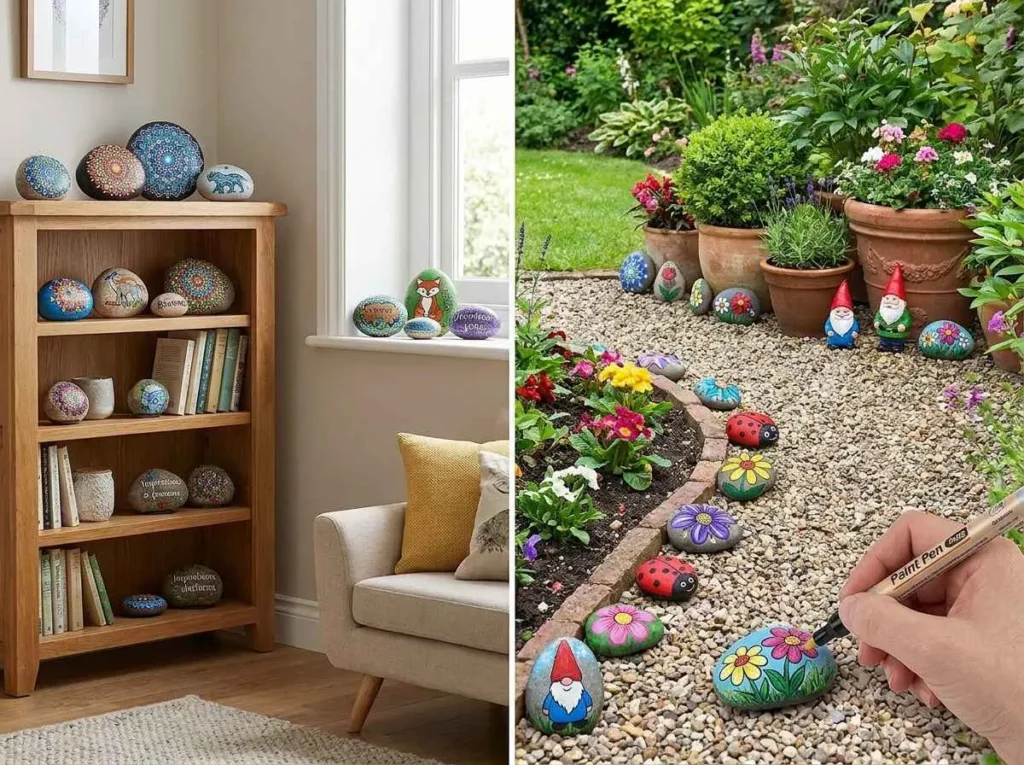
Acrylic paint can last for a long time on rocks when the surface is prepared correctly and the artwork is protected properly. The lifespan of painted rocks depends on where you keep them, the quality of materials, and the conditions around them.
Indoor painted rocks usually last much longer because they are protected from weather. Outdoor painted rocks need more care because sunlight, rain, and temperature changes can affect the paint over time.
Indoor Painted Rocks
Indoor painted rocks can stay beautiful for many years because they are protected from harsh conditions.
They are not exposed to:
• Rain
• Direct sunlight
• Moisture
• Extreme temperature changes
If you use good quality acrylic paint and prepare the surface properly, indoor rocks can maintain their colors and finish for a long time.
A clear sealer can still be useful indoors because it helps protect against dust, scratches, and regular handling.
Outdoor Painted Rocks
Outdoor painted rocks require more protection because they face natural conditions every day.
Without proper protection, outdoor rocks may experience:
• Fading from sunlight
• Damage from moisture
• Cracking from temperature changes
• Loss of color brightness
Using quality acrylic paint and a weather resistant sealer can help your artwork handle outdoor conditions better.
The location also matters. A painted rock placed in a covered garden area may last longer than one placed under direct sunlight and heavy rain.
Factors That Affect Durability
Several things can affect how long your painted rocks last.
Rock Preparation
Clean and dry rocks provide a better surface for acrylic paint. Dirt or moisture can reduce paint adhesion.
Paint Quality
Better quality paint usually provides stronger colors and better durability.
Weather Exposure
Outdoor rocks exposed to harsh weather may need extra protection.
Number of Paint Layers
Thin and even layers create better coverage and a stronger finish.
Drying Time
Allowing each layer to dry properly helps prevent smudging and improves the final result.
Importance of Sealing
Sealing is one of the most important steps for protecting painted rocks. A clear sealer adds a protective layer over your design and helps reduce damage.
A good sealer helps:
• Keep colors brighter
• Protect against scratches
• Reduce moisture damage
• Improve outdoor durability For indoor rocks, a simple clear finish may be enough. For outdoor rocks, choose a sealer designed for exterior use.
Easy Rock Painting Ideas for Beginners
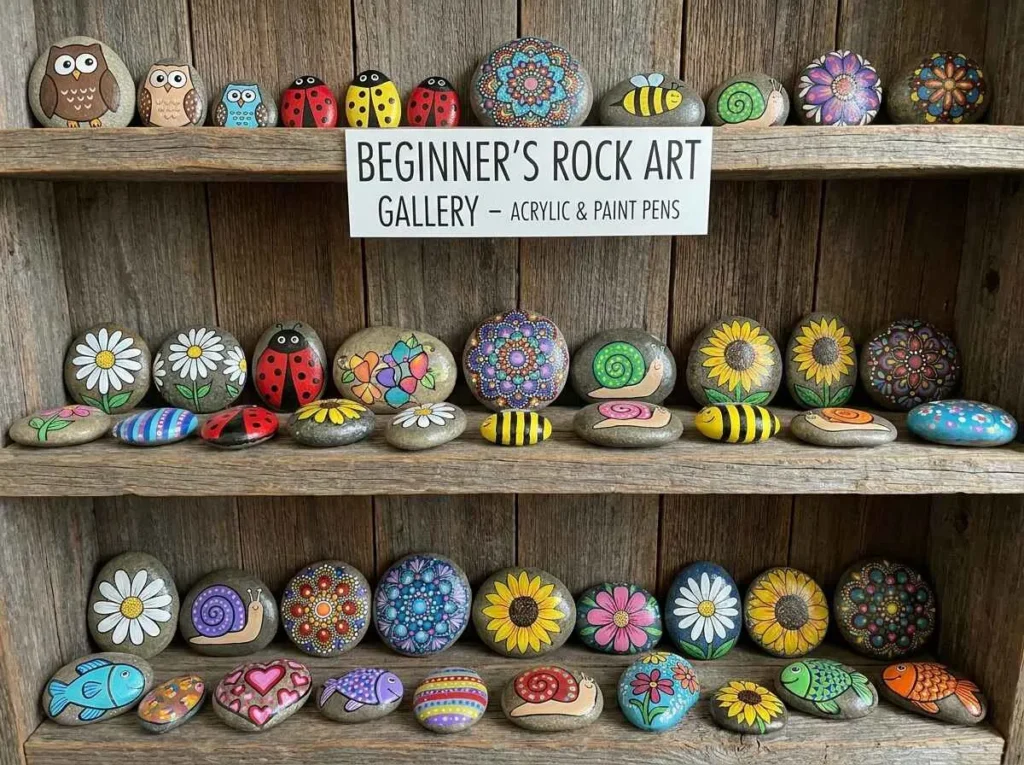
One of the best parts of rock painting is choosing creative designs. Beginners do not need complicated artwork to create something beautiful. Simple shapes, colors, and patterns can create amazing results.
Painted rocks can be used as home decorations, garden art, handmade gifts, or fun craft projects.
Animal Rock Painting Ideas
Animal designs are popular because they are fun and easy to customize.
Ladybug Rock Painting
Ladybugs are perfect for beginners because they use simple shapes and colors.
You can create one by:
• Painting the rock red
• Adding black spots
• Creating eyes with white and black paint
Small rounded rocks work especially well for ladybug designs.
Owl Rock Painting
Owls allow you to experiment with colors and patterns.
Simple owl ideas include:
• Large eyes
• Colorful feathers
• Small wing details
• Different background colors
Cat Rock Painting
Cat designs are cute and beginner friendly.
Ideas include:
• Sleeping cats
• Cartoon faces
• Paw prints
• Different cat colors
Fish Rock Painting
Fish designs are great for using bright colors.
You can create:
• Tropical fish
• Ocean scenes
• Colorful scales
• Simple cartoon fish
Flower Rock Painting Ideas
Flower designs are relaxing and easy to create.
Simple Flowers
Start with basic flowers using circles and petals.
Beginner ideas include:
• Daisies
• Sunflowers
• Tulips
• Colorful garden flowers
Garden Designs
Garden themed rocks can add a creative touch to outdoor spaces.
Ideas include:
• Flowers and leaves
• Butterflies
• Garden signs
• Nature patterns
Colorful Patterns
You can combine flowers with dots, lines, and different colors to create unique designs.
Mandala Rock Painting Ideas
Mandala designs use repeated patterns and dots to create beautiful artwork. Although some designs look complex, beginners can start with simple patterns.
Dot Painting Techniques
Dot painting is one of the easiest ways to create attractive rock designs.
Simple techniques include:
• Starting from the center
• Creating circles with dots
• Using different dot sizes
• Repeating color patterns
Tools Needed for Mandala Painting
Useful tools include:
• Small brushes
• Paint pens
• Dotting tools
• Toothpicks
• Cotton swabs
Beginner Mandala Patterns
Easy patterns include:
• Circle designs
• Flower shapes
• Repeated dots
• Simple color combinations
With practice, you can create more detailed mandala artwork.
Seasonal Rock Painting Ideas
Seasonal designs are a fun way to create themed rocks throughout the year.
Holiday Designs
Ideas include:
• Christmas designs
• Halloween rocks
• Easter patterns
• Valentine themes
Birthday Themes
Painted rocks can also become creative gifts.
Ideas include:
• Birthday messages
• Cakes
• Balloons
• Favorite colors
Nature Inspired Designs
Nature provides endless inspiration.
Ideas include:
• Trees
• Mountains
• Sunsets
• Leaves
• Butterflies
• Bees
Common Rock Painting Mistakes to Avoid
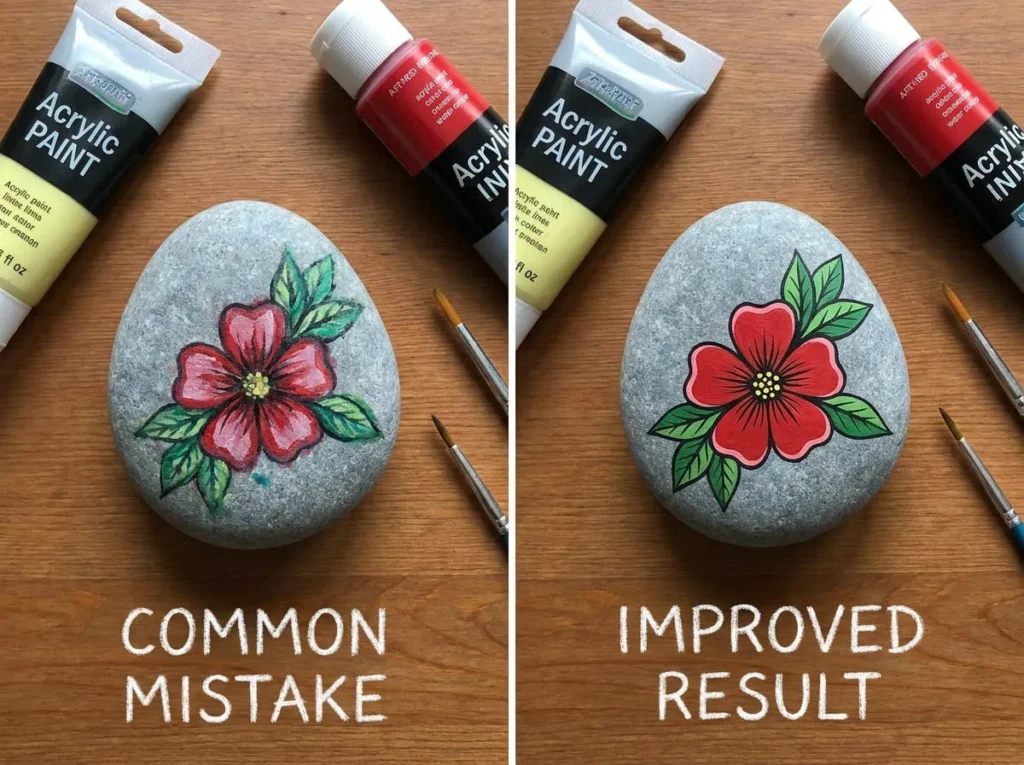
Rock painting is a simple craft, but beginners often make small mistakes that affect the final result. Understanding these common problems can help you create cleaner designs and make your painted rocks last longer.
Taking your time, preparing your materials properly, and following a simple process will help you improve your results.
Painting Dirty Rocks
One of the biggest mistakes is painting on rocks that have not been cleaned properly. Outdoor rocks often contain dirt, dust, and small particles that can prevent acrylic paint from sticking well.
A dirty surface can cause:
• Uneven paint coverage
• Peeling paint
• Poor color results
Before painting, always wash your rocks with soap and water. Remove any dirt from cracks and allow the rocks to dry completely.
A clean surface gives your acrylic paint a better base and helps your design look smoother.
Using Too Much Paint
Many beginners think adding more paint will create better results, but thick layers can actually make your artwork look uneven.
Using too much paint can:
• Take longer to dry
• Hide small details
• Create a rough surface
• Cause cracking
Instead, apply thin layers and allow each layer to dry before adding more color.
Building your design slowly gives you more control and creates a smoother finish.
Skipping Drying Time
Patience is an important part of rock painting. Adding new colors before the previous layer dries can cause colors to mix and designs to become messy.
Always allow enough drying time between steps:
• Let the base coat dry
• Allow each color layer to set
• Wait before adding details
• Make sure the paint is fully dry before sealing
Giving your paint time to dry will help your artwork look cleaner and more professional.
Forgetting to Seal Outdoor Rocks
A beautiful painted rock can lose its appearance quickly if it is placed outside without protection.
Outdoor rocks are exposed to:
• Sunlight
• Rain
• Moisture
• Temperature changes
A good outdoor sealer helps protect your design and keeps the colors looking fresh.
Always apply sealer after the paint has dried completely. This small step can greatly improve how long your artwork lasts.
Choosing the Wrong Brushes
Using the wrong brush can make painting details harder. A large brush is useful for backgrounds, but it is not suitable for small patterns or fine lines.
Use different brushes for different tasks:
• Large brushes for backgrounds
• Medium brushes for shapes
• Small brushes for details
Paint pens can also help create small lines, dots, and detailed designs.
You do not need many brushes to start. A few good brushes in different sizes are enough for most beginner projects.
Tips to Make Acrylic Painted Rocks Look Professional
You do not need to be an expert artist to create beautiful painted rocks. Simple techniques can make your designs look cleaner and more polished.
Use Multiple Thin Layers
Applying several thin layers creates better results than using one thick layer.
Thin layers help you:
• Create smoother colors
• Control the design better
• Avoid uneven surfaces
Let each layer dry before adding another one. This technique is especially useful for bright colors and detailed artwork.
Practice Designs First
Practicing your design before painting on a rock can help you avoid mistakes.
You can practice on:
• Paper
• Cardboard
• Extra rocks
Testing your design first helps you understand how colors work together and gives you more confidence.
Mix Colors Carefully
Mixing colors allows you to create unique designs and new shades.
Simple examples include:
• Blue and yellow create green
• Red and white create pink
• Blue and white create lighter shades
Start with small amounts when mixing colors. It is easier to add more paint than to fix a color that becomes too strong.
Use Good Lighting
Good lighting helps you see colors clearly and create better details.
Natural daylight is often the best choice because it shows true colors. If you paint indoors, use a bright workspace with enough light.
Good lighting helps you:
• Create cleaner lines
• Notice small mistakes
• Choose better colors
Protect Finished Artwork
After finishing your design, protect it with a suitable sealer.
Before sealing:
• Make sure all paint is dry
• Remove dust from the surface
• Use the right type of sealer
A protective finish helps maintain your colors and keeps your artwork looking beautiful for longer.
Frequently Asked Questions
Can you use acrylic paint on rocks?
Yes, acrylic paint works very well on rocks. It is one of the most popular choices because it is easy to apply, dries quickly, and comes in many colors.
Before painting, clean the rock properly and allow it to dry completely. For outdoor projects, adding a sealer is recommended to protect the design.
Is acrylic paint waterproof on rocks?
Acrylic paint is water resistant after drying, but it is not completely waterproof by itself.
If your painted rocks will stay outdoors, apply a clear protective sealer. This helps protect the artwork from rain, moisture, and sunlight.
What is the best acrylic paint for rock painting?
The best acrylic paint depends on your project.
Beginners can use student acrylic paint because it is affordable and easy to work with. Artists who create detailed designs may prefer higher quality acrylic paint with stronger colors.
For outdoor projects, choose paint and a sealer designed for better durability.
Do painted rocks need a sealer?
A sealer is not required for every project, but it is highly recommended.
Indoor painted rocks may not need much protection, but outdoor rocks benefit greatly from sealing because they face sunlight, rain, and weather changes.
How long does acrylic paint take to dry on rocks?
Acrylic paint usually dries quickly, but drying time depends on the thickness of the paint, the number of layers, and the environment.
Thin layers dry faster than thick layers. Always allow paint to dry completely before adding more details or applying sealer.
Can painted rocks stay outside?
Yes, painted rocks can stay outside when they are prepared and protected properly.
For better outdoor results: • Clean the rock before painting
• Use quality acrylic paint
• Apply outdoor sealer
• Avoid placing rocks where they face extreme weather when possible
Final Thoughts on Painting Rocks with Acrylic Paint
Painting rocks with acrylic paint is a fun and creative activity that anyone can enjoy. You do not need advanced skills or expensive equipment to create beautiful designs. With simple supplies, patience, and practice, you can turn ordinary rocks into colorful handmade artwork.
The process is easy to remember. Choose and clean your rocks, prepare the surface, apply your paint, add creative details, and protect your finished design with a sealer. Each step helps you create painted rocks that look better and last longer.
Do not worry if your first attempts are not perfect. Every artist improves with practice. Try different colors, patterns, and styles to discover what you enjoy creating.
Once you become comfortable with the basics, you can explore more rock painting ideas, learn about helpful tools, and try advanced designs. Future guides like Best Paint Pens for Rock Painting, How to Seal Painted Rocks So They Last Outdoors, and Easy Rock Painting Ideas for Beginners can help you continue improving your skills.
Most importantly, enjoy the creative process. Rock painting is not only about the final artwork. It is about having fun, relaxing, and creating something unique with your own hands.