
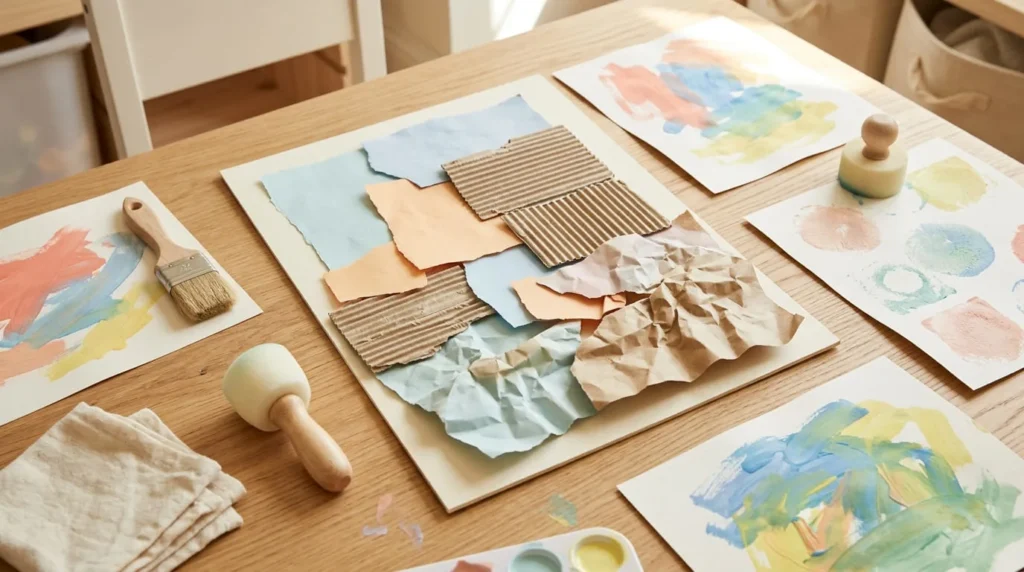
DIY sensory crafts for toddlers are a fun way to introduce young children to different textures, colors, and creative experiences. With simple materials such as large paper shapes, textured cardboard, washable paint, and suitable craft tools, toddlers can explore how different surfaces feel and how materials change when they touch or move them.
These activities do not require expensive supplies or complicated instructions. Many sensory crafts can be prepared at home using everyday materials that are carefully selected for the child’s age and abilities.
Toddlers can enjoy pressing sponges onto paper, exploring smooth and rough surfaces, making colorful marks, and arranging large paper shapes.
The goal is not to create perfect artwork. Instead, sensory crafting allows children to explore materials through simple, enjoyable activities.
In this guide, you will discover 15 DIY sensory crafts for toddlers, learn how to make a simple texture collage, and find practical tips for preparing activities safely at home or in daycare.
What Are Sensory Crafts for Toddlers?
Sensory crafts are creative activities that encourage children to explore different materials through their senses.
For toddlers, these activities often involve touching, pressing, moving, and observing objects with different textures and colors.
Unlike traditional crafts that focus on producing a particular finished object, sensory crafts place more importance on the experience of exploring the materials.
How Sensory Crafts Are Different from Regular Crafts
Regular crafts often involve following instructions to make something specific, such as a paper animal or a decorative picture.
Sensory crafts are usually more flexible.
For example, instead of asking a toddler to create a perfectly shaped flower, an adult might provide a large sponge and suitable washable paint so the child can explore making different marks.
The finished artwork may contain circles, patches of color, or simple patterns.
What matters most is the child’s opportunity to experiment.
Sensory crafts can still produce finished pictures or decorations, but completing the project is not always the main goal.
How Toddlers Explore Materials Through Touch
Toddlers often explore objects by touching and moving them.
Different craft materials can provide different tactile experiences.
Smooth paper may feel different from corrugated cardboard. A large crumpled sheet may have raised folds, while a sponge may feel soft when pressed.
Children can explore these differences by touching suitable materials with their hands.
Adults can introduce simple words such as smooth, rough, soft, and bumpy.
Not every toddler enjoys the same sensations. Some may prefer smooth surfaces, while others enjoy experimenting with more noticeable textures.
Allow children to explore at their own pace without forcing them to touch anything uncomfortable.
Why Simple Sensory Activities Work Well for Toddlers
Toddlers may find complicated instructions difficult to follow.
Activities that involve only one or two actions are often easier to introduce.
For example, a child can press a large sponge onto paper or explore the difference between two large textured surfaces.
The activity does not need a complicated design or multiple stages.
Adults can prepare materials before starting and demonstrate the activity using simple movements.
Keep the session flexible and allow the child to stop when they lose interest.
A short, enjoyable sensory experience can be more suitable than a long project with many instructions.
Why Try DIY Sensory Crafts with Toddlers?
Sensory crafts offer opportunities for toddlers to explore unfamiliar materials and express their creativity through simple activities.
These experiences can be adapted to individual interests, abilities, and comfort levels.
They do not need to produce a perfect finished project to be worthwhile.
Encourage Curiosity and Exploration
Young children often enjoy discovering what happens when they interact with different materials.
A toddler may notice that a sponge creates a different paint mark from a brush.
They might also explore the raised surface of corrugated cardboard or the smooth feel of ordinary paper.
These simple discoveries can make crafting interesting.
Adults can encourage curiosity by asking short questions such as, “Does this feel smooth?” or “What happens when you press here?”
Allow the child time to explore rather than immediately demonstrating every possible action.
Provide Opportunities to Practice Hand Movements
Sensory crafts involve simple hand movements such as pressing, touching, moving, and arranging materials.
For example, a toddler may press a large sponge against paper or move a broad brush across a painting surface.
Another child might enjoy touching securely attached textured materials or placing large paper shapes onto a board.
These activities provide opportunities to practice handling objects and coordinating movements.
Children develop these abilities at different rates.
Choose activities that match each child’s current skills and provide assistance when needed.
Introduce Different Colors and Textures
Sensory crafts can introduce toddlers to familiar colors and contrasting textures.
A simple activity might involve two colors of washable paint or two large pieces of paper with different surfaces.
Children can observe what happens when colors overlap or compare how different materials feel.
You can introduce words such as red, blue, smooth, rough, and soft during the activity.
Avoid expecting toddlers to identify every color or texture correctly.
The purpose is to provide opportunities for observation and exploration.
Create Enjoyable Shared Activities
Sensory crafting can be an enjoyable activity for toddlers and caregivers.
Adults can prepare the materials, demonstrate simple actions, and supervise the child throughout the session.
For example, a parent might help a toddler explore two different paper textures.
In daycare, an educator could introduce a simple sponge painting activity to one or two children at a time.
Allow children to participate at their own pace.
Some may enjoy touching and pressing materials, while others prefer watching before joining.
The shared activity should remain relaxed and comfortable.
What Supplies Do You Need for Toddler Sensory Crafts?
Most toddler sensory crafts require only a few carefully selected materials.
The best supplies are simple, suitable for the child’s age, and easy for an adult to inspect before use.
Because toddlers may put objects into their mouths, avoid loose small items and materials that can easily break apart.
Always follow product age recommendations and provide direct adult supervision.
Large Paper and Textured Cardstock
Paper is useful for many sensory crafts because it comes in different colors, thicknesses, and textures.
Large sheets of smooth drawing paper can provide a simple surface for painting and exploring.
Corrugated cardboard has raised ridges that create a different tactile experience.
Textured cardstock may also be used when it is sturdy and suitable for the child’s age.
Choose large pieces that are easy to handle.
Avoid sharp paper edges, staples, loose coatings, and pieces that tear into small fragments.
If a toddler frequently mouths paper, choose a different supervised activity.
Washable Paint Suitable for Toddlers
Washable paint can be useful for supervised sensory art activities.
Choose products specifically intended for the child’s age and the planned painting method.
For example, paint used directly on the hands should be approved for finger or hand painting.
A product labeled nontoxic is not necessarily edible or suitable for skin contact.
Read the manufacturer’s instructions before use.
Start with one or two colors to keep the activity simple.
Place small amounts of paint in stable, shallow trays.
Do not allow toddlers to taste or swallow paint.
Large, Secure Painting Tools
Large brushes and sturdy sponge applicators can help toddlers explore different painting movements.
Choose tools that are comfortable to hold and do not contain small detachable parts.
Inspect brushes to make sure the bristles are secure.
Sponges should be large enough to handle appropriately and must not shed small pieces.
Avoid fragile tools, sharp edges, and items that could create choking hazards.
Remove any tool that becomes damaged during the activity.
Child Appropriate Glue and Adult Prepared Materials
Some sensory crafts involve attaching paper or fabric to a sturdy backing surface.
Choose adhesives that are suitable for the materials and the child’s age.
Adults should prepare and attach materials whenever a step requires glue or tools that are not appropriate for toddlers.
Avoid leaving wet adhesive or loose craft pieces where the child can access them.
For younger toddlers, a prepared texture board may be more suitable than asking them to glue materials independently.
Check that all pieces are firmly attached before allowing supervised exploration.
Protective Mats, Aprons, and Cleanup Supplies
Prepare the workspace before beginning a sensory craft activity.
A washable table mat can protect furniture from paint and glue.
Choose suitable clothing or an apron that does not have long loose ties.
Keep cleaning cloths and appropriate handwashing supplies nearby.
Prepare a separate location for wet artwork to dry.
Remove unnecessary materials from the table so the child can focus on the activity.
An organized workspace also makes it easier for adults to supervise.
Materials to Avoid in Toddler Sensory Crafts
Not every popular sensory material is suitable for toddlers.
Avoid water beads, loose beans, dry rice bins, small beads, buttons, glitter, and tiny decorative pieces because of ingestion or choking concerns.
Conventional slime recipes may involve ingredients or textures that are unsuitable for young children.
Avoid sharp natural materials, small detachable parts, and objects that can break into dangerous pieces.
Do not assume homemade materials are automatically safer than commercial products.
If a material cannot be used safely for the child’s age and behavior, choose another activity.
How to Choose Sensory Crafts for Different Toddler Ages
Toddlers develop at different rates, so sensory activities should be selected according to each child’s abilities and interests.
Age recommendations are useful starting points, but they do not replace product instructions or adult judgment.
Activities involving paints, paper, and textured materials require close supervision.
Sensory Activities for Younger Toddlers
Younger toddlers may enjoy exploring simple textures presented by an adult.
For example, they can touch a large, securely attached piece of smooth paper and compare it with a sturdy textured surface.
Keep activities short and introduce only one or two materials at a time.
Avoid loose pieces, small objects, and materials that can easily be torn apart.
If the child frequently puts objects into their mouth, select activities that do not introduce accessible craft materials.
An adult should remain directly involved throughout the experience.
Sensory Crafts for 2 Year Olds
Some 2 year olds enjoy broad painting movements, large sponge stamps, and simple paper activities.
They may be interested in exploring how paint changes when pressed onto paper or comparing different textures on a prepared board.
Choose materials specifically suitable for the child’s age.
Adults can handle preparation while the child explores simple movements.
For example, a toddler might press a large sponge onto thick paper while an adult supervises.
Avoid expecting a recognizable picture or a completed design.
Sensory Crafts for Toddlers Approaching Age 3
Older toddlers may enjoy activities with a few additional steps.
Simple shape stamping, broad brush painting, and arranging large paper shapes can provide interesting experiences.
They may also enjoy experimenting with two colors or creating repeated patterns.
Demonstrate each action slowly.
Allow the child to try the technique without expecting perfect results.
Provide help with cutting, gluing, or any task that requires tools beyond the child’s abilities.
Adapt Activities to Individual Comfort and Abilities
Children respond differently to sensory materials.
Some toddlers enjoy touching rough surfaces, while others prefer smooth paper or dry activities.
A child may also dislike having paint on their hands.
Respect these preferences.
Offer alternatives, such as using a large brush instead of finger painting.
Do not force a child to touch an unfamiliar material.
If the child becomes uncomfortable, stop or change the activity.
The goal is to create an enjoyable experience that respects individual needs.
How to Make a Simple Toddler Texture Collage Step by Step
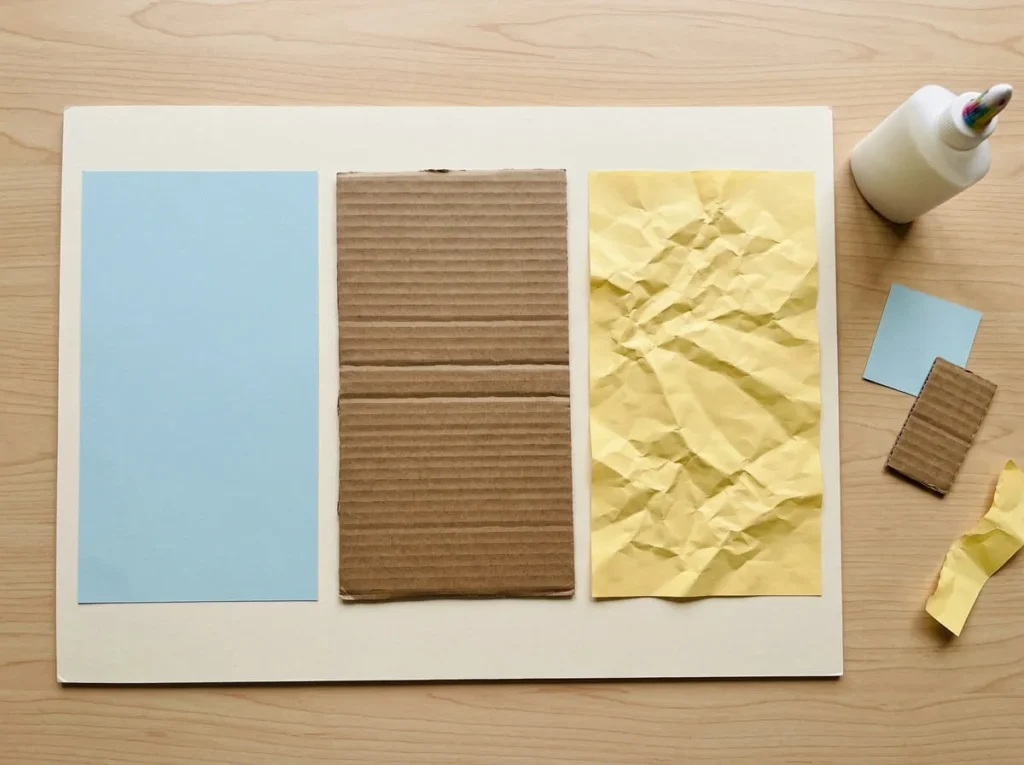
A toddler texture collage is a simple craft that allows young children to explore the difference between smooth, ridged, and crumpled paper surfaces.
For this activity, you will prepare a large backing board containing several securely attached paper materials with different textures.
The finished collage can include smooth colored paper, corrugated cardboard, and large crumpled paper shapes.
Unlike ordinary paper collages, the main purpose is not to create a picture of an animal or object. Instead, children can explore how the materials feel and compare the different surfaces.
An adult should prepare and attach the materials as needed. Toddlers can help choose positions and explore the completed board when it is suitable for their age and behavior.
This project is not suitable for a child who is likely to pull off and mouth paper or cardboard pieces.
Step 1: Prepare a Safe Crafting Area
Choose a stable table or other suitable workspace.
Cover the surface with a washable protective mat.
Remove unnecessary objects and keep adhesives, scissors, and other preparation tools away from the toddler.
Make sure the child can participate comfortably.
Have an adult remain present throughout the activity.
Prepare a separate space where the collage can dry after assembly.
Step 2: Gather Large Textured Paper Materials
Choose a few sturdy paper materials with different surfaces.
You can use smooth colored paper, corrugated cardboard, and a large piece of crumpled paper.
Select materials without sharp edges, staples, loose coatings, or detachable decorations.
Inspect the cardboard for damaged sections that might break away.
Avoid small pieces that could be placed in the mouth.
For the first collage, two or three textures are enough.
Step 3: Choose a Sturdy Backing Board
Select a strong cardboard or cardstock backing that can support the different materials.
The backing should be large enough to display the textures separately.
Check the corners and edges for damage.
If necessary, an adult can prepare the board before the child joins the activity.
Place it flat on the protected table.
Avoid using heavy or awkward materials that may be difficult to handle safely.
Step 4: Prepare Different Textures
Have an adult prepare large sections of smooth paper and corrugated cardboard.
For the crumpled texture, gently squeeze a large sheet of paper to create folds and raised areas.
Open it slightly so the texture remains visible.
Check that the material has not developed loose or torn pieces.
Keep each texture separate before attaching it to the board.
This allows the child to observe the different surfaces.
Step 5: Let the Toddler Explore the Materials
If the child can safely handle the selected materials, introduce one large texture at a time under direct supervision.
Begin with smooth paper.
Allow the toddler to touch the surface if they want to.
Then introduce the corrugated cardboard and gently demonstrate how its ridges feel different.
Finally, show the crumpled paper.
Use simple words such as smooth, bumpy, and rough.
Do not force the child to touch any material.
Remove pieces immediately if the child begins tearing or mouthing them.
Step 6: Arrange the Large Paper Shapes
Place the backing board in front of the child.
Show how the different paper sections can be arranged across the surface.
For example, smooth paper might go on the left, corrugated cardboard in the center, and crumpled paper on the right.
Allow the toddler to indicate a preferred position or help move a large piece if appropriate.
Keep enough space between the sections so the textures remain easy to distinguish.
The collage does not need a complicated pattern.
Step 7: Attach the Materials Securely
An adult should attach the prepared materials to the sturdy backing using an appropriate adhesive.
Apply the adhesive according to the manufacturer’s instructions.
Press each section into position and make sure its edges are secured.
Keep wet glue inaccessible to the child.
Avoid adding small decorations, loose ribbons, or other pieces that could detach.
Leave the collage in a protected location until the adhesive has fully dried or cured.
Step 8: Explore the Finished Textures
Once the adhesive has cured, an adult should inspect the collage carefully.
Check that the paper and cardboard sections are firmly attached and that no loose pieces can be pulled away.
If the board is appropriate for the child’s age and behavior, allow supervised exploration.
The toddler may enjoy touching each section and observing the different surfaces.
Use simple descriptive words and allow them to choose which texture they want to explore.
How to Introduce Different Textures Without Overwhelming Toddlers
Start with one texture rather than presenting everything at once.
Allow the child to observe and touch the material voluntarily.
When they appear comfortable, introduce another surface.
Some toddlers may prefer smooth paper, while others enjoy the raised ridges of cardboard.
If the child turns away, becomes upset, or does not want to continue, respect their response.
You can offer a different activity or stop the session.
Sensory exploration should be comfortable and enjoyable.
Step 9: Allow the Collage to Dry and Check for Loose Parts
After assembly, follow the adhesive manufacturer’s drying and curing instructions.
Do not give the collage to the toddler while the adhesive is wet.
Before each supervised use, inspect all sections for lifting edges, torn paper, or loose material.
If any part becomes damaged, remove the board from use.
Do not attempt to cover damaged or loose sections with additional decorations.
The finished collage should remain sturdy and suitable for its intended use.
Step 10: Display or Store the Finished Collage Safely
Once the collage is complete, choose a suitable storage or display location.
You can place it on a high shelf or store it flat in a clean, dry area when it is not being used for supervised activities.
Keep it away from moisture and excessive heat.
Do not leave the board unattended with a toddler or place it in a crib or sleeping area.
Because paper and cardboard can tear or deteriorate, inspect the project before every use.
Your completed texture collage will contain several different paper surfaces arranged on one sturdy backing, offering a simple way to explore textures through supervised craft activities.
15 Easy DIY Sensory Crafts for Toddlers
DIY sensory crafts for toddlers can turn everyday art materials into opportunities for creative exploration. From pressing a sponge onto paper to discovering how different surfaces feel, these activities introduce simple sensory experiences without complicated instructions. The following ideas use basic supplies and focus on touching, pressing, arranging, and observing. Choose materials suitable for your child’s age and abilities, supervise every activity closely, and allow your toddler to explore at a comfortable pace.
1. Simple Finger Painting Exploration
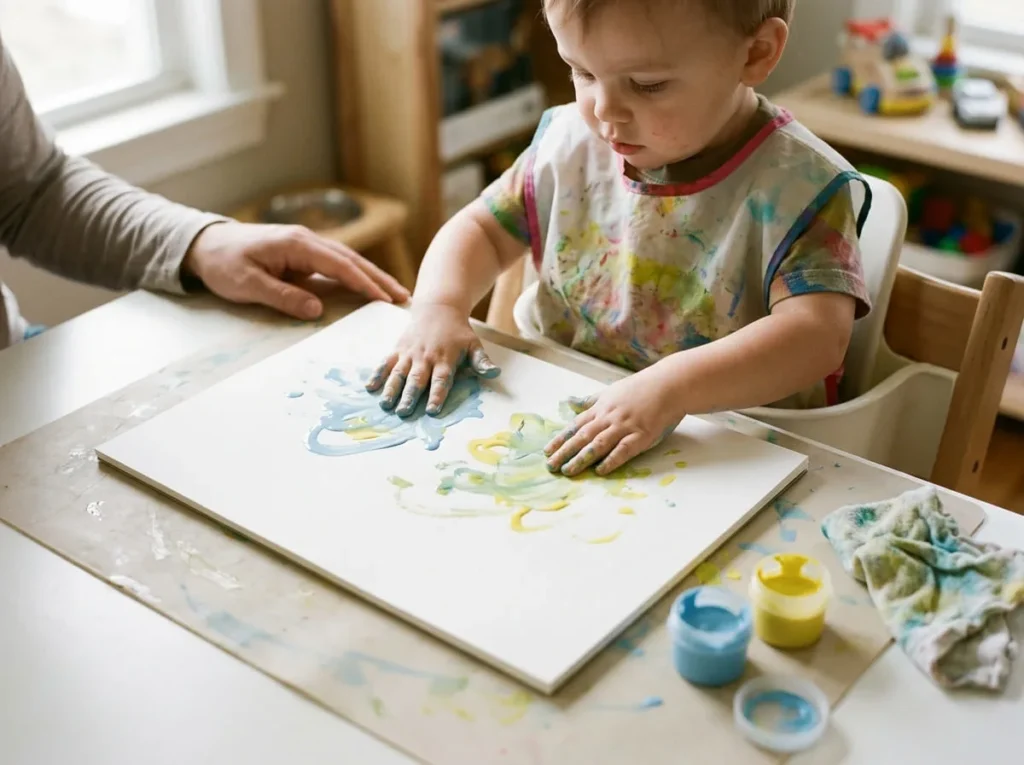
Finger painting is a sensory craft that allows toddlers to explore colors and the feeling of paint through gentle hand movements.
Instead of trying to create a particular picture, children can make broad marks, circles, and simple patterns on paper.
This activity works best when the child is comfortable touching paint and the product is specifically approved for their age and for direct skin contact.
Materials needed:
- Finger paint suitable for the child’s age
- Large sheets of thick paper
- Washable protective mat
- Damp cleaning cloth
- Suitable painting apron
How to Make a Toddler Finger Painting
Begin by covering the work surface with a washable mat.
Place a large sheet of thick paper in front of your toddler.
Choose one color of finger paint and add a small amount to the paper.
Demonstrate how to touch the paint gently and move a finger across the surface.
Your toddler may choose to make dots, short lines, or broad patches of color.
Allow the child to explore without expecting a specific design.
If they enjoy the experience, introduce a second color and show how the colors can overlap.
Keep the activity short and provide direct supervision throughout.
When finished, help the child wash their hands and place the artwork somewhere safe to dry.
For a simpler version, use one color and encourage a few large finger marks instead of covering the entire page.
If the child dislikes touching paint, offer a suitable painting brush instead.
The finished artwork may contain colorful swirls, lines, or scattered marks. Each result will be different.
2. Large Sponge Texture Painting
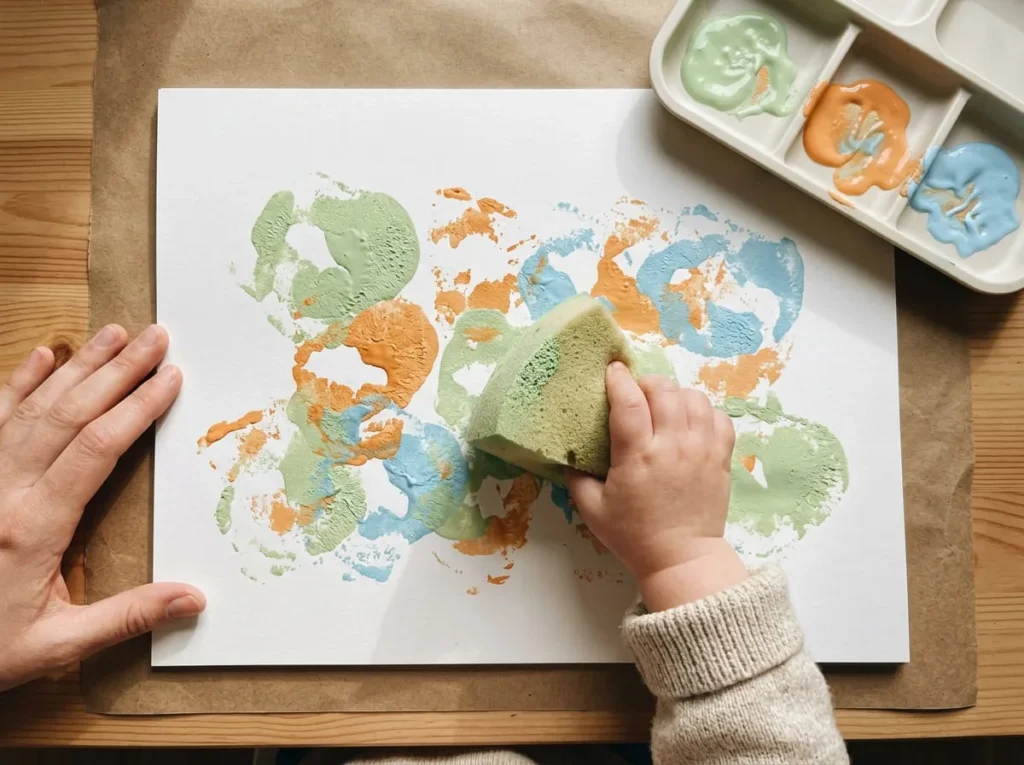
Sponge painting introduces toddlers to a different way of applying paint.
Unlike a regular brush, a sponge can leave soft, uneven impressions with interesting textures.
This activity is particularly useful for children who enjoy pressing objects onto a surface.
Choose a large, sturdy sponge applicator that cannot be easily torn apart or placed in the mouth.
Materials needed:
- Large, secure sponge applicator
- Washable paint suitable for the child’s age
- Thick white paper
- Shallow paint tray
- Protective table covering
How to Create Texture Prints with a Sponge
Place a sheet of thick paper on a protected table.
Add a small amount of suitable washable paint to a stable, shallow tray.
Show your toddler how to press the large sponge gently into the paint.
Lift the sponge and press it onto the paper.
A textured paint impression should appear where the sponge touches the surface.
Demonstrate the movement again if necessary.
Allow the child to make several impressions across the paper.
The prints may overlap or form an irregular pattern.
If the toddler wants to continue, offer another color.
Avoid giving too many colors at once, especially during the first attempt.
Once the child finishes, remove the sponge and place the artwork somewhere safe to dry.
Check the sponge frequently for loose or damaged pieces.
A simple variation is to use a sponge with a broad, flat surface to make large rectangular impressions.
There is no need to cut complicated shapes into the sponge.
3. Smooth and Rough Paper Exploration
Different kinds of paper can provide interesting sensory experiences without requiring paint.
Smooth paper feels different from corrugated cardboard or textured cardstock.
This activity introduces toddlers to contrasting surfaces through simple observation and supervised touch.
It can also be an alternative for children who do not enjoy wet or messy materials.
Materials needed:
- Large sheet of smooth paper
- Large piece of corrugated cardboard
- Sturdy textured cardstock
- Strong backing board
- Suitable adhesive for adult preparation
How to Make a Simple Paper Texture Activity
Begin by selecting two or three large paper materials with noticeably different textures.
An adult should inspect each piece for sharp edges, loose layers, or damaged sections.
Attach the materials securely to a sturdy backing board before giving the toddler access to them.
Allow the adhesive to dry completely and check that the pieces cannot be pulled away.
Place the board on a stable surface.
Show your toddler the smooth paper first.
If they want to, allow them to touch it with their fingers.
Next, introduce the corrugated cardboard.
You can describe the difference using simple words such as smooth, bumpy, or rough.
Allow the child to move between the textures naturally.
Do not insist that they touch every surface.
Some toddlers may prefer looking at the materials or watching an adult demonstrate.
The activity can end whenever the child loses interest.
Avoid using sandpaper, loose fabric fibers, or materials that could cause skin irritation.
4. Crumpled Paper Texture Art
Crumpled paper art is a simple way to explore how paper changes when it is squeezed and folded.
A smooth sheet can develop raised folds and an uneven surface after being crumpled.
Toddlers can observe the transformation and help arrange large prepared paper shapes onto a backing surface.
This activity is best suited to children who can participate without tearing off and mouthing small paper pieces.
Materials needed:
- Large sheets of colored paper
- Thick cardstock for the background
- Suitable craft adhesive
- Protective table covering
How to Make Crumpled Paper Art
Choose two or three large sheets of colored paper.
Show your toddler how the paper looks and feels before it is crumpled.
Gently squeeze one sheet into a loose shape.
Open it slightly so the folds remain visible.
If appropriate for the child’s abilities, allow them to help crumple a large sheet under direct supervision.
An adult should prepare the remaining paper shapes and check for torn pieces.
Place a sturdy backing sheet on the table.
Arrange the crumpled paper sections across the surface.
For example, use a large yellow section in the center and blue or green sections around it.
Allow your toddler to indicate where each piece should go.
An adult should attach the paper securely to the backing.
Keep adhesive inaccessible and allow the artwork to dry completely.
The finished project will have a raised, uneven surface created by the folded paper.
If your child frequently mouths or tears paper, skip this activity and choose a different sensory craft.
5. Large Shape Stamp Painting
Stamp painting introduces toddlers to repeated shapes and patterns.
Instead of using small decorative stamps, this activity uses large, sturdy stamp tools designed for young children.
The child can explore what happens when a paint covered stamp is pressed onto paper.
Simple circles or other broad shapes are easier to use than complicated designs.
Materials needed:
- Large stamps suitable for toddlers
- Washable paint appropriate for the child’s age
- Thick paper
- Stable, shallow paint tray
- Protective table covering
How to Make Simple Shape Stamps
Prepare the table with a washable protective covering.
Place a large sheet of paper in front of the child.
Add a small amount of paint to a shallow tray.
Choose one large stamp with a secure handle and no detachable parts.
Show your toddler how to touch the stamp’s printing surface to the paint.
Then press it gently against the paper.
Lift the stamp to reveal the shape.
Allow your toddler to repeat the movement.
The prints may appear close together, far apart, or partially overlapping.
There is no need to create an organized pattern.
If the child enjoys the activity, introduce a second stamp with a different broad shape.
Keep the session relaxed and allow them to stop whenever they wish.
Afterward, clean the stamp according to the manufacturer’s instructions.
A useful variation is to explore the difference between a light press and a firmer press, while ensuring the tool remains comfortable and safe to handle.
6. Simple Color Mixing with Washable Paint
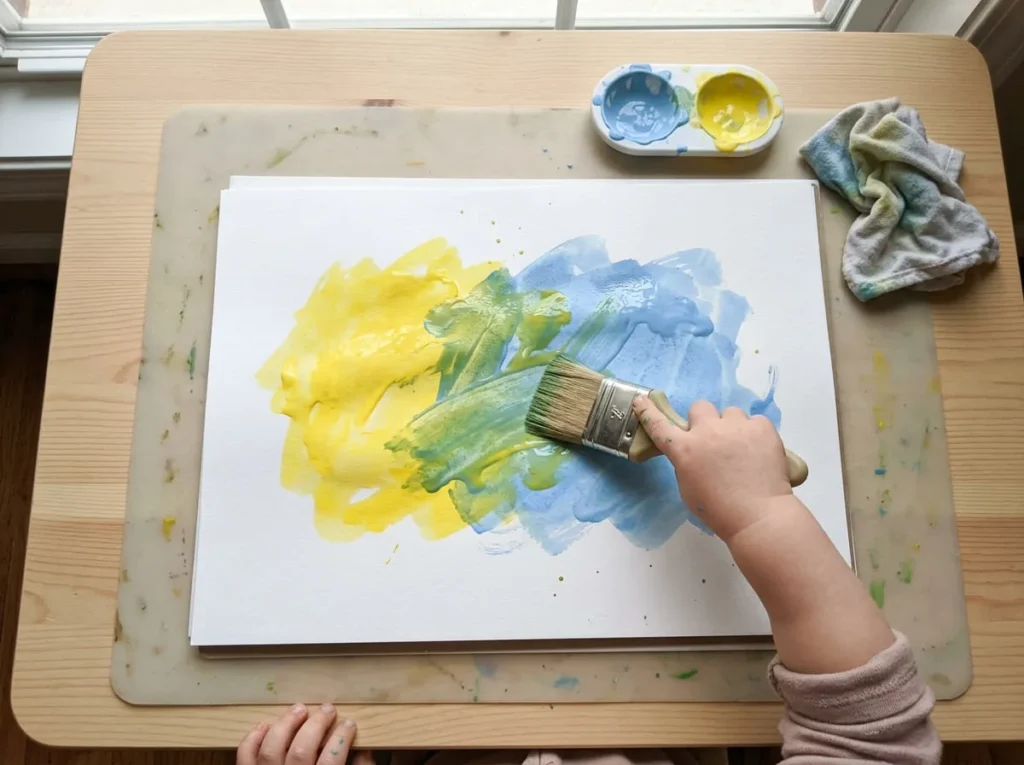
Color mixing is an engaging sensory art activity because toddlers can observe colors changing as they overlap.
Using just two colors helps keep the experience simple.
The goal is to explore what happens when paint is moved across paper, rather than memorizing color combinations.
Children may enjoy using a broad brush or another large painting tool.
Materials needed:
- Two colors of suitable washable paint
- Large sheet of thick paper
- Broad, secure painting brush
- Shallow paint containers
- Protective table mat
How to Explore Two Paint Colors
Begin by preparing the painting area.
Choose two paint colors that will produce a noticeable change when mixed.
For example, yellow and blue can create shades of green.
Place a small amount of each color on the paper, leaving a little space between them.
Show your toddler how to move a broad brush through the first color.
Then demonstrate how to move the brush into the second color.
As the colors overlap, a new shade may begin to appear.
Allow your toddler to continue exploring with the brush.
They may create long strokes, circular marks, or irregular patches.
Use simple language to describe the colors.
For example, you might say, “The blue and yellow are mixing.”
Avoid correcting the child’s painting or directing every movement.
Once the activity is complete, place the paper somewhere safe to dry.
For toddlers who are sensitive to messy materials, a broad brush can provide an alternative to touching paint directly.
7. Textured Cardboard Printing
Corrugated cardboard has raised ridges that can create interesting lines when used for printing.
This activity allows toddlers to explore how a textured surface leaves a pattern on paper.
It differs from ordinary sponge painting because the cardboard creates a more defined series of marks.
The cardboard should be large, sturdy, and free from loose or damaged sections.
Materials needed:
- Large piece of sturdy corrugated cardboard
- Suitable washable paint
- Thick paper
- Shallow paint tray
- Protective table mat
How to Make Prints with Corrugated Cardboard
Choose a large piece of corrugated cardboard with a clearly textured surface.
An adult should inspect the cardboard to ensure it is sturdy and has no loose layers.
Place a sheet of thick paper on the protected table.
Add a small amount of paint to a shallow tray.
Demonstrate how to apply paint lightly to the raised cardboard surface.
An adult may need to prepare the cardboard before the toddler begins.
Guide the child in pressing the painted surface onto the paper, if the tool is suitable for them to handle.
Lift the cardboard carefully.
The raised texture should leave a series of lines or irregular marks.
Repeat the process in another part of the paper.
Allow the toddler to observe how the prints change depending on paint coverage and pressure.
Avoid using excessive paint because it can hide the cardboard texture.
When the activity is finished, remove the cardboard and inspect it for damage.
Discard any piece that starts to separate or tear.
The final artwork may contain repeated ridged impressions and overlapping colors.
8. Broad Brush Sensory Painting
Broad brush painting is a simple sensory craft for toddlers who enjoy moving their hands and observing colorful marks.
A large brush can create long lines, sweeping curves, and wide patches of paint.
The activity is easy to adapt because children can use one color or experiment with several colors as their abilities and interests develop.
It is also a useful option for toddlers who prefer not to touch paint directly.
Materials needed:
- Large brush suitable for toddlers
- Washable paint appropriate for the child’s age
- Thick drawing paper
- Shallow paint tray
- Protective table covering
- Cleaning cloth
How to Make Broad Brush Paintings
Cover the crafting surface with a protective mat.
Place a large sheet of paper on the table.
Select one color of suitable washable paint and pour a small amount into a stable tray.
Give your toddler a large brush with a secure handle and firmly attached bristles.
Demonstrate how to move the brush gently across the paper.
You can make one long line or a broad curved mark.
Allow the child to try the movement independently if they are able.
They may enjoy moving the brush from side to side or making large circular strokes.
Some toddlers may prefer short, repeated marks.
Follow their interests rather than asking them to copy a particular design.
If the child wants another color, introduce it gradually.
Avoid adding too much paint, which can make the paper difficult to handle.
When the painting is finished, place it somewhere safe to dry.
Clean the brush and help the toddler wash their hands.
A simple variation is to use a larger sheet of paper so the child has more room to explore broad movements.
The finished painting may be a collection of colorful strokes, curves, and overlapping marks. Its appearance is less important than the child’s opportunity to explore the painting process.
9. Large Paper Tear and Arrange Art
Tearing paper can be an interesting sensory activity for older toddlers who are ready to explore how materials change when pulled apart.
The sound of tearing paper, the movement of the hands, and the appearance of different paper edges can make this activity engaging.
However, torn paper can create small pieces that are unsuitable for children who put materials in their mouths.
Choose this craft only when the child can safely participate, and keep an adult close throughout the activity.
Materials needed:
- Large sheets of colored paper
- Thick cardstock for the background
- Suitable craft glue for adult use
- Protective table covering
How to Make Paper Tear Art
Begin by placing a large sheet of colored paper on a clean table.
Show your toddler how an adult can gently tear the paper into two large sections.
Allow the child to observe the sound and movement.
If the child can safely participate, help them tear a large sheet into broad pieces.
Avoid making tiny strips or small paper decorations.
Inspect the pieces and remove any that are damaged or too small.
Place a sheet of thick cardstock on the table.
Arrange the large torn paper sections across the background.
Your toddler can help choose where each piece should go.
An adult should attach the paper using suitable craft glue and allow the project to dry completely.
Keep the child away from wet glue and loose pieces during assembly.
The finished artwork will contain overlapping paper shapes with naturally uneven edges.
If your toddler frequently mouths paper, choose a different activity instead.
10. Toddler Nature Texture Collage
A nature inspired texture collage introduces toddlers to shapes and surfaces that resemble materials found outdoors.
Instead of collecting loose stones, pinecones, or small natural objects, you can create this activity using large paper textures inspired by leaves, tree bark, and other familiar outdoor surfaces.
This makes it easier to control the materials while still encouraging an interest in nature.
Materials needed:
- Large green and brown paper sheets
- Corrugated cardboard
- Thick cardstock
- Suitable craft adhesive for adult assembly
- Protective table mat
How to Make a Nature Inspired Texture Collage
Begin by selecting large paper materials in natural colors such as green, brown, and yellow.
An adult can prepare broad leaf shapes from sturdy paper.
Use a large section of corrugated cardboard to represent the rough texture of tree bark.
Place the materials on a strong backing board.
Arrange the green paper shapes on one side and the textured cardboard on the other.
Your toddler can observe the arrangement and indicate where the shapes should go.
An adult should attach everything securely and allow the adhesive to dry completely.
Before supervised exploration, inspect the board for loose edges or pieces that might detach.
Introduce the different surfaces one at a time.
You can describe the paper as smooth and the corrugated cardboard as bumpy.
Avoid using actual bark, sharp twigs, loose seeds, or unknown plants in a toddler’s collage.
The finished project can resemble a simple nature scene while providing opportunities to explore different paper textures.
11. Simple Sealed Color Painting Activity
A sealed color painting activity allows toddlers to watch paint move and spread without touching it directly.
It can be an alternative for children who dislike wet paint on their hands.
However, ordinary household plastic bags can tear, leak, or create suffocation hazards. They should not be used as toddler play materials.
For this activity, use only an age appropriate, purpose made painting enclosure that securely contains the paint and is intended for supervised young children’s activities.
If a suitable enclosure is unavailable, choose regular brush painting instead.
Materials needed:
- Purpose made, age appropriate sealed painting enclosure
- Compatible washable paint approved by the enclosure manufacturer
- Stable work surface
- Cleaning cloth
- Adult supervision
How to Explore Colors Without Direct Paint Contact
Begin by reading the instructions supplied with the painting enclosure.
An adult should prepare the activity according to the manufacturer’s directions.
If the product is designed to contain paint, add only the recommended amount.
Choose two colors that will be easy to distinguish.
Secure the enclosure exactly as instructed.
Inspect it for damage or leaks before introducing it to the child.
Place it on a stable surface and remain directly beside your toddler.
If the product permits supervised pressing, demonstrate the movement gently.
Your toddler may enjoy watching the colors spread or overlap inside the enclosure.
Use simple language to describe what happens.
Stop immediately if the material becomes damaged or the child attempts to bite, pull apart, or open it.
Remove the enclosure when the activity ends.
Never leave plastic painting materials unattended with a toddler or place them in a sleeping area.
12. Large Paper Texture Rubbings
Texture rubbing allows toddlers to discover how a textured surface can create a pattern on paper.
This activity is similar to ordinary crayon drawing, but the pattern comes from a textured material placed beneath the drawing sheet.
A large piece of sturdy corrugated cardboard can produce simple repeated lines.
Choose crayons specifically suitable for the child’s age and avoid broken or small pieces.
Materials needed:
- Large sheet of drawing paper
- Large, sturdy corrugated cardboard
- Chunky crayons suitable for the child’s age
- Stable table surface
- Protective mat
How to Make Simple Texture Rubbings
Place a large section of corrugated cardboard flat on the table.
Check that it has no damaged edges or loose layers.
Position a sheet of drawing paper over the cardboard.
An adult can hold the paper steady while the toddler participates.
Show the child how to move a suitable chunky crayon across the paper.
Using the side of the crayon may reveal the raised pattern more clearly, depending on the tool and the child’s abilities.
As the crayon moves, lines and textured marks may begin to appear.
Allow the toddler to explore the movement without expecting a perfect rubbing.
Try a different color if the child remains interested.
Avoid small pieces of broken crayons and remove materials if the child attempts to mouth them.
Once the activity is complete, lift the paper to reveal the textured pattern.
The finished artwork may contain repeated lines and colorful marks created by the hidden cardboard surface.
13. Soft Fabric Texture Art
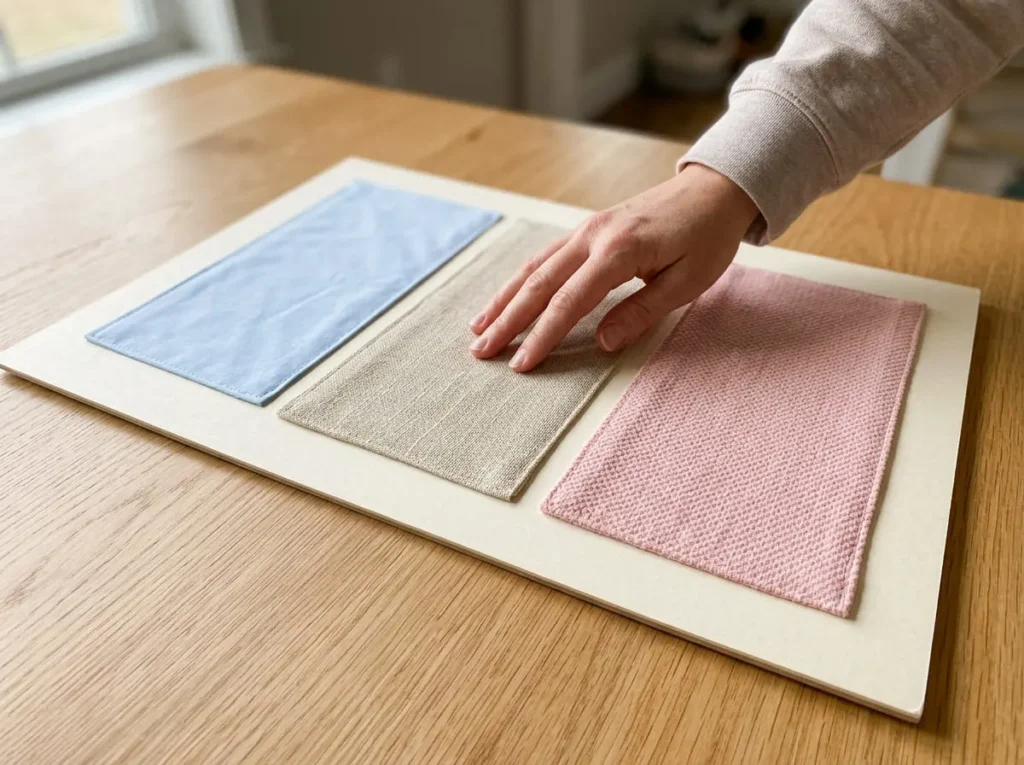
Fabric can introduce toddlers to different surfaces, from smooth cotton to materials with a more noticeable woven texture.
A simple fabric texture board lets children compare these surfaces without handling loose fabric scraps.
For this craft, an adult should securely attach large fabric sections to a sturdy backing.
Avoid materials with loose threads, detachable decorations, or fibers that shed easily.
Materials needed:
- Large pieces of smooth cotton fabric
- Large pieces of sturdy textured fabric
- Strong backing board
- Suitable adhesive for adult assembly
- Protective workspace covering
How to Make a Fabric Texture Board
Choose two or three large pieces of clean fabric with different textures.
For example, smooth cotton may feel different from a sturdy, closely woven textured fabric.
Inspect each piece for loose threads, fraying, or detachable decorations.
Avoid sequins, buttons, beads, ribbons, and fluffy materials that release fibers.
An adult should prepare the backing board and attach the fabric sections securely.
Make sure all edges are firmly secured and the adhesive has fully cured.
Inspect the completed board before allowing supervised exploration.
Introduce the smooth fabric first.
Allow the toddler to touch it if they wish.
Then introduce the textured fabric.
Use simple words such as soft, smooth, and rough to describe the surfaces.
Do not force the child to touch anything uncomfortable.
Remove the board if the child pulls at the fabric or if any section becomes loose.
Store the finished board out of reach when the activity is over.
14. Simple Handprint Sensory Art
Handprint art is a simple painting activity that allows toddlers to create a picture using the shape of their own hand.
The process involves touching suitable finger paint and pressing a hand gently against paper.
This can be enjoyable for children who are comfortable with paint on their skin.
Some toddlers may dislike the sensation, so participation should always be optional.
Materials needed:
- Finger paint approved for the child’s age and skin contact
- Thick white paper
- Protective table covering
- Damp cleaning cloth
- Handwashing supplies
How to Make a Toddler Handprint Picture
Prepare a clean table with a protective covering.
Place a large sheet of thick paper in front of the child.
Choose one color of finger paint suitable for direct skin contact.
Apply a small amount of paint according to the manufacturer’s instructions.
An adult can demonstrate making a handprint using their own hand.
If your toddler wants to participate, help them gently press their painted hand onto the paper.
Avoid forcing the child’s fingers open or pressing their hand down if they resist.
Lift the hand carefully to reveal the print.
Some paint may spread unevenly, creating an imperfect outline.
That is normal.
Allow the toddler to make another print if they enjoy the activity.
When finished, wash their hands thoroughly and place the artwork somewhere safe to dry.
Do not add small decorations or loose craft accessories.
The finished project can be kept as a simple handmade memory or displayed in a safe location.
15. Large Paper Texture Pattern Board
A paper texture pattern board combines simple shapes, colors, and tactile surfaces in one activity.
Unlike the earlier texture collage, this project focuses on arranging repeated shapes into an easy pattern.
For example, smooth paper rectangles can alternate with large pieces of corrugated cardboard.
Toddlers can observe the pattern and explore the difference between the surfaces.
Materials needed:
- Large pieces of smooth colored paper
- Large sections of sturdy corrugated cardboard
- Strong cardstock backing
- Suitable craft adhesive
- Protective table covering
How to Make a Simple Texture Pattern Board
Begin by selecting two large paper materials with different textures.
An adult should prepare broad shapes with smooth edges.
For example, use large yellow paper rectangles and large brown corrugated cardboard rectangles.
Arrange the pieces on a sturdy backing board.
Start with a simple alternating pattern.
Place one smooth rectangle beside one textured rectangle.
Repeat the sequence across the board.
Show the toddler how the shapes alternate.
The child can observe and suggest where a large piece should go, depending on their abilities.
An adult should securely attach the materials.
Allow the adhesive to dry completely before introducing the board for supervised exploration.
Check that no edges can be lifted or pulled loose.
When the board is ready, invite the toddler to explore the different textures voluntarily.
The finished project will show a simple repeating pattern made from contrasting paper surfaces.
How to Make Sensory Crafts Enjoyable for Toddlers
Sensory crafts should feel relaxed and manageable for young children.
Some toddlers enjoy messy painting, while others prefer dry paper or fabric textures.
The best activities allow children to participate according to their individual interests and abilities.
Introduce One Texture at a Time
Offering several unfamiliar materials at once can make an activity difficult for some toddlers.
Start with one simple texture.
For example, introduce a large piece of smooth paper before showing corrugated cardboard.
Allow the child time to observe or touch the material.
Introduce another texture only when they appear interested.
This approach makes it easier to notice which surfaces the toddler prefers.
Follow the Toddler’s Interests
Not every child will respond to the same craft activity.
One toddler may enjoy painting with a broad brush, while another prefers exploring dry textured paper.
Watch how the child responds.
If they repeatedly press a sponge onto paper, allow them to continue.
There is no need to move immediately to another activity.
Following their interests can make crafting more enjoyable.
Keep Activities Short and Flexible
Toddlers do not need long crafting sessions.
A simple activity may last only a few minutes, depending on the child’s interest.
Prepare the materials before starting so the child does not have to wait through complicated setup.
If they become tired, distracted, or uncomfortable, finish the activity.
You can offer a different craft another day.
The goal is an enjoyable experience rather than completing a set amount of work.
Encourage Exploration Without Expecting Perfect Results
Sensory crafts often produce unpredictable artwork.
A toddler may create overlapping paint marks instead of a recognizable picture.
They might also prefer moving materials rather than arranging them into a particular pattern.
Avoid correcting every action or expecting a polished final result.
Offer encouragement for trying new movements and exploring materials.
The experience matters more than how the artwork looks.
Respect Children’s Sensory Preferences
Some toddlers dislike sticky paint, rough materials, or unfamiliar sensations.
These preferences should be respected.
Do not force a child to touch a material they find uncomfortable.
Offer a suitable alternative, such as using a brush instead of finger painting.
Allow them to observe an activity without participating directly.
If they show signs of discomfort, stop or change the activity.
Easy Sensory Craft Activities for Home and Daycare
Sensory crafts can be prepared in different environments using simple materials.
Whether you are planning an activity at home or in a daycare setting, careful preparation helps keep the experience manageable.
Choose projects that suit the available space and the number of children participating.
Simple Sensory Crafts at Home
At home, begin with activities that require only a few materials.
Broad brush painting, large sponge prints, and supervised paper texture exploration are practical starting points.
Prepare one activity before inviting your toddler to join.
Keep unnecessary supplies out of reach.
Choose a comfortable area that is easy to clean afterward.
Avoid leaving unfinished craft materials accessible between sessions.
Supervised Sensory Activities in Daycare
In daycare, activities should reflect each child’s developmental abilities and the setting’s safety procedures.
Educators can prepare simple individual workspaces for painting or texture exploration.
Use materials that are appropriate for the youngest children participating.
Avoid activities involving loose small pieces or supplies that could be shared unsafely.
Ensure enough adults are available to supervise children closely.
Clean reusable tools between uses according to the setting’s hygiene requirements.
How to Prepare a Small Sensory Craft Station
A simple sensory craft station does not require special furniture.
Choose a stable table with a washable protective mat.
Place only the supplies needed for the current activity within the adult’s control.
For painting, prepare the paper, suitable paint, and one large painting tool.
For texture exploration, prepare a finished board with securely attached materials.
Keep cleaning cloths nearby.
Remove any damaged or unnecessary supplies before starting.
How to Make Cleanup Easier
Choose washable materials whenever possible.
Protect the table before beginning.
Use small amounts of paint to reduce spills.
Keep a suitable cleaning cloth and handwashing supplies nearby.
When the activity ends, remove the tools before cleaning the workspace.
Place wet artwork in a protected drying area.
Inspect reusable supplies before storing them for another session.
Important Safety Tips for Toddler Sensory Crafts
Safety is especially important because toddlers may explore unfamiliar objects by putting them in their mouths.
Materials that work well for older children are not automatically appropriate for younger toddlers.
Every activity should match the child’s abilities, behavior, and the manufacturer’s age recommendations.
Choose Materials Suitable for the Child’s Age
Read product labels before introducing craft supplies.
Choose paint, brushes, stamps, and other tools intended for the child’s age group.
Do not rely on appearance alone to judge whether an item is suitable.
A large object may still be unsafe if it breaks apart or contains detachable pieces.
If you are unsure about a material, choose a simpler alternative.
Avoid Choking and Ingestion Hazards
Avoid small beads, buttons, seeds, loose grains, tiny paper pieces, and detachable decorations.
Do not provide materials that can easily break into pieces small enough to swallow.
Inspect craft tools and finished projects for loose parts.
If a toddler begins putting craft materials into their mouth, stop the activity and remove the materials.
Supervision does not make an inherently unsuitable material safe.
Do Not Use Water Beads or Conventional Slime
Water beads are unsuitable for toddler sensory crafts because swallowing them can cause serious injury.
Conventional slime recipes may also contain ingredients that are unsuitable for young children.
Avoid activities using borax solutions, concentrated detergents, or other household chemicals.
Do not assume a homemade sensory recipe is safe simply because its ingredients are commonly found at home.
Choose age appropriate paper and painting activities instead.
Supervise Every Sensory Activity Closely
An adult should remain present and attentive throughout the activity.
Prepare supplies before introducing them to the child.
Keep scissors, adhesives, and preparation tools inaccessible unless specifically appropriate for the child and directly supervised.
Do not leave toddlers alone with paint, plastic materials, loose paper, or unfinished craft projects.
Stop the activity immediately if a material becomes damaged or the child begins using it unsafely.
Use Paint Appropriate for the Activity and Skin Contact
Choose paint products specifically approved for the child’s age.
If the activity involves direct contact with the hands, use paint intended for finger or hand painting.
A nontoxic label does not mean that a product is edible.
Washable paint is not necessarily approved for skin contact either.
Follow product instructions and prevent paint from entering the child’s mouth or eyes.
Wash hands after painting.
Check for Allergies, Irritation, and Loose Parts
Review material ingredients when the child has known allergies or sensitivities.
Avoid unfamiliar substances that may irritate the skin.
Before using a texture board, inspect the attached paper or fabric for loose sections.
Check sponges and brushes for deterioration.
Remove materials immediately if they shed pieces or become damaged.
If a child develops irritation or another concerning reaction, stop using the material and seek appropriate medical advice.
Stop Activities When Materials Become Damaged
Craft materials can change during use.
Paper may tear, cardboard can separate into layers, and sponge applicators may begin to crumble.
Inspect supplies before and during the activity.
Do not continue using damaged tools or projects.
Remove broken pieces immediately and dispose of them safely.
Do not leave finished paper or fabric texture boards where toddlers can access them without adult supervision.
Common Mistakes When Making Sensory Crafts for Toddlers
Sensory crafts do not need complicated instructions, but a few common mistakes can make activities less enjoyable or unsuitable for young children.
Keeping the preparation simple can help avoid these problems.
Offering Too Many Materials at Once
Providing several paints, brushes, paper types, and textures at the same time may be difficult for some toddlers.
Begin with a small selection.
For example, offer one large brush and one paint color.
Introduce more materials gradually if the child remains interested.
Choosing Projects That Are Too Complicated
A project requiring precise cutting, folding, or assembly may not suit a toddler’s abilities.
Choose activities involving simple actions such as pressing, touching, or making broad marks.
Adults can complete preparation steps that require greater precision.
Using Small or Loose Craft Materials
Tiny decorations may look attractive but are not necessary for toddler crafts.
Avoid beads, sequins, loose seeds, small buttons, and similar materials.
Choose large, sturdy supplies that are appropriate for the child’s age.
Inspect materials regularly.
Expecting Toddlers to Finish Every Project
Toddlers may lose interest before a craft is complete.
That is normal.
A child might make only a few sponge prints before deciding to stop.
Allow the activity to end naturally.
There is no need to encourage the child to continue simply to produce a finished picture.
Ignoring Sensory Discomfort
A toddler who avoids paint or rough textures may be communicating discomfort.
Do not insist that they continue.
Offer a different material or a dry activity.
Respecting the child’s preferences can help make future craft sessions more comfortable.
Not Preparing the Workspace and Cleanup Area
Starting without preparing the table can create unnecessary interruptions.
Set out the paper, tools, and protective materials before inviting the child to participate.
Keep cleaning supplies within adult reach.
Prepare a safe area for drying artwork.
An organized workspace makes supervision easier.
Frequently Asked Questions
What Are the Easiest Sensory Crafts for Toddlers?
Broad brush painting, supervised finger painting with age appropriate products, large sponge stamping, and securely prepared paper texture boards are simple options.
Choose an activity that matches the child’s abilities and behavior.
What Sensory Crafts Can a 1 Year Old Try?
For some younger toddlers, brief supervised exploration of large, securely attached textures may be appropriate.
However, many children at this age frequently mouth objects.
Avoid accessible paper pieces, paint, and other craft materials when mouthing makes the activity unsafe.
Follow product age recommendations and choose activities according to the individual child.
What Sensory Activities Are Suitable for 2 Year Olds?
Some 2 year olds enjoy broad brush painting, large sponge prints, and exploring prepared texture boards.
Keep instructions simple and provide direct supervision.
Choose materials suitable for the child’s developmental abilities and avoid loose small pieces.
What Sensory Crafts Are Good for 3 Year Olds?
Children approaching age 3 may enjoy simple color mixing, shape stamping, texture rubbings, and large paper collages.
Adults should still prepare any steps involving tools or materials that are unsuitable for independent use.
What Materials Are Suitable for Toddler Sensory Activities?
Depending on the child’s age and abilities, suitable materials may include large sheets of sturdy paper, secure textured boards, washable paint approved for the intended use, and appropriately designed painting tools.
Always follow product instructions and inspect materials before use.
Can Toddlers Do Sensory Crafts Without Paint?
Yes. Toddlers can explore contrasting paper and fabric textures on a securely prepared board.
These activities can be useful for children who dislike wet or messy materials.
Ensure all surfaces are appropriate for the child and remain firmly attached.
What Are Some Simple Sensory Activities at Home?
Large sponge printing, broad brush painting, and supervised texture exploration are practical home activities.
Use only a few suitable materials and prepare a comfortable workspace before starting.
How Do You Introduce Textures to Toddlers?
Begin with one familiar surface, such as smooth paper.
Allow the child to observe or touch it voluntarily.
Introduce another texture gradually.
Use simple descriptive words and avoid forcing participation.
Can Sensory Crafts Be Done Without Making a Mess?
Yes. Supervised exploration of securely attached paper and fabric textures can be relatively clean.
You can also choose dry activities involving large prepared materials instead of paint.
Inspect all materials before use.
How Do You Keep Sensory Crafts Safe?
Choose age appropriate materials, avoid choking hazards, inspect supplies for damage, and supervise continuously.
Keep adhesives, preparation tools, and unfinished projects inaccessible.
Stop any activity that becomes unsafe.
What Should You Avoid in Toddler Sensory Crafts?
Avoid water beads, conventional slime, small loose decorations, dry beans, loose rice, sharp materials, and objects that can break into choking hazards.
Also avoid paints or adhesives that are not intended for the child’s age or the planned activity.
How Long Should a Toddler Sensory Activity Last?
There is no single required duration.
Some toddlers may enjoy an activity for only a few minutes, while others remain interested longer.
Follow the child’s attention, comfort, and behavior rather than a strict schedule.
What If a Toddler Does Not Like Certain Textures?
Do not force contact with an uncomfortable material.
Offer a different surface or an activity using a tool instead of direct touch.
Allow the child to observe without participating.
Respect their individual sensory preferences.
How Do You Store Toddler Sensory Crafts?
Allow paint and adhesives to dry or cure completely before storage.
Keep finished projects in a clean, dry location out of the toddler’s reach.
Inspect texture boards and other reusable crafts for damage before each supervised use.
Discard projects that develop loose or damaged parts.
Final Thoughts
DIY sensory crafts for toddlers do not have to be complicated or expensive. Simple activities involving paper, suitable paint, and different textures can provide enjoyable opportunities for creative exploration.
Start with one activity that matches your child’s age, abilities, and interests. Prepare the materials carefully, supervise throughout, and allow your toddler to explore at their own pace.
Remember that sensory crafts are about the experience rather than creating perfect artwork.
Whether your child enjoys broad brush painting, making sponge prints, or exploring a prepared texture board, a simple activity can become an enjoyable shared experience.
With suitable materials and thoughtful preparation, sensory crafting can be a practical addition to everyday play.