

DIY painted wooden signs are a simple way to add a personal touch to your home without spending much money. You can use them to decorate entryways, bedrooms, shelves, and living rooms or create thoughtful handmade gifts for friends and family.
The best part is that you do not need expensive equipment or professional painting skills. With a wooden board, some acrylic paint, a few brushes, and a little patience, you can create a beautiful sign at home.
You can also personalize your sign with a favorite word, short message, or simple floral design.
In this guide, you will learn how to choose the right wood, prepare the surface, paint a smooth background, transfer lettering, and decorate your finished sign. We will make a simple wooden welcome sign using beginner-friendly techniques that do not require a Cricut or other cutting machine.
Can Beginners Make DIY Painted Wooden Signs?
Yes, beginners can make DIY painted wooden signs using simple supplies and easy painting techniques.
You do not need to be an experienced artist to create an attractive wooden sign. Many beginner designs use basic lettering, simple colors, and small decorative shapes.
For example, you can paint a wooden board with a soft white background and add the word “WELCOME” in dark green or black letters.
A few painted leaves or tiny flowers around the edges can make the sign more decorative without requiring complicated artwork.
The key is to start with a smooth wooden surface, choose a simple design, and work carefully through each step.
Do You Need a Cricut to Make Wooden Signs?
No, you do not need a Cricut to make painted wooden signs.
Although cutting machines can help create lettering templates and vinyl stencils, there are several inexpensive alternatives.
You can draw letters by hand, use reusable stencils, or transfer a printed design onto wood with an ordinary pencil.
The pencil transfer method is especially useful for beginners because it helps you position letters before painting them.
It also allows you to create consistent lettering without buying specialized equipment.
What Is the Easiest Wooden Sign for Beginners?
A small indoor wooden welcome sign is one of the easiest projects to try.
Choose a smooth, unfinished wooden craft board with enough space for a short word.
Paint the background in a light color, such as warm white or pale beige, and add dark lettering for good contrast.
You can keep the design simple by painting the word “WELCOME” in the center and adding a few green leaves near the corners.
This project introduces the basic skills needed for more detailed wooden signs without making the process too difficult.
Supplies Needed for DIY Painted Wooden Signs
You can make a painted wooden sign with materials commonly available at craft stores or already found at home.
For your first project, focus on basic supplies rather than buying a large collection of painting tools.
Having everything ready before beginning will make the process easier and help you avoid interruptions while the paint is wet.
Essential Wood Sign Painting Supplies
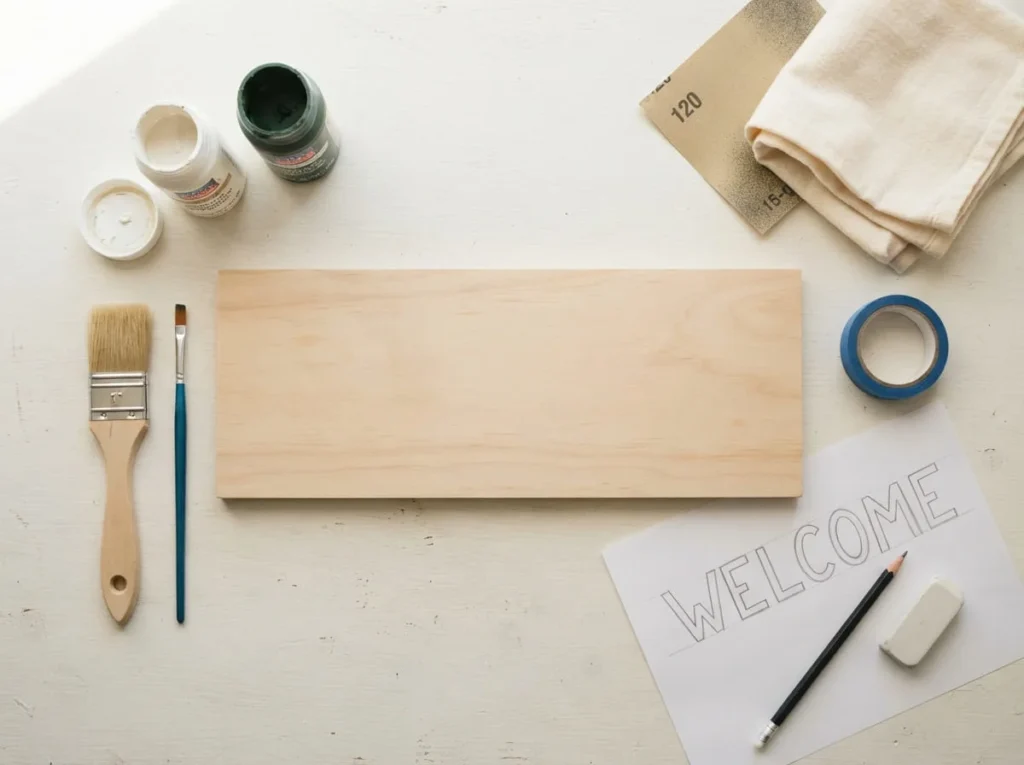
Gather these materials before starting:
- A smooth, unfinished wooden craft board
- Fine or appropriately graded sandpaper
- A clean, soft cloth for removing dust
- Acrylic craft paint in your chosen colors
- A flat paintbrush or foam brush for the background
- A small detail brush for lettering
- A pencil and eraser
- Plain paper for planning your design
- Painter’s tape
- Protective paper or a reusable craft mat for your workspace
For our beginner welcome sign, you can choose warm white paint for the background, dark green paint for the letters, and a lighter green shade for decorative leaves.
You do not need many colors to create an attractive design.
Optional Supplies for Lettering and Decoration
Some additional tools can make painting easier, but they are not essential.
Reusable letter stencils can help you create consistent shapes if you prefer not to draw letters yourself.
Acrylic paint pens may be useful for outlines, small letters, and decorative details when they are suitable for the prepared wooden surface.
You can also use transfer paper instead of the pencil transfer technique.
If you plan to protect your finished sign, you may need a compatible clear finish.
Hanging hardware or a suitable display stand can be added later, depending on where you want to place the sign.
Choosing the Right Paint for Wooden Signs
Acrylic craft paint is a practical option for many indoor wooden signs.
It comes in different colors, is relatively easy to apply, and works well for simple decorative projects when used on suitable surfaces.
You can use it to paint backgrounds, letters, flowers, leaves, and other small details.
Chalk paint is another option for certain indoor wooden decorations, particularly when you want a soft matte appearance.
However, different paints have different preparation and finishing requirements.
For outdoor wooden signs, ordinary indoor craft paint may not provide enough weather resistance.
Choose an exterior paint and protective system suitable for wood if your sign will be exposed to rain, sunlight, or changing temperatures.
For this beginner project, we will use acrylic craft paint intended for indoor wooden decorations.
What Type of Wood Is Best for Painted Wooden Signs?
The wood you choose can affect how easy your sign is to paint.
Some wooden boards have smooth surfaces that allow brushes and paint pens to move easily. Others have rough grain, knots, or uneven areas that can make lettering more difficult.
For beginners, a clean, smooth wooden board is usually the most convenient choice.
Unfinished Wooden Craft Boards
Unfinished wooden craft boards are an excellent starting point for beginners.
They are commonly sold in craft stores and come in different shapes and sizes.
Many are already cut into convenient shapes, which means you may not need woodworking tools.
Look for a board with a flat surface, smooth edges, and no loose splinters.
You may still need to sand minor rough areas before painting.
Unfinished boards can be painted with a background color or decorated while leaving some of the natural wood grain visible.
Plywood for Homemade Wooden Signs
Plywood can be useful for making wooden signs, especially when you want a flat board for lettering.
It is made from layers of wood bonded together and is available in different surface grades.
For painted signs, choose a board with a smooth face and suitable edges.
Rough plywood may require additional preparation before painting.
If the board needs cutting, use appropriate tools and safety precautions or have it cut to your preferred shape.
For beginners who do not have woodworking equipment, buying a ready-cut piece can make the project easier.
Reclaimed Wood for Rustic Signs
Reclaimed wood can give handmade signs an interesting rustic appearance.
Natural color variations, visible grain, and minor imperfections can create a distinctive look.
However, reclaimed wood may contain splinters, old paint, nails, stains, or other unknown materials.
Avoid using wood with an uncertain history or potentially hazardous coatings.
Choose clean, stable pieces that are safe to handle.
If your reclaimed board has a rough surface, it may be difficult to create neat lettering without additional preparation.
You can still preserve some of its natural character while smoothing the areas you plan to paint.
Should You Use Smooth or Rough Wood?
Smooth wood is generally easier for beginners to paint.
A flat surface helps brushes move more evenly and makes it easier to create neat letters and decorative lines.
Rough wood can interrupt brush strokes, cause paint to collect in grooves, and create uneven stencil edges.
If you want a rustic appearance, you do not necessarily need to remove every natural mark.
However, the main lettering area should be smooth enough for the painting method you plan to use.
For your first wooden welcome sign, choose a board with a relatively even surface.
How to Make DIY Painted Wooden Signs Step by Step
Now that you have your supplies and wooden board ready, you can begin making your painted sign.
For this tutorial, we will create a simple indoor welcome sign with a warm white background, dark green lettering, and a few decorative leaves.
We will use a pencil transfer method to create the letters, so you do not need a Cricut, vinyl cutter, or advanced lettering skills.
Follow each step carefully and allow enough drying time between painted layers.
Step 1: Choose Your Wooden Board
Start with a clean, sturdy wooden craft board.
A rectangular board is convenient for this project because it provides enough space for the word “WELCOME” and a few decorations.
Check that the board is flat and does not have cracks, loose splinters, or damaged edges.
Place it on your worktable and think about where the letters will appear.
Leave some space around the edges so the design does not look crowded.
If you plan to hang the sign later, consider how its shape and weight will affect the display method.
For now, focus on choosing a wooden surface that is easy to paint.
Step 2: Sand the Wood Smooth
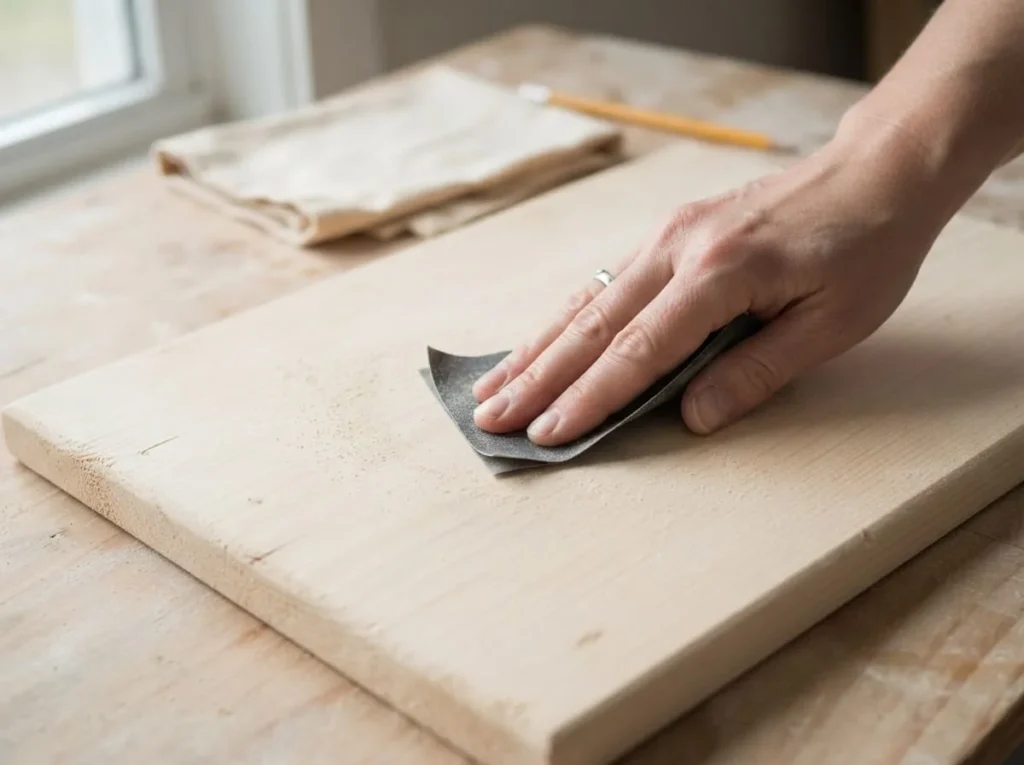
Before painting, gently check the wooden board for rough areas.
If the surface feels uneven, use suitable fine sandpaper to smooth it.
Move the sandpaper along the direction of the wood grain whenever practical.
Pay attention to the main painting area and any rough edges.
You do not need to sand away a large amount of material.
The goal is to create a smooth surface that allows paint to spread more evenly.
If your wooden board is already smooth and ready for painting, additional sanding may not be necessary.
Avoid sanding old painted wood with an unknown finish because some older coatings can contain hazardous materials.
Step 3: Remove Dust and Clean the Surface
After sanding, remove the dust from your wooden board.
Use a clean, soft cloth to wipe the surface gently.
Pay attention to corners and edges where small particles may collect.
Dust can interfere with paint application and make the finished surface feel rough.
If necessary, use a cleaning method suitable for the wood and allow it to dry completely before painting.
Place the clean board on your protected worktable.
Try to avoid touching the main painting area with dirty or greasy hands.
Once the surface is clean and dry, you are ready to choose your background color.
Step 4: Decide on the Background Color
Think about the appearance you want for your wooden welcome sign.
You can leave the natural wood visible or paint the board with a background color.
For this beginner project, choose a warm white or soft cream background.
This will create a simple, neutral base for the dark green lettering.
You can also use pale beige, light gray, or another color that matches your preferred decorating style.
The most important thing is to choose colors that provide enough contrast for the letters to remain easy to read.
Before applying paint, test your chosen background color on a spare piece of similar wood if available.
Step 5: Apply the Base Coat
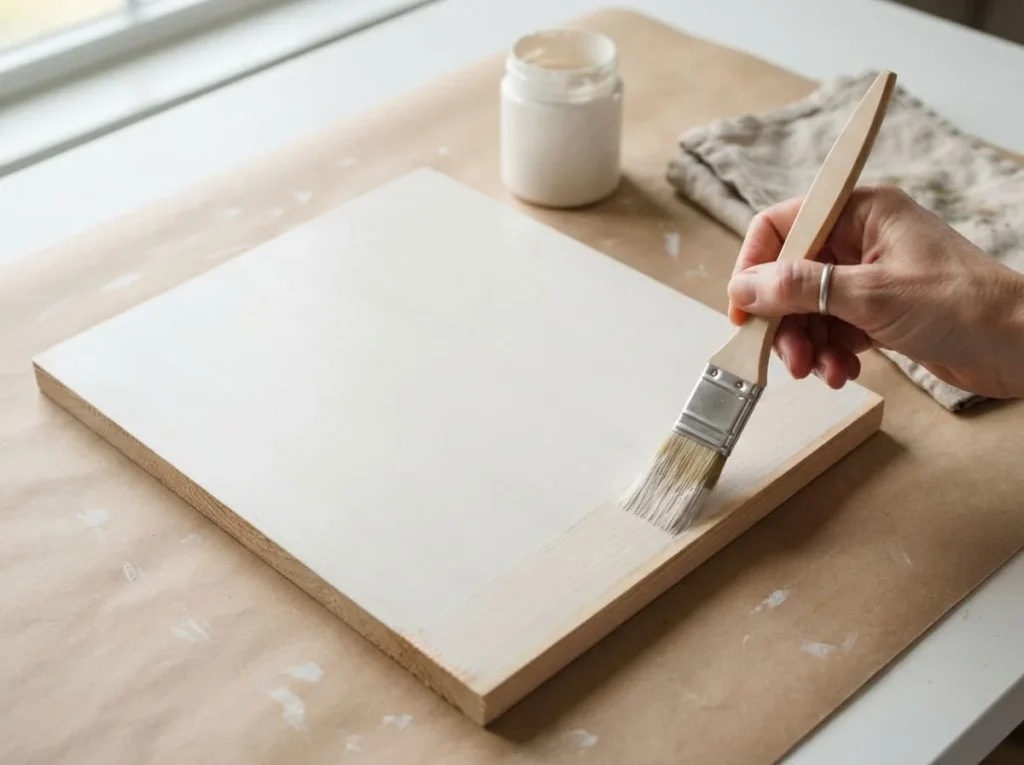
Once you have chosen your background color, prepare your acrylic craft paint according to its instructions.
Use a clean flat brush or foam brush to apply a thin, even layer across the wooden surface.
Work with controlled strokes and avoid placing too much paint in one area.
If you notice excess paint collecting near an edge, gently smooth it before it begins to dry.
Allow the first coat to dry according to the paint manufacturer’s instructions.
Once dry, check whether the background looks even.
If the wood grain shows through more than you want, apply another thin coat.
Avoid applying a heavy layer of paint all at once because it may create brush marks, drips, or uneven coverage.
If you want to paint the back and edges as well, allow each side to dry before turning the board over.
How Many Coats of Paint Does a Wooden Sign Need?
There is no single number of coats that works for every wooden sign.
The amount of paint required depends on the type of wood, the paint formulation, the background color, and how opaque you want the finish to look.
Some prepared boards may look good after one coat, while others need additional layers.
Dark wood or highly absorbent surfaces may require more attention.
Apply thin coats and allow each one to dry before adding another.
Stop when the background provides the appearance you want without unnecessary paint buildup.
Step 6: Plan Your Sign Lettering
Once the painted background is dry, plan the lettering.
For our example, we will use the word “WELCOME” in the center of the board.
You can write the word on plain paper or create a simple printed template.
Choose clear, easy-to-read letters rather than complicated decorative lettering.
Check that the word fits comfortably within the wooden surface.
Leave enough space between the letters and the edges.
You can also mark the center of the board lightly to help position your design.
Before transferring the lettering, place the paper on the board and check how it looks.
If the design feels too large or crowded, adjust it before continuing.
Step 7: Transfer the Lettering onto the Wood
The pencil transfer method is an inexpensive way to copy letters onto a painted wooden surface.
It works well for beginners because it allows you to follow a prepared design rather than drawing each letter directly on the board.
Make sure your background paint has dried sufficiently before beginning.
How to Transfer Letters Without a Cricut
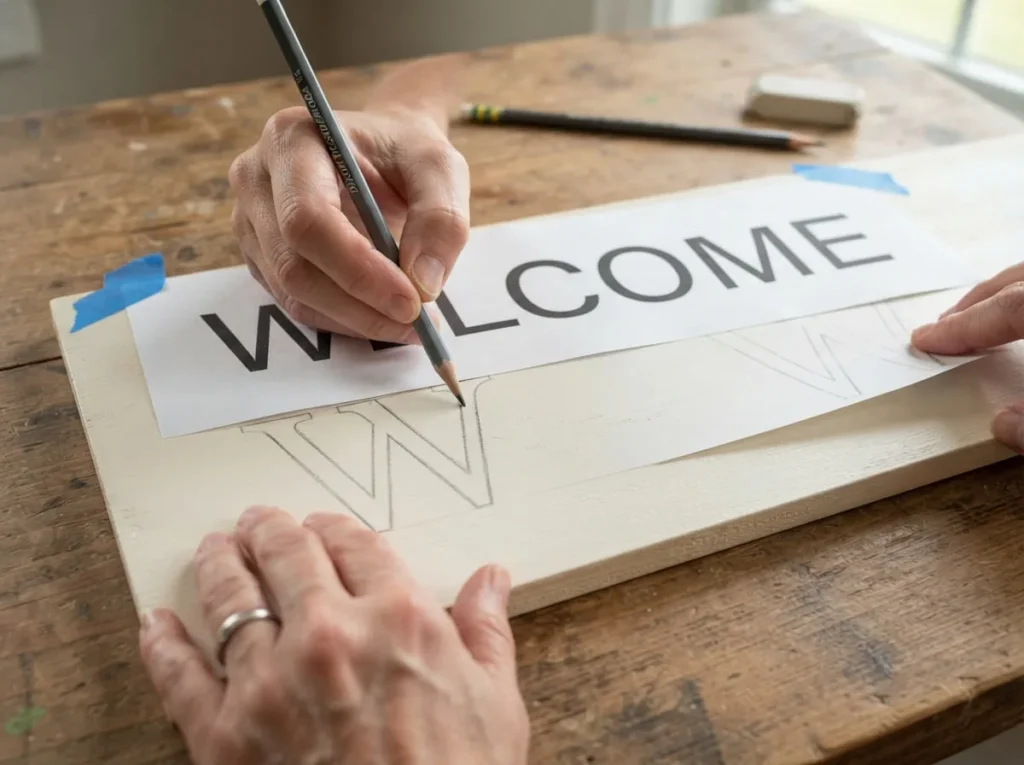
Start with your word or design written or printed on plain paper.
Turn the paper over so the back is facing you.
Use a soft graphite pencil to shade the back of the paper in the areas behind the letters.
You do not need to cover the entire sheet. Focus on the sections where the lettering appears.
Turn the paper back over and place it on your wooden board with the letters facing upward.
Position the design carefully and secure the paper with painter’s tape that is suitable for your painted surface.
Use a pencil to trace the outline of each letter.
Apply enough pressure to transfer a visible guide, but avoid pressing so hard that you damage the painted background.
The graphite on the back of the paper should transfer lightly onto the wooden surface.
Lift one corner carefully to check whether the marks are visible without shifting the entire template.
If the lettering looks clear, remove the paper gently.
You should now have a simple guide that you can follow with paint.
Step 8: Paint the Wooden Sign Letters
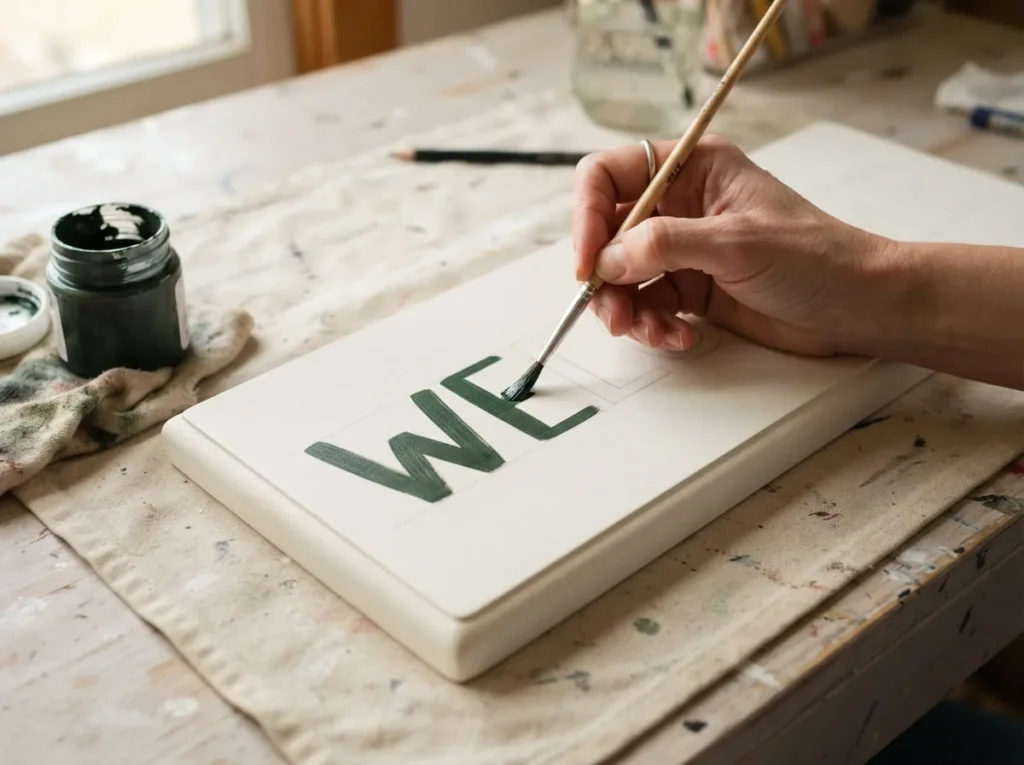
Once your lettering has been transferred, choose the paint color for your word.
For our welcome sign, use dark green acrylic craft paint.
Take a small detail brush and begin carefully painting along the outlines of the first letter.
Work slowly and use a comfortable amount of paint on the brush.
Avoid pressing too hard or loading the brush with excessive paint.
After outlining a letter, fill the inside using short, controlled strokes.
Continue with the remaining letters.
If you find painting with a brush difficult, you can use a compatible acrylic paint pen for the lettering instead.
The pen may offer more control for certain outlines and small details.
Allow the letters to dry before deciding whether they need another coat.
If any edges look uneven, correct them carefully after the paint has dried.
Step 9: Add Simple Decorative Details
After the lettering is complete, you can add a few decorative details.
For this project, paint small green leaves near two corners of the board.
Use a small brush to create short stems and simple oval leaf shapes.
You can also add tiny white or yellow dots if they suit your design.
Keep the decorations modest so the word “WELCOME” remains the main focus.
You do not need to fill every empty space.
A few carefully placed details can make the sign feel handmade and personal without becoming too busy.
If you prefer a minimalist appearance, you can leave the sign with lettering only.
Step 10: Let the Painted Sign Dry Completely
After completing the design, place your wooden sign somewhere clean and protected.
Allow the paint to dry according to the manufacturer’s instructions.
Avoid touching the letters or decorations while they are still wet.
Keep the board flat and away from dust, pets, and objects that could accidentally touch the surface.
Remember that paint can feel dry before it has fully cured.
If you plan to apply a protective finish, wait until the paint is ready for that process.
Once the artwork is properly dry, inspect the sign under good lighting.
Check for small areas that may need correction and make sure all painted details look complete.
Your wooden welcome sign is now painted and ready for the appropriate finishing and display steps.
Easy Ways to Paint Letters on Wooden Signs
Lettering is one of the most important parts of a painted wooden sign. Neat, readable letters can make even a simple design look attractive.
You do not need beautiful handwriting or expensive equipment to create good lettering. There are several beginner-friendly methods, and each one works well for different projects.
The best method depends on your confidence, the size of your sign, and the supplies you already have.
Freehand Lettering for Wooden Signs
Freehand lettering is a simple option if you enjoy drawing and want your sign to have a personal, handmade appearance.
Start by lightly drawing horizontal guidelines on your prepared wooden board. These lines will help you keep the letters at a consistent height.
Sketch your word with a pencil before applying paint.
For example, if you want to paint the word “HOME,” draw the letters slowly and check their spacing before filling them with color.
Use a small detail brush to follow your pencil outlines.
Do not worry if every letter looks slightly different. Small variations can give handmade wooden signs their own character.
Painting Letters with Stencils
Letter stencils are useful when you want more consistent shapes without drawing each letter yourself.
Choose a stencil that fits your wooden board and matches the style of your sign.
Position it carefully and secure it using painter’s tape that is suitable for the painted surface.
Use a stencil brush or small foam applicator to apply paint through the openings.
Work with a small amount of paint rather than covering the stencil with a thick layer.
Follow the stencil manufacturer’s instructions for removing or repositioning it.
Allow the painted letters to dry before adding more decorations.
How to Prevent Paint from Bleeding Under a Stencil
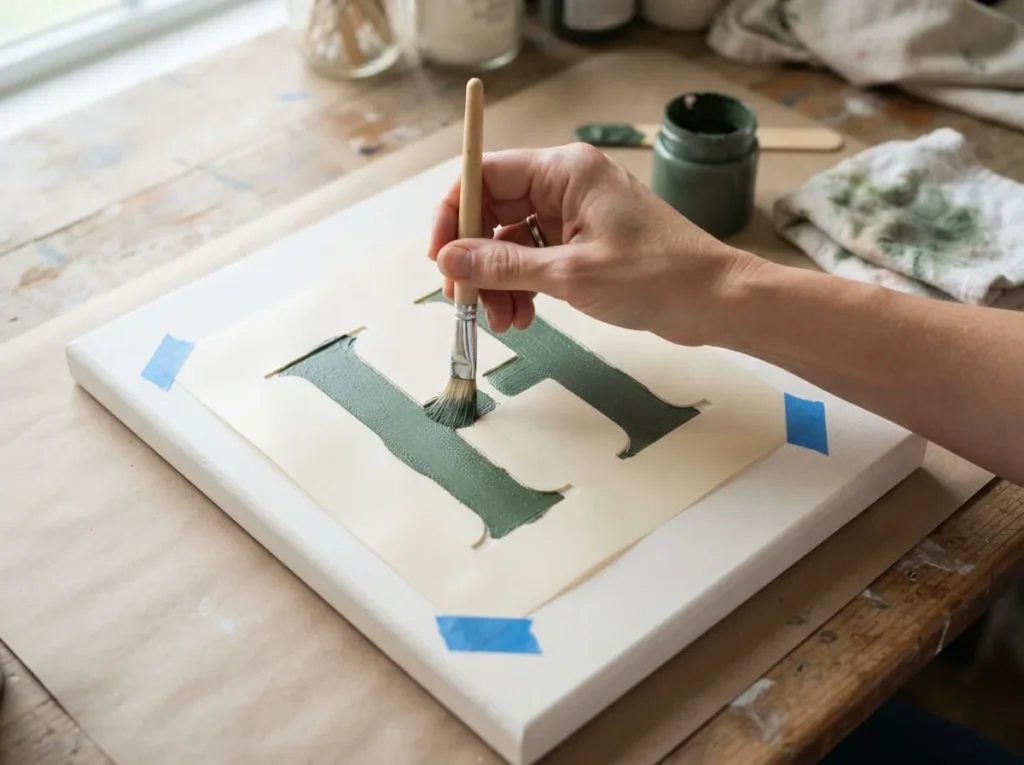
Paint bleeding happens when liquid paint spreads underneath the stencil edges, making the letters look blurry.
To reduce this problem, make sure your wooden surface is smooth and the stencil sits flat.
Remove excess paint from your brush or applicator before touching the stencil.
Apply light layers using gentle dabbing movements rather than pushing paint toward the edges.
Some crafters use a compatible base-color sealing technique to help close small gaps beneath a stencil. If you try this method, test it on a spare wooden piece first.
Carefully remove the stencil according to the product instructions to avoid lifting or smearing the paint.
Using Acrylic Paint Pens for Wooden Sign Lettering
Acrylic paint pens can be useful when you want more control over small letters and decorative outlines.
Unlike a traditional paintbrush, a paint pen allows you to draw directly onto the wooden surface.
Fine-tip markers are suitable for small lettering, while medium-tip markers can help with larger letters and simple shapes.
Before using a paint pen, check that it is compatible with your wooden surface and any existing background paint.
Test it on scrap paper and a small prepared wooden sample.
If you want to learn more about choosing suitable markers, Best Acrylic Paint Pens for Wood Crafts explains different tip styles and their uses.
Using Printed Letter Templates
Printed letter templates are helpful when you want consistent spacing and a particular lettering style.
You can create a simple word using a computer or draw a template on paper.
Choose letters that are easy to read and large enough for your wooden board.
Place the template on your sign before transferring it to check the overall layout.
A printed template can be used with graphite transfer paper or the pencil transfer method described earlier.
This approach is especially useful for longer words, names, or signs where careful alignment matters.
How to Make Painted Wooden Signs Look Neat and Professional
A beautiful wooden sign does not need complicated artwork. Simple design choices and careful painting can make a big difference.
The goal is to create a sign that looks balanced, readable, and neatly finished while keeping its handmade character.
Choose Colors with Good Contrast
Choose lettering colors that stand out clearly against the background.
For example, dark green letters can look attractive on a warm white wooden board.
White lettering may work well on a dark blue or deep green background.
If your colors are too similar, the words may be difficult to read from a distance.
Test a small sample before painting the entire sign.
Keep Letter Spacing Consistent
Uneven spacing can make a wooden sign look crowded or unbalanced.
Before painting, arrange your letters on paper and check how much room they need.
Mark the center of the board lightly to help position your design.
Try to keep the distance between letters visually balanced rather than placing every character too close together.
Check the layout from a short distance before adding paint.
Use Thin Layers of Paint
Applying too much paint at once can create drips, raised edges, and uneven coverage.
Use a suitable brush and apply a controlled amount of paint.
For larger areas, thin coats can help produce a smoother appearance.
Allow each coat to dry according to the manufacturer’s instructions before adding another layer.
Avoid repeatedly brushing over paint that has already started drying.
Keep Decorative Details Simple
A wooden sign often looks better when the lettering remains the main focus.
You can add small leaves, flowers, dots, or simple borders without covering every empty area.
For example, a welcome sign might need only two leafy branches near the corners.
Leave some open space around the words so the design feels comfortable and easy to read.
Fix Small Mistakes Before Finishing
If you notice uneven letters or small paint marks, wait until the affected area has dried before attempting a correction, unless your paint instructions recommend another method.
You may be able to cover a minor mistake with a carefully applied layer of the original background color.
Allow the correction to dry before repainting the detail.
Avoid excessive rubbing or scraping because this can damage the painted surface.
How to Seal DIY Painted Wooden Signs
Sealing a painted wooden sign may help protect its surface from scratches, rubbing, and occasional handling.
However, not every handmade sign needs an additional protective coating.
The best finishing method depends on the paint you used, where the sign will be displayed, and how often it will be touched.
Do All Painted Wooden Signs Need Sealing?
No, not all painted wooden signs require sealing.
A decorative indoor sign that sits on a shelf and is rarely handled may not need an extra protective coating.
However, signs placed in busy areas or handled frequently may benefit from additional protection.
If you are using acrylic craft paint, check whether its manufacturer recommends sealing for your intended use.
Remember that adding a protective finish does not automatically correct poor paint adhesion.
The underlying paint should be properly applied and allowed to dry or cure before finishing.
What Type of Sealer Works on Painted Wood?
Several protective finishes are available for wooden crafts.
Some water-based clear varnishes are suitable for use over compatible acrylic paint, while other products are designed for specific wood finishing systems.
You can choose from different appearances depending on the product.
Matte finishes create a low-shine appearance, satin finishes provide a gentle sheen, and glossy finishes produce a more reflective surface.
However, the finish may change how the colors and wood grain look.
Check that the protective coating is suitable for your paint and wooden surface.
Test it on a separate painted sample before applying it to your completed sign.
How to Apply a Protective Finish
If your wooden sign needs sealing, follow these steps while keeping the product manufacturer’s instructions as your main guide.
Step 1: Let the Paint Dry or Cure
Before applying any protective finish, make sure the lettering, background, and decorations have dried or cured as required.
Paint that feels dry to the touch may still need additional time before another coating can be applied.
Rushing this step may cause the colors to smear or affect the finish.
Step 2: Test the Finish on a Sample
Use a spare piece of wood with the same paint and preparation as your sign.
Apply a small amount of your chosen sealer according to its instructions.
Check whether the finish changes the colors, creates unwanted shine, or affects the painted details.
Allow the sample to dry completely before deciding whether to use the product.
Step 3: Apply the Protective Coat Correctly
Apply the compatible finish using the method recommended by its manufacturer.
Some products require a brush, while others are applied by spraying.
Work in a suitable area and follow the safety and ventilation instructions.
Avoid unnecessarily thick coats that may create drips or uneven patches.
If additional coats are required, follow the recommended waiting time between applications.
Step 4: Allow the Finish to Cure
Place the sign somewhere clean and protected after applying the finish.
Let the coating dry and cure according to the product instructions.
Do not stack, wrap, hang, or heavily handle the sign until the finish is ready.
Once cured, the sign can be prepared for display using appropriate hardware or a stable stand.
Can You Make a Painted Wooden Sign Waterproof?
A suitable protective coating can improve moisture resistance, but it does not automatically make a painted wooden sign completely waterproof.
Wood can absorb moisture through unprotected edges, cracks, and exposed areas.
Outdoor conditions can also cause wood to expand and contract, which may affect the paint and protective finish.
If your sign will be exposed to rain, choose an exterior wood painting system rather than relying on an ordinary indoor craft sealer.
Even an exterior sign may require occasional inspection and maintenance.
How to Make Painted Wooden Signs for Outdoor Use
Outdoor wooden signs can decorate porches, gardens, and entrances, but they face different conditions from indoor decorations.
Rain, sunlight, humidity, and temperature changes can affect both the paint and the wood.
If you want your painted sign to remain outdoors, choose materials specifically suitable for exterior conditions.
Choose Wood Suitable for Outdoor Conditions
Start with wood that is appropriate for exterior use.
Some wood species and exterior-rated boards are better suited to outdoor conditions than ordinary indoor craft blanks.
Check that the board is sound, dry, and suitable for painting.
Avoid damaged wood or pieces with loose, deteriorating areas.
If you need to cut or prepare the wood, follow appropriate tool safety instructions.
Use Exterior Primer and Paint
Ordinary indoor acrylic craft paint may not withstand long-term exposure to rain and sunlight.
For an outdoor sign, choose a compatible exterior primer and paint designed for wood.
Follow the manufacturer’s instructions for cleaning, surface preparation, application, and drying.
If you plan to paint letters over a background color, make sure the products are compatible.
Do not assume that adding an outdoor sealer will make unsuitable indoor paint weatherproof.
Protect the Front, Back, and Edges
When finishing an exterior wooden sign, remember that moisture can enter through areas that are not properly protected.
This includes the back, edges, and exposed holes.
Follow the exterior coating system’s instructions for treating these surfaces.
Pay attention to cut edges because they may absorb moisture differently from the main face of the board.
Allow all required coatings to cure before installing the sign.
Display Outdoor Signs Where They Are Protected
Even when you use suitable exterior materials, the location of your sign matters.
A sign displayed under a covered porch may experience less direct rain than one placed in an open garden.
Try to choose a location that reduces unnecessary water exposure and allows moisture to drain.
Inspect outdoor signs occasionally for peeling paint, cracks, or damaged finishes.
Repairing small problems early may help extend the useful life of your decoration.
How to Display Your Finished Wooden Sign
Once your painted wooden sign has dried and any required protective finish has cured, you can display it at home.
Choose a location that suits the sign’s size, weight, and design.
A simple welcome sign can look attractive without needing an elaborate arrangement.
Displaying a Wooden Sign on a Shelf
Small wooden signs can be displayed on shelves, mantels, or suitable cabinets.
If the sign cannot stand securely on its own, use a stable display stand designed for its size and weight.
Keep it away from the edge of the shelf and places where it could easily be knocked over.
You can place it beside a small plant or another simple decoration without hiding the lettering.
Hanging a Painted Wooden Sign on a Wall
If you want to hang your sign, choose hardware suitable for the board’s weight and the wall material.
Some lightweight signs may be compatible with certain hanging strips, while heavier wooden boards may need properly installed hooks or other hardware.
Follow the hardware manufacturer’s instructions and avoid attaching supports to weak or damaged wood.
Check that the sign hangs securely before leaving it in place.
Decorating an Entryway with a Wooden Welcome Sign

An entryway is a natural place to display a handmade welcome sign.
You can place the finished sign on a narrow shelf, console table, or suitable wall.
Keep the surrounding decorations simple so the lettering remains easy to notice.
For the warm white and dark green welcome sign created in this tutorial, a neutral entryway with natural wood accents or greenery can provide a pleasant background.
The finished sign adds a personal handmade detail while keeping the space welcoming and uncluttered.
Easy DIY Painted Wooden Sign Ideas to Try
Once you have completed your first wooden welcome sign, you can experiment with different colors, lettering styles, and simple decorations.
You do not need to learn a completely new painting technique for every project. A few small changes can give your wooden signs a different appearance.
Here are some beginner-friendly ideas you can try using the same basic supplies.
Simple Wooden Welcome Sign
A wooden welcome sign is a great starting point for beginners.
Choose a smooth rectangular board and paint the word “WELCOME” in the center.
Use dark letters against a light background so the message is easy to read.
Add a few green leaves or small flowers near the corners.
This design works well in entryways, on shelves, or as a handmade gift.
Minimalist Wooden Sign
Minimalist wooden signs focus on simple lettering and limited decoration.
Choose a neutral background, such as warm white, soft beige, or light gray.
Add one short word, such as “HOME,” using a contrasting paint color.
Leave plenty of empty space around the lettering.
You can also keep the natural wood grain visible if you prefer a more organic appearance.
This style is especially useful for beginners who want a clean design without complicated patterns.
Rustic Farmhouse Wooden Sign
Rustic farmhouse signs often feature natural wood textures, muted colors, and simple lettering.
You can use a wooden board with visible grain and paint a short phrase in white or dark brown.
Another option is to apply a soft cream background while leaving some of the natural character of the wood visible.
Keep the decorations simple with small leaves or a subtle border.
Avoid using damaged or contaminated reclaimed wood simply to achieve a rustic appearance.
Floral Painted Wooden Sign
Flowers can make a basic wooden sign look colorful and welcoming.
Start with a short word or phrase in the center of your board.
Add small flowers around the corners using pink, yellow, lavender, or white paint.
Use a fine brush to paint green stems and leaves.
Choose simple flower shapes with rounded petals rather than complicated botanical drawings.
A few carefully placed flowers are enough to make the sign attractive.
Seasonal Wooden Sign
You can also create wooden signs for different seasons and holidays.
For autumn, try warm orange, brown, and yellow colors with small painted leaves.
For Christmas, you could use green, red, and white with a simple star or evergreen branch.
Spring decorations can feature pastel flowers and fresh green leaves.
Keep the main lettering readable and choose seasonal decorations that are easy to paint.
You can reuse the same wooden sign-making process while changing the colors and design.
Common Problems When Making Painted Wooden Signs
Even a simple painted wooden sign may not look exactly how you expected on the first attempt.
You might notice patchy paint, uneven lettering, blurry edges, or unwanted marks.
Most of these problems are related to surface preparation, paint application, or the way the design was transferred.
Understanding the causes can help you improve your results and avoid making the same mistakes again.
Paint Looks Patchy on the Wooden Board
Patchy paint can occur when wood absorbs paint unevenly.
Some areas may look darker or lighter because of differences in wood grain and surface porosity.
Using too little paint or applying it inconsistently can also produce uneven coverage.
To improve the result, allow the first coat to dry completely.
Then apply another thin, even layer if the paint manufacturer’s instructions allow it.
For future projects, consider using a compatible primer or base coat on highly absorbent wood.
Always remove sanding dust before painting because leftover particles can also affect the finish.
Painted Letters Have Blurry Edges
Blurry lettering often happens when paint spreads beyond the intended outlines.
If you are using stencils, too much paint may seep beneath the edges.
Rough wooden surfaces can also make it difficult to create clean lines.
To reduce bleeding, use a smooth prepared board and make sure the stencil sits flat.
Apply small amounts of paint using gentle dabbing movements.
If you are painting letters by hand, use a suitable detail brush and work slowly.
Allow the paint to dry before correcting uneven edges with a compatible background color.
Lettering Looks Crooked or Uneven
Crooked lettering can make an otherwise attractive wooden sign look unbalanced.
This often happens when letters are drawn directly onto wood without planning their placement.
Before painting, measure or mark the center of your board.
Sketch the lettering on paper and check that it fits within the available space.
You can also use a simple printed template to maintain consistent letter sizes.
Light pencil guidelines may help keep the letters aligned.
Check the layout from a short distance before adding paint.
Pencil Marks Show Through the Paint
Pencil marks can sometimes remain visible around painted letters.
This is more noticeable when using light-colored paint or pressing heavily while transferring a design.
To prevent this, draw and transfer your lettering with gentle pressure.
Use only enough graphite to create a visible guide.
If pencil marks remain after painting, wait until the paint has dried before attempting to remove them.
A clean, soft eraser may remove some visible graphite, but test it carefully because rubbing can damage certain painted finishes.
If necessary, you may be able to cover unwanted marks with a small amount of the original background paint.
Paint Peels or Scratches Off
Paint may peel or scratch when it does not adhere properly to the wooden surface.
Possible causes include dust, grease, incompatible materials, or an existing finish that prevents the new paint from bonding.
Handling the sign before the paint has fully cured can also cause damage.
If paint begins peeling, do not simply cover the loose area with another thick coat.
Remove loose material using a method appropriate for the surface, then clean and prepare the affected area before repainting.
For future projects, choose paint suitable for wood and follow the manufacturer’s preparation and curing instructions.
The Protective Sealer Changes the Paint Color
Sometimes, a painted wooden sign looks slightly different after a protective finish is applied.
A glossy sealer may make colors appear more reflective or deeper, while certain finishes can change the appearance of the background.
Some coatings may also produce cloudiness or unwanted discoloration if they are incompatible with the paint.
Before sealing your sign, test the protective finish on a separate painted wooden sample.
Allow the test coating to dry or cure before judging the result.
Choose a finish that provides the appearance you want while remaining compatible with the materials used.
Tips for Making Better Painted Wooden Signs
Creating attractive wooden signs becomes easier with practice. Small improvements in preparation, lettering, and painting techniques can make a noticeable difference.
These simple tips will help you work more confidently on future projects.
Practice Your Lettering on Paper First
Before painting letters onto wood, practice the word or phrase on plain paper.
This helps you understand how much space each letter needs.
You can also try different lettering styles before choosing your final design.
Test Paint Colors on Spare Wood
Paint colors may look different on wood than they do inside their containers.
If possible, test your chosen colors on a spare piece of similar wood.
This helps you check coverage and decide whether the background and lettering have enough contrast.
Let Each Paint Layer Dry
Allow the background, letters, and decorations to dry before adding another layer.
Painting over wet areas too soon may cause smudging or uneven coverage.
Follow the drying instructions for the paint you are using.
Use the Right Brush for Each Detail
A flat brush is useful for applying background paint, while a small detail brush provides better control for letters and decorative lines.
Choose brushes that suit the size of your design.
Avoid trying to paint tiny details with an unnecessarily large brush.
Avoid Overcrowding Your Design
Leave enough empty space around the main lettering.
Too many flowers, dots, or decorative shapes can make a sign look busy.
Choose a few simple elements that complement the words rather than compete with them.
Start Small Before Making Larger Signs
Small wooden boards are convenient for practicing new painting techniques.
They require fewer materials and are easier to handle.
Once you feel comfortable with background painting, lettering, and simple decorations, you can try larger wooden signs.
Frequently Asked Questions
What Kind of Paint Is Best for DIY Wooden Signs?
Acrylic craft paint is a practical choice for many indoor painted wooden signs because it is available in different colors and works on suitably prepared wood. Chalk paint can also be useful for certain decorative finishes. For outdoor signs, choose a compatible exterior primer and paint system designed for wooden surfaces.
Can You Make Wooden Signs Without a Cricut?
Yes, you can make wooden signs without a Cricut or other cutting machine. You can transfer printed letters using a pencil, use reusable letter stencils, or draw your designs by hand. The pencil transfer method is particularly useful for beginners because it provides lettering guides without requiring specialized equipment.
Do You Have to Sand Wood Before Painting a Sign?
Not every wooden board needs sanding before painting. If you are using a smooth, ready-made craft blank, it may already be suitable for painting. However, rough areas and raised wood fibers can affect paint application and lettering. Gentle sanding may help when appropriate, followed by thorough dust removal.
Should You Prime Wood Before Painting Letters?
Primer is not always necessary for small indoor wooden signs. However, highly absorbent wood may benefit from a compatible primer or base coat to create more even paint coverage. If you want bright lettering over a dark surface, a suitable preparation coat may also help. Follow the instructions for the products you choose.
How Do You Paint Straight Letters on Wood?
To paint straight letters, start by planning your lettering on paper. Mark the center of the wooden board and use light guidelines to keep the letters aligned. You can transfer a printed template onto the surface or use a suitable stencil. Paint carefully along the outlines before filling the letters with color.
How Do You Stop Paint from Bleeding Under Stencils?
Start with a smooth wooden surface and secure your stencil so it lies flat. Use a small amount of paint on a stencil brush or foam applicator, applying it with gentle dabbing movements. Avoid pushing wet paint beneath the stencil edges. A compatible base-color sealing technique may also help on some surfaces when tested first.
Can You Use Acrylic Paint Pens on Wooden Signs?
Yes, acrylic paint pens suitable for wood can be used to create lettering, outlines, and decorative details on wooden signs. Fine tips are useful for smaller letters, while medium and broad tips can help with larger designs. Make sure the wooden surface is properly prepared and any background paint is compatible with the marker.
How Long Does a Painted Wooden Sign Take to Dry?
Drying time depends on the paint formulation, coating thickness, temperature, and humidity. Thin acrylic paint layers may become touch-dry relatively quickly, while thicker sections can take longer. The sign may also need additional curing time before sealing or handling. Follow the manufacturer’s drying and curing instructions rather than using one fixed time for every project.
Do You Need to Seal DIY Painted Wooden Signs?
Not every painted wooden sign requires sealing. A decorative indoor sign that is rarely touched may remain suitable without an additional protective finish. However, signs that receive regular handling may benefit from a compatible coating. Test the sealer before applying it and allow the paint to dry or cure properly.
Can You Leave a Painted Wooden Sign Outdoors?
You can display a painted wooden sign outdoors when the wood, primer, paint, and protective finish are suitable for exterior conditions. Ordinary indoor craft paint is not automatically weather-resistant. Choose appropriate outdoor materials, protect exposed surfaces, and follow the manufacturer’s instructions. Even properly finished exterior signs may need occasional maintenance.
Final Thoughts
DIY painted wooden signs are an enjoyable way to create personalized decorations using simple materials and beginner-friendly techniques.
You do not need expensive equipment or perfect handwriting to make an attractive sign. A smooth wooden board, suitable paint, a clear lettering guide, and a little patience are enough to get started.
Begin with a small welcome sign and focus on neat lettering, thin paint layers, and simple decorative details. Allow the paint to dry properly and choose a suitable finish when needed.
As you become more comfortable with the process, you can experiment with different colors, messages, and styles to create wooden signs that suit your home.