
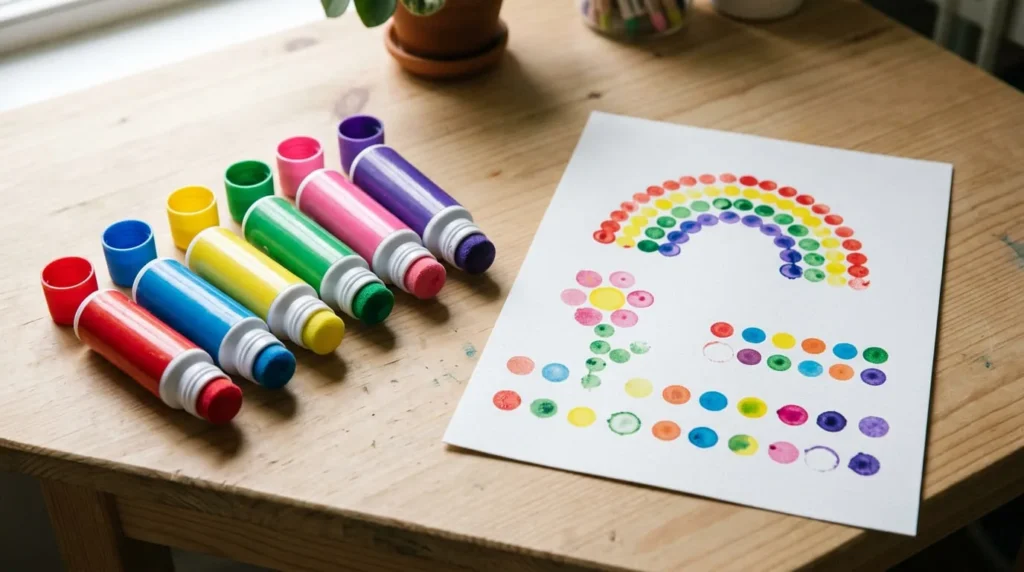
Dot paint markers are a simple way to create colourful artwork without needing paintbrushes, palettes, or complicated supplies. With their rounded applicator tips, these markers let you stamp bright dots directly onto paper, making them suitable for beginners, children’s craft activities, and anyone who enjoys experimenting with patterns and colours.
From decorating paper flowers to creating colourful rainbows and abstract designs, dot paint markers offer plenty of creative possibilities. They are especially useful for introducing younger children to painting because the stamping motion is straightforward and encourages hands-on exploration.
In this guide, you’ll learn what dot paint markers are, how they differ from regular paint pens, what to look for when choosing them, and how to use them correctly before trying some easy art projects.
What Are Dot Paint Markers?
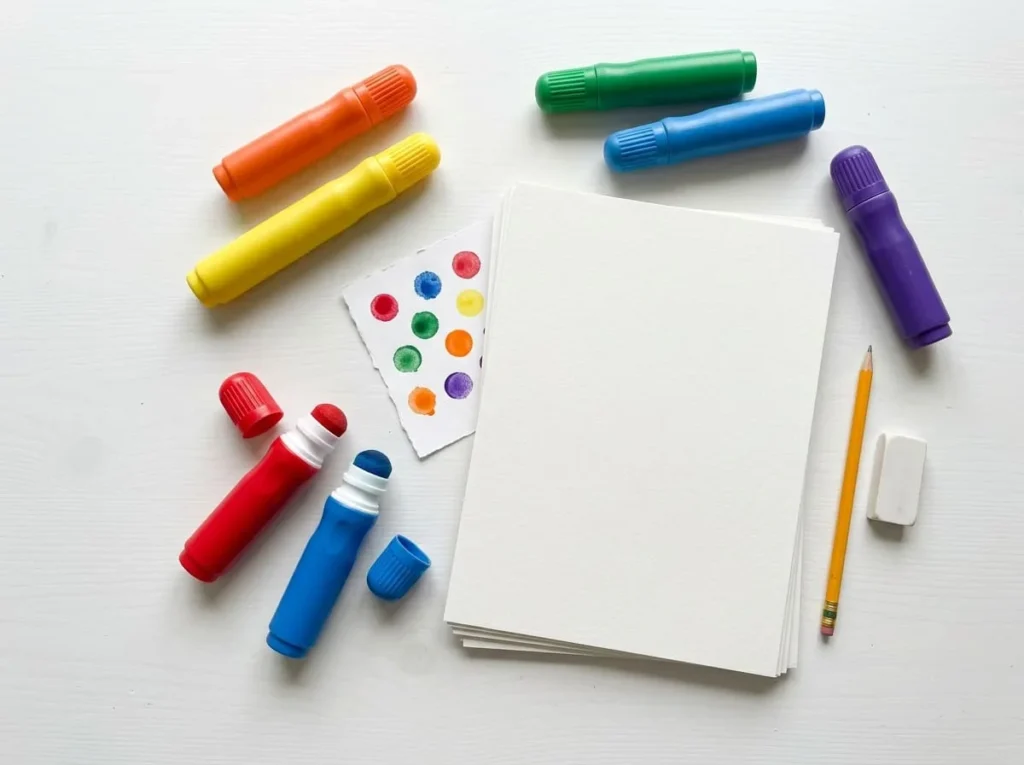
Dot paint markers are art tools designed to create round, colourful marks on paper and other compatible surfaces. Unlike ordinary pens that produce thin lines, these markers typically have wide, rounded foam or sponge applicators that transfer colour when pressed against a surface.
Most craft-style dot markers contain water-based ink or a similar colouring formula inside a bottle-shaped body. When the applicator touches paper, the colour flows through the tip and leaves a circular impression. The result is a painted dot without the need to dip a brush into paint.
These markers are particularly popular for preschool painting activities, classroom projects, and simple paper crafts. Their larger bodies are often easier for small hands to grip than traditional thin markers, although suitable age ranges vary by product.
Dot paint markers can be used for several creative purposes, including:
- Creating colourful patterns and repeated shapes.
- Filling large illustrations with dots instead of solid colouring.
- Decorating paper flowers, butterflies, and animals.
- Practising colour recognition and simple counting activities.
- Making greeting cards and handmade paper decorations.
- Exploring basic painting techniques without using brushes.
While they are commonly associated with children’s crafts, dot markers can also be useful for beginners interested in repetitive patterns and simple decorative artwork.
How Do Dot Paint Markers Work?
Dot paint markers work by transferring ink from an internal reservoir through a rounded applicator tip onto the painting surface.
The tip is generally made from absorbent foam or a similar material that holds a small amount of colour. When the marker is pressed gently against paper, the applicator makes contact with the surface and deposits ink in a circular shape.
The appearance of each dot depends on several factors.
The amount of pressure applied can influence how much ink transfers to the paper. A gentle, controlled press usually produces a cleaner impression, while excessive pressure may release too much colour or cause an uneven mark.
Paper quality also matters. Smooth, reasonably thick paper generally provides a better starting surface than very thin sheets, which can become saturated or allow ink to show through.
The marker itself also affects the result. Some markers create relatively consistent circles, while others produce softer edges or slightly irregular dots depending on their applicator design and ink flow.
For beginners, the easiest technique is to hold the marker upright, place the tip flat against the paper, press briefly, and lift it straight up.
Once comfortable with this motion, you can experiment with dot spacing, colour combinations, and repeated patterns.
Dot Paint Markers vs. Regular Paint Markers
Although dot paint markers and regular paint markers are both used to apply colour, they are designed for different kinds of artwork.
The biggest difference is the applicator.
Dot paint markers generally feature broad foam tips intended to stamp round marks. Regular paint markers, including acrylic paint pens, often use felt, fibre, brush-shaped, or other specialized nibs that allow artists to draw lines, write letters, and create detailed illustrations.
Their colouring formulas may also differ.
Many dot markers intended for children’s crafts contain washable, water-based inks designed primarily for paper. Acrylic paint markers usually contain pigmented paint formulations intended for particular surfaces, which may include wood, canvas, glass, and other materials depending on the product.
| Feature | Dot Paint Markers | Regular Acrylic Paint Markers |
|---|---|---|
| Typical tip | Wide foam or sponge applicator | Fine, medium, brush, or broader nib |
| Main purpose | Stamping dots and simple patterns | Drawing, lettering, outlining, and painting |
| Common surfaces | Paper and compatible craft materials | Surface compatibility varies by product |
| Typical colour formula | Often water-based ink | Usually acrylic-based paint |
| Detail control | Limited fine-detail control | Better suited to detailed work |
| Common projects | Dot art, paper crafts, early learning activities | Decorative painting, illustrations, lettering, and mixed-media crafts |
Neither option is automatically better than the other. The right choice depends on what you want to create.
If your goal is to make repeated colourful circles, decorate worksheets, or explore simple stamping activities, dot paint markers are generally more convenient.
If you want to draw fine outlines, add detailed lettering, or work on a wider variety of compatible materials, acrylic paint markers may be a better choice.
It’s also worth distinguishing foam-tipped dot markers from fine-tipped acrylic pens used to create small dots in mandala artwork. Both can produce dots, but they offer very different levels of precision.
Are Dot Paint Markers the Same as Bingo Daubers?
Dot paint markers and bingo daubers have similar designs, but they are not always identical products.
Bingo daubers are traditionally used to mark numbers on bingo cards. They typically contain ink and feature a rounded applicator that produces a visible circular mark when pressed onto paper.
Craft dot markers use a similar stamping mechanism, which is why the terms are sometimes used interchangeably.
However, there can be important differences in the ink formulation, intended audience, colour selection, and product safety information.
Dot markers marketed for children’s art activities often emphasize washable formulations, bright colours, and age-appropriate designs. Traditional bingo daubers may prioritize quick application and visible marks rather than easy cleanup from clothing or furniture.
When choosing markers for children, check the manufacturer’s recommended age range, safety information, and washability claims instead of assuming that every bingo dauber is suitable for children’s crafts.
For everyday paper art, both tools may create similar-looking dots, but craft-specific markers are usually the more practical starting point when children’s activities are the main purpose.
How to Choose Dot Paint Markers
Choosing suitable dot paint markers can make painting activities easier, cleaner, and more enjoyable.
Although many sets look similar, differences in ink formulation, applicator size, colour selection, and paper compatibility can affect how well they perform.
Before purchasing a set, consider who will be using the markers, what kind of artwork they want to create, and whether easy cleanup is important.
Washable and Non-Toxic Ink
For children’s craft activities, the ink formulation is one of the first features worth checking.
Washable dot paint markers are a practical choice because accidental marks on hands, clothing, and work surfaces are common during stamping activities.
However, washable does not mean every stain will disappear completely. Results depend on the ink, the surface, and how quickly the mark is cleaned.
Look for clear manufacturer information about washability and suitable cleaning methods.
The term non-toxic is also useful, but it should be considered alongside the product’s intended use and age guidance. An art material labelled non-toxic is not necessarily suitable for children of every age, and it should not be treated as safe to ingest.
When shopping in the United States, check for relevant art-material safety labelling, such as an ACMI AP seal where applicable. UK shoppers should look for appropriate product safety information and clear manufacturer age recommendations.
Adult supervision remains important, especially for younger children who may put art supplies in their mouths.
For families and classrooms, a washable, age-appropriate set with clearly documented safety information is generally a sensible starting choice.
Tip Size and Ink Flow
The size and quality of the applicator tip influence how easy it is to create neat dots.
Wide foam tips are useful for filling large shapes, creating bold patterns, and helping beginners practise stamping motions.
Smaller applicators may offer greater control when working inside narrow outlines, although sizes vary between products.
For young children, a comfortable bottle shape and an applicator that produces a mark without excessive force can make the activity easier to manage.
Ink flow is equally important.
A marker that releases too little ink may create pale or incomplete dots. One that releases too much can cause the colour to spread beyond the intended shape.
A good marker should transfer colour reasonably consistently during normal use without requiring repeated hard pressing.
When evaluating a set, look for information about the applicator design and read product reviews for recurring complaints about leaks, overly wet tips, or markers drying out quickly.
Remember that pressing harder is not always the solution to poor ink flow. Some markers require specific priming instructions, while others are ready to use immediately.
Following the manufacturer’s directions is the safest approach.
Colour Selection and Paper Compatibility
Dot paint markers are available in different colour combinations, from small starter sets to larger collections.
For beginners, a basic selection of familiar colours is usually enough to create many projects.
Red, yellow, blue, green, orange, and purple provide plenty of options for rainbows, flowers, animals, and abstract patterns.
Larger sets may include pink, brown, black, and additional shades that are useful for themed artwork.
However, having more colours does not automatically make a set better. Consistent ink flow, comfortable handling, and easy cleanup are often more important than the number of shades included.
Paper compatibility also deserves attention.
Ordinary printer paper can work for quick practice, but it may wrinkle or allow ink to bleed through when several dots are applied close together.
Thicker drawing paper or lightweight cardstock can be a better option for finished artwork, particularly when using markers that release generous amounts of colour.
Before beginning a larger project, test the markers on a small piece of the chosen paper. This helps you check dot shape, drying time, and whether the colour spreads or shows through.
If you’re decorating coloured paper, remember that some water-based inks may appear less vibrant against dark backgrounds.
For the first few projects, white drawing paper is usually the easiest surface to work with.
How to Use Dot Paint Markers Step by Step
Learning to use dot paint markers is straightforward, but a few simple techniques can improve the appearance of your artwork.
Beginners sometimes press too hard, stamp repeatedly in the same spot, or place dots so close together that the colours merge.
The following steps will help you understand the stamping motion and create more controlled patterns.
Step 1: Prepare Your Paper and Work Area
Start by choosing a clean, flat workspace with enough room to move your hands comfortably.
Place a protective mat, scrap paper, or reusable craft covering beneath your artwork. Even washable inks can leave unwanted marks on certain surfaces.
Choose a sheet of drawing paper or cardstock suitable for the markers you’re using.
If you’re working with children, prepare all the materials before starting so they can focus on painting rather than searching for supplies.
Keep a few spare sheets nearby for practising dots or testing colours.
Make sure the paper lies flat. A curled or uneven surface can make it harder for the applicator to produce consistent circular marks.
Step 2: Test the Marker on Scrap Paper
Before starting your design, test each colour on a separate piece of paper.
Remove the cap and inspect the applicator tip.
Some markers are ready to stamp immediately, while others may require preparation according to the manufacturer’s instructions.
Hold the marker upright and gently press the tip onto the test paper.
Check whether the colour transfers evenly and produces a recognizable circle.
If the dot looks incomplete, try another controlled press after checking the instructions. Avoid repeatedly forcing the applicator against the paper because this may release too much ink or damage the tip.
Testing the markers first also gives you an opportunity to compare colours and see how quickly they dry.
Step 3: Make Your First Dots
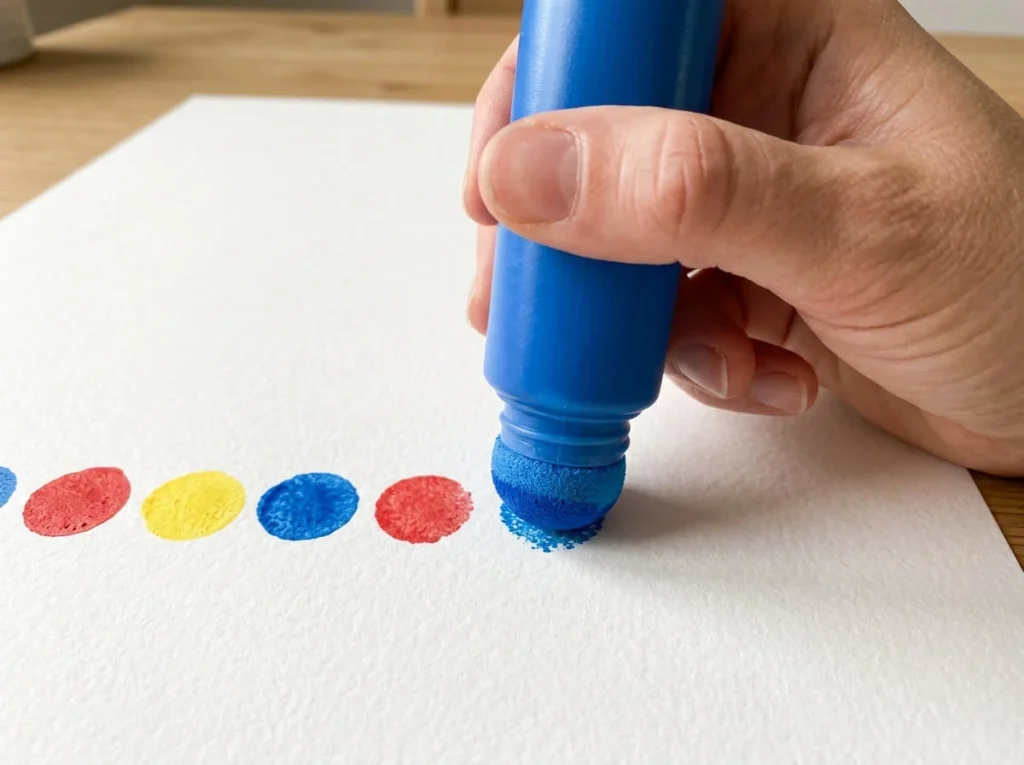
Once the marker is ready, place a clean sheet of paper in front of you.
Hold the marker in a comfortable, upright position and gently press the rounded tip onto the paper.
Lift the marker straight up after making contact.
This simple downward-and-upward movement is the foundation of most dot marker artwork.
Try making a row of individual dots with small spaces between them.
As you practise, focus on keeping the marker upright and using similar pressure for each impression.
Next, experiment with creating dots in different arrangements, such as a circle, triangle, or curved line.
You may notice that holding the applicator at an angle produces less consistent shapes. Keeping the tip flat against the surface generally gives you better control.
For young children, neatness isn’t the main goal. Exploring colour, movement, and patterns is often more valuable than creating perfectly uniform circles.
Step 4: Create Patterns and Simple Shapes
After practising individual dots, begin combining them into simple patterns.
Start with a straight line of one colour, then add a second row underneath using a different colour.
You can alternate colours to create repeated sequences or arrange dots around a central point to make a flower-like shape.
Another beginner-friendly exercise is to draw a large pencil outline of a heart, star, or butterfly and fill the space using dots.
Try leaving small gaps between impressions to preserve the circular shapes.
If you want the dots to overlap, experiment first on scrap paper. Depending on the ink formulation and drying time, overlapping wet colours may blend together or create darker areas.
Gradually move from basic patterns to recognizable illustrations as your confidence improves.
The goal is to become comfortable controlling where each dot appears before attempting more detailed artwork.
Step 5: Allow the Artwork to Dry
When your design is complete, place the paper on a clean, flat surface and allow the ink to dry.
Drying time varies depending on the marker formula, the amount of ink applied, and the thickness or absorbency of the paper.
Avoid stacking freshly painted sheets or touching areas that still look wet.
If you’ve applied several dots close together, those areas may take longer to dry than isolated impressions.
Before displaying, cutting, or folding the artwork, lightly check a small inconspicuous area to make sure the colour has set.
Once the page is dry, it can be used for greeting cards, paper decorations, classroom displays, or other craft projects.
Finally, replace the marker caps securely and store the markers according to the manufacturer’s instructions so they’re ready for your next painting session.
Basic Dot Painting Techniques for Beginners
Once you feel comfortable making individual dots, the next step is learning how to arrange them into attractive patterns and simple illustrations. Dot paint markers may seem limited because they produce rounded marks rather than detailed lines, but changing the spacing, colours, and placement of those marks can create surprisingly varied artwork.
You don’t need advanced drawing skills to get started. A few basic techniques will help you make cleaner patterns, experiment with colour combinations, and create designs that look more intentional.
The following techniques are useful for both independent beginners and children working on supervised craft activities.
Creating Evenly Spaced Dots
Even spacing can make a simple dot pattern look neat and balanced. Whether you’re decorating a greeting card, filling a shape, or creating a repeated border, learning to control the distance between dots is a useful starting skill.
Begin by drawing a faint pencil line across a piece of paper. This will act as a guide while you practise.
Hold your dot paint marker upright and stamp the first dot near the beginning of the line. Lift the marker straight up, move it a short distance, and make another dot.
Continue along the line, leaving approximately the same amount of space between each impression.
If you’re struggling to keep the spacing consistent, make small pencil marks to indicate where each dot should go. These can be erased later if the paper and ink allow it without smudging.
You can also experiment with different arrangements:
- Straight rows create simple borders and structured patterns.
- Curved rows work well for rainbows, flowers, and decorative shapes.
- Circular arrangements can form petals, wheels, and repeating motifs.
- Alternating colours add variety to basic lines.
- Scattered dots produce playful backgrounds and abstract effects.
For more structured designs, try creating a simple grid with lightly drawn pencil lines. Place dots at the intersections or arrange them in alternating rows.
Remember that dot markers have different applicator sizes. The amount of space needed between impressions depends on the width of the tip and how much ink spreads after stamping.
Perfect symmetry isn’t necessary, particularly for children’s artwork. The purpose of practising is to develop better control while enjoying the creative process.
Layering Colours Without Smudging
Combining colours is one of the easiest ways to make dot marker artwork more interesting. However, placing fresh ink over another wet impression can cause the colours to blend, spread, or lose their distinct circular shapes.
If you want clearly separated colours, allow the first layer to dry before adding the next.
For example, you might create a row of yellow dots and later add smaller decorative marks around them using another colour and a separate drawing tool.
Start by testing how your markers behave on scrap paper. Some water-based formulas dry relatively quickly, while others remain wet longer, especially when several impressions overlap.
Paper choice can also influence the result. Thin paper may become saturated when multiple layers are applied, causing the ink to spread beyond the intended design.
For cleaner layered artwork, use these techniques:
- Apply one colour at a time when creating closely spaced patterns.
- Leave small gaps between wet dots to prevent unwanted blending.
- Allow the first layer to dry before adding additional details.
- Avoid repeatedly stamping the same area.
- Test overlapping colours before applying them to a finished project.
You can also experiment with intentional colour blending.
Try placing a blue dot beside a yellow dot so their wet edges touch slightly. Depending on the ink formulation, the colours may produce a blended green area.
This effect will vary by marker, so it is best treated as an experiment rather than a guaranteed result.
For beginners, working with clearly separated colours is generally easier. Once you’re familiar with the ink flow and drying behaviour, you can explore more expressive combinations.
Combining Dots with Simple Drawings
Dot paint markers become even more versatile when you combine them with basic pencil drawings or outlines.
You don’t have to draw complicated illustrations. Simple shapes provide enough structure to turn colourful dots into recognizable objects.
For example, draw a large flower with a pencil and fill each petal with dots. Alternatively, sketch a butterfly and decorate its wings using symmetrical patterns.
The outline acts as a guide, making it easier to decide where each dot should go.
A simple approach is to create the outline first, stamp the coloured areas, and allow the ink to dry before adding final details with a suitable pen.
Here are a few ways to combine drawing and dot painting:
- Draw a tree trunk and use green dots to create its leaves.
- Sketch a heart and fill it with alternating pink and red dots.
- Make a large butterfly outline and decorate each wing with matching colours.
- Draw a bunch of balloons and fill the circles using colourful impressions.
- Create a simple landscape and use dots for flowers, falling leaves, or decorative skies.
For children who are still developing drawing skills, an adult can prepare large outlines beforehand.
Older children and adult beginners may enjoy drawing their own shapes and experimenting with different arrangements.
If you’re using printed templates, check that the printing ink won’t smudge when the dot marker ink touches it. Let freshly printed pages dry completely before starting.
You can gradually reduce the number of pencil guides as you gain confidence.
This combination of stamping and drawing opens up many possibilities beyond basic dot patterns, including the eight projects below.
8 Easy Art Ideas Using Dot Paint Markers
Dot paint markers can transform simple paper shapes into colourful handmade artwork. You don’t need expensive materials or complicated techniques to create something attractive.
Most of the following projects use drawing paper, dot markers, pencils, and a few optional supplies. They can be adapted for different ages, although younger children will benefit from supervision and help preparing outlines.
Start with a project that uses only a few colours, then move on to more detailed designs as you become familiar with the stamping technique.
1. Colourful Rainbow Dot Art
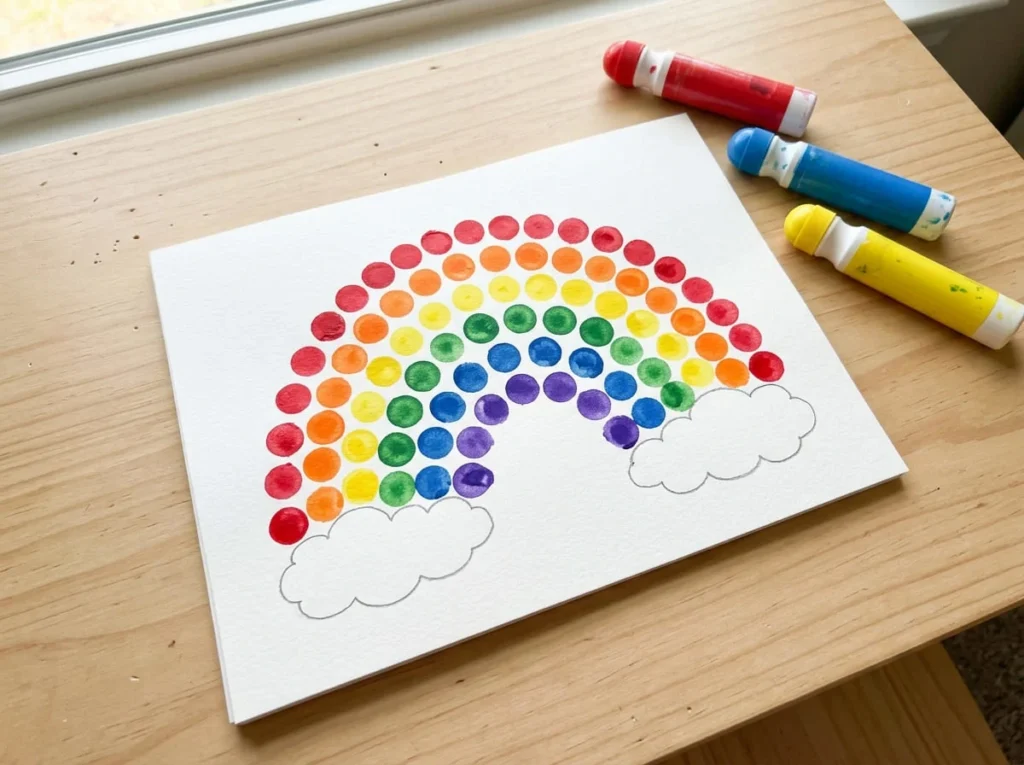
Rainbow dot art is an excellent beginner project because it introduces curved patterns, colour recognition, and basic spacing.
The design is easy to understand, and the finished artwork can be used as a cheerful wall decoration or handmade greeting card.
Materials Needed
- White drawing paper or lightweight cardstock
- Dot paint markers in rainbow colours
- Pencil
- Eraser
How to Make Rainbow Dot Art
- Place your paper horizontally on a flat surface.
- Lightly draw several curved rainbow guidelines using a pencil.
- Begin with the outer curved line and stamp red dots along it, leaving small gaps between each impression.
- Follow the next curve with orange dots, then continue with yellow, green, blue, and purple.
- Keep each colour within its own curved row to create a recognizable rainbow.
- Allow the ink to dry completely before removing any visible pencil guides.
For a playful finishing touch, draw two large clouds at the ends of the rainbow and decorate them with light blue or other suitable colours.
If you’re creating this project with young children, simplify the design by drawing only three or four rainbow curves.
A useful variation is to create a rainbow from dots of different sizes. If your markers have the same tip size, you can vary the overall pattern by changing the spaces between dots rather than forcing the applicator to produce smaller marks.
This project helps beginners practise following curved lines while experimenting with bright colour combinations.
2. Dot Painted Flower Garden
A flower garden is a natural subject for dot painting because circular marks can resemble flower petals and centres.
This project also introduces simple composition by combining multiple flowers, stems, and leaves on one sheet of paper.
Materials Needed
- Drawing paper or cardstock
- Dot paint markers in several colours
- Green coloured pencil or marker
- Pencil for optional guidelines
How to Make a Dot Painted Flower Garden
- Begin by deciding where you want the flowers to appear on the page.
- Stamp a yellow or orange dot to create the centre of the first flower.
- Arrange five or six dots around the centre using another colour to create petals.
- Repeat the process in different areas of the paper, changing the petal colours for variety.
- Let the dots dry, then use a green pencil or suitable marker to draw stems beneath each flower.
- Add simple leaves and grass to complete the garden scene.
Try positioning some flowers higher and others lower on the page to give the artwork a more natural appearance.
You can also create a border of small decorative dots around the garden.
For an interesting variation, make a collection of flowers using different colour patterns. One flower might have alternating pink and purple petals, while another uses only yellow and orange.
This project works well for handmade cards, spring decorations, and simple classroom displays.
3. Butterfly Wings with Dot Patterns
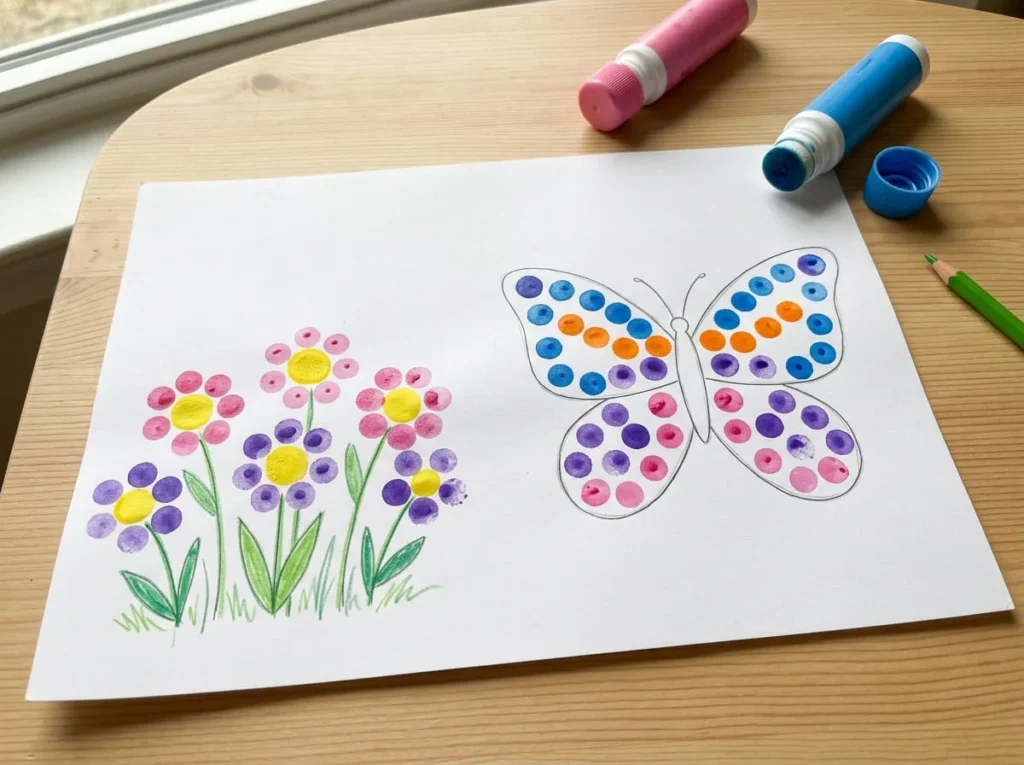
Butterfly artwork offers an opportunity to practise symmetry and repeated patterns.
By placing similar colours and dot arrangements on both wings, you can create a balanced design without needing complex drawing techniques.
Materials Needed
- White drawing paper
- Dot paint markers in two to five colours
- Pencil
- Black coloured pencil or washable marker
- Eraser
How to Make Butterfly Dot Art
- Draw a large butterfly outline in the centre of your paper.
- Add a narrow body and two antennae between the wings.
- Choose two or three colours for the main wing decorations.
- Stamp several dots on the left upper wing, keeping them within the outline.
- Repeat a similar arrangement on the right upper wing.
- Continue decorating the lower wings with matching or complementary patterns.
- Allow the ink to dry before adding any final outlines or small details.
If you’re helping younger children, prepare the butterfly outline beforehand and encourage them to explore different colours.
Older children can experiment with more detailed symmetrical arrangements.
For example, place a large blue dot near the outer edge of each upper wing and surround it with smaller decorative marks using a coloured pencil.
You can also leave some areas of the wings blank to prevent the design from looking overcrowded.
A creative variation is to make several butterflies using different colour combinations and arrange them together as a paper wall display.
4. Cherry Blossom Tree Dot Painting
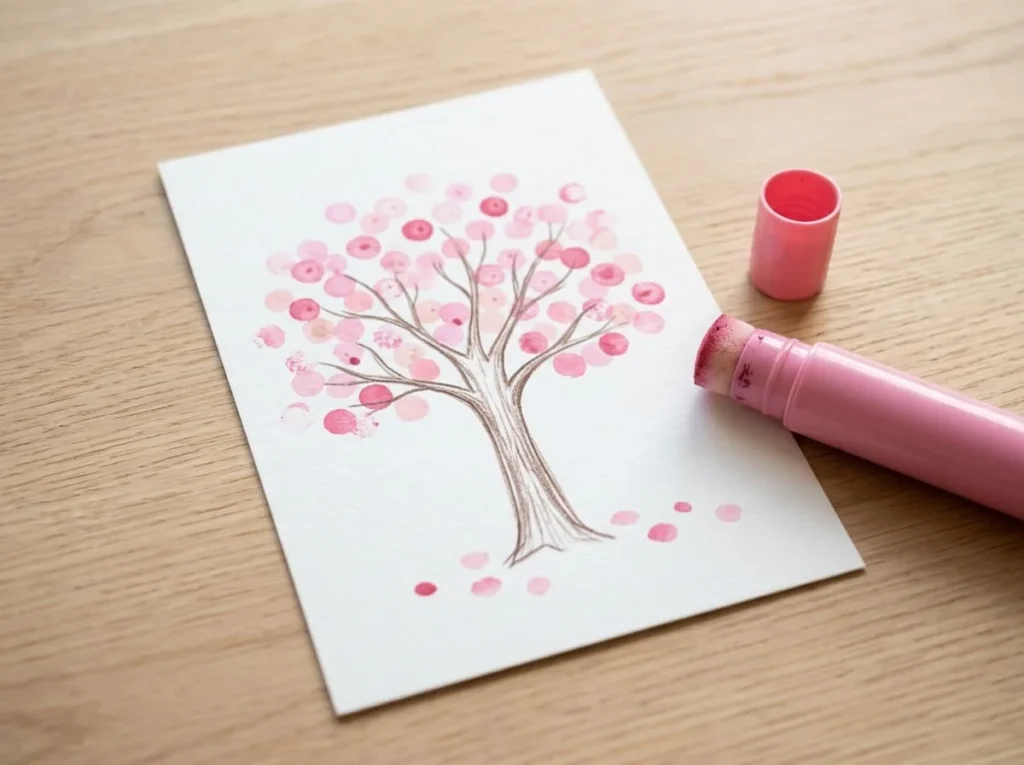
Cherry blossom tree artwork combines a simple drawn silhouette with clusters of colourful dots.
The contrast between dark branches and soft pink blossoms can create an attractive spring-inspired picture using only a few materials.
Materials Needed
- White or pale blue drawing paper
- Pink dot paint markers
- Brown or black coloured pencil or marker
- Pencil
- Optional green marker for grass
How to Make a Cherry Blossom Tree
- Draw a tree trunk rising from the lower section of the paper.
- Add several branches extending outward in different directions.
- Leave enough open space around the branches for clusters of blossoms.
- Use a pink dot paint marker to stamp groups of dots along the branches.
- Add additional pink shades if available to create variation between the blossom clusters.
- Scatter a few dots beneath the tree to represent fallen petals.
- Allow the artwork to dry before adding any final details.
Try arranging the dots in loose clusters instead of perfectly straight lines. This creates a softer, more natural-looking tree.
You can also use a white dot marker on coloured paper if the product provides enough opacity, though some translucent inks may not show clearly.
For a seasonal variation, use orange, yellow, and red dots instead of pink to create an autumn-inspired tree.
This project is useful for exploring how repeated circular impressions can represent leaves, blossoms, and other natural textures.
5. Fruit-Themed Dot Art
Fruit designs are colourful, recognizable, and easy to simplify into basic shapes.
They are especially useful for children learning about different colours and familiar foods, but the project can also be adapted into decorative kitchen-themed artwork.
Materials Needed
- White drawing paper or cardstock
- Red, yellow, green, orange, and other dot paint markers
- Pencil
- Coloured pencils for outlines and details
How to Make Fruit-Themed Dot Art
- Draw three or four large fruit outlines on your paper.
- Choose simple shapes such as an apple, orange, strawberry, or watermelon slice.
- Select marker colours that match the fruit designs.
- Fill the apple with red dots, leaving small spaces between impressions.
- Decorate the orange with orange dots and the watermelon flesh with red or pink dots.
- Allow the ink to dry, then add stems, leaves, seeds, or other small details with coloured pencils.
- Display the finished page as a colourful fruit collection.
For a strawberry, you can draw a large pointed oval, fill it with red dots, and add green leaves at the top.
For a watermelon slice, draw a triangular shape with a curved base. Use red or pink dots for the flesh and a green pencil for the rind.
Encourage younger children to choose familiar fruits and focus on exploring colours rather than achieving perfect accuracy.
An additional variation is to create a fruit alphabet page by drawing a large letter beside each illustrated fruit.
For example, pair the letter A with an apple and O with an orange.
6. Animal Spots and Patterns
Many animals have distinctive spots, markings, or colourful features that can be represented with dot paint markers.
Ladybugs, giraffes, and spotted fish are particularly suitable because their designs can be simplified into large shapes and repeated circles.
Materials Needed
- Drawing paper or cardstock
- Dot paint markers in suitable colours
- Pencil
- Black and other coloured pencils
- Eraser
How to Make Animal Spot Artwork
- Choose an animal with simple markings, such as a ladybug or giraffe.
- Draw a large outline of the animal in the centre of the paper.
- Use coloured pencils to fill the main body areas if desired.
- Select a contrasting dot marker colour for the animal’s spots.
- Stamp dots inside the outline, leaving spaces between the impressions.
- Allow the ink to dry before adding eyes, legs, and smaller features.
- Finish with simple background details that match the animal’s environment.
A ladybug is a good starting choice.
Draw a round red body, then add black dots to represent its spots. If using a black dot marker, test it on the red colouring first to see whether the marks remain visible.
For a giraffe, draw a long neck and body, then decorate the surface with brown or orange spots.
A spotted fish offers another simple option, particularly for children who enjoy ocean-themed crafts.
You can also make a collection of animal cards, with each card featuring a different spotted creature.
The activity encourages observation while giving beginners practice placing dots within defined shapes.
7. Alphabet and Name Dot Art
Dot markers can turn large letters into colourful designs while also supporting playful letter recognition activities.
This project is especially useful for younger children, but personalized name artwork can also make an attractive handmade decoration.
Materials Needed
- Drawing paper or cardstock
- Dot paint markers in several colours
- Pencil
- Printed or hand-drawn large letters
- Optional ruler
How to Make Alphabet and Name Dot Art
- Write a large letter or name across the centre of the paper.
- Make each letter wide enough to accommodate the dot marker’s applicator.
- Choose two or three colours for the design.
- Stamp dots inside the first letter, following its overall shape.
- Continue decorating the remaining letters.
- Use alternating colours or repeated patterns to add visual interest.
- Allow the artwork to dry before displaying it.
For beginners, start with a single large capital letter.
Letters such as A, B, C, and O provide recognizable shapes and offer plenty of room for stamping.
If a letter contains narrow sections, use fewer dots rather than trying to squeeze multiple impressions into the same area.
You can also create letter outlines made entirely from dots by stamping along the pencil guidelines instead of filling the letters.
For a personalized variation, write a child’s name in large block letters and allow them to choose the colours for each letter.
Another option is to decorate the first letter of a name and surround it with stars, flowers, or simple dot borders.
Keep the activity relaxed and creative, particularly when working with children who are still learning to recognize letters.
8. Abstract Dot Pattern Artwork
Abstract dot art is a flexible project that encourages experimentation without requiring a recognizable subject.
Instead of painting flowers, animals, or other objects, you arrange dots into repeated patterns, circular formations, and colourful clusters.
This makes abstract artwork suitable for beginners who want to explore colour combinations and composition without worrying about drawing accuracy.
Materials Needed
- White or coloured cardstock
- Dot paint markers in several colours
- Pencil
- Optional ruler
- Protective craft mat
How to Make Abstract Dot Artwork
- Place a clean sheet of cardstock on your work surface.
- Choose three to five colours that work well together.
- Begin by stamping a simple row, circle, or cluster of dots near the centre of the page.
- Add additional dots around the first group, changing colours or spacing as you go.
- Experiment with repeating patterns, diagonal arrangements, and curved formations.
- Leave some blank areas to give the design breathing room.
- Continue until the composition feels balanced, then allow the ink to dry.
One easy approach is to make several concentric circles using different colours.
Start with one dot in the centre, then arrange a ring of dots around it. Continue adding wider rings until the pattern reaches the desired size.
Alternatively, create vertical rows of dots, using a different colour for each row.
For a more playful result, divide the paper into four sections and experiment with a different pattern in each area.
You can try closely spaced clusters in one section, wide gaps in another, and alternating colours in the remaining sections.
Abstract dot art can be used for handmade greeting cards, simple decorative prints, or colourful backgrounds for other paper crafts.
Because there is no single correct arrangement, this project encourages creativity while reinforcing the basic stamping techniques learned earlier.
Common Dot Paint Marker Problems and How to Fix Them
Dot paint markers are relatively simple to use, but beginners may occasionally experience uneven dots, excessive ink flow, smudging, or paper that becomes too wet.
Most of these problems are related to how the marker is handled, the type of paper being used, or the amount of ink released during stamping.
Understanding what causes these issues can help you create cleaner artwork and avoid wasting paper or materials.
Why Is My Dot Marker Not Making Clear Dots?
If your dot paint marker produces incomplete circles, faded marks, or irregular shapes, there may be several possible explanations.
One common cause is uneven contact between the applicator and the paper. When the marker is held at an angle, only part of the rounded tip may touch the surface, resulting in a partial dot.
Try holding the marker upright so the entire applicator makes contact with the paper. Press gently and lift it straight up rather than dragging the tip sideways.
Another possibility is inconsistent ink flow. If the applicator is not sufficiently saturated, the marker may leave faint or incomplete impressions.
Some dot markers require preparation before their first use. Others are designed to work immediately without shaking or pumping.
Always check the manufacturer’s instructions before attempting to prime the marker. Repeatedly pressing or shaking a product that doesn’t require these actions could cause unwanted ink release.
The condition of the applicator also matters. A damaged, dirty, or dried-out foam tip may produce uneven marks.
If you notice that the tip appears dry or clogged, inspect it carefully and follow the manufacturer’s recommended maintenance instructions. Avoid using sharp objects or harsh chemicals to clear the applicator.
Paper texture can also affect the result. Very rough paper may prevent the foam tip from making uniform contact, while highly absorbent paper can cause the ink to spread.
For troubleshooting, try these simple steps:
- Hold the marker vertically while stamping.
- Use gentle, consistent pressure.
- Test the marker on smooth drawing paper.
- Check whether the applicator is clean and undamaged.
- Follow any brand-specific priming instructions.
- Replace a marker if its tip is damaged or its ink is exhausted.
Testing one change at a time can help you identify what is causing the problem.
If a marker consistently produces poor impressions despite correct handling, the issue may be with the product rather than your technique.
How to Prevent Ink from Bleeding Through Paper
Ink bleeding occurs when colour spreads beyond the intended area or penetrates through the paper.
This is especially common when using thin paper, applying too much ink, or repeatedly stamping the same spot.
Because many dot markers release water-based colouring, the paper must absorb some moisture during the stamping process.
Ordinary printer paper can work for quick activities, but it may not provide enough resistance when large areas are covered with dots.
For more controlled results, try using thicker drawing paper or cardstock.
The best choice depends on the marker formula, but testing a heavier paper is often a useful first step when bleeding occurs.
You should also avoid holding the marker against the paper for too long.
A brief, controlled stamp generally releases less ink than repeatedly pressing the applicator into the same area.
Leave a little space between neighbouring dots, particularly if the first impressions still look wet.
When decorating large shapes, work across the paper gradually instead of saturating one small section with repeated stamps.
Placing a protective sheet beneath your artwork is another practical precaution. This prevents any colour that passes through the paper from marking your table.
If you’re making greeting cards or decorations, test the markers on a spare piece of the same material before working on the final design.
Remember that thicker paper doesn’t guarantee there will be no bleeding. Ink flow, paper coating, and the number of overlapping impressions can all influence the outcome.
How to Avoid Smudged or Uneven Dots
Smudging usually happens when wet ink is touched, rubbed, or covered before it has dried.
Uneven dots may result from inconsistent pressure, a tilted applicator, or paper that shifts during stamping.
The easiest way to improve both problems is to slow down and focus on controlled movements.
Place the paper on a stable surface and keep one hand away from the freshly stamped areas.
Stamp each dot with a gentle downward motion, then lift the marker straight up.
Avoid sliding the tip across the paper unless you’re deliberately experimenting with a different mark-making technique.
When working on a large design, begin in an area that allows you to move across the page without resting your hand on wet ink.
For example, a right-handed person may find it easier to work from left to right, while a left-handed person may prefer the opposite direction.
If you’re using multiple colours close together, allow the first colour to dry before adding dots beside or over it.
This is particularly useful when creating flower petals, butterfly patterns, and other designs with closely spaced impressions.
If the paper becomes wrinkled or damp, stop adding ink and allow it to dry naturally on a flat surface.
Pressing more ink into an already saturated area will usually make the problem worse.
For young children, slightly uneven dots are a normal part of learning. The aim should be to encourage confidence and creativity rather than insist on perfect results.
How to Clean and Store Dot Paint Markers
Taking care of dot paint markers helps keep them ready for future craft sessions.
Although many products are designed for straightforward everyday use, their cleaning and storage requirements can vary.
Some contain washable inks and simple foam applicators, while others have different formulations or valve systems.
Following the manufacturer’s directions is the best way to protect the applicator and avoid accidental leaks.
Cleaning Ink from Hands and Work Surfaces
Even when you’re careful, small ink marks can end up on hands, tables, clothing, or other nearby surfaces.
If you’re using washable dot paint markers, begin cleaning with mild soap and water where appropriate for the affected surface.
For hands, rinse the stained area with lukewarm water and wash gently using ordinary soap.
Avoid excessive scrubbing, especially on children’s sensitive skin. Some pigments may leave temporary staining even after washing.
For washable work surfaces, wipe fresh marks with a damp cloth before the ink dries.
If colour remains, use a cleaning method recommended for that particular surface. Always test cleaning products in an inconspicuous area first.
Painted wood, untreated furniture, fabric upholstery, and certain porous materials may absorb colour more easily than smooth, sealed surfaces.
Clothing stains can be more difficult to remove.
Check the marker manufacturer’s stain-removal advice and the garment’s care label before washing. Treat washable ink claims as product-specific rather than assuming every stain will disappear.
Avoid placing stained clothing in a tumble dryer until you’re satisfied with the cleaning result, because heat may make some stains harder to remove.
For future projects, protective table coverings and old clothing or craft aprons can reduce cleanup.
Keeping Marker Tips Clean and Ready to Use
Dot marker applicators can collect small amounts of paper dust, loose fibres, or other debris during use.
If these materials accumulate, they may affect how smoothly the marker transfers colour.
To reduce this problem, use clean paper and avoid pressing the foam tip against dusty or rough surfaces.
Keep your markers away from glitter, glue, and wet paint that could stick to the applicator.
If a tip becomes dirty, check the manufacturer’s cleaning instructions.
For some products, carefully removing loose surface debris may be sufficient. Others may require a specific maintenance method.
Avoid soaking the applicator in water unless the manufacturer explicitly recommends doing so.
Excess moisture could dilute the ink or affect the internal flow mechanism.
You should also avoid pulling, cutting, or scraping the foam tip, as this may permanently damage its shape.
After each activity, inspect the applicator briefly and replace the cap securely.
This simple habit can help prevent accidental contact with other materials and reduce unnecessary exposure to air.
Storing Markers to Prevent Drying Out
Proper storage can help maintain dot marker performance between craft sessions.
The most important step is to close each marker securely after use.
Leaving the cap off may expose the applicator to air, potentially causing the tip to dry or affecting how easily the ink transfers.
Store the markers in a cool, dry location away from excessive heat and direct sunlight, unless the manufacturer’s instructions specify otherwise.
Extreme temperatures can affect some ink formulations and may increase the risk of leaks or changes in performance.
The correct storage position can also vary.
Some markers are designed for upright storage, while others may have different recommendations depending on their internal construction.
Follow the guidance provided with your particular set rather than assuming that all dot markers should be stored horizontally or vertically.
Keep markers in their original packaging or a suitable container to help prevent lost caps and accidental damage.
If children use the markers, store them somewhere appropriate for their age and level of supervision.
Before beginning a new project, check that each marker is properly closed, its applicator is intact, and there are no signs of leaking.
Good storage habits can make craft preparation easier and help reduce unnecessary material waste.
Frequently Asked Questions
Are Dot Paint Markers Washable?
Many dot paint markers intended for children’s crafts contain washable, water-based ink, but not every product is washable.
Some formulas are easier to remove from skin and washable surfaces than others.
Always check the product label and manufacturer’s cleaning instructions before purchasing.
Even when a marker is advertised as washable, stains may remain on certain fabrics, unfinished wood, or porous surfaces.
For children’s activities, choosing markers specifically labelled washable is usually a practical option.
Can Toddlers Use Dot Paint Markers?
Some dot paint markers are designed for young children, but suitability depends on the product’s recommended age range, construction, and safety information.
Always follow the manufacturer’s age guidance and supervise young children during craft activities.
A non-toxic label does not mean a product is safe to put in the mouth, and caps or detachable components may present hazards.
For children who are old enough to use an appropriate marker safely, simple supervised activities such as stamping large circles or filling basic outlines can be enjoyable ways to explore colour and movement.
Choose large sheets of paper and keep the activity short and manageable.
Can You Use Dot Paint Markers on Cardboard?
Yes, many dot paint markers can be used on cardboard, provided the marker formula is compatible with the surface.
Smooth, light-coloured cardboard often works better for clear dot impressions than rough or highly absorbent material.
Because cardboard varies in thickness and texture, test the marker on a spare piece before starting your project.
Some inks may spread, appear less vibrant, or take longer to dry on certain cardboard surfaces.
Lightweight cardboard can be useful for handmade cards, decorated shapes, and simple craft displays.
Can You Mix Colours with Dot Paint Markers?
You can experiment with colour mixing using dot paint markers, although the results depend on the ink formulation and how the colours interact.
Placing two wet dots close together may allow their edges to blend.
For example, yellow and blue inks may produce a greenish area where they overlap, but the outcome isn’t guaranteed.
If you want clearly defined dots, allow each colour to dry before adding another.
For intentional blending, experiment on scrap paper first and avoid applying too much ink to one area.
Some markers produce translucent effects, while others leave stronger individual colours.
What Is the Difference Between Dot Paint Markers and Acrylic Paint Pens?
Dot paint markers generally feature rounded foam applicators designed to stamp coloured circles onto paper.
Acrylic paint pens typically use smaller or differently shaped nibs that allow artists to draw lines, add details, write letters, and paint on compatible surfaces.
Their formulations also differ. Craft dot markers often contain water-based inks, while acrylic paint pens contain paint-based colouring materials.
Dot markers are useful for repeated patterns, simple decorative artwork, and age-appropriate children’s activities.
Acrylic paint pens are generally more suitable for detailed illustrations, lettering, and projects requiring greater control.
If you mainly want to make large colourful dots on paper, a foam-tipped dot marker is often the more convenient option.
If you need fine outlines or precise decorative marks, an appropriate acrylic paint pen may be better.
Final Thoughts
Dot paint markers offer an accessible way to explore colour, patterns, and creative paper artwork without complicated painting equipment.
Their rounded applicators make it easy to create repeated impressions, while their simple stamping action allows beginners to focus on arranging colours and shapes.
Choosing suitable markers, testing them on the right paper, and using gentle, consistent pressure can help you achieve cleaner results. Proper cleaning and storage also make future craft sessions easier.
Whether you’re creating rainbow patterns, colourful flowers, butterfly wings, or abstract decorations, there are plenty of ways to experiment with this simple art tool.
If you’re new to dot painting, start with a small set of suitable markers and one uncomplicated project, such as a rainbow or flower garden. Once you’re comfortable controlling the dots, try combining different colours, patterns, and drawn outlines to develop your own designs.
The most rewarding part of using dot paint markers is discovering how much you can create with a few colours and a little imagination.