
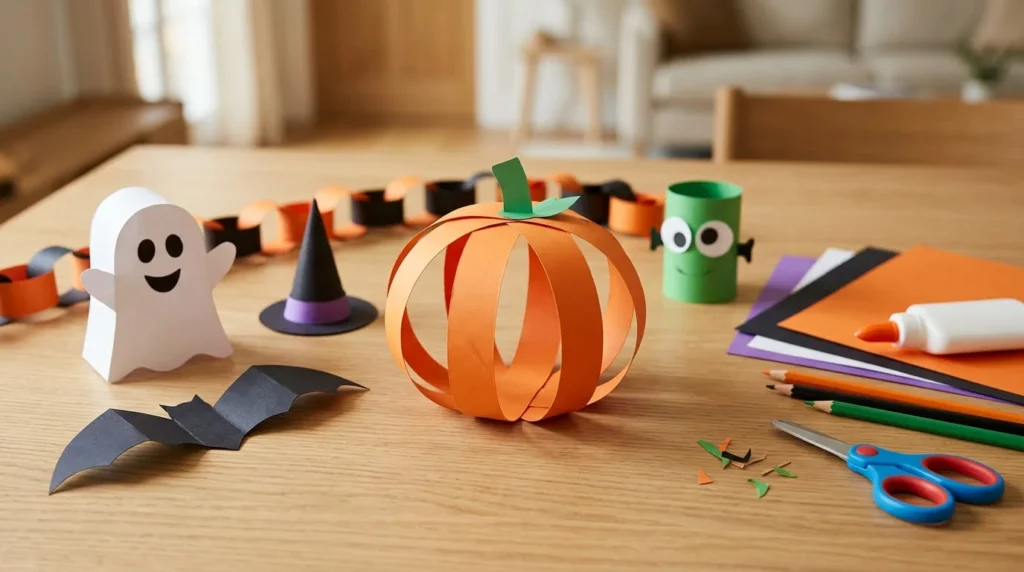
Halloween paper crafts for kids are a fun and affordable way to celebrate the season with handmade decorations. Using simple materials such as construction paper, cardstock, glue, and crayons, children can create colorful pumpkins, friendly ghosts, paper bats, and other Halloween characters.
You do not need expensive craft kits or special cutting machines to get started. Many projects can be made with supplies already available at home or in the classroom.
From easy paper decorations for preschoolers to creative folding projects for older children, Halloween crafting offers plenty of opportunities to experiment with colors, shapes, and designs.
In this guide, you will discover 15 easy Halloween paper crafts for kids, including a complete tutorial for making a 3D paper pumpkin. You will also learn which materials to prepare, how to organize your crafting space, and how to adapt activities for different ages.
Why Are Halloween Paper Crafts Fun for Kids?
Halloween paper crafts combine creativity with simple activities that children can enjoy at home, in school, or with friends.
Kids can experiment with familiar Halloween characters, choose their favorite colors, and turn ordinary sheets of paper into decorations.
The projects can be as simple or detailed as needed, making paper crafting suitable for different ages and abilities.
Encourage Creativity with Halloween Characters
Halloween characters provide plenty of inspiration for creative paper projects.
Children can turn orange paper into smiling pumpkins, white paper into friendly ghosts, or black cardstock into bats with wide wings.
Each character can have its own expression and personality.
For example, one child may create a pumpkin with a big smile, while another chooses round eyes and a surprised expression.
There is no need for every craft to look identical.
Allow children to experiment with different shapes, colors, and decorative details.
This makes the activity more enjoyable and encourages them to develop their own ideas.
Make Affordable Decorations at Home
Paper is one of the most accessible materials for Halloween crafting.
A few sheets of construction paper can become several decorations.
You can make paper chains for a doorway, folded bats for a wall display, or small pumpkins for a table.
Recycled cardboard and leftover colored paper can also be useful when they are clean and in good condition.
Instead of buying a separate decoration for every room, children can help create simple handmade pieces.
These projects do not require expensive equipment, and many can be completed with ordinary household craft supplies.
Enjoy Halloween Crafting with Family and Friends
Halloween paper crafting can become an enjoyable shared activity.
Parents can help younger children prepare shapes, while older children may prefer cutting, folding, and assembling their own projects.
Family members can work on different decorations at the same table.
For example, one child might create paper ghosts while another makes a pumpkin.
Friends can also decorate their crafts using different colors and expressions.
The goal is not to compete over who creates the best decoration.
Instead, focus on spending time together and enjoying the creative process.
Create Seasonal Activities for Classrooms
Halloween paper crafts can be adapted for classroom activities because they use familiar materials and straightforward techniques.
Teachers can prepare large paper shapes before the activity begins.
Younger children may enjoy coloring pumpkins or attaching prepared ghost faces.
Older students can experiment with folded paper bats, paper chains, and simple dimensional decorations.
Finished projects can be arranged on classroom walls or display boards.
Choose activities that match the students’ abilities and the available lesson time.
Preparing materials in advance can help keep classroom sessions organized.
What Materials Do You Need for Halloween Paper Crafts?
Most Halloween paper crafts require only a few basic materials.
Construction paper, scissors, glue, and drawing supplies are enough for many of the projects in this guide.
Choosing suitable materials before starting makes the activity easier to manage and helps children focus on creating their decorations.
Construction Paper and Colored Cardstock
Construction paper is useful for creating Halloween shapes and characters.
Orange paper works well for pumpkins, while white paper can be used for ghosts.
Black paper is suitable for bats, cats, and spooky silhouettes.
Purple and green paper can add color to monsters, witches, and decorative garlands.
Cardstock is thicker than ordinary construction paper, making it useful for projects that need to hold their shape.
For example, a freestanding paper pumpkin will usually be sturdier when made from cardstock.
Keep a small selection of colors available rather than placing every sheet on the table at once.
Child Appropriate Scissors and Craft Glue
Scissors and glue are common supplies for Halloween paper crafting.
Choose scissors suitable for the child’s age and abilities.
Younger children may need an adult to prepare the shapes before the activity begins.
For projects involving detailed cutting, adults should handle difficult sections.
Use craft glue intended for paper projects and follow the product instructions.
Glue sticks work well for many flat paper decorations, while some dimensional projects may require a stronger paper adhesive.
Apply only enough glue to hold the pieces together.
Too much adhesive can wrinkle the paper or make a project difficult to assemble.
Crayons, Markers, and Colored Pencils
Drawing supplies help children personalize their Halloween characters.
Black markers can be used to draw pumpkin faces, ghost expressions, and bat details.
Colored pencils are useful for smaller decorations.
Crayons work well for filling large shapes with color.
Choose supplies appropriate for the child’s age.
You can also allow children to draw their own decorations before cutting or assembling the paper.
For example, a child might draw a funny monster face and then attach it to a colorful paper body.
Simple details often make each finished project feel unique.
Simple Household Craft Supplies
Several ordinary household items can support Halloween paper crafts.
A pencil is useful for sketching shapes before cutting.
A ruler can help older children measure paper strips.
Clean recycled cardboard can provide a sturdy backing for decorations.
Plain paper plates are suitable for pumpkin faces and other circular designs.
Suitable tape may help temporarily position paper pieces during assembly.
Keep the workspace organized and avoid adding unnecessary supplies.
A small collection of basic tools is enough for most beginner projects.
Optional Halloween Craft Templates
Templates can make paper crafting easier, especially when children are learning to cut recognizable shapes.
A simple pumpkin outline, ghost shape, or bat silhouette can help guide the activity.
However, printed templates are not required.
You can draw basic shapes directly onto colored paper using a pencil.
For a pumpkin, begin with a large rounded outline.
For a ghost, draw a rounded top with a gently curved bottom edge.
A bat can be created using a simple body shape and two broad wings.
Adults can prepare templates for younger children, while older children may enjoy designing their own.
How to Prepare for Halloween Paper Craft Activities
Preparing the workspace and materials before starting can make Halloween crafting more enjoyable.
A few simple steps can help reduce interruptions, keep supplies organized, and make projects easier for children to complete.
Choose Projects for the Child’s Age
Start by considering the child’s age, interests, and ability to handle craft tools.
Preschoolers may enjoy coloring large pumpkins or decorating paper ghosts with prepared shapes.
Older children may prefer projects involving folding, measuring, and assembling several pieces.
Choose simple activities for beginners.
More complicated projects can be introduced as children become comfortable with basic techniques.
Provide adult assistance whenever necessary.
Prepare Paper Shapes Before Starting
Some projects require several pieces of paper to be cut before assembly.
Preparing these shapes in advance can make crafting easier for younger children.
For example, an adult can cut the orange strips needed for a 3D paper pumpkin.
The child can then help arrange and decorate the pieces.
For classroom activities, prepare materials for each student before the session begins.
Keep extra paper available in case a piece tears or a shape needs to be replaced.
Organize a Clean Crafting Area
Choose a stable table with enough room for paper, glue, and drawing supplies.
Cover the surface if necessary to protect it from adhesive and coloring materials.
Place scissors and other tools where they can be safely supervised.
Keep scraps in a separate container so they do not cover the workspace.
An organized table makes it easier to find supplies and reduces distractions.
After each project, clear away unused materials before beginning another activity.
Keep Instructions Simple and Flexible
Children may find long instructions difficult to follow.
Explain one step at a time and demonstrate unfamiliar techniques when needed.
For younger children, adults can handle cutting and complicated assembly.
Allow children to select colors, facial expressions, and decorative details.
If a project becomes frustrating, simplify the design rather than insisting on perfect results.
A basic paper pumpkin or ghost can still be an enjoyable craft.
Plan Where to Display Finished Crafts
Consider how the decorations will be used before starting.
Flat paper ghosts and bats work well on walls or display boards.
Paper pumpkins can be placed on shelves or tables.
Short paper garlands can decorate suitable areas under adult supervision.
Choose safe display locations away from candles, heaters, electrical lights that produce heat, and other fire hazards.
Keep hanging decorations and paper strings away from very young children.
Store unfinished crafts in a dry area until the glue has completely dried.
15 Easy Halloween Paper Crafts for Kids
These Halloween paper crafts for kids include simple decorations, friendly characters, and creative projects using everyday supplies. Some activities involve basic cutting and gluing, while others introduce folding and dimensional shapes. Start with an easy project that matches the child’s abilities, then explore more detailed ideas as their confidence grows. Each craft can be personalized with different colors, expressions, and decorative details.
1. Easy 3D Paper Pumpkin Craft
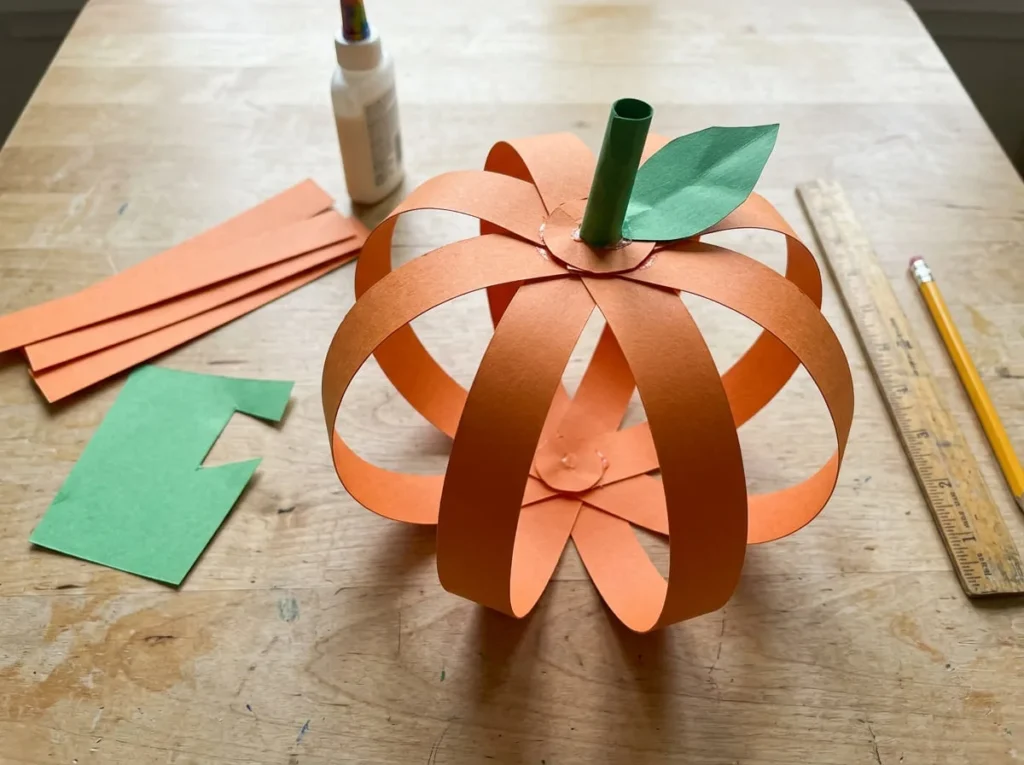
A 3D paper pumpkin is a simple Halloween decoration that children can create using strips of orange cardstock.
Instead of making a flat pumpkin picture, this project uses curved paper strips to form a rounded shape.
The completed pumpkin can stand on a table or shelf, making it a useful decoration for bedrooms, classrooms, or seasonal displays.
Children can experiment with different shades of orange, add a green paper stem, and adjust the shape to create pumpkins that look slightly different from one another.
The construction is straightforward, but younger children will need adult help with cutting and attaching the strips.
Materials needed:
- Orange cardstock
- Green construction paper
- Pencil
- Ruler
- Child appropriate scissors
- Suitable craft glue
- Small piece of sturdy cardstock for the base
- Optional brown paper for a stem detail
Step 1: Gather Your Pumpkin Craft Supplies
Begin by collecting all the materials needed for the project.
Choose sturdy orange cardstock rather than very thin paper.
Cardstock helps the curved strips retain their shape and makes the finished decoration more stable.
Place the orange cardstock, green paper, scissors, glue, and ruler on a clean table.
Prepare a small piece of sturdy cardstock for the base.
If younger children are participating, an adult should handle measuring and cutting.
Keep the materials organized so each piece is easy to find during assembly.
Step 2: Cut Orange Paper into Long Strips
Use a ruler and pencil to mark several long strips on the orange cardstock.
For a simple pumpkin, prepare approximately eight strips of similar length and width.
The strips should be long enough to curve into a rounded shape without creasing sharply.
Carefully cut along the marked lines.
Try to keep the strips reasonably even so the finished pumpkin looks balanced.
However, small differences in width will not ruin the project.
An adult should help children who are not ready to cut long straight lines independently.
Once the strips are ready, place them side by side on the table.
Step 3: Prepare the Pumpkin’s Base
Cut a small circle from sturdy cardstock.
This circle will provide a central attachment point for the bottom ends of the orange paper strips.
Place the circle flat on the table.
Make sure it is large enough to accommodate the strip ends without excessive overlapping.
Apply a small amount of suitable craft glue to the area where the strips will be attached.
If the adhesive needs extra drying time, work slowly and attach the pieces in stages.
The base does not need to be visible once the pumpkin is assembled.
Its purpose is to help keep the strips connected.
Step 4: Attach the Paper Strips at the Bottom
Begin attaching one end of each orange strip to the base circle.
Arrange the strips so they extend outward in different directions, similar to the spokes of a wheel.
Space the strips as evenly as possible.
This arrangement will help the pumpkin form a rounded shape when the opposite ends are brought together.
Press each strip gently against the base until it is secure.
Avoid using excessive glue.
If necessary, allow the adhesive to set before moving to the next step.
Once all the strips are attached, the project should resemble a flat sunburst made from orange paper.
Step 5: Curve the Strips into a Pumpkin Shape
Carefully lift the free end of one orange strip.
Bend it upward and inward toward the center above the base.
The strip should form a gentle curve rather than a sharp fold.
Repeat the process with the other strips.
As the strips rise, they will begin to create the rounded outline of a pumpkin.
Try to maintain similar curves on opposite sides.
Do not pull the paper too tightly because it may crease or tear.
If a strip becomes damaged, replace it before continuing.
Children can help guide the strips while an adult supports the structure.
Step 6: Secure the Strips at the Top
Prepare a second small cardstock circle to connect the upper ends of the strips.
Bring the free ends together at the top center of the pumpkin.
Attach them beneath the second circle, spacing them around the center.
Work with two opposite strips first to establish the rounded shape.
Then attach the remaining strips one at a time.
Adjust the curves gently so the pumpkin looks balanced.
Press the attachment points carefully and allow the glue to set.
If the pumpkin leans or collapses, check whether the upper and lower connections are secure.
The finished structure should resemble a rounded pumpkin made from evenly curved paper strips.
Step 7: Make a Green Paper Stem and Leaf
Cut a small rectangular strip from green construction paper.
Roll or fold it into a short stem shape.
Secure the paper with a small amount of glue.
Next, draw a simple leaf outline on another piece of green paper.
Cut out the leaf carefully.
You can add a small curved paper strip to resemble a pumpkin vine if desired.
Keep the decorations simple so they do not add too much weight to the top.
For younger children, adults can prepare these shapes in advance.
Step 8: Attach the Pumpkin Decorations
Place the green stem over the upper attachment circle.
Use a small amount of suitable craft glue to secure it.
Attach the green leaf near the base of the stem.
If you prepared a curled paper vine, add it beside the leaf.
Check that the decorations are positioned securely.
Avoid adding heavy materials that could pull the top of the pumpkin out of shape.
The orange curved strips should remain the main feature.
You can leave the pumpkin plain or add a small paper face to one side.
If adding a face, use lightweight paper shapes so the pumpkin keeps its rounded form.
Step 9: Let the Paper Pumpkin Dry
Place the completed pumpkin on a clean, stable surface.
Allow the glue to dry according to the manufacturer’s instructions.
Avoid pressing or moving the pumpkin while the attachment points are still wet.
Once dry, inspect the base and top connections.
Make sure the strips remain secure and the stem is firmly attached.
If the decoration does not stand steadily, adjust the base or place it on a small, flat cardstock support.
The finished paper pumpkin can be displayed on a shelf, classroom table, or seasonal craft display.
Keep it away from moisture, flames, and heat sources.
How to Make Your Paper Pumpkin Look More Realistic
A few simple adjustments can make your paper pumpkin more interesting.
Try combining light orange and darker orange cardstock strips to create subtle color variation.
You can also experiment with the width of the strips.
Slightly wider strips create a fuller appearance, while narrower strips leave more space between the curved sections.
For a rounder pumpkin, use strips that curve gently outward before meeting at the top.
A short green stem and a small leaf provide a natural finishing detail.
If children want to decorate their pumpkins, encourage them to create different shapes rather than copying one example exactly.
Some pumpkins can be tall and narrow, while others can be short and round.
These variations allow children to personalize their decorations while practicing the same basic paper assembly technique.
2. Cute Paper Ghost Craft
A cute paper ghost is one of the easiest Halloween decorations children can make with basic craft supplies. It requires only a few paper shapes and gives kids plenty of room to experiment with different facial expressions.
Instead of making scary ghosts, children can create friendly characters with smiling faces, surprised expressions, or funny eyes.
These paper ghosts can be used for classroom displays, bedroom decorations, or Halloween artwork.
Materials needed:
- White construction paper
- Black construction paper
- Pencil
- Child appropriate scissors
- Craft glue
- Black marker
- Optional colored paper for decorations
How to Make a Paper Ghost
Begin by placing a sheet of white construction paper on a clean table.
Use a pencil to draw a large ghost outline. Make the top rounded and create a gently curved, wavy bottom edge.
The shape does not need to be perfectly symmetrical.
Carefully cut along the outline.
Younger children may need an adult to prepare the ghost shape before the activity begins.
Next, draw two large eyes and a simple mouth on black construction paper.
Cut out the shapes and arrange them on the ghost’s face.
Try different positions before attaching them.
For example, placing the eyes close together may create a funny expression, while wider eyes can make the ghost look surprised.
Once you are happy with the arrangement, glue the facial features onto the white paper.
Alternatively, children can draw the face directly with a black marker.
Allow the glue to dry before moving the decoration.
For a creative variation, make several ghosts with different expressions and arrange them together on a Halloween display board.
You can also use colored paper to add a small bow or hat.
Keep the decorations lightweight so the paper remains flat.
3. Paper Bat with Folded Wings
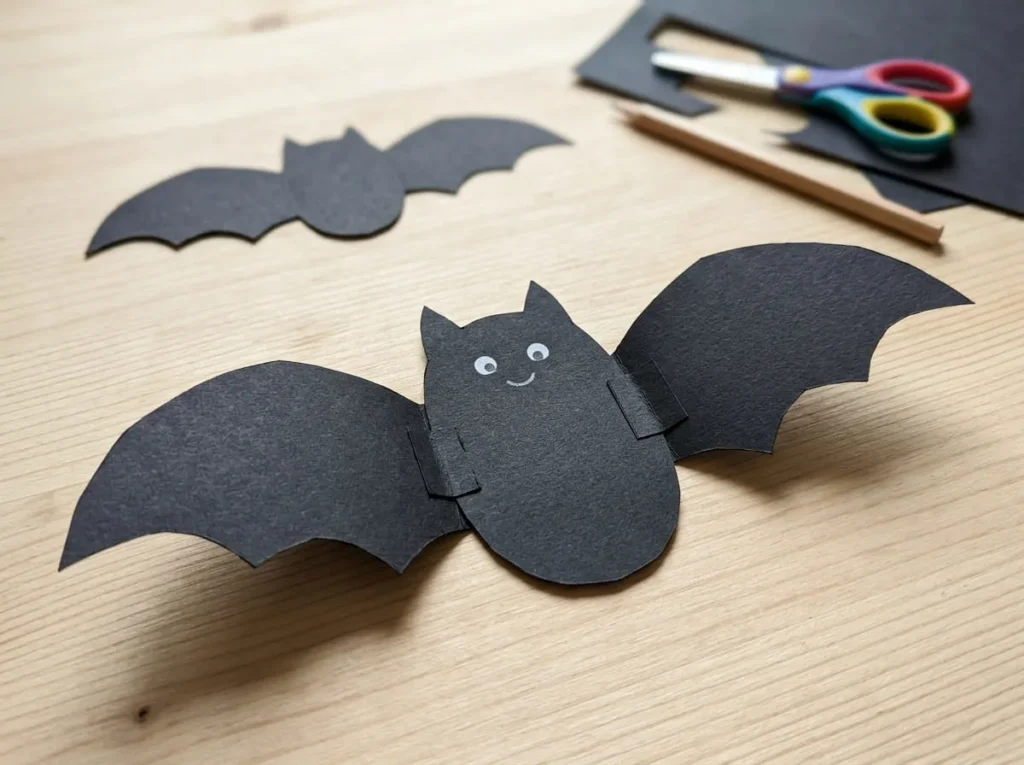
Paper bats are popular Halloween decorations because their wide wings create an instantly recognizable shape.
This project adds a simple folding technique to make the wings stand slightly away from the background.
Children can make one large bat or several smaller bats in different shapes.
The completed bats work well on classroom walls, seasonal display boards, or handmade Halloween cards.
Materials needed:
- Black construction paper or cardstock
- Pencil
- Child appropriate scissors
- Craft glue
- White pencil or marker
- Optional purple paper
How to Make a Paper Bat
Start by drawing a simple bat body on black construction paper.
The body can be a rounded oval with two pointed ears at the top.
Cut out the body carefully.
Next, draw two broad bat wings on another sheet of black paper.
Give each wing a gently curved upper edge and a scalloped lower edge.
The shapes should resemble the wings of a cartoon bat rather than those of a real flying animal.
Cut out both wings.
Place the wings beside the body to check their position.
Fold a narrow section at the inner edge of each wing. These folded tabs will help attach the wings while allowing the remaining sections to stand away from the body.
Apply a small amount of glue to the folded tabs.
Attach one wing to each side of the bat’s body.
Allow the glue to set before gently lifting the wings.
Use a white pencil or marker to add two eyes and a small smiling mouth.
Children can also experiment with different expressions.
For a simple variation, fold the wings slightly along their length to create additional dimension.
Avoid making sharp folds across the entire wing because this may weaken the paper.
Once dry, display the bat on a flat surface or attach it to a suitable display board.
The raised wings will create a subtle shadow, making the decoration more interesting than a completely flat paper cutout.
4. Halloween Paper Spider Web
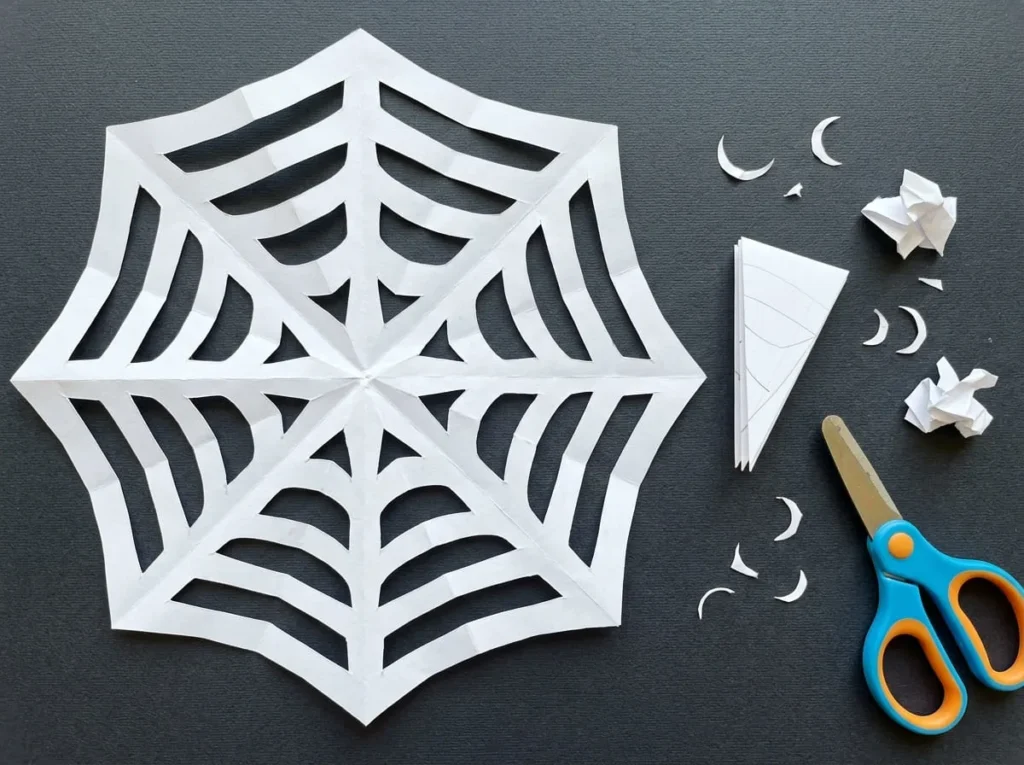
A paper spider web is a creative Halloween craft that introduces children to folding and cutting techniques.
The finished decoration contains open spaces that resemble the pattern of a spider web.
This project is better suited to older children who can follow several folding steps. Younger children can participate by decorating a web prepared by an adult.
The cutting requires care because some sections are narrow and detailed.
Materials needed:
- White or black square paper
- Pencil
- Child appropriate scissors
- Optional colored cardstock for display
- Suitable craft glue
How to Make a Paper Spider Web
Begin with a square sheet of paper.
Fold it in half diagonally to form a triangle.
Fold the triangle in half again to create a smaller triangle.
Depending on the size of the paper, you may fold it once more to make a narrow layered shape.
Press the folds gently so the paper stays in position.
With the folded point facing downward, draw several small curved or angled openings along the outer folded edges.
Leave connecting sections of paper between the openings so the web does not fall apart.
Carefully cut out the marked sections.
An adult should handle any cutting that requires precise movements or could be difficult for the child.
Avoid cutting completely through the folded point.
Once the openings are cut, slowly unfold the paper.
The repeated cutouts should create a decorative pattern.
If the web tears while unfolding, try again using slightly larger spaces between the cuts.
You can attach the finished web to dark cardstock to make the pattern easier to see.
Another option is to display a white web against a dark wall or classroom board.
For younger children, provide a completed paper web and let them add a large paper spider prepared by an adult.
The spider web does not need to look perfectly symmetrical. Slight differences in the openings can make each decoration unique.
5. Paper Witch Hat Craft
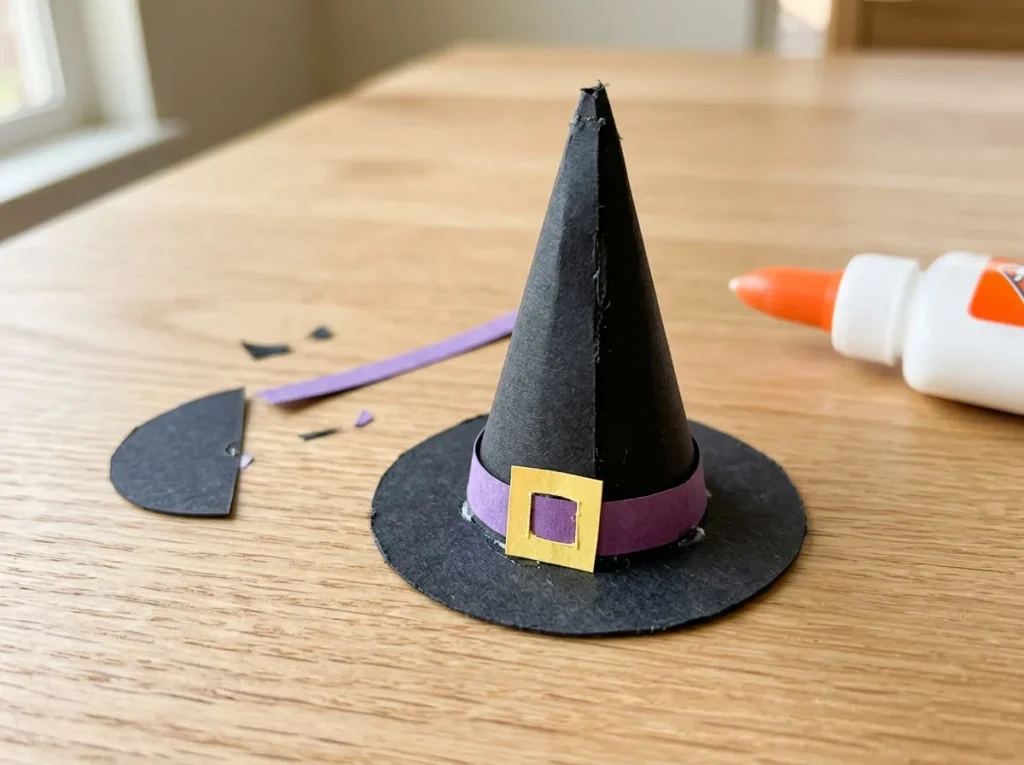
A miniature paper witch hat is a fun Halloween project that combines cutting, rolling, and gluing.
The finished hat can stand on a table as a small decoration or become part of a larger Halloween craft display.
Black cardstock works well because it helps the cone and brim maintain their shape.
Children can personalize the hat with a colorful paper band or a simple paper buckle.
Materials needed:
- Black cardstock
- Purple construction paper
- Yellow paper
- Pencil
- Child appropriate scissors
- Craft glue
- Circular object for tracing
How to Make a Paper Witch Hat
Begin by preparing the cone that will form the pointed top of the hat.
Draw a large circle on black cardstock and cut it out.
Cut the circle in half.
Take one semicircle and gently roll it into a cone, overlapping the straight edges until the opening at the bottom is the desired size.
Apply glue along the overlapping edge and hold the paper in place until it stays secure.
Next, prepare the brim.
Draw a larger circle on another piece of black cardstock.
Inside it, draw a smaller circle that is slightly narrower than the cone’s base.
An adult should help cut out the inner circle, creating a ring-shaped brim.
Check that the cone fits inside the opening.
If necessary, adjust the opening carefully.
Apply a small amount of glue around the lower edge of the cone.
Attach the cone to the brim and allow the adhesive to set.
Cut a narrow strip of purple paper and wrap it around the lower part of the cone.
Secure the ends with glue.
To add a decorative buckle, cut a small square from yellow paper and remove its center with adult assistance.
Attach the buckle to the purple band.
Allow the completed hat to dry on a flat surface.
For a different appearance, try using dark purple cardstock for the cone or adding a simple folded paper star.
Keep the decorations light so the hat can stand without tipping.
6. Halloween Paper Chain Garland
A Halloween paper chain garland is an easy decoration that children can make using repeated paper loops.
It is a useful group activity because several children can prepare strips in different colors before joining them together.
Orange, black, purple, and green paper create a recognizable Halloween color combination.
You can make a short chain for a classroom display or a longer decoration for a suitable wall.
Materials needed:
- Orange construction paper
- Black construction paper
- Purple construction paper
- Green construction paper
- Pencil
- Ruler
- Child appropriate scissors
- Craft glue or suitable tape
How to Make a Halloween Paper Garland
Begin by selecting the paper colors you want to use.
For a traditional Halloween combination, choose orange and black.
For a more colorful design, include purple and green.
Use a ruler to mark strips of similar width and length on the construction paper.
Carefully cut along the marked lines.
Younger children may need an adult to prepare the strips.
Take the first strip and curve it into a loop.
Overlap the ends slightly and attach them with glue or suitable tape.
Allow the connection to become secure.
Take a second paper strip in a different color.
Pass it through the first loop before joining its ends.
This creates two connected paper loops.
Continue adding strips one at a time.
You can alternate orange and black or follow a repeating sequence of four colors.
Encourage children to choose their own patterns.
For example, a chain might follow orange, black, purple, and green before repeating the sequence.
Keep the loops similar in size so the garland hangs evenly.
When the chain reaches the desired length, check that every connection is secure.
Allow glued sections to dry before displaying the decoration.
Hang the garland in a suitable location away from candles, heaters, and other heat sources.
Keep hanging paper chains and strings out of reach of very young children.
For a creative variation, use a black marker to draw simple Halloween faces on some of the orange paper strips before forming the loops.
7. Paper Plate Jack-o’-Lantern
A paper plate jack-o’-lantern is an easy Halloween craft that works particularly well for younger children.
The round shape of the plate provides a ready-made pumpkin face, reducing the amount of cutting required.
Children can experiment with different expressions by changing the shapes of the eyes, nose, and mouth.
This activity can be adapted for preschool classrooms, family craft sessions, or beginner art projects.
Materials needed:
- Plain paper plate
- Orange crayons or washable paint
- Black construction paper
- Green paper
- Pencil
- Child appropriate scissors
- Craft glue
- Optional black marker
How to Make a Paper Plate Pumpkin
Begin by placing a plain paper plate on a protected table.
Choose orange crayons or suitable washable paint to color the front surface.
If using crayons, encourage children to fill the plate with broad strokes.
If using paint, apply a thin, even layer and allow it to dry before continuing.
Next, prepare the pumpkin’s facial features.
Draw two large eyes, a simple nose, and a mouth on black construction paper.
The eyes can be triangles, circles, or other easy shapes.
For a friendly expression, draw a wide curved smile.
For a surprised pumpkin, use a round mouth instead.
Carefully cut out the pieces.
Younger children may need help with this step.
Arrange the shapes on the orange plate before applying glue.
Move them around to see how the pumpkin’s expression changes.
Once the child is happy with the design, attach the facial features.
Cut a short green stem from construction paper.
Glue it behind the top edge of the plate so it extends above the pumpkin.
You can also add a green paper leaf beside the stem.
Allow all attached pieces to dry.
The completed paper plate pumpkin can be placed on a seasonal display board or used as part of a larger Halloween decoration.
For a variation, let children create several pumpkin faces using different expressions.
A collection of smiling, surprised, and funny pumpkins can make a colorful classroom display.
8. Friendly Paper Monster Craft
A friendly paper monster is a creative Halloween craft that allows children to invent their own characters.
Unlike crafts that require a recognizable animal or object, monster designs can include unusual shapes, oversized eyes, colorful bodies, and funny expressions.
This makes the activity flexible for children with different creative interests.
A monster can be bright green, purple, orange, or any color the child prefers.
Materials needed:
- Colored construction paper
- White paper
- Black paper
- Pencil
- Child appropriate scissors
- Craft glue
- Markers or crayons
How to Make a Paper Monster
Start by choosing a color for the monster’s body.
Draw a large, simple shape on construction paper.
The body can be a rectangle, oval, triangle, or an irregular rounded shape.
Carefully cut out the body.
Next, prepare the eyes.
Draw two large circles on white paper and smaller black circles for the pupils.
Children can use one eye, two eyes, or three oversized eyes to create different characters.
Cut out the eye shapes and arrange them near the top of the body.
Use black or colored paper to create a mouth.
A curved smile, wide oval mouth, or simple zigzag expression can give the monster personality.
If you want to add teeth, cut broad white triangles and attach them inside the mouth.
Avoid making tiny pieces for younger children.
Next, prepare the arms and legs.
Cut four simple strips of colored paper.
Attach two strips to the sides of the body and two near the bottom.
For a playful effect, fold the strips back and forth into simple accordion shapes.
Make sure the folds are not too narrow.
Attach the eyes, mouth, arms, and legs using suitable craft glue.
Press each piece gently into place.
Allow children to add details with crayons or markers.
They might draw spots, stripes, eyebrows, or colorful patterns on the monster’s body.
Once the glue dries, the finished monster can be displayed on a wall or craft board.
For a creative variation, make a family of paper monsters using different body shapes and colors.
One monster might be tall and narrow, while another is short and round.
Children can also give their characters imaginary names and create simple stories about them.
This makes the craft enjoyable beyond the cutting and gluing process while keeping the project easy to personalize.
9. Halloween Paper Lantern Decoration
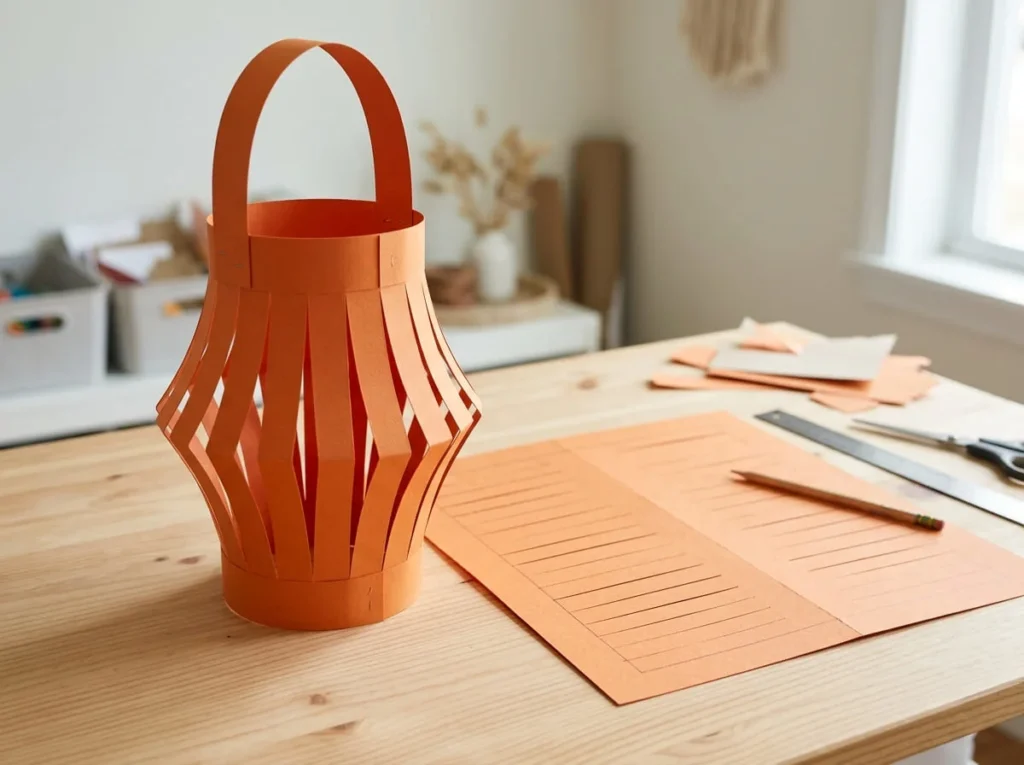
A Halloween paper lantern is a simple decoration that introduces children to folding and cutting techniques. Using colored paper, children can create a lantern with curved sides and open spaces that give it a decorative appearance.
Orange, purple, and black cardstock work particularly well for this project. The finished lantern can be displayed on a table or shelf as part of a Halloween arrangement.
This is a decorative paper craft, not a working lantern. Never place candles, electrical lights that generate heat, or other heat sources inside it.
Materials needed:
- Orange, purple, or black cardstock
- Pencil
- Ruler
- Child appropriate scissors
- Craft glue or suitable tape
- Additional paper for a handle
How to Make a Paper Halloween Lantern
Begin by choosing a sheet of colored cardstock.
Place it horizontally on a clean table and fold it in half lengthwise.
Press the fold gently to create a clear crease.
Use a ruler to draw several evenly spaced lines starting from the folded edge. Stop each line before reaching the opposite open edge, leaving an uncut border to hold the paper together.
Carefully cut along the marked lines.
Younger children may need an adult to complete this step because the cuts must stop before reaching the opposite edge.
Once the cutting is finished, slowly unfold the paper.
Bring the two shorter ends together to form a cylinder.
Secure the overlapping ends with suitable craft glue or tape.
The cut sections should bow outward slightly, creating the lantern’s rounded shape.
If the paper remains flat, gently adjust the sides without pulling too hard.
Next, cut a broad strip of matching paper to make a handle.
Attach the strip across the top opening.
Allow the glue to dry before lifting the decoration.
Children can personalize their lanterns with simple paper bat shapes or Halloween colors.
Avoid adding heavy decorations that might cause the lantern to collapse.
Display the finished paper lantern on a stable surface or hang it securely in a suitable location.
Keep it away from flames, heat sources, and the reach of very young children.
10. Paper Black Cat Craft
A paper black cat is a recognizable Halloween decoration that children can make using a few simple shapes.
The pointed ears, curved tail, and bright facial features give the character its familiar appearance.
Black construction paper works well for the body, while contrasting colors help the face stand out.
This project is suitable for children learning to combine different paper shapes into one finished character.
Materials needed:
- Black construction paper
- White or yellow paper
- Pink paper
- Pencil
- Child appropriate scissors
- Craft glue
- White pencil or marker
How to Make a Black Cat from Paper
Begin by drawing a large oval on black construction paper.
This will form the cat’s body.
Next, draw a smaller circle for the head.
Carefully cut out both shapes.
Place the head slightly above the body and check how the pieces fit together.
Attach the head using craft glue.
Cut two small triangles from black paper to create the cat’s pointed ears.
Attach them behind the upper part of the head.
If desired, cut two slightly smaller pink triangles and glue them inside the ears.
Next, prepare the eyes.
Draw two large oval shapes on yellow or white paper.
Cut them out and attach them to the cat’s face.
Use a black marker to add simple pupils.
Draw a small nose and a curved mouth beneath the eyes.
You can use a white pencil to create short whisker lines.
For the tail, cut a long curved strip from black cardstock.
The strip should be wide enough to hold its shape without tearing easily.
Attach one end behind the cat’s body so the tail curves upward.
Allow the glue to dry completely.
For a different design, create a sitting cat using a taller oval body.
Children can also experiment with surprised eyes, smiling faces, or different tail positions.
The completed black cat can be added to a Halloween wall display or attached to a greeting card.
11. Halloween Paper Bag Puppet
A Halloween paper bag puppet is a creative project that children can use for pretend play after completing the craft.
A plain paper lunch bag provides the main structure, while construction paper can be used to create a ghost, witch, pumpkin, or friendly monster.
The folded bottom flap of the bag becomes the puppet’s moving mouth.
This activity combines paper decoration with simple character design.
Materials needed:
- Plain paper lunch bag
- Colored construction paper
- White paper
- Black marker
- Child appropriate scissors
- Craft glue
- Crayons or colored pencils
How to Make a Halloween Paper Puppet
Place a plain paper lunch bag on the table with its folded bottom flap facing upward.
The folded flap will form the upper part of the puppet’s face.
Choose a Halloween character to create.
For a friendly monster, select green or purple construction paper.
Cut a large paper shape that fits over the front of the bag.
Attach it carefully without gluing the movable flap to the section beneath it.
Next, prepare the character’s facial features.
Cut large white paper circles for the eyes and smaller black circles for the pupils.
Glue the eyes onto the upper flap.
Create a mouth using black or colored paper.
Position the mouth so it appears to open when the flap moves.
If making a monster, you can add broad paper teeth or colorful eyebrows.
For a pumpkin puppet, use orange paper for the face and green paper for a small stem.
For a ghost puppet, cover the front with white paper and add a friendly expression.
Allow the glue to dry completely.
Once the puppet is ready, an adult can demonstrate how to insert a hand into the paper bag and move the folded flap.
Children can use their finished puppets to invent simple Halloween stories.
For classroom activities, several puppets can become characters in a short group storytelling session.
Keep the designs simple and avoid decorations that could detach during play.
12. Folded Paper Candy Corn Decoration
A folded paper candy corn decoration is an easy Halloween project that uses three familiar colors.
The white, orange, and yellow sections create a recognizable candy corn design without requiring complicated drawing.
Children can assemble a large flat shape and add a folded paper support to make it stand on a table.
This activity is useful for practicing basic cutting, arranging, and gluing.
Materials needed:
- White construction paper
- Orange construction paper
- Yellow construction paper
- Sturdy cardstock
- Pencil
- Child appropriate scissors
- Craft glue
How to Make a Candy Corn Paper Craft
Begin by drawing a large rounded triangle on sturdy cardstock.
The triangle should have a broad bottom and a gently rounded point.
Cut out the shape carefully.
This will become the backing for the decoration.
Next, prepare the three colored sections.
Cut a broad yellow paper piece to cover the bottom part of the triangle.
Prepare an orange section for the middle.
Finally, cut a smaller white section for the rounded tip.
Arrange the pieces on the cardstock backing before applying glue.
The yellow section should be at the bottom, followed by orange in the middle and white at the top.
Adjust the pieces so the edges fit neatly.
Once the arrangement looks balanced, attach the colored sections with craft glue.
Press them gently against the backing.
Allow the glue to dry.
To make the decoration stand, prepare a separate strip of sturdy cardstock.
Fold the strip to create a simple support that can be attached to the back.
An adult can help position the support so the candy corn decoration stands at a slight backward angle.
Secure the support and allow the adhesive to dry completely.
For a creative variation, children can draw a smiling face on the orange section.
They can also make several candy corn decorations in different sizes.
Arrange the finished pieces together on a shelf or classroom display table.
13. Halloween Paper Bookmark Characters
Halloween paper bookmarks are useful crafts because children can enjoy their finished projects while reading.
A simple cardstock bookmark can be decorated with a pumpkin, ghost, bat, or friendly monster.
Unlike bulky decorations, bookmarks should remain reasonably flat so they fit comfortably between book pages.
This project gives children opportunities to experiment with color and character expressions while making something practical.
Materials needed:
- Colored cardstock
- Orange, black, and white paper
- Pencil
- Ruler
- Child appropriate scissors
- Craft glue
- Markers or colored pencils
How to Make Halloween Paper Bookmarks
Start by choosing a piece of sturdy cardstock.
Use a ruler and pencil to draw a long rectangular bookmark.
Carefully cut along the lines.
The bookmark should be narrow enough to fit comfortably inside a book.
Next, choose a Halloween character.
For a pumpkin bookmark, cut a simple orange pumpkin shape that fits within the width of the cardstock strip.
For a ghost bookmark, use white paper with a rounded top and wavy bottom.
A bat bookmark can feature a small black bat silhouette near the upper section.
Arrange the selected character on the bookmark before applying glue.
Keep the design flat and avoid thick folded pieces.
Attach the character using a small amount of craft glue.
Use markers or colored pencils to add facial expressions.
Children can also decorate the lower section with simple dots, stripes, or Halloween colors.
Avoid using beads, raised decorations, or other materials that could damage book pages.
Allow the glue to dry completely before placing the bookmark inside a book.
For a creative variation, make a set of bookmarks featuring different Halloween characters.
These bookmarks can be used during seasonal reading activities or shared as handmade gifts.
14. Halloween Paper Door Hanger
A Halloween paper door hanger is a simple way for children to decorate a bedroom or classroom door.
The main design uses a sturdy paper shape with an opening that fits over a suitable door handle.
Children can personalize the hanger with pumpkins, ghosts, bats, or other Halloween characters.
This activity requires some careful cutting, so younger children may need an adult to prepare the main shape.
Materials needed:
- Sturdy colored cardstock
- Orange, black, and white construction paper
- Pencil
- Child appropriate scissors
- Craft glue
- Markers or crayons
How to Make a Halloween Door Hanger
Begin by choosing a sheet of sturdy cardstock.
Draw a large vertical rectangle with softly rounded corners.
Near the top, draw a circular opening large enough to fit over the intended door handle.
Leave a generous amount of paper around the opening so the hanger remains strong.
An adult should cut the opening and help prepare the main shape.
Next, choose the Halloween decorations.
Cut a large orange pumpkin, a friendly white ghost, or a black bat from construction paper.
Arrange the shapes on the lower portion of the hanger.
Leave the opening at the top completely clear.
Once the design looks balanced, attach the decorations using craft glue.
Children can add facial expressions with markers or crayons.
For example, a pumpkin can have a wide smile, while a ghost can have round surprised eyes.
Avoid attaching heavy materials that could make the hanger bend.
Allow the glue to dry completely.
Before displaying the craft, check that it fits securely over the chosen handle without interfering with the door’s normal operation.
Do not place it on handles for emergency exits, doors with safety equipment, or locations where it could interfere with access.
For younger children, display the finished hanger on a suitable wall hook instead.
15. Halloween Paper Scene Collage
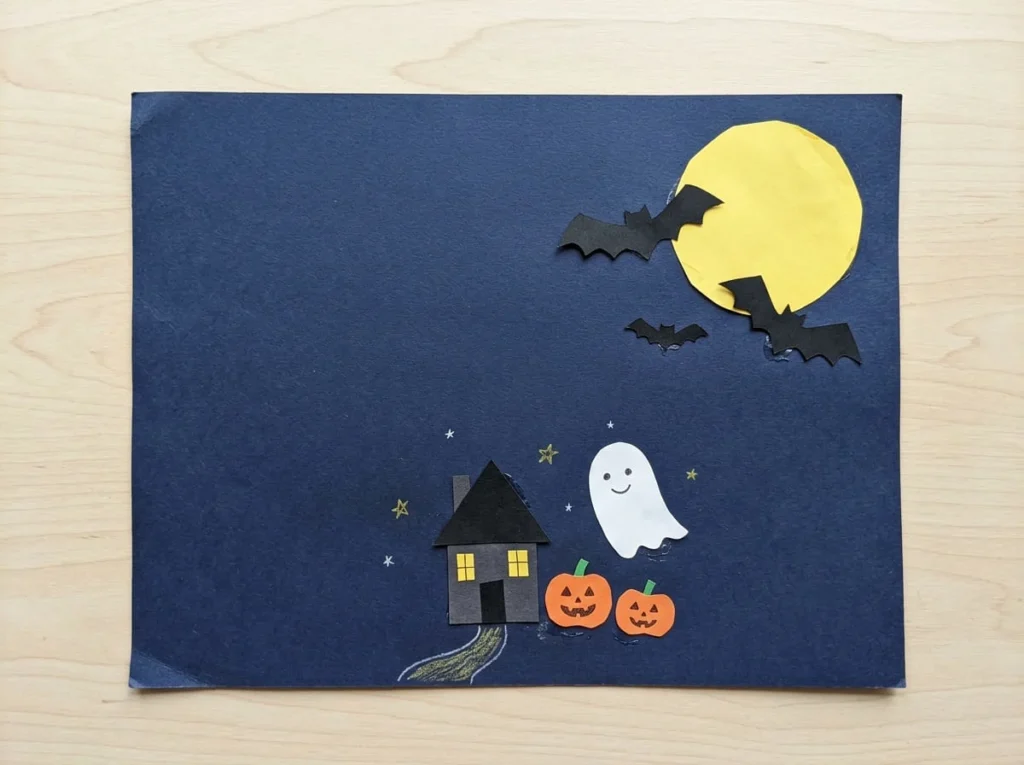
A Halloween paper scene collage allows children to combine several simple paper crafting techniques into one finished picture.
Instead of creating a single character, children can arrange pumpkins, bats, houses, and ghosts against a nighttime background.
This project encourages storytelling and personal creativity.
Each child can design a different Halloween scene using familiar paper shapes.
Materials needed:
- Dark blue or black cardstock
- Orange construction paper
- White construction paper
- Black construction paper
- Yellow paper
- Pencil
- Child appropriate scissors
- Craft glue
- Markers or crayons
How to Make a Halloween Paper Scene
Begin by placing a large sheet of dark blue or black cardstock on the table.
This will represent the nighttime sky.
Next, prepare a large moon from yellow paper.
Draw a circle, cut it out, and place it near the upper corner of the background.
Create a few small paper bats using black construction paper.
Keep the bat shapes simple, with broad wings and small pointed ears.
Arrange them around the moon.
Next, make a small Halloween house.
Cut a rectangle from dark paper for the building and a triangle for the roof.
Add a few yellow paper windows.
Place the house near the bottom of the background.
Prepare one or two pumpkins using orange paper.
Children can draw smiling faces on the pumpkins before attaching them.
Add a friendly white ghost beside the house or above the pumpkins.
Move the pieces around before applying glue.
Encourage children to think about where each character belongs in the scene.
Once the arrangement is complete, attach the paper shapes to the background.
Use a small amount of glue to avoid wrinkling the paper.
Children can add details such as stars, clouds, or a pathway using crayons or markers.
Allow the collage to dry completely.
The finished artwork can be displayed on a classroom board or used as a seasonal wall decoration.
For a creative variation, ask children to invent a short story about the characters in their Halloween scene.
How to Adapt Halloween Paper Crafts for Different Ages
Halloween paper crafts can be adjusted to suit children with different abilities and interests.
Younger children often benefit from large prepared shapes, while older children may enjoy folding, measuring, and creating more detailed decorations.
Choose activities that match each child’s current skills rather than expecting everyone to complete the same project independently.
Simple Halloween Paper Crafts for Preschoolers
Preschoolers may enjoy projects that involve coloring, arranging, and gluing large paper shapes.
Paper plate pumpkins, friendly ghosts, and simple monster faces are practical options.
Adults can prepare the shapes before the activity begins.
Children can then choose facial expressions, arrange the pieces, and help attach them.
Avoid complicated folding or detailed cutting.
Keep instructions short and allow plenty of time for exploration.
Halloween Paper Crafts for Elementary School Kids
Elementary school children may enjoy crafts that involve several steps.
Paper bats with folded wings, Halloween bookmarks, and paper chain garlands provide opportunities to practice measuring, cutting, and assembling.
Demonstrate unfamiliar techniques before children begin.
Encourage them to personalize their designs.
Provide help when a project requires difficult cutting or precise attachment.
The finished decorations do not need to look identical.
Halloween Paper Crafts for Older Kids
Older children may prefer more detailed Halloween paper projects.
They can experiment with additional folded layers, dimensional decorations, and more complex patterns.
For example, a 3D paper pumpkin can be made with alternating shades of orange.
A paper spider web can feature a more detailed arrangement of openings.
Encourage older children to plan their designs before cutting.
This gives them opportunities to experiment while still working with simple materials.
Group Halloween Crafts for Classrooms
For classroom activities, choose projects that can be completed with a manageable number of supplies.
Paper ghosts, pumpkins, and monsters work well because children can decorate similar starting shapes in different ways.
Prepare materials for each group before the activity begins.
Give instructions one step at a time.
Allow students who finish early to add drawings or create another simple character.
Display the completed projects together to create a colorful Halloween collection.
Creative Ways to Display Halloween Paper Crafts
Finished Halloween paper crafts can become decorations for homes, classrooms, and seasonal displays.
The best display method depends on the size, strength, and shape of each project.
Always choose locations that keep paper away from flames, moisture, and heat sources.
Decorate Windows with Paper Ghosts and Bats
Flat paper ghosts and bats can create simple window decorations.
Use suitable removable adhesive to attach the shapes to a clean window surface.
Arrange larger characters near the center and smaller shapes around them.
Make sure the decorations do not block important visibility or interfere with opening the window.
Avoid placing paper directly against hot surfaces or electrical decorations.
Create a Halloween Craft Display Wall
A display wall can bring several Halloween paper projects together.
Choose a suitable wall or classroom board.
Arrange pumpkins, ghosts, bats, and monsters in small groups.
Leave enough space between the pieces so each character remains visible.
Use appropriate mounting materials that will not damage the surface.
Children can help decide where their decorations should go.
Arrange Paper Pumpkins on Tables and Shelves
Freestanding paper pumpkins and miniature witch hats work well on stable shelves or tables.
Group decorations in different sizes to create visual variety.
For example, place one large paper pumpkin beside two smaller ones.
Keep the display away from drinks, sinks, and damp areas.
Avoid placing paper decorations near candles or heat producing lights.
Make a Classroom Halloween Decoration Corner
A classroom decoration corner can showcase children’s seasonal artwork.
Use a display board or suitable shelves for completed crafts.
Arrange flat paper collages on the wall and freestanding projects on a stable surface.
Allow children to contribute their own designs.
Avoid overcrowding the display.
Keep decorations away from exits, walkways, and areas where they could interfere with classroom activities.
Reuse Finished Crafts for Seasonal Decorations
Many paper decorations can be stored and reused.
Allow the glue to dry completely before packing them away.
Place flat crafts between clean sheets of paper or store them in a suitable folder.
Keep dimensional decorations in a box that provides enough space to protect their shape.
Store everything in a cool, dry location.
Inspect decorations before using them again.
Tips for Making Halloween Paper Crafts Look Better
Simple adjustments can improve the appearance of handmade Halloween decorations.
You do not need professional craft tools or expensive supplies.
Good material choices, careful assembly, and a little patience can make a noticeable difference.
Choose a Simple Halloween Color Palette
Orange, black, purple, green, and white are useful colors for Halloween paper crafts.
Choose two or three main colors for each project rather than using every available shade.
A limited color palette can help the decoration look more organized.
For example, a black bat with purple details creates a clear contrast.
Use Thicker Paper for Standing Decorations
Thin paper may bend when used for freestanding projects.
Cardstock is usually a better choice for paper pumpkins, miniature witch hats, and other decorations that need to hold their shape.
Use lighter paper for small decorative details.
Choosing the right paper can reduce problems during assembly.
Combine Flat and Folded Paper Shapes
Folding can add depth to simple paper decorations.
A bat with folded wings may look more dimensional than a flat silhouette.
A paper pumpkin made from curved strips creates a rounded appearance.
Use simple folds that children can complete comfortably.
Avoid overly complicated shapes when working with beginners.
Add Personality with Different Facial Expressions
Small changes in facial features can make Halloween characters look unique.
Round eyes may create a surprised expression.
A wide curved mouth can make a ghost or pumpkin look friendly.
Children can experiment with different expressions before attaching the paper pieces.
Encourage creative choices rather than asking everyone to copy one design.
Let Glue Dry Before Moving Finished Crafts
Moving paper decorations too early can cause pieces to shift.
Allow glue to dry according to the manufacturer’s instructions.
Keep projects on a stable surface during drying.
Check the attachments before displaying or storing the finished craft.
This is especially important for dimensional decorations with several connected pieces.
Important Safety Tips for Halloween Paper Crafts with Kids
Halloween crafting should be enjoyable, but preparation and supervision are important.
Choose materials that suit the child’s age and abilities.
Adults should handle tasks that require tools or techniques beyond the child’s skills.
Supervise Scissors and Cutting Tools
Use child appropriate scissors for activities involving cutting.
Demonstrate safe handling before starting.
Younger children may need an adult to cut the shapes.
Detailed openings, such as those required for spider webs or door hangers, should be prepared by an adult when necessary.
Keep sharp tools out of reach when not in use.
Choose Age Appropriate Materials
Select paper, adhesives, and drawing supplies suitable for the children participating.
Read product labels and follow the manufacturer’s instructions.
Avoid damaged materials or supplies with sharp edges.
Choose simpler projects when children are not ready for complicated assembly.
Avoid Small Decorations for Younger Children
Small beads, loose decorations, and tiny paper pieces may create choking hazards for young children.
Use larger paper shapes and simple drawn details instead.
Keep scraps away from children who may put craft materials into their mouths.
Supervise closely throughout the activity.
Keep Paper Crafts Away from Flames and Heat
Paper is combustible and should never be placed near open flames.
Do not use real candles inside paper lanterns.
Keep decorations away from heaters, fireplaces, hot light fixtures, and other heat sources.
Choose safe display locations before hanging or arranging finished crafts.
Hang Garlands and Decorations Securely
Paper chains and hanging decorations should be attached securely.
Keep garlands and hanging strings out of reach of very young children.
Avoid placing decorations where they could become tangled around a child’s neck.
Do not hang crafts across doorways, emergency exits, or other areas where they could interfere with movement.
Keep Crafting Areas Clean and Organized
A tidy workspace makes it easier to supervise children.
Keep unused scissors, glue, and small scraps away from the main activity.
Clean spills promptly.
Remove damaged materials.
After crafting, collect leftover supplies and store them safely.
Common Mistakes to Avoid When Making Halloween Paper Crafts
Halloween paper crafts are usually straightforward, but a few common mistakes can make projects harder to complete.
Simple preparation and careful material choices can help prevent these problems.
Choosing Paper That Is Too Thin
Thin paper may tear during cutting or collapse when used for dimensional decorations.
Choose cardstock for projects that need to stand or hold curved shapes.
Ordinary construction paper is suitable for many flat decorations.
Cutting Shapes Before Planning the Design
Cutting without checking the intended arrangement may lead to pieces that do not fit together.
Draw or arrange the shapes before applying glue.
For projects with several parts, prepare the main shape first and add smaller details afterward.
Using Too Much Glue
Excessive glue can wrinkle paper and make shapes difficult to attach.
Apply a small amount to the areas that need to be joined.
Press the pieces gently into position.
Allow the adhesive to dry before handling the craft.
Making Projects Too Complicated for Younger Kids
Intricate folding and detailed cutting may frustrate younger children.
Choose projects with large shapes and simple steps.
Adults can prepare difficult sections in advance.
Allow children to contribute through coloring, arranging, and decorating.
Moving Decorations Before They Dry
Paper decorations can lose their shape if moved while the glue is wet.
Leave completed projects on a stable surface.
Check that the attachments are secure before displaying them.
For dimensional crafts, allow additional drying time if required by the adhesive instructions.
Frequently Asked Questions
What Are the Easiest Halloween Paper Crafts for Kids?
Paper ghosts, paper plate pumpkins, friendly monsters, and simple Halloween paper chains are good beginner projects.
They use basic supplies and can be adapted for different ages.
Younger children may need adults to prepare the paper shapes.
What Halloween Crafts Can You Make with Construction Paper?
Construction paper can be used to make ghosts, bats, pumpkins, black cats, monsters, paper garlands, and Halloween collages.
Thicker cardstock works better for decorations that need to stand or hold a dimensional shape.
How Do You Make Simple Halloween Paper Decorations?
Start with a recognizable Halloween shape, such as a pumpkin or ghost.
Draw the shape on colored paper and cut it out carefully.
Add facial features or decorative details using paper and markers.
Allow glued pieces to dry before displaying the decoration.
What Halloween Paper Crafts Are Suitable for Preschoolers?
Preschoolers may enjoy coloring paper plate pumpkins, decorating large ghost shapes, and creating friendly monster faces.
Adults should prepare shapes that require difficult cutting.
Use age appropriate materials and supervise throughout.
Can You Make Halloween Paper Crafts Without a Printer?
Yes. Most simple Halloween paper crafts can be made without printed templates.
Draw basic outlines directly onto construction paper using a pencil.
Pumpkins, ghosts, bats, and cats can all be created using simple shapes.
What Can Kids Make with Black and Orange Paper?
Black and orange paper can be used for pumpkins, bats, Halloween paper chains, cats, and seasonal collages.
Combining these two colors creates a familiar Halloween appearance without requiring many supplies.
How Do You Make a Paper Pumpkin for Halloween?
Cut several long strips of orange cardstock.
Attach one end of each strip around a small cardstock base.
Curve the strips upward and secure their opposite ends together at the top.
Add a green paper stem and leaf.
Allow the glue to dry before displaying the pumpkin.
How Can You Make Paper Ghosts for Halloween?
Draw a large ghost outline on white construction paper.
Cut out the shape and add eyes and a mouth using black paper or a marker.
Children can create different expressions to personalize their ghosts.
What Halloween Crafts Are Good for Classrooms?
Paper plate pumpkins, Halloween paper chains, friendly monsters, and paper scene collages work well for classroom activities.
Teachers can prepare materials in advance and adapt instructions to different ages.
Finished crafts can be displayed together.
Can You Make Halloween Decorations with Recycled Paper?
Yes. Clean recycled cardstock, paper packaging, and suitable cardboard can be used for many decorations.
Choose materials that are sturdy and free from sharp edges or damaged sections.
Avoid paper that is dirty, moldy, or unsuitable for children.
How Do You Make Halloween Paper Crafts Without Special Tools?
Use construction paper, child appropriate scissors, craft glue, pencils, and coloring supplies.
Draw simple shapes by hand instead of using printed templates or cutting machines.
Many Halloween decorations require only basic cutting and gluing.
How Long Do Halloween Paper Crafts Take to Make?
The time depends on the child’s age, the project’s complexity, and the amount of preparation required.
Simple ghosts and pumpkin faces may take only a short crafting session.
Dimensional pumpkins and detailed spider webs usually require more time.
Allow additional time for glue to dry.
How Do You Store Halloween Paper Decorations?
Allow the decorations to dry completely.
Store flat crafts in folders or between clean sheets of paper.
Place dimensional decorations in boxes that protect their shape.
Keep the crafts in a cool, dry location away from moisture and excessive heat.
Final Thoughts
Halloween paper crafts for kids offer an affordable way to turn everyday materials into festive decorations and creative characters.
From friendly paper ghosts and colorful pumpkins to folded bats and Halloween garlands, these projects provide plenty of opportunities for children to explore different shapes and designs.
Start with simple activities that match the child’s age and abilities. As children become more comfortable with cutting, folding, and gluing, they can experiment with more detailed projects.
With basic supplies, thoughtful preparation, and appropriate supervision, Halloween paper crafting can become an enjoyable seasonal activity for families and classrooms.