
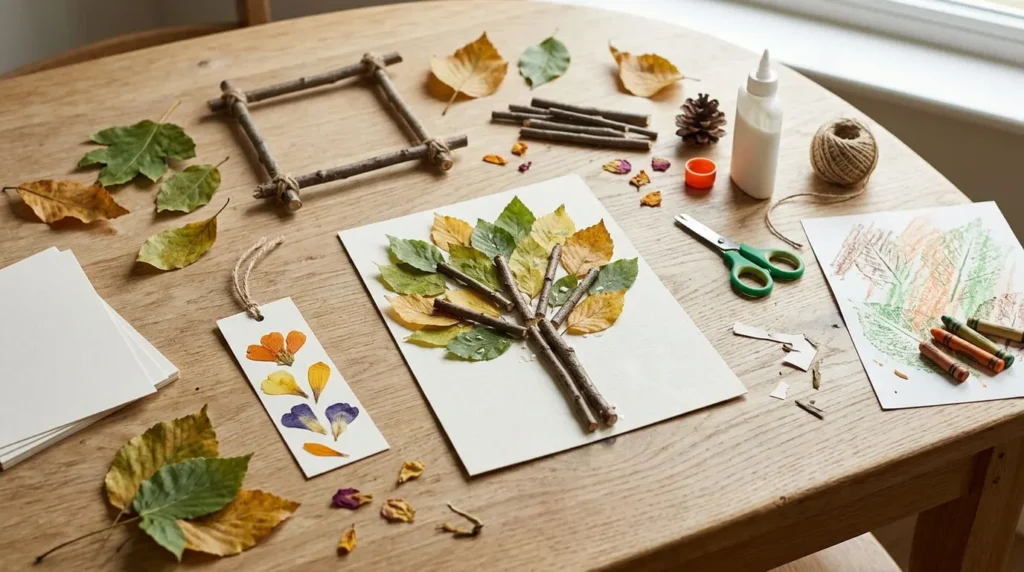
Easy nature crafts for kids are a wonderful way to turn ordinary outdoor finds into creative, handmade projects. Leaves, twigs, flowers, pinecones, and other natural materials can become beautiful artwork with just a few basic craft supplies.
These activities are suitable for parents, teachers, and caregivers who want affordable projects that encourage children to explore their surroundings and express their creativity. Many nature crafts require little preparation and can be enjoyed at home, in the classroom, or during family time outdoors.
Children can make leaf collages, pressed flower bookmarks, twig picture frames, and colorful nature inspired decorations. Each project offers an opportunity to notice different shapes, textures, and colors while creating something unique.
In this guide, you will discover 15 easy nature crafts for kids, learn how to make a simple leaf and twig collage, and find practical tips for choosing materials and completing projects safely.
Why Are Nature Crafts Good for Kids?
Nature crafts combine creative activities with opportunities to observe the world around us. Children can use materials they discover outdoors to make artwork without needing expensive supplies.
These projects are flexible, making them suitable for different ages and experience levels when activities are adapted appropriately.
Encourage Creativity and Imagination
Natural materials come in different shapes, sizes, and colors, giving children plenty of ways to experiment.
A fallen leaf might become a butterfly wing, while a few twigs could form the branches of an imaginary tree. Pinecones can become decorative displays, and flower petals can create colorful patterns.
There is no single correct way to arrange these materials.
Encourage children to develop their own ideas instead of expecting every project to look like an example. This helps make each craft a personal creative experience.
Explore Natural Shapes, Colors, and Textures
Nature provides many interesting details for children to discover.
Some leaves have smooth edges, while others have pointed tips or visible veins. Twigs vary in thickness, and pinecones have layered surfaces that feel different from flat leaves.
Children can compare these features while choosing materials for their projects.
For example, they might use broad leaves to create a collage background and narrow twigs to form tree branches.
These simple observations make crafting more engaging and encourage children to pay attention to their surroundings.
Make Creative Activities More Affordable
Many nature crafts can be made using materials collected responsibly from the ground.
Fallen leaves, small twigs, and pinecones can provide the main materials, while ordinary household supplies such as cardstock, glue, and crayons help complete the projects.
You do not need to purchase a separate craft kit for every activity.
Start with materials already available at home and choose projects that require only a few additional supplies.
Enjoy Time Outdoors and Together
Collecting suitable natural materials can become part of the activity itself.
Families can take a short walk and look for interesting fallen leaves, while teachers can organize supervised nature observation activities before a classroom craft session.
Children can compare their finds, discuss their favorite shapes, and decide how to use them.
These shared experiences make nature crafts enjoyable beyond the finished artwork.
What Materials Do You Need for Nature Crafts?
Most nature crafts require only a small collection of natural materials and basic household craft supplies.
The exact materials depend on the project, so there is no need to collect everything before getting started.
Leaves, Flowers, and Petals
Fallen leaves are useful for collages, leaf rubbing, greeting cards, and other decorative projects.
Pressed flowers and petals can be used for bookmarks and flat artwork. Choose materials that are clean, reasonably dry, and taken from plants known to be safe.
Avoid unidentified plants, irritating sap, thorns, and unknown berries or seeds.
For projects that need flat materials, prepare leaves and flowers in advance and allow them to dry properly.
Twigs, Pinecones, and Other Natural Finds
Short twigs can form picture frames, simple sculptures, and nature inspired patterns.
Pinecones can be used for decorative projects or carefully prepared bird feeders. Choose clean, dry specimens without sharp broken sections or visible mold.
You can also use suitable fallen grasses and other natural materials when they are safe to handle.
Avoid collecting from protected areas or removing materials that belong to wildlife habitats.
Basic Craft Supplies
Keep a few basic supplies available for assembling your projects.
Useful items include:
- Thick cardstock or sturdy drawing paper
- Glue suitable for children’s craft activities
- Crayons and washable markers
- Child appropriate scissors
- Short pieces of yarn or string
- A pencil and ruler
- A clean work surface or protective mat
Not every project requires every item. Select supplies according to the child’s age and the materials being used.
Simple Tools for Collecting Materials
A small collection basket or paper bag can help children carry fallen leaves and twigs during a nature walk.
Choose containers that are easy to hold and avoid sharp collecting tools.
Adults should inspect collected materials before bringing them into the craft area.
Keep natural finds separate from food and wash hands after handling outdoor materials.
Prepare a Clean Crafting Workspace
Before beginning, choose a flat table with enough space to arrange the materials.
Remove dirt and debris from suitable natural finds and let damp materials dry when appropriate.
Place paper, glue, and other supplies within comfortable reach.
Sorting leaves by size or color can also help children decide how to arrange their designs.
A simple workspace makes it easier to concentrate on crafting and reduces unnecessary mess.
How to Collect Natural Materials Safely
Collecting materials is an enjoyable part of nature crafts, but children need guidance about which items are suitable to handle.
Choose Fallen Materials Whenever Possible
Use naturally fallen leaves, small twigs, and pinecones whenever possible.
Avoid breaking branches, picking protected flowers, or damaging living plants just to obtain craft materials.
If you are visiting a park or nature reserve, follow the site’s collection rules. Some areas do not allow visitors to remove natural materials.
Avoid Unknown or Irritating Plants
Children should not collect or handle unidentified berries, mushrooms, thorny plants, or plants with irritating sap.
Adults should check materials before children use them.
Do not allow children to taste natural finds, even when the materials appear harmless.
Respect Parks and Natural Areas
Collect only what is permitted and needed for the planned activity.
Leave wildlife, nests, and important natural habitats undisturbed.
A small collection of fallen leaves and twigs is often enough for several crafts.
Clean and Inspect Materials Before Crafting
Check each item for insects, mold, sharp edges, dirt, and damage.
Discard anything that appears unsafe or unsuitable.
Use appropriate cleaning methods for the material, and allow damp items to dry before storing or gluing them.
Supervise children throughout collection and crafting, particularly when scissors, adhesives, or small natural objects are involved.
15 Easy Nature Crafts for Kids
These easy nature crafts for kids use simple materials such as fallen leaves, twigs, flowers, and pinecones to create fun handmade projects. Each idea includes basic instructions to help parents and teachers choose activities suitable for children. Explore the following crafts and find a creative project to try at home or in the classroom.
1. Leaf and Twig Nature Collage
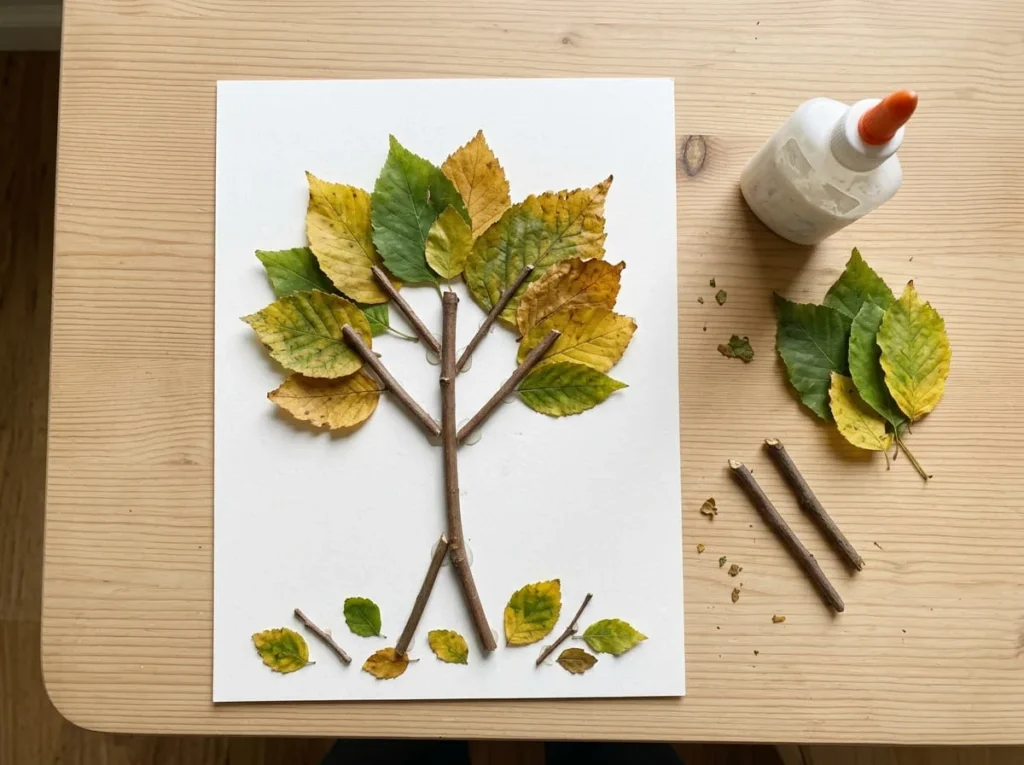
A leaf and twig nature collage is a simple project that lets children turn natural finds into a picture.
They can arrange fallen leaves into trees, flowers, or an imaginary landscape, then use small twigs to add branches, stems, or other details.
This craft works well at home or in a classroom because it uses basic materials and allows plenty of creative freedom.
Materials: Thick cardstock, clean fallen leaves, short smooth twigs, glue suitable for children’s crafts, and a pencil.
Suggested ages: 4 to 10 years with appropriate adult supervision and assistance.
Step 1: Gather Suitable Leaves and Twigs
Choose a few fallen leaves in different shapes and colors.
Collect several short, smooth twigs that are easy to position on paper. Avoid sharp, brittle, moldy, or damaged pieces.
You do not need a large collection. A handful of leaves and a few twigs will be enough for a small collage.
Step 2: Prepare the Cardstock
Place a sheet of thick cardstock on a clean, flat surface.
Sturdy paper provides better support for natural materials than thin drawing paper, which may bend when glue is applied.
Choose a light background so the leaves and twigs remain easy to see.
Step 3: Arrange the Natural Materials
Before using glue, place the leaves and twigs on the cardstock to experiment with different arrangements.
Try positioning two larger leaves near the top to form tree canopies, with twigs underneath as trunks and branches.
Alternatively, arrange leaves in a circle to create a flower or use several shapes to form an imaginary animal.
Move the materials around until the arrangement looks appealing.
Step 4: Create a Simple Nature Scene
Choose a design that matches the child’s interests.
A garden scene might include leaves as flowers and twigs as stems. A woodland picture could use several leaves as tree canopies with twigs for trunks.
Children can also make an abstract collage by arranging materials according to color, shape, or size.
There is no need to draw a detailed outline first.
Step 5: Add Twigs for Stems and Branches
Place short twigs beneath the leaves to form stems or tree trunks.
Use smaller pieces to create branches if the design needs them.
An adult should help with any trimming that is necessary.
Check that the twigs lie flat and do not extend beyond the paper in a way that could create sharp or protruding edges.
Step 6: Glue the Pieces Carefully
Lift one piece at a time and apply a small amount of suitable craft glue to the back.
Return it to its planned position and press gently.
Continue until the main leaves and twigs are attached.
Avoid using excessive glue, as it can soak into the paper or leave visible patches.
Step 7: Let the Collage Dry
Leave the completed collage flat in a clean, protected area.
Allow the glue to dry according to the manufacturer’s instructions before moving the artwork.
Once dry, the collage can be displayed or stored in a folder.
How to Make a Nature Collage Last Longer
Start with reasonably dry natural materials and sturdy cardstock.
Avoid using damp or moldy leaves, which may deteriorate or leave marks on the paper. Use only enough glue to secure the materials, and store the finished collage in a dry place away from direct moisture.
Natural leaves can change color and become brittle over time, so the collage may not remain exactly the same as the day it was made.
That is part of working with natural materials. The goal is to create something meaningful while enjoying the process.
2. Leaf Rubbing Art
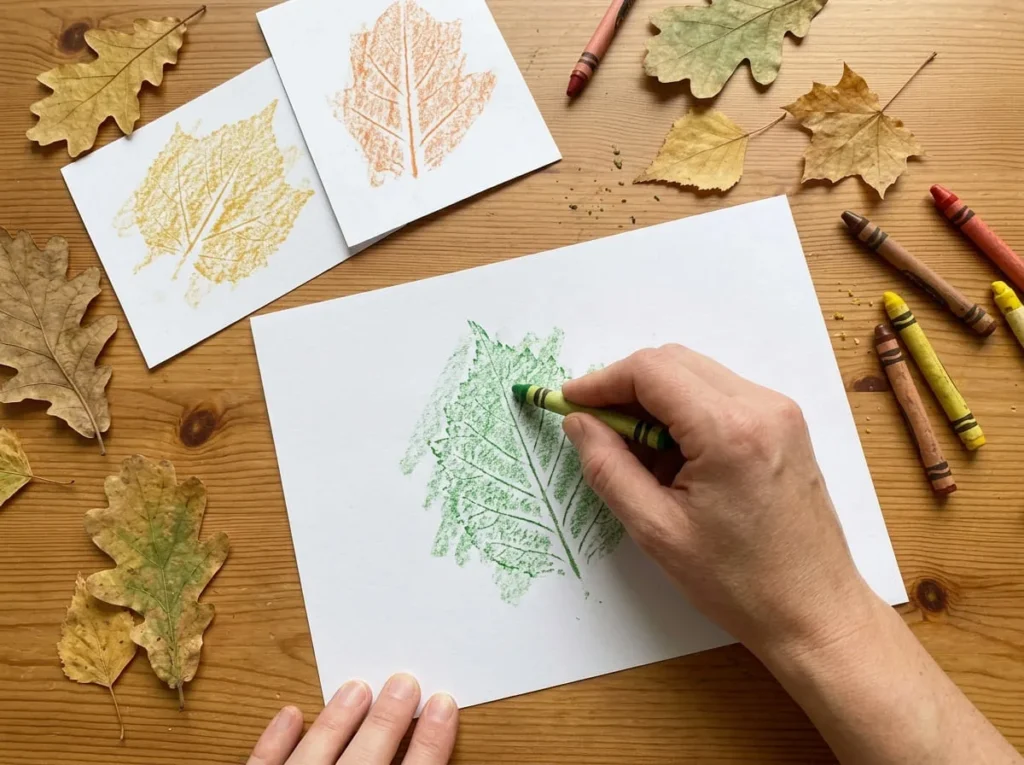
Leaf rubbing art is one of the easiest nature crafts for kids because it requires only a few basic supplies. Children can place leaves beneath paper and rub a crayon over the surface to reveal their shapes and natural vein patterns.
This activity is suitable for a quiet afternoon at home or a simple classroom art session. Children can experiment with different leaf shapes and crayon colors to create unique pictures.
Materials: Dry fallen leaves with visible veins, drawing paper, crayons, and a flat working surface.
Suggested ages: 3 to 10 years with age appropriate supervision.
How to Make Leaf Rubbing Art
- Collect several clean, dry leaves from plants known to be safe.
- Place one leaf on a flat table with its raised veins facing upward.
- Lay a sheet of drawing paper over the leaf.
- Hold the paper gently to prevent it from moving.
- Remove the paper wrapper from a crayon if needed and use the side of the crayon rather than its pointed tip.
- Rub the crayon gently across the paper above the leaf.
- Continue until the leaf outline and veins become visible.
- Repeat with different leaves and colors to create a larger picture.
- Arrange several rubbings together to make a colorful nature collage.
- Display the finished artwork or store it in a folder.
Children can use green, yellow, orange, and brown crayons to explore the colors commonly associated with leaves. They can also use unexpected colors to create imaginative designs.
Encourage children to compare the shapes and veins revealed by different leaves. Some prints may appear bold, while others may be lighter or less detailed.
Beginner tip: Choose leaves that are relatively flat and have clearly visible veins. Apply gentle, even pressure so the paper does not tear.
3. Pressed Flower Bookmarks
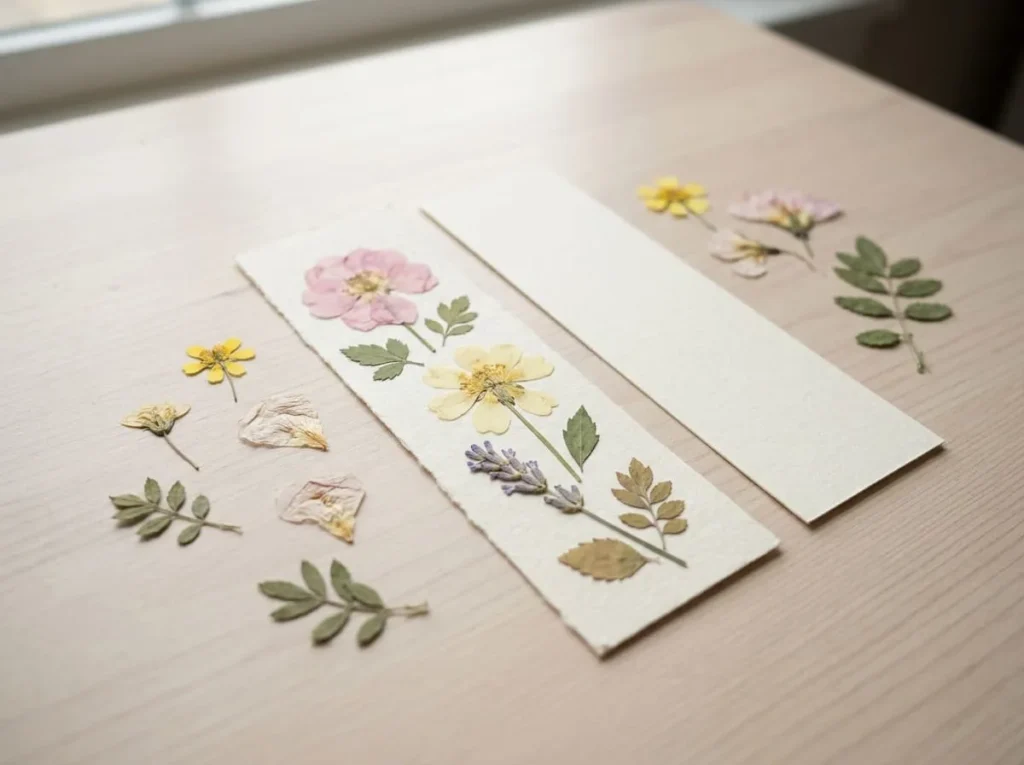
Pressed flower bookmarks are a lovely way for children to preserve the appearance of small flowers and turn them into useful handmade gifts.
The project combines natural materials with simple cardstock and glue. Children can arrange pressed flowers in different patterns to make each bookmark unique.
Because fresh flowers contain moisture, they should be pressed and dried before this craft begins. Adults can prepare the flowers in advance to make the activity easier for younger children.
Materials: Fully pressed and dried flowers, sturdy cardstock, suitable paper glue, pencil, ruler, and a clear protective covering if desired.
Suggested ages: 5 to 10 years with appropriate assistance.
How to Make a Pressed Flower Bookmark
- Choose several small, completely dry pressed flowers from known safe plants.
- Cut a strip of sturdy cardstock into a bookmark shape, with adult help if necessary.
- Arrange the flowers on the cardstock before applying glue.
- Experiment with placing one flower near the top or arranging several flowers along the center.
- Lift each flower carefully and apply a small amount of suitable paper glue.
- Return the flowers to their chosen positions and press them gently.
- Allow the glue to dry according to the manufacturer’s instructions.
- Add a clear protective covering if desired and suitable for the project.
- Trim any uneven cardstock edges with appropriate adult assistance.
- Let the bookmark dry completely before placing it inside a book.
Children can make bookmarks with a single flower, a small arrangement of petals, or a combination of different flower shapes.
For a more natural appearance, leave some of the cardstock visible around the flowers. This helps the delicate details stand out.
Beginner tip: Prepare the pressed flowers ahead of time. Fresh or damp flowers can discolor the cardstock, curl, or develop mold if sealed before drying completely.
4. Twig Picture Frames
Twig picture frames are simple nature crafts that transform small fallen branches into a decorative border for a favorite photograph or drawing.
Children can explore different twig lengths and arrangements while learning how to build a basic frame. The finished project can display a family picture, a nature drawing, or another small piece of artwork.
Materials: Sturdy cardboard, short smooth twigs, suitable craft glue, a photograph or drawing, and adult assistance.
Suggested ages: 5 to 10 years with appropriate supervision.
How to Make a Twig Picture Frame
- Prepare a sturdy rectangular cardboard base with a suitable opening for the photograph or drawing.
- Collect short, dry twigs that are smooth and free from sharp or damaged ends.
- Arrange the twigs around the outer edges of the cardboard.
- Adjust their positions to create a simple rectangular border.
- Ask an adult to help trim any pieces that are too long.
- Attach the twigs using an adhesive suitable for the materials and the child’s age.
- Allow the frame to dry completely according to the adhesive instructions.
- Place the photograph or drawing behind the opening.
- Secure the picture using a suitable backing method.
- Display the finished frame on a stable surface.
Children can use twigs of similar lengths for a neat border or combine different sizes for a more rustic appearance.
They may also add a few flat leaves or other suitable natural materials to the outer border, provided the frame remains stable.
Beginner tip: Arrange all the twigs before applying glue. Adults should handle difficult cutting and check that no sharp ends protrude from the finished frame.
5. Nature Weaving with Twigs and Leaves
Nature weaving combines natural materials with yarn to create a simple textured decoration. Children can thread suitable leaves and grasses through a basic frame and observe how different materials look when arranged together.
This activity is especially useful for children who enjoy hands on projects and experimenting with patterns.
Materials: Two or more sturdy twigs, short lengths of yarn, large fallen leaves, suitable grasses, and adult assistance.
Suggested ages: 6 to 10 years with supervision.
How to Make a Simple Nature Weaving
- Choose several short, sturdy twigs that are smooth and safe to handle.
- Ask an adult to assemble and secure a simple rectangular frame.
- Attach short lengths of yarn across the frame to create parallel weaving lines.
- Check that the yarn is secure and that no sharp twig ends remain exposed.
- Select large leaves or suitable grasses that can be handled easily.
- Gently pass a leaf over one yarn strand and under the next.
- Continue with other natural materials, alternating their positions where possible.
- Add a few different leaf shapes or colors to create an interesting pattern.
- Adjust the materials gently so the arrangement remains visible.
- Display the finished weaving in a suitable location.
Children can experiment with alternating green leaves and dried grasses or arranging materials in repeating patterns.
The project does not need to be tightly woven or perfectly symmetrical. Its purpose is to explore how natural materials can be arranged within a simple structure.
Beginner tip: Start with a small frame and only a few weaving strands. Use short yarn pieces and supervise children closely, particularly if they are not yet comfortable handling string.
6. Leaf Suncatchers
Leaf suncatchers allow children to create a decorative piece that shows the shapes and colors of natural leaves when light passes through it.
This project uses clear contact paper rather than complicated tools. The finished craft can be displayed in a suitable window or bright area.
Materials: Large clean leaves, clear adhesive contact paper, cardstock, and adult assistance.
Suggested ages: 5 to 10 years with supervision.
How to Make a Leaf Suncatcher
- Collect several flat, clean leaves from plants known to be safe.
- Allow the leaves to dry so they do not introduce excess moisture into the craft.
- Cut a piece of clear adhesive contact paper to the desired size.
- Have an adult place it on a clean, flat surface with the adhesive side facing upward.
- Arrange the leaves on the sticky surface, leaving small gaps between them.
- Press the leaves gently so they stay in place.
- Cover the arrangement with a second suitable layer of clear contact paper.
- Smooth the surface carefully to reduce air pockets.
- Add a cardstock border if desired.
- Ask an adult to trim and prepare the finished suncatcher for display.
Children can arrange leaves in a row, circle, or loose pattern. Mixing leaves of different sizes can create an interesting design without requiring additional decorations.
Choose a display location where the craft will not obstruct a window, interfere with a window’s operation, or create a hazard if it falls.
Beginner tip: Use dry, relatively flat leaves and avoid overly thick natural materials. The simpler the arrangement, the more clearly the leaves will show through the finished craft.
7. Pinecone Bird Feeder

A pinecone bird feeder combines nature crafting with an opportunity to observe local birds. Children can help prepare a suitable feeder using a clean pinecone and birdseed, while an adult manages the materials and placement.
The project also offers a chance to discuss how different birds use their surroundings and why wildlife should be treated respectfully.
Materials: A large clean pinecone, suitable birdseed, an appropriate bird safe binding material, and short hanging string handled by an adult.
Suggested ages: 5 to 10 years with close adult supervision.
How to Make a Pinecone Bird Feeder
- Choose a large, dry pinecone and inspect it for mold, dirt, insects, or sharp damaged sections.
- Clean it appropriately and allow it to dry completely.
- Ask an adult to attach a short hanging string securely to the upper part of the pinecone.
- Select birdseed appropriate for the local bird species.
- Prepare an appropriate bird safe binding material according to its instructions.
- Apply a small amount of the binding material to the pinecone.
- Sprinkle suitable birdseed over the coated sections.
- Check that the seed adheres without creating large loose clumps.
- Have an adult select a suitable outdoor location for the feeder.
- Observe visiting birds from a respectful distance and clean up fallen seed when needed.
Children can help choose the pinecone and observe the birds that visit. Adults should check local wildlife guidance to ensure the ingredients and feeding method are appropriate.
Avoid salted foods, unsuitable human snacks, and ingredients that may be harmful to birds. Do not use sticky substances that could coat feathers or interfere with birds’ movement.
Beginner tip: Treat this as a supervised nature activity rather than an ordinary hanging decoration. Check the feeder regularly, maintain cleanliness, and stop feeding if local wildlife guidance recommends doing so.
8. Nature Crowns for Kids
Nature crowns are fun for imaginative play, seasonal celebrations, and outdoor activities. Children can decorate a simple cardstock band with fallen leaves and other flat natural materials.
The craft is easy to personalize because children can choose their own colors and arrangements.
Materials: Sturdy cardstock, large clean fallen leaves, suitable paper glue, pencil, ruler, and adult assistance.
Suggested ages: 4 to 8 years with supervision.
How to Make a Nature Crown
- Measure a strip of cardstock that can form a comfortable band around the child’s head.
- Have an adult cut the strip to the appropriate size.
- Arrange several large leaves along the band before gluing them.
- Choose a simple pattern, such as alternating green and yellow leaves.
- Apply a small amount of suitable craft glue to each leaf.
- Press the leaves gently onto the cardstock.
- Add a few additional flat natural materials if they are safe and securely attached.
- Allow the crown to dry completely.
- Have an adult join the ends of the cardstock band using a suitable fastening method.
- Check the fit and remove the crown if it feels uncomfortable or contains loose pieces.
Children can make woodland crowns, autumn crowns, or green leaf crowns using materials gathered responsibly.
They can also create different patterns by arranging leaves from largest to smallest.
Beginner tip: Keep the crown lightweight and comfortable. Avoid thorny plants, unknown flowers, sharp twigs, and small detachable decorations. Supervise children during wear and remove the crown before active play.
9. Flower Petal Mandala

A flower petal mandala is a beautiful nature craft for kids who enjoy arranging natural materials into patterns. Instead of using glue or paper, children create a temporary design using fallen flower petals, leaves, and other suitable natural finds.
This activity encourages children to explore shapes, colors, repetition, and balance. It can be enjoyed in a garden, on a patio, or during a supervised nature walk.
Materials: Fallen flower petals, large clean leaves, small fallen flowers from known safe plants, and a flat outdoor surface.
Suggested ages: 4 to 10 years with appropriate supervision.
How to Make a Nature Mandala
- Choose a clean, flat surface where children can arrange natural materials.
- Collect a small selection of fallen petals and leaves.
- Place one large leaf or flower in the center of the surface.
- Arrange petals around the center to form a circle.
- Add another ring of leaves or petals around the first arrangement.
- Repeat the pattern using different colors or shapes.
- Adjust the materials until the design looks balanced.
- Step back and observe the completed mandala.
- Take a photograph if you want to preserve the design.
- Leave the area clean and return suitable natural materials to the ground where appropriate.
Children can create simple circular patterns or experiment with more elaborate arrangements. They might alternate yellow and pink petals or use leaves to create a border.
There is no need to make the pattern perfectly symmetrical. The activity is about exploring natural shapes and enjoying the process.
Beginner tip: Start with one central object and a single ring of petals. Add more layers only if the child wants to continue.
10. Bark Texture Rubbing
Bark texture rubbing is an easy outdoor craft that allows children to discover patterns found on tree trunks and fallen branches.
Different trees have different bark textures. Some have relatively smooth surfaces, while others have deep lines and ridges that create interesting patterns on paper.
This activity uses only paper and crayons, making it a useful option when you want a simple craft without glue or paint.
Materials: Drawing paper, crayons, and a safe, accessible tree trunk or large fallen branch with a suitable textured surface.
Suggested ages: 4 to 10 years with adult supervision.
How to Make a Bark Rubbing
- Choose a safe tree trunk or a large, stable fallen branch with interesting bark texture.
- Place a sheet of drawing paper gently against the surface.
- Hold the paper in position without damaging the bark.
- Remove the wrapper from a crayon if necessary.
- Turn the crayon sideways so its broad surface touches the paper.
- Rub the crayon gently across the paper.
- Continue until the bark pattern begins to appear.
- Experiment with another crayon color if desired.
- Remove the paper carefully and examine the texture.
- Repeat with another suitable surface to compare the patterns.
Children may notice that one rubbing produces long lines while another creates small irregular shapes.
You can ask them which pattern looks rougher or which tree has the most noticeable texture.
Never peel bark from a living tree or climb to reach a suitable surface. If no appropriate tree is available, use a stable fallen branch that an adult has checked beforehand.
Beginner tip: Hold the paper firmly and use gentle, even crayon strokes. Pressing too hard can tear the paper.
11. Nature Paintbrushes
Nature paintbrushes are a creative way for kids to explore painting with materials inspired by the outdoors. Instead of using an ordinary brush alone, children can experiment with the textures produced by suitable leaves and other natural fibers.
The goal is to discover how different materials create different marks on paper.
Materials: Short smooth twig handles prepared by an adult, suitable leaves or natural fibers, secure attachment materials, washable paint, thick paper, and a protective table cover.
Suggested ages: 5 to 10 years with close adult supervision.
How to Make and Use Nature Paintbrushes
- Ask an adult to prepare short, smooth handles without sharp ends.
- Select clean leaves or suitable natural fibers from known safe plants.
- Have an adult attach the natural material firmly to each handle using an appropriate method.
- Check each brush carefully to ensure that no loose pieces can detach.
- Place thick paper on a protected work surface.
- Put a small amount of washable paint into a shallow tray.
- Dip the natural brush lightly into the paint.
- Make a few gentle marks on the paper.
- Try a different natural brush to compare the patterns.
- Allow the artwork to dry and clean the workspace.
A broad leaf may create a soft, wide mark, while a suitable cluster of natural fibers may leave a more textured pattern.
Children can combine these marks to make abstract artwork, a garden picture, or a colorful background.
Beginner tip: Adults should prepare and inspect every tool before use. Avoid brittle plant material that sheds, sharp twigs, and any natural material that could irritate the skin.
12. Twig and Yarn Sculptures
Twig and yarn sculptures are simple nature crafts that allow children to experiment with shapes and structures.
By arranging short twigs and wrapping yarn around selected sections, children can create small geometric designs or abstract decorations.
This project works well for children who enjoy building and arranging materials.
Materials: Short smooth twigs, short lengths of yarn, suitable adult prepared fastenings, and a stable work surface.
Suggested ages: 6 to 10 years with supervision.
How to Make a Simple Twig Sculpture
- Select several short, smooth twigs that are free from sharp or damaged ends.
- Arrange the twigs into a simple shape, such as a triangle or square.
- Ask an adult to help secure the points where the twigs meet.
- Check that the structure sits safely on the work surface.
- Choose a few short pieces of yarn in different colors.
- Wrap the yarn gently around selected sections of the twigs.
- Secure the yarn so that it does not create long, loose loops.
- Add another twig if the structure remains stable.
- Adjust the arrangement to create the desired shape.
- Display the finished sculpture in a safe place.
Children can experiment with different arrangements, such as crossed twigs or simple geometric frames.
They can also use contrasting yarn colors to highlight different sections of the structure.
Avoid making tall or unstable sculptures. The finished project should be small enough to handle comfortably and should not have sharp points.
Beginner tip: Start with three or four twigs and one yarn color. A simple structure is easier to assemble and less likely to fall apart.
13. Pressed Leaf Greeting Cards
Pressed leaf greeting cards are a thoughtful way to turn natural materials into handmade gifts.
Children can decorate cardstock with dry leaves and simple drawings to create cards for birthdays, thank you messages, or other special occasions.
The project requires few supplies and can be adapted to different seasons.
Materials: Folded cardstock, fully dried pressed leaves, suitable paper glue, crayons, and a pencil.
Suggested ages: 5 to 10 years with appropriate assistance.
How to Make a Nature Greeting Card
- Choose a sheet of sturdy cardstock and fold it in half.
- Select a few pressed leaves that are completely dry.
- Arrange the leaves on the front of the card before applying glue.
- Try placing one large leaf in the center or several smaller leaves around the edges.
- Lift each leaf carefully and apply a small amount of suitable paper glue.
- Return the leaves to their chosen positions.
- Press gently to help them adhere.
- Add simple crayon details, such as a border or small decorative lines.
- Leave the card open until the glue has dried completely.
- Write a personal message inside when the card is ready.
Children can create different designs using leaf shapes and colors. For example, several small leaves can form a flower, while one large leaf can become the main decoration.
Encourage children to leave enough empty space for the natural materials to stand out.
Beginner tip: Use completely dry leaves and avoid applying too much glue. This helps reduce staining and prevents the cardstock from becoming unnecessarily wet.
14. Nature Mobile with Fallen Materials
A nature mobile is a decorative project that uses lightweight natural materials suspended from a sturdy support. Children can help select the materials and decide how to arrange them, while an adult handles assembly and hanging.
This activity can introduce simple ideas about balance, spacing, and how objects move.
Materials: A sturdy smooth twig, large lightweight dry leaves, suitable short hanging strings, and adult prepared fastenings.
Suggested ages: 6 to 10 years with adult assistance.
How to Make a Simple Nature Mobile
- Choose a sturdy, smooth twig that an adult has inspected.
- Select several large, lightweight natural materials that are dry and safe to handle.
- Decide which materials will hang from the support.
- Ask an adult to prepare short pieces of string and secure the main hanging point.
- Attach the natural materials using suitable fastenings.
- Space the hanging pieces apart so they do not become tangled.
- Check that each piece is securely attached.
- Adjust the arrangement to distribute the weight as evenly as possible.
- Have an adult hang the mobile in a suitable location out of children’s reach.
- Check it regularly for loose parts or damage.
Children can choose materials with different shapes and colors to create an attractive arrangement.
A few large leaves may look beautiful when placed at different heights. However, dry leaves can become brittle, so the mobile may change over time.
Beginner tip: Keep the design lightweight and simple. Avoid sharp twigs, small loose parts, and long strings within children’s reach. The mobile should be securely mounted where it cannot fall onto anyone.
15. Nature Pattern Art with Leaves and Sticks
Nature pattern art is one of the simplest ways to explore natural materials without needing glue, paint, or other supplies.
Children arrange leaves and short sticks into repeated shapes, lines, or circles. They can change the design whenever they want, making this an excellent activity for outdoor play.
Materials: Large fallen leaves, short smooth sticks, and a clean flat surface or sturdy backing board.
Suggested ages: 3 to 10 years with appropriate supervision.
How to Make Nature Pattern Art
- Choose a clean, flat surface where the materials can be arranged safely.
- Collect several large leaves and short smooth sticks.
- Place three leaves in a row.
- Add a stick beside each leaf to create a repeating pattern.
- Continue the arrangement using the same order.
- Try changing the pattern by alternating large and small leaves.
- Experiment with arranging the materials into a circle or spiral.
- Step back and observe the design.
- Rearrange the materials to create a different pattern.
- Photograph the finished artwork if you want to keep a record.
Children can explore simple patterns such as leaf, stick, leaf, stick. Older children may enjoy more complex arrangements involving different sizes and shapes.
Because the materials are not glued down, the activity can be repeated many times.
Beginner tip: Start with a simple pattern using two types of material. Let children decide how to extend or change the arrangement.
How to Make Nature Crafts Fun for Different Ages
Nature crafts can be adapted to suit children’s interests and abilities. Choose projects according to how comfortably each child handles the materials rather than relying only on age.
Nature Crafts for Preschoolers
Younger children often enjoy simple activities that involve sorting, arranging, and making basic patterns.
Leaf rubbing, large leaf collages, and nature pattern art can be good starting points when appropriate materials are provided.
Use large natural objects that are easy to see and handle. Adults should manage cutting, inspect materials, and supervise the use of glue.
Keep instructions short and allow children to explore their own arrangements.
Nature Crafts for Elementary School Kids
Older children may enjoy projects with several steps, such as twig picture frames, pressed flower bookmarks, and nature weaving.
They can experiment with different patterns and plan how materials will fit together.
Encourage children to think about the structure of their project before attaching anything.
Provide help with difficult assembly tasks while allowing them to make their own creative decisions.
Nature Crafts for Families and Classrooms
Group nature crafts can be enjoyable when materials are organized before the activity begins.
Families can collect suitable fallen leaves during a walk, while teachers can prepare separate trays of natural materials for small groups.
Give children enough space to arrange their projects comfortably.
For shared activities, explain how to collect materials responsibly and how to return or dispose of unused items appropriately.
Tips for Preparing and Storing Nature Crafts
Natural materials behave differently from manufactured craft supplies. Some remain relatively stable when dry, while others curl, fade, or become brittle over time.
A little preparation can help improve the finished project.
Dry Natural Materials Before Using Them
Remove excess dirt and inspect materials before bringing them into the craft area.
Allow damp leaves, twigs, and pinecones to dry appropriately. Press flowers and leaves fully before using them in flat artwork.
Never seal damp natural materials inside a craft, as trapped moisture may encourage mold.
Choose Glue and Other Supplies for the Project
Different materials may require different adhesives.
Use glue suitable for the materials and the child’s age, and follow the manufacturer’s instructions.
For projects involving twigs or heavier materials, an adult should handle any adhesive or assembly method that is not suitable for children.
Use only the amount needed to secure the materials.
Protect Finished Crafts from Moisture
Paper crafts containing leaves or flowers should be stored in a dry place.
Avoid placing them near damp windows, wet surfaces, or areas where moisture may collect.
Some natural materials will change color or become brittle with time. This is normal and cannot always be prevented.
Keep Natural Materials Organized
Separate leaves, twigs, flowers, and pinecones into suitable containers before beginning a project.
Keep potentially messy materials away from clean paper and finished artwork.
Store dry materials in a clean, dry location and inspect them before reuse.
Discard anything that develops mold, attracts pests, or becomes damaged.
Safety Tips for Nature Crafts with Kids
Nature crafts are most enjoyable when materials are selected carefully and children have suitable supervision.
Avoid Unknown Plants, Berries, and Mushrooms
Do not allow children to collect or handle unidentified plants, berries, mushrooms, or seeds.
Some natural materials may be poisonous or cause skin irritation. Adults should inspect every item before use and avoid anything that cannot be identified confidently.
Children should never taste natural craft materials.
Inspect Twigs and Pinecones Before Use
Check twigs for sharp ends, splinters, and broken sections.
Inspect pinecones and other collected materials for mold, insects, and damage.
Discard anything that cannot be made suitable for the intended activity.
Supervise Glue, Scissors, and Small Materials
Choose supplies appropriate for each child’s age and abilities.
Adults should handle difficult cutting, hot tools, and adhesives that are unsuitable for children.
Avoid small detachable pieces for children who may put objects in their mouths.
Check assembled crafts to make sure they do not have loose parts or sharp edges.
Wash Hands After Outdoor Craft Activities
Children should wash their hands after handling natural materials and before eating.
Clean work surfaces and reusable tools after the activity.
Follow the cleaning instructions for the supplies used.
Collect Natural Materials Responsibly
Collect only materials that are permitted to be removed.
Prefer fallen leaves, twigs, and pinecones rather than damaging living plants.
Leave protected areas, wildlife habitats, and natural features undisturbed.
A small amount of suitable material is usually enough for a successful project.
Frequently Asked Questions
What Are the Easiest Nature Crafts for Kids?
Leaf rubbing, nature collages, flower petal mandalas, and nature pattern art are easy options. They use simple materials and do not require complicated tools or detailed instructions.
What Can Kids Make with Leaves and Sticks?
Children can make leaf collages, twig picture frames, nature patterns, simple sculptures, and greeting cards. The best project depends on the materials available and the child’s abilities.
What Nature Crafts Are Suitable for Preschoolers?
Simple leaf rubbing, large leaf collages, and nature pattern art can be suitable for preschoolers with appropriate supervision. Choose large, safe materials and keep instructions short.
What Natural Materials Are Best for Children’s Crafts?
Clean fallen leaves, short smooth twigs, fully dried pressed flowers, and suitable pinecones are useful options. Always inspect materials and avoid unknown plants or anything damaged or moldy.
How Do You Dry Leaves and Flowers for Crafts?
Place suitable leaves or flowers between sheets of absorbent paper and press them inside a heavy book or an appropriate flower press. Allow enough time for them to dry completely, checking periodically. Adults should supervise preparation and avoid pressing unidentified plants.
What Nature Crafts Can Kids Make at School?
Classroom options include leaf rubbing, nature collages, twig frames, pressed flower bookmarks, and nature pattern art. Teachers can prepare materials in advance and organize activities according to students’ ages and abilities.
Can You Make Nature Crafts Without Glue?
Yes. Flower petal mandalas, bark rubbing, and nature pattern art can all be made without glue. These temporary projects allow children to rearrange the materials and create new designs.
How Can You Make Nature Crafts Last Longer?
Use clean, completely dry materials and suitable adhesives. Store finished crafts in a dry place away from moisture. Keep in mind that leaves and flowers may fade or become brittle over time.
Are Nature Crafts Suitable for Rainy Days?
Yes. You can collect suitable natural materials in advance and use them for indoor crafts such as leaf rubbing, twig frames, and pressed flower bookmarks. Keep the workspace protected and make sure all materials are suitable for indoor use.
How Can Kids Collect Natural Materials Safely?
Choose fallen materials from permitted areas, avoid unidentified plants and mushrooms, and do not collect sharp or damaged objects. Adults should inspect the materials before children handle them and supervise the entire activity.
Final Thoughts
Easy nature crafts for kids offer a simple way to combine creativity with exploring the natural world. Leaves, twigs, flowers, and pinecones can become collages, bookmarks, picture frames, and decorative patterns with only a few basic supplies.
Start with a project that matches the child’s interests and abilities. Simple activities can be just as enjoyable as more complicated creations, especially when children have freedom to experiment.
Remember to inspect natural materials, supervise craft tools, and collect items responsibly.
The goal is not to create perfect artwork. It is to give children an opportunity to notice the beauty of natural materials and turn their own ideas into something special.