
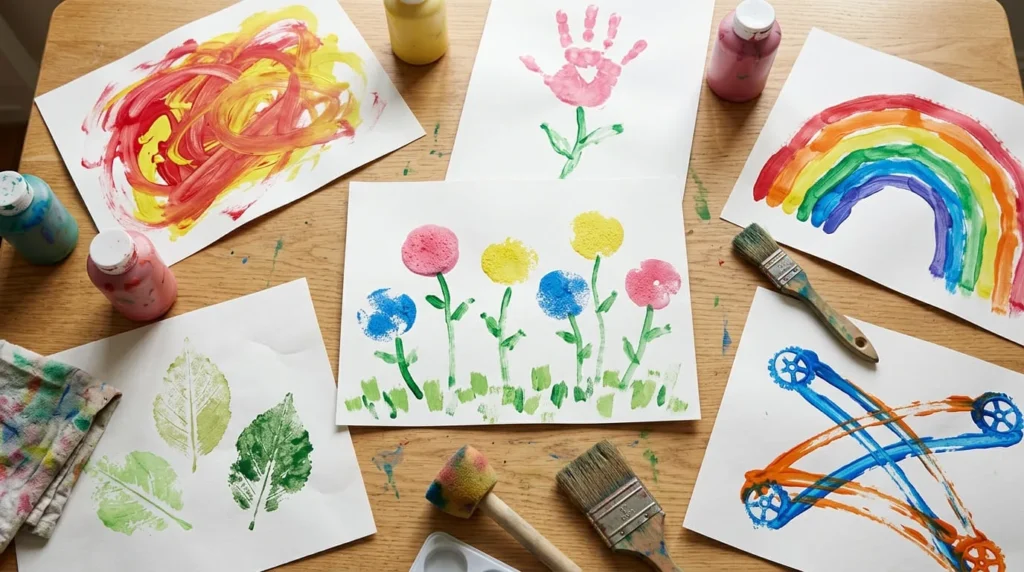
Simple painting activities for preschoolers are a fun and creative way to introduce young children to colors, shapes, and artistic expression. With washable paint, paper, brushes, and everyday materials, children can explore different painting techniques while creating colorful artwork.
You do not need expensive art supplies or complicated instructions to get started. Many preschool painting activities require only a few basic materials and can be prepared easily at home or in the classroom.
Children can experiment with finger painting, sponge printing, brush strokes, and color mixing without worrying about making perfect pictures.
Painting also gives preschoolers opportunities to practice using their hands, explore textures, and express their own ideas.
In this guide, you will discover 15 simple painting activities for preschoolers, learn how to create a colorful sponge painted flower garden step by step, and find practical tips for choosing activities suitable for different ages and abilities.
Why Are Painting Activities Important for Preschoolers?
Painting offers preschool children opportunities to explore creativity through colors, movements, and different materials.
Unlike activities that require children to follow complicated instructions, simple painting allows them to experiment and discover what happens when they move a brush, press a sponge, or mix two colors.
The goal is not to create perfect artwork but to make the creative process enjoyable.
Painting Encourages Creativity and Imagination
Preschoolers often enjoy expressing their ideas through colors and pictures.
Painting allows them to decide which colors to use, where to place different marks, and what their artwork represents.
For example, one child may paint a bright yellow sun, while another creates a purple flower or an imaginary animal.
Both paintings can be meaningful expressions of creativity.
Children can also experiment with unusual color combinations without following strict rules.
Encourage them to describe their pictures and explain what they wanted to create.
Avoid correcting every detail because personal choices are part of the artistic experience.
Painting Gives Children Opportunities to Practice Hand Movements
Painting involves a variety of simple movements that children can practice during creative activities.
Holding a brush, pressing a sponge against paper, and moving paint across a surface require different hand actions.
For example, children may use a large brush to create broad lines or a sponge to make circular prints.
They can also experiment with gentle and firm pressure to observe how the marks change.
These activities provide opportunities to practice hand coordination and tool handling.
However, children develop these abilities at different rates.
Choose painting tools that are comfortable to hold and provide assistance whenever needed.
Painting Introduces Colors, Shapes, and Textures
Painting is a practical way for young children to explore colors and basic shapes.
Children can discover how red and yellow paint combine to create orange or how different tools produce different patterns.
A sponge may leave a soft textured print, while a brush creates lines and curved marks.
Finger painting can produce dots, swirls, and broad patches of color.
These experiences help children observe differences between painting materials and techniques.
You can introduce simple questions during the activity.
For example, ask what happens when two colors touch or which tool makes the widest mark.
Allow children to explore and describe what they notice.
Painting Can Be a Fun Shared Activity
Painting can be an enjoyable activity for parents, teachers, caregivers, and children.
Adults can help prepare the materials, demonstrate simple techniques, and supervise the activity.
Children can then experiment with colors and create their own artwork.
In preschool classrooms, several children can participate in the same activity while making different pictures.
For example, a group of children may all create sponge painted flower gardens using their favorite colors.
The finished paintings do not need to look identical.
Encourage children to enjoy the process and appreciate each other’s creative ideas.
What Supplies Do You Need for Preschool Painting Activities?
Most preschool painting activities require only a small collection of basic art supplies.
You can prepare many projects using washable paint, thick paper, brushes, sponges, and a few simple containers.
Choose materials designed for children’s activities and suitable for each child’s age.
Always check product labels and provide appropriate adult supervision.
Washable Paint Suitable for Young Children
Washable paint is useful for preschool activities because it is generally easier to clean from many surfaces than permanent craft paint.
Choose paint specifically intended for children’s art activities.
Washable tempera paint and suitable finger paint are common options.
Read the manufacturer’s age recommendations and instructions before use.
Remember that a nontoxic label does not mean the paint is edible.
Children should not put paint in their mouths.
For beginners, start with a few bright colors such as red, yellow, blue, and green.
You can introduce additional colors as children become more comfortable with painting.
Thick Paper and Painting Surfaces
Choose paper that can handle the amount of moisture used in the activity.
Thick drawing paper or paper intended for painting is often more suitable than very thin printer paper.
Thin paper may wrinkle or tear when children apply too much wet paint.
For sponge printing, use a sturdy sheet that stays reasonably flat on the table.
For watercolor activities, choose paper suitable for watercolor paint when possible.
Large sheets can be useful because they provide plenty of space for broad brush strokes and prints.
You can also use suitable paper plates for certain painting activities.
Keep the painting surface stable during the activity.
Brushes, Sponges, and Simple Painting Tools
Painting tools should be easy for preschoolers to hold and control.
Large brushes with comfortable handles are useful for broad lines and simple shapes.
Soft sponges can create textured prints and colorful patterns.
Choose sponge pieces that are large enough to handle safely and do not have loose parts.
Some activities may also use large stamps or small painting rollers designed for children’s art.
Avoid sharp tools, fragile equipment, and tiny detachable pieces.
For younger children, introduce one tool at a time.
This helps them understand how each tool works without feeling overwhelmed.
Paint Trays and Protective Table Covers
Shallow paint trays can help children access small amounts of paint.
Choose stable containers that are unlikely to tip over easily.
Separate colors into different sections when possible.
A protective table cover or washable mat can reduce cleanup after the activity.
Place the paper in the center of the workspace and keep paint containers within comfortable reach.
Avoid overcrowding the table with unnecessary supplies.
A simple, organized painting station is often easier for children to use.
Aprons, Wipes, and Cleanup Materials
Painting can become messy, especially when children are experimenting with new techniques.
Provide suitable aprons or clothing that can tolerate washable paint.
Keep clean cloths, paper towels, and other appropriate cleanup materials nearby.
Make sure children have access to suitable handwashing facilities.
Prepare a separate area where wet paintings can dry without being touched.
Check the paint manufacturer’s cleaning instructions before using products on clothing or furniture.
Being prepared for cleanup allows children to explore more comfortably.
Optional Materials for Printing and Textures
Different materials can create interesting paint textures.
For example, large sponge shapes can make soft circular prints.
Clean, broad leaves from known safe plants can be used for nature printing.
A large intact sheet of bubble wrap can create a dotted pattern when handled by an adult with close supervision.
Other options include suitable painting rollers and adult prepared stamps.
Avoid small objects that could create choking hazards, along with materials that may break into small pieces.
Only introduce optional tools when they are appropriate for the child’s abilities and the planned activity.
How to Choose Painting Activities for Different Preschool Ages
Preschool children have different interests, abilities, and levels of experience with art materials.
A painting activity that feels simple for one child may be challenging for another.
Choose activities based on the child’s comfort with the materials rather than relying only on age.
The following suggestions are general guidelines.
Adult supervision remains important throughout the painting process.
Painting Activities for 3 Year Olds
Many 3 year olds enjoy activities involving broad movements, bright colors, and simple tools.
Finger painting with suitable washable paint can be an option when the child can participate safely under close supervision.
Large brushes and sponge printing are also useful choices.
For example, children can press a large sponge onto paper to make colorful circular marks.
They may also enjoy making wide brush strokes across a large sheet.
Avoid complicated pictures that require precise shapes or detailed drawing.
Provide one or two paint colors at first to keep the activity manageable.
Painting Activities for 4 Year Olds
Many 4 year olds enjoy experimenting with different painting tools and color combinations.
Simple sponge printing, leaf printing, and watercolor mixing can provide interesting experiences.
Children may also be ready to make basic patterns using dots, circles, and lines.
For example, they can use a large sponge to create flower heads and a brush to add green stems.
Offer assistance when a technique requires more control.
Encourage children to explore how different colors and tools change their artwork.
Painting Activities for 5 Year Olds
Some 5 year olds enjoy slightly more structured painting projects.
They may be interested in making simple landscapes, using large stamps, or painting pictures with several steps.
Activities such as tape resist painting, broad rainbow brush strokes, and simple animal prints can be enjoyable.
Children may also experiment with layering colors after earlier paint marks have dried.
Demonstrate one step at a time and allow children to personalize their designs.
Avoid expecting realistic drawings or perfect patterns.
Follow Each Child’s Abilities and Interests
Age recommendations should not be treated as strict rules.
Some younger children may enjoy detailed painting, while older preschoolers may prefer exploring colors freely.
Observe how comfortably the child handles brushes, sponges, and other tools.
If a project becomes difficult, simplify it.
For example, use larger sponge shapes, reduce the number of colors, or prepare materials in advance.
Let children take breaks when needed.
The goal is to make painting enjoyable, safe, and suitable for each individual child.
How to Make a Simple Sponge Painted Flower Garden Step by Step
A sponge painted flower garden is one of the easiest painting activities for preschoolers because it uses simple printing movements instead of detailed drawing.
Children can press large sponges onto paper to create colorful flower heads, then use a brush to add green stems and leaves.
The finished painting can include several flowers in different colors, along with grass, a sun, or other simple garden details.
This activity is suitable for children who can handle large sponge tools with appropriate adult supervision.
Younger preschoolers may need help positioning the sponges or painting the stems.
The project encourages children to explore colors, shapes, and textures while creating a cheerful garden picture.
Step 1: Prepare the Painting Area
Choose a stable table with enough space for the activity.
Cover the surface with a washable mat or suitable protective material.
Provide an apron or clothing that can tolerate paint.
Place a clean cloth and appropriate cleanup supplies nearby.
Make sure the child can sit comfortably and reach the painting materials.
Keep unnecessary objects away from the work area.
Prepare a separate space where the completed painting can dry safely.
A clean and organized setup makes the activity easier to manage.
Step 2: Gather Washable Paint and Sponge Tools
Choose washable paint specifically intended for preschool art activities.
Prepare yellow, pink, blue, and green paint.
You can use two flower colors instead of three if the child prefers a simpler activity.
Select large soft sponge shapes that are easy to grip and do not have loose parts.
Round sponge surfaces are useful for creating simple flower heads.
You will also need a comfortable paintbrush for the stems and leaves.
Place small amounts of paint into shallow trays.
Avoid filling the trays with more paint than necessary.
Step 3: Place Thick White Paper on the Table
Choose a sturdy sheet of white painting paper.
Place it flat in the center of the protected workspace.
If the paper moves too easily, an adult can secure the corners using suitable removable tape.
Make sure the tape will not damage the paper when removed.
Leave enough space around the sheet for paint trays and brushes.
Explain that the paper will become a colorful flower garden.
Children can decide where the flowers will appear.
There is no need to draw detailed outlines before starting.
Step 4: Choose Colors for the Flower Garden
Let the child select two or three colors for the flower heads.
For example, pink, yellow, and blue can create a bright garden picture.
You can also use orange, purple, or another suitable paint color.
Explain that each sponge print will become part of a flower.
Children may choose to make all the flowers the same color or use different colors.
Keep green paint separate for the stems and leaves.
Avoid introducing too many colors at once.
A small selection is often easier for beginners to explore.
Step 5: Dip a Sponge Lightly into Paint
Take one large sponge and demonstrate how to use it.
Gently press the sponge onto a small amount of washable paint in the tray.
The surface should collect enough paint to make a visible print without becoming completely saturated.
If the sponge collects too much paint, an adult can help remove the excess using a suitable method.
Show the child how to lift the sponge carefully.
Keep the paint tray close to the paper so the sponge does not need to travel far.
Encourage gentle movements rather than squeezing the sponge tightly.
Step 6: Press the Sponge to Make Flower Heads
Choose a position near the upper half of the paper.
Press the painted sponge gently onto the surface.
Lift it straight up to reveal a colorful print.
Repeat the process in another area to create a second flower head.
Children can use different colors for additional flowers.
Leave enough space beneath each flower for a green stem.
The prints do not need to be perfectly round.
Some may appear slightly uneven or textured.
These natural differences are part of sponge painting.
How to Avoid Blurry Sponge Prints
A sponge containing too much paint may leave a large wet patch instead of a recognizable shape.
Use a small amount of paint and press gently.
Avoid sliding the sponge across the paper when making a print.
Lift it upward after each impression.
If the child wants to make another flower, move to a clean section of the paper.
You can demonstrate the technique on a spare sheet before beginning the main picture.
Remember that uneven prints are normal, especially when young children are learning.
Step 7: Add Green Flower Stems
Once the flower heads are finished, take a comfortable paintbrush.
Dip the brush lightly into green washable paint.
Show the child how to make a simple line beneath one flower.
Move the brush downward toward the lower part of the paper.
Repeat beneath the other flower heads.
The stems can be straight, slightly curved, or different lengths.
Allow children to decide how tall their flowers should look.
If a child finds it difficult to draw a continuous line, they can make several connected short strokes.
Step 8: Paint Leaves Along the Stems
Use the same green paint to add leaves.
Demonstrate how a short sideways brush stroke can create a simple leaf shape.
Place one or two leaves beside each flower stem.
Children can also use gentle dabbing movements to make small green marks.
There is no need to paint detailed leaf outlines.
Encourage children to experiment with the direction and shape of their brush strokes.
Some flowers may have one leaf, while others have several.
The garden can look natural and colorful without being perfectly symmetrical.
Step 9: Add Extra Colors and Simple Garden Details
Once the main flowers are complete, children can add a few additional details.
Use a broad brush to paint short green strokes along the bottom of the paper for grass.
A yellow circular brush mark near the upper corner can represent the sun.
Children may also add small colored dots around the flowers.
Keep the extra details simple so the flower prints remain visible.
If the paint is still very wet, avoid brushing repeatedly over the same areas.
Allow children to stop whenever they feel their artwork is complete.
Step 10: Let the Painting Dry and Display It

Place the finished flower garden painting in a clean, protected drying area.
Keep the artwork flat and away from children who might accidentally touch the wet paint.
Allow it to dry according to the paint manufacturer’s instructions.
Wash painting tools and clean the work area using appropriate methods.
Once the artwork is dry, children can display it on a classroom board or at home using a suitable mounting method.
You can also store the finished painting in a folder to help protect it from bending.
Encourage the child to describe the colors and flowers they created.
The completed sponge painted flower garden will feature colorful textured flower heads, simple green stems, and creative details made using basic preschool painting techniques.
15 Fun and Simple Painting Activities for Preschoolers
Painting is one of the most enjoyable ways for preschool children to explore colors, shapes, and different textures. With washable paint and a few simple tools, children can create colorful pictures without needing advanced artistic skills.
These simple painting activities for preschoolers are designed for parents, teachers, and caregivers who want creative projects that are easy to prepare and suitable for young children.
The following activities introduce different painting methods, including finger painting, cotton swab dots, watercolors, handprints, texture printing, and painting with everyday objects.
Each activity includes materials, suggested ages, simple instructions, and a practical tip.
The age ranges are general suggestions. Adults should choose activities based on each child’s abilities, supervise the use of materials, and follow product safety instructions.
1. Easy Finger Painting with Washable Paint
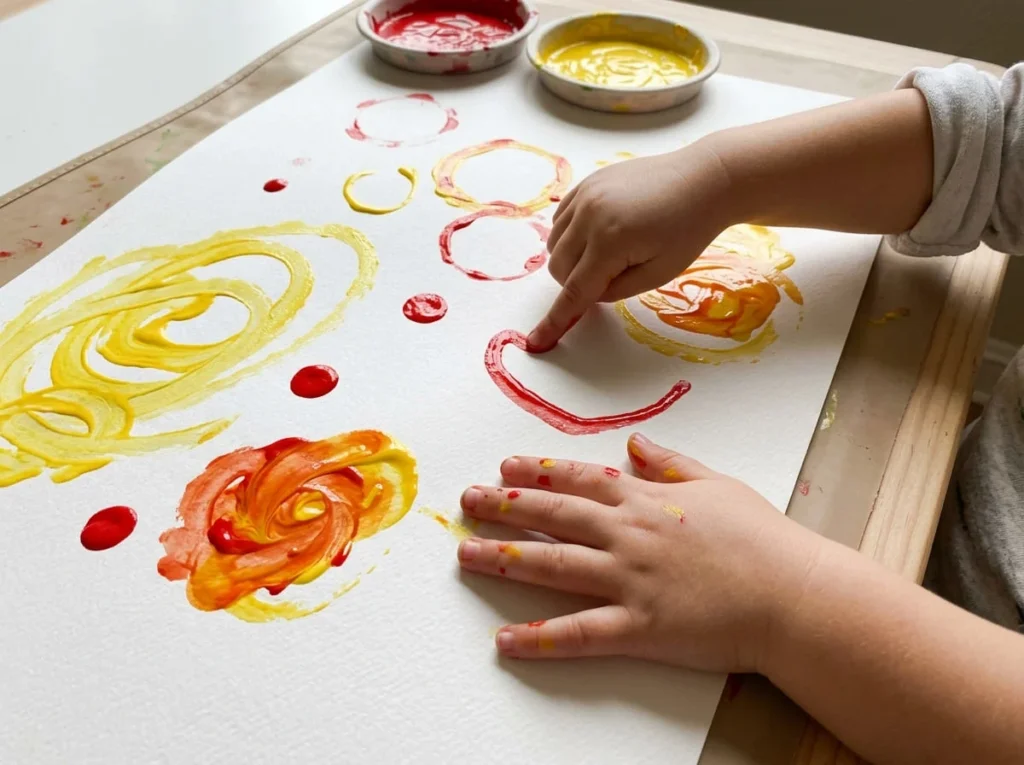
Materials: Washable finger paint suitable for preschool children, thick white paper, protective table mat, and cleaning supplies.
Suggested ages: 3 to 5 years with close adult supervision.
Finger painting is a simple activity that allows preschoolers to explore colors and textures using their hands.
Children can create circles, lines, dots, and swirling patterns by moving their fingers across paper.
There is no need to draw specific objects or follow complicated instructions.
The main purpose is to let children experiment with color and movement while enjoying the painting process.
How to Make a Colorful Finger Painting
- Cover the painting table with a washable protective mat.
- Place a large sheet of thick white paper in front of the child.
- Choose two colors of washable finger paint intended for the child’s age.
- Put a small amount of each color onto a suitable paint tray.
- Show the child how to touch a little paint with one finger.
- Encourage them to make colorful dots on the paper.
- Demonstrate drawing simple lines and circles using a fingertip.
- Allow the child to experiment with larger swirls and curved marks.
- Introduce another color if the child wants to explore color mixing.
- Place the finished artwork somewhere safe to dry and help the child wash their hands.
Children can create colorful abstract pictures without needing a particular design.
Some may enjoy making long lines, while others prefer dots and circular patterns.
You can also ask children what they notice when two colors meet.
Beginner tip: Offer only a small amount of paint at first. Make sure children understand that paint is not food, and keep their hands away from their mouths during the activity.
2. Cotton Swab Dot Painting
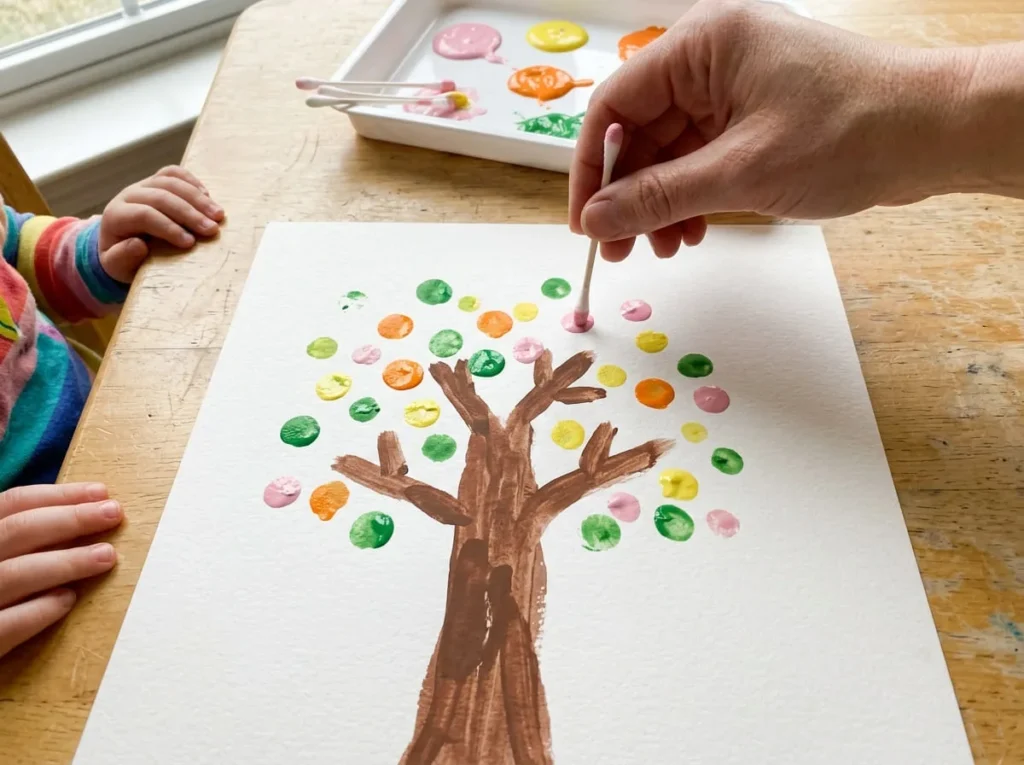
Materials: Washable tempera paint, cotton swabs suitable for supervised use, thick paper, and a shallow paint tray.
Suggested ages: 4 to 5 years with direct adult supervision.
Cotton swab painting is an easy way to introduce preschoolers to making small dots and repeated patterns.
Instead of using an ordinary paintbrush, children gently touch a paint covered cotton tip to the paper.
For this activity, children can create a colorful tree filled with painted dots.
The trunk and branches can be prepared by an adult or painted using a larger brush.
How to Make a Painting with Colorful Dots
- Choose a sturdy white sheet of painting paper.
- Draw or paint a simple tree trunk with several broad branches.
- Allow the trunk to dry if needed.
- Place small amounts of yellow, green, orange, and pink washable paint in separate trays.
- Give the child one suitable cotton swab under direct supervision.
- Show them how to touch the cotton tip lightly to the paint.
- Demonstrate pressing the tip onto the paper to create one dot.
- Encourage the child to add dots around the tree branches.
- Change colors to create a bright tree canopy.
- Allow the painting to dry before displaying it.
Children can make spring trees with pink flowers or autumn trees with orange and yellow leaves.
They may also use dots to create simple flowers or colorful abstract patterns.
Avoid expecting every dot to be the same shape or distance apart.
Beginner tip: Start with two or three paint colors. Check cotton swabs for loose tips and replace them if damaged. A larger dot painting tool is a better choice for children who may put small objects in their mouths.
3. Easy Watercolor Color Mixing
Materials: Child appropriate washable watercolor paints, watercolor paper, soft paintbrush, clean water, and protective table cover.
Suggested ages: 4 to 5 years with adult supervision.
Watercolor painting allows preschoolers to explore how colors spread and blend when mixed with water.
Children can paint broad areas using two colors and observe what happens when the wet sections touch.
This activity is more about discovering color combinations than creating a finished picture.
Using only two colors at first helps keep the process simple.
How to Mix Colors with Watercolor Paint
- Cover the table with a protective mat.
- Place a sheet of watercolor paper on the table.
- Prepare washable watercolor paints suitable for preschool children.
- Choose two colors, such as yellow and blue.
- Give the child a soft brush and a small stable container of clean water.
- Show how to moisten the brush and collect a little paint.
- Paint a broad yellow area on one side of the paper.
- Rinse the brush and paint a blue area next to the yellow section.
- Allow the wet colors to touch and observe how they blend.
- Leave the painting flat until it dries.
Children may notice green areas appearing where yellow and blue overlap.
Try another suitable color combination during a separate painting session.
Allow children to describe the changes they see.
Beginner tip: Begin with only two colors and a small amount of water. Too much water can make thin paper wrinkle and may cause paint to spread beyond the intended area.
4. Handprint Flower Painting
Materials: Washable paint specifically suitable for children’s hand painting, thick paper, soft sponge or brush, and handwashing supplies.
Suggested ages: 3 to 5 years with close adult assistance.
Handprint flower painting is a colorful activity that allows children to use the shape of their hands as part of an artwork.
For this project, a painted handprint becomes a large flower head.
Children can then add a green stem and leaves using a suitable brush.
Every handprint will look slightly different, making the finished pictures personal.
How to Make a Handprint Flower
- Prepare a protected painting table and a large sheet of thick white paper.
- Choose washable paint intended for children’s skin contact during finger or hand painting.
- Place a small amount of paint in a shallow tray.
- Help the child spread their fingers comfortably.
- Use a soft sponge or suitable brush to apply a thin layer of paint to the palm and fingers.
- Guide the child in pressing their painted hand gently onto the paper.
- Lift the hand carefully to reveal the print.
- Help the child wash their hands using appropriate cleaning methods.
- Use green washable paint and a brush to add a stem and leaves beneath the handprint.
- Allow the finished flower painting to dry completely.
Children can use yellow, pink, orange, or purple paint for their flowers.
You can also make two handprint flowers on one sheet if there is enough space.
Avoid pressing too hard because the paint may spread and blur the hand shape.
Beginner tip: Prepare washing supplies before starting. Do not use ordinary household paint or craft paint that is not suitable for this type of skin contact.
5. Bubble Wrap Texture Painting
Materials: Large intact sheet of clean bubble wrap, washable tempera paint, thick paper, paintbrush, and protective table cover.
Suggested ages: 4 to 5 years with direct adult supervision.
Bubble wrap can create interesting circular patterns when used as a printing surface.
The raised bubbles collect paint and transfer a repeated dotted texture onto paper.
This activity introduces preschoolers to printing with different surfaces.
Because bubble wrap can tear and release small plastic pieces, an adult should control the material throughout the activity.
Use only a large intact sheet and discontinue the activity if it becomes damaged.
How to Make Bubble Wrap Paint Prints
- Cover the worktable with a protective mat.
- Place thick white painting paper in the center.
- Choose one large intact piece of clean bubble wrap.
- Check that the plastic is not torn or damaged.
- Secure the bubble wrap on a stable surface so it does not slide.
- Use a brush to apply a thin layer of washable paint to the raised bubble surface.
- With adult help, place the painted surface gently onto the paper.
- Press lightly across the back without popping or tearing the bubbles.
- Lift the bubble wrap carefully to reveal the dotted pattern.
- Repeat with another color if desired, then remove the plastic from the children’s work area.
The finished picture may show rows of colorful circles and interesting overlapping textures.
Children can use blue and green paint to create a simple abstract background.
Beginner tip: Apply only a thin layer of paint and use the material under direct adult control. If bubble wrap is unsuitable for the group, replace it with a large reusable sponge stamp.
6. Leaf Printing with Washable Paint
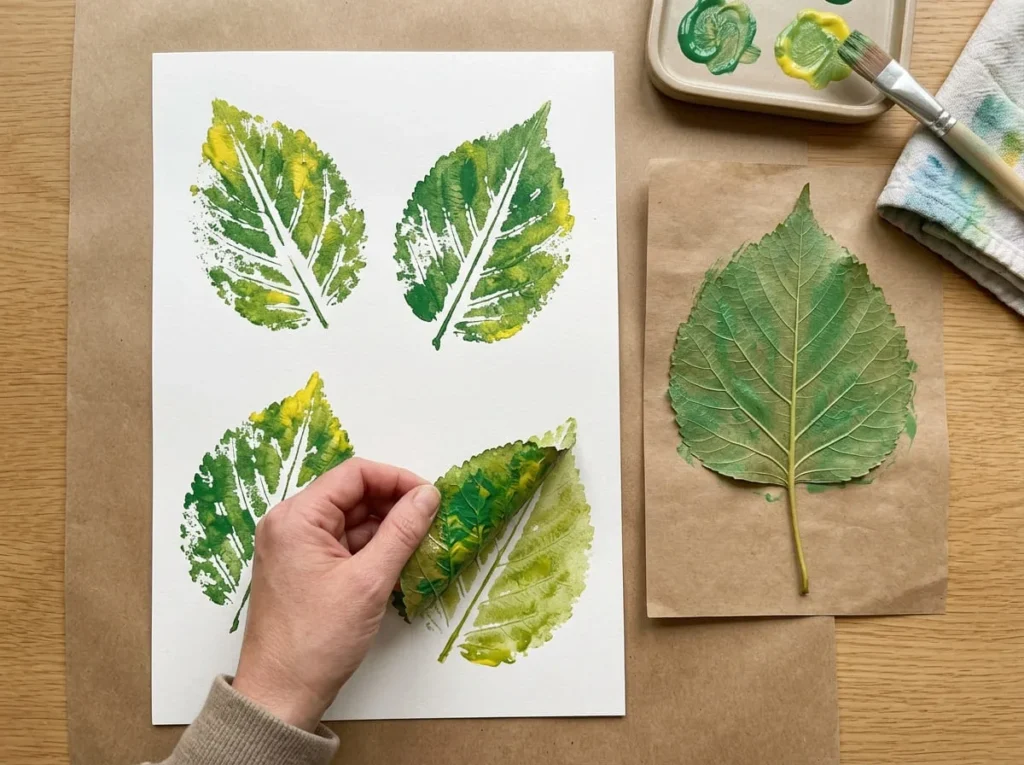
Materials: Large clean leaves from known safe plants, washable paint, thick paper, soft brush, and shallow paint tray.
Suggested ages: 4 to 5 years with adult supervision.
Leaf printing is a simple nature inspired painting activity that helps preschoolers explore shapes and textures found outdoors.
A leaf can leave an interesting pattern when paint is applied to its surface and transferred onto paper.
Children may notice that different leaves produce different shapes.
For this activity, choose broad leaves that are clean, undamaged, and known to be safe to handle.
Avoid thorny plants, irritating sap, and unidentified leaves.
How to Make Painted Leaf Prints
- Gather several large leaves from plants known to be safe.
- Check that the leaves are clean and free from insects or sharp sections.
- Place a sheet of thick white paper on a protected table.
- Choose two colors of washable paint.
- Put one leaf on a separate protected surface with its textured underside facing upward.
- Use a soft brush to apply a thin layer of paint to the leaf.
- Carefully place the painted side against the white paper.
- Press gently across the leaf with adult assistance.
- Lift the leaf slowly to reveal the printed shape.
- Repeat with another leaf or color, then allow the painting to dry.
Children can arrange several leaf prints to create a colorful nature picture.
They may also compare the shapes produced by broad and narrow leaves.
Encourage them to observe the patterns without expecting every leaf print to be perfectly clear.
Beginner tip: Broad, sturdy leaves are easier to handle than small or delicate ones. Avoid plants that may cause skin irritation.
7. Ice Painting with Colored Water
Materials: Large adult prepared ice painting tools with secure handles, coloring materials suitable for the activity, sturdy painting paper, shallow tray, and cleanup supplies.
Suggested ages: 4 to 5 years with close adult supervision.
Ice painting introduces preschoolers to a different way of making colorful marks.
As the ice begins to melt, it leaves watery color trails across paper.
Children can observe how the marks change as the ice becomes smaller and the colors spread.
This activity requires careful preparation because ice can become slippery, cold, and difficult to handle.
It should only be offered when an adult can provide continuous supervision and suitable painting tools.
How to Paint with Melting Ice
- Prepare the activity in advance using coloring materials intended for children’s art.
- Freeze the colored water in a suitable large mold with a securely attached handle designed for supervised use.
- Check the frozen painting tool before giving it to the child.
- Cover the table with a waterproof protective mat.
- Place sturdy paper inside a shallow tray to collect melting water.
- Give the child one large handled ice painting tool.
- Demonstrate moving the colored ice gently across the paper.
- Encourage the child to create short lines and broad colored marks.
- Stop the activity if the ice becomes too small, the handle loosens, or the child becomes uncomfortable with the cold.
- Remove the remaining ice, clean the workspace, and allow the picture to dry.
Children may enjoy watching the watery colors spread and blend.
Use only a small selection of colors to avoid excessive wetness.
Make sure children do not place the ice or colored water in their mouths.
Beginner tip: Keep this activity brief and provide constant supervision. If safe handling cannot be ensured, choose sponge or brush painting instead.
8. Toy Car Track Painting
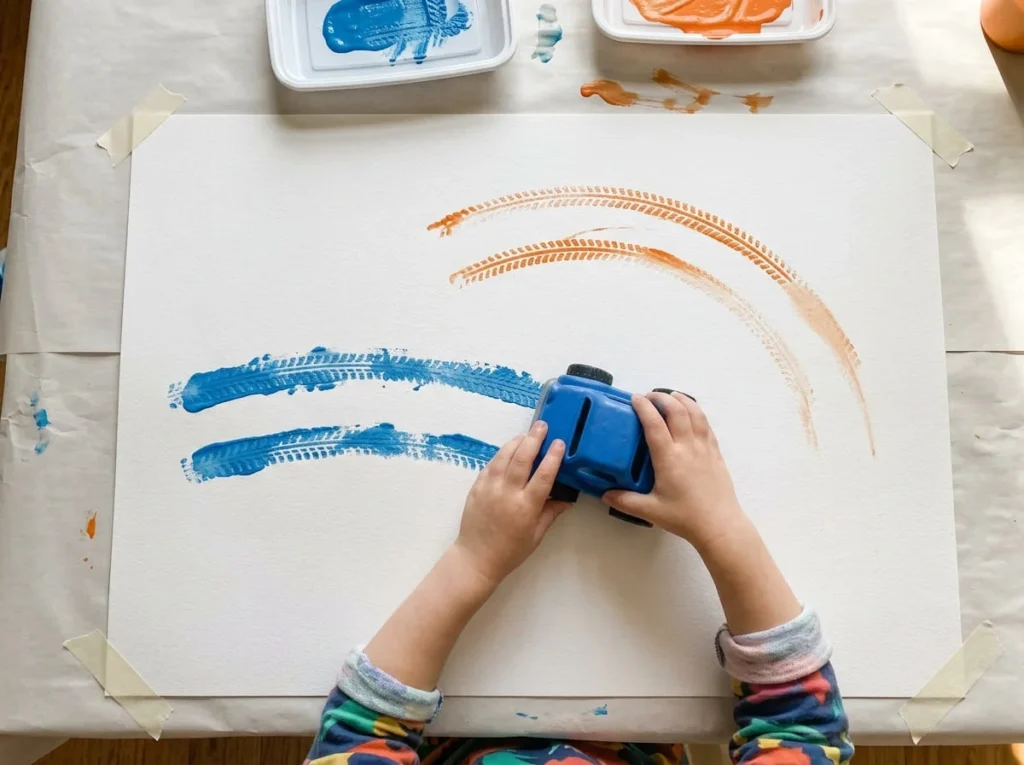
Materials: Large toy car with securely attached washable wheels, washable paint, thick paper, shallow paint tray, and protective mat.
Suggested ages: 4 to 5 years with adult supervision.
Toy car painting is a fun activity for preschoolers who enjoy vehicles and exploring movement.
Instead of using a paintbrush, children roll a suitable toy car through a small amount of washable paint and across paper.
The wheels leave colorful tracks that may form straight lines, curves, and overlapping patterns.
This activity combines simple painting with imaginative play.
Choose a sturdy toy without removable small parts and check that the wheels can be cleaned safely after the activity.
How to Make Paint Tracks with Toy Cars
- Cover the table with a washable protective mat.
- Place a large sheet of sturdy white paper in the center.
- Choose one large toy car with smooth, securely attached wheels.
- Check the car for loose parts or damaged edges.
- Pour a small amount of washable paint into a shallow tray.
- Gently roll the car wheels through the paint.
- Place the car onto one side of the paper.
- Encourage the child to push the car forward to create a painted track.
- Try gentle curves and different directions to make additional marks.
- Allow the artwork to dry and clean the toy according to its care instructions.
Children can experiment with two different colors and observe how the tracks overlap.
They may enjoy creating imaginary roads or racing paths with their painted lines.
Avoid using electronic toy cars or toys that cannot be washed safely.
Beginner tip: Use a small amount of paint so the wheels leave recognizable tracks. Choose a sturdy, easy to clean toy without detachable small pieces.
9. Simple Shape Stamp Painting
Materials: Large sponge stamps in circle, square, and triangle shapes, washable tempera paint, thick white paper, and shallow paint trays.
Suggested ages: 3 to 5 years with adult supervision.
Shape stamp painting is an enjoyable activity that introduces preschoolers to basic shapes through colorful prints.
Instead of drawing circles or triangles with a brush, children can press large sponge stamps onto paper to create repeated patterns.
This activity allows children to explore shapes, colors, and different arrangements without needing detailed painting skills.
Parents and teachers can prepare large stamps before the activity begins or use suitable stamps designed for preschool art.
How to Paint with Simple Shape Stamps
- Cover the table with a washable protective mat.
- Place a large sheet of thick white paper in front of the child.
- Choose two large sponge stamps, such as a circle and a triangle.
- Prepare small amounts of washable paint in separate shallow trays.
- Show the child how to press one stamp gently into the paint.
- Lift the stamp and place it onto the paper.
- Press lightly to create a clear shape.
- Repeat the process in different areas of the paper.
- Introduce another color or shape when the child is ready.
- Allow the finished painting to dry before displaying it.
Children can create rows of colorful circles, groups of triangles, or their own abstract patterns.
Some children may enjoy arranging the shapes into simple pictures.
For example, a large circle and several triangles can become an imaginary sun.
Beginner tip: Start with two large stamp shapes and a small selection of colors. Large stamps are easier for young children to handle and reduce the need for complicated movements.
10. Painting with a Small Roller
Materials: Child appropriate mini paint roller, washable tempera paint, thick paper, shallow paint tray, and protective table cover.
Suggested ages: 4 to 5 years with adult supervision.
Roller painting allows preschoolers to create broad bands of color using a simple rolling movement.
Unlike ordinary paintbrushes, rollers cover larger areas of paper with relatively little effort.
Children can experiment with moving the roller up, down, or across the paper to make colorful patterns.
This is a useful activity for introducing different painting tools.
How to Make a Roller Painting
- Cover the worktable with a protective mat.
- Place a large sheet of thick painting paper on the table.
- Choose a small paint roller suitable for children’s art activities.
- Pour a little washable paint into a shallow tray.
- Demonstrate how to roll the tool gently through the paint.
- Remove excessive paint using the tray’s appropriate surface.
- Place the roller near one edge of the paper.
- Move it slowly across the paper to create a broad colored band.
- Repeat the movement using another color if desired.
- Allow the finished artwork to dry before displaying it.
Children can create colorful stripes by rolling different colors across the paper.
They may also experiment with overlapping bands to observe how the colors change.
Encourage them to use gentle movements rather than pressing the roller too firmly.
Beginner tip: Use a shallow paint tray and a small amount of paint. Too much paint may create large wet patches and cause the paper to wrinkle.
11. Tape Resist Painting for Preschoolers
Materials: Thick white paper, suitable removable painter’s tape, washable paint, large sponge, and protective table cover.
Suggested ages: 4 to 5 years with adult assistance.
Tape resist painting is a simple way to create interesting patterns using paint and removable tape.
Before painting begins, an adult places strips of suitable tape onto the paper.
Children then paint over the paper using their favorite colors.
When the tape is removed carefully, the covered sections reveal clean lines or shapes.
This activity can introduce preschoolers to patterns and negative space without complicated drawing.
How to Make a Simple Tape Resist Painting
- Place a sturdy sheet of white paper on a protected worktable.
- Choose removable painter’s tape suitable for the paper surface.
- Have an adult attach three or four strips of tape across the paper.
- Arrange the strips to create large triangles or simple geometric sections.
- Prepare two or three colors of washable paint.
- Give the child a large sponge or comfortable paintbrush.
- Encourage them to paint across the paper, including over the tape.
- Allow the paint to dry as required.
- Have an adult remove the tape carefully according to the tape and paper instructions.
- Display the finished picture with its colorful sections and uncovered lines.
Children can choose different colors for each section.
For example, they might paint one area yellow, another blue, and another pink.
The uncovered lines will separate the colors and create a simple geometric design.
Beginner tip: Use a few broad tape strips rather than complicated patterns. Simple arrangements are easier to prepare and help the finished design remain clear.
12. Folded Paper Paint Prints
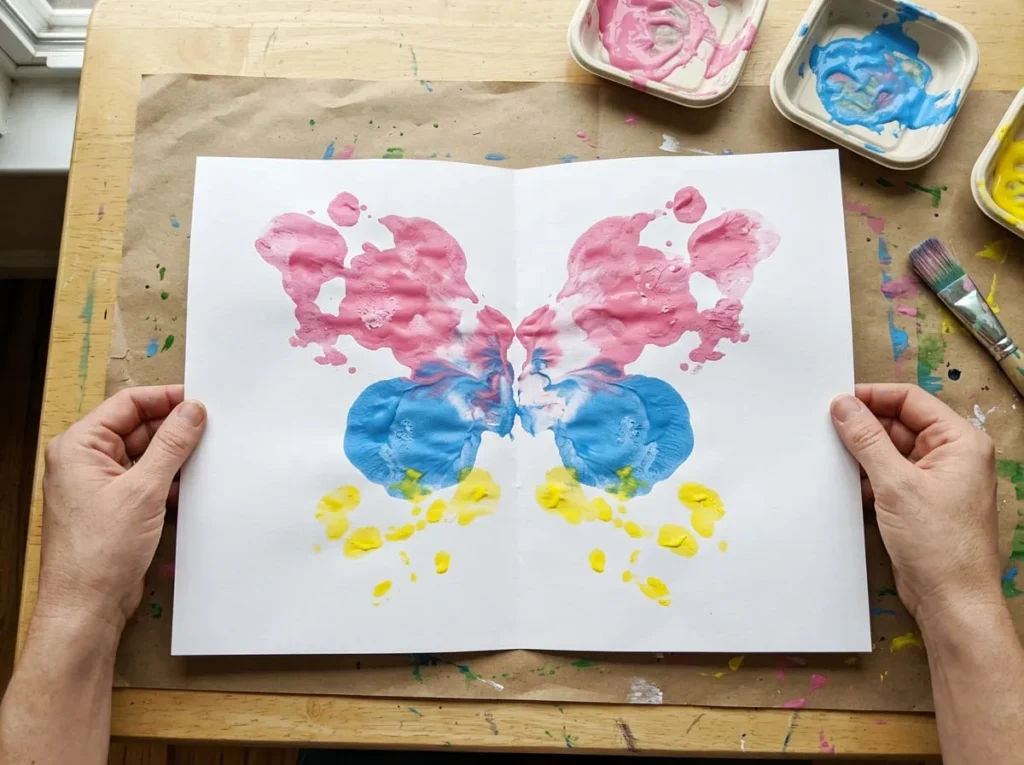
Materials: Thick white paper, washable tempera paint, soft paintbrush or sponge, and protective table mat.
Suggested ages: 3 to 5 years with adult assistance.
Folded paper paint printing is a creative activity that allows preschoolers to discover symmetrical patterns.
Children place small amounts of paint on one side of a folded sheet.
When the paper is closed and pressed gently, the paint transfers to the opposite side.
Opening the paper reveals a colorful mirrored design.
The finished artwork may resemble butterfly wings, flowers, or interesting abstract shapes.
How to Make a Symmetrical Paint Print
- Cover the painting table with a protective mat.
- Choose a sheet of sturdy white paper.
- Fold the paper in half and press along the center crease.
- Open the paper and place it flat on the table.
- Choose two or three colors of washable paint.
- Add a few small paint marks to one side of the paper using a brush or sponge.
- Fold the paper closed along the original crease.
- Press gently across the folded surface with adult assistance.
- Open the paper carefully to reveal the mirrored paint pattern.
- Place the artwork flat in a suitable drying area.
Children may enjoy watching the colors spread into unexpected shapes.
You can ask them what the finished print reminds them of.
One child may see a butterfly, while another imagines a colorful flower.
There is no need to turn every print into a recognizable picture.
Beginner tip: Use small amounts of paint. Excessive paint can saturate the paper and make the design difficult to see.
13. Nature Inspired Painting with Leaves and Stems
Materials: Large safe leaves for observation, washable paint, thick paper, soft paintbrushes, and shallow paint trays.
Suggested ages: 4 to 5 years with adult supervision.
Nature inspired painting gives preschoolers an opportunity to observe simple shapes and colors found outdoors.
Instead of printing directly with leaves, children look at natural materials and create their own painted versions.
They can use broad brush strokes to represent leaves, stems, and other plant shapes.
This activity encourages children to notice different shades of green and variations in natural forms.
Choose clean leaves from plants known to be safe to handle.
How to Paint a Simple Nature Picture
- Prepare a protected painting area.
- Place a sheet of thick white paper on the table.
- Show children one or two large leaves from known safe plants.
- Encourage them to observe the shape and color of each leaf.
- Prepare green, yellow, and brown washable paint.
- Demonstrate painting a simple brown or green stem using a brush.
- Show how broad sideways brush strokes can represent leaves.
- Let children paint several leaves around the stem.
- Encourage them to add grass or other simple nature details.
- Allow the finished painting to dry before displaying it.
Children can use light and dark green paint to create different leaf shapes.
They may also add colorful flowers or imaginary plants.
Avoid expecting the painted leaves to match real ones perfectly.
Beginner tip: Encourage children to observe the natural materials without requiring realistic drawings. Simple brush marks are enough to create an interesting nature picture.
14. Rainbow Brush Stroke Painting
Materials: Washable tempera paint, thick white paper, broad paintbrushes, shallow paint trays, and protective mat.
Suggested ages: 3 to 5 years with adult supervision.
Rainbow brush stroke painting is a colorful activity that uses simple curved movements.
Children can create a rainbow by making several broad brush strokes in different colors.
This project is suitable for preschoolers because it does not require detailed drawing or complicated materials.
The finished rainbow can include a few simple clouds or a painted sun.
How to Paint a Colorful Rainbow
- Cover the table with a protective mat.
- Place a large sheet of thick white painting paper on the table.
- Prepare washable paint in several bright colors.
- Choose a broad brush that the child can hold comfortably.
- Demonstrate making one curved brush stroke across the paper.
- Let the child paint a large red or another favorite colored curve.
- Clean the brush or provide another suitable brush.
- Paint a second curved line beneath the first.
- Continue adding colors until the child is happy with the rainbow.
- Allow the painting to dry before displaying it.
Children can add simple clouds or a sun if they want to create a complete weather picture.
The rainbow does not need perfectly spaced colors or identical curves.
Some children may prefer straight colorful lines instead.
Allow them to experiment and enjoy the painting process.
Beginner tip: Let children choose their own color order. The main goal is to explore broad brush movements and colorful patterns rather than create a perfect rainbow.
15. Simple Sponge Painted Animal Picture
Materials: Large sponge shapes, washable tempera paint, thick paper, soft paintbrush, and shallow paint tray.
Suggested ages: 4 to 5 years with adult assistance.
Sponge painting can also be used to create simple animal pictures.
For this activity, children will make a friendly bear face using large circular sponge prints.
The bear’s head and ears can be created using the same basic printing technique.
A brush can then be used to add eyes, a nose, and a smiling mouth.
This project is a simple introduction to creating recognizable pictures with painted shapes.
How to Paint an Easy Sponge Animal
- Cover the painting table with a protective mat.
- Place a sheet of thick white paper on the table.
- Prepare washable brown or another suitable paint color.
- Choose one large round sponge stamp for the bear’s head.
- Dip the sponge lightly into the paint.
- Press it gently onto the paper to create a large circular head.
- Use a smaller suitable sponge stamp to add two rounded ears near the top.
- Allow the prints to dry sufficiently before adding facial details.
- Use a soft brush to paint simple eyes, a nose, and a smiling mouth.
- Allow the completed bear picture to dry before displaying it.
Children can create bears in brown, yellow, or imaginative colors.
They can also add a painted background with grass or simple flowers.
The face does not need perfectly shaped circles.
Beginner tip: Start with a simple round animal face rather than a full animal body. Large sponge impressions are easier for preschoolers to control.
How to Make Preschool Painting Activities Fun and Engaging
Painting activities are often more enjoyable when children have freedom to explore materials and make creative choices.
A relaxed environment, simple instructions, and suitable supplies can help preschoolers participate comfortably.
Let Children Explore Colors Freely
Allow children to choose the colors they want to use.
A flower does not need to be pink, and a bear does not need to be brown.
Children may enjoy creating purple suns, blue leaves, or orange rainbows.
These choices are part of their creative expression.
You can introduce basic color names while allowing children to experiment with different combinations.
Demonstrate One Painting Step at a Time
Preschoolers may find long instructions difficult to follow.
Demonstrate one simple action before introducing the next.
For example, show how to press a sponge into paint and then onto paper.
Let children try the movement themselves.
Provide assistance when necessary, but avoid completing the entire painting for them.
Focus on Creativity Instead of Perfect Pictures
Children’s paintings do not need to look identical.
Some may use bright colors, while others prefer softer shades.
Paint may spread, shapes may overlap, and brush strokes may appear uneven.
These results are normal during creative exploration.
Encourage children to enjoy experimenting rather than worrying about making mistakes.
Encourage Different Painting Tools and Textures
Introduce different suitable painting tools over time.
Children can explore broad brushes, large sponge stamps, and simple rollers.
Each tool creates different marks.
For example, a sponge leaves textured impressions, while a roller creates broad bands of color.
Offer one new tool at a time so children can become comfortable using it.
Display Children’s Artwork with Appreciation
Displaying finished paintings can show children that their creative efforts are valued.
You can place dry artwork on a classroom display board or keep it in a folder at home.
Ask children to describe their pictures if they want to share their ideas.
Avoid comparing paintings or ranking them by appearance.
Every child may approach the same activity differently.
Easy Preschool Painting Activities for Home and Classroom
Preschool painting activities can be adapted to different environments.
Some projects are suitable for quiet afternoons at home, while others work well with small classroom groups.
Choose activities according to the number of children, available materials, and cleanup space.
Simple Painting Ideas for Rainy Days at Home
Rainy afternoons are a good opportunity for indoor creative activities.
Sponge painting, finger painting, and broad rainbow brush strokes can be prepared with basic supplies.
Choose one activity that does not require complicated preparation.
Cover the worktable and keep cleaning materials nearby.
Allow children to explore at a comfortable pace.
Painting Activities for Preschool Classrooms
Preschool classrooms can use painting activities to introduce colors, shapes, and textures.
Large sponge stamps, simple rollers, and washable brush painting are practical options.
Teachers can prepare paint trays before children begin.
Offer enough space for each child to work comfortably.
Choose activities that can be adapted for different abilities.
Group Painting Activities for Young Children
Group painting can encourage children to explore materials together.
For example, several children can create individual flower gardens using shared paint colors.
Another option is a large group mural where children contribute simple brush strokes or sponge prints.
Provide appropriate supervision and avoid overcrowding the painting area.
Allow children to work independently on their own sections.
How to Set Up a Small Painting Station
Choose a stable table with a washable protective surface.
Place thick paper in the center and provide a few paint colors in shallow trays.
Arrange brushes or sponges where children can reach them safely.
Keep cleaning cloths and suitable handwashing supplies nearby.
Prepare a separate drying area for wet artwork.
An organized setup helps make painting and cleanup easier.
Safety Tips for Painting with Preschoolers
Safety is an important part of planning painting activities for young children.
Preschoolers may explore materials in unexpected ways, so adults should supervise activities and choose suitable products.
Choose Paint Appropriate for Preschool Children
Use paint specifically intended for children’s art activities.
Check the manufacturer’s age recommendations, ingredients information where available, and directions.
Washable tempera paint and suitable finger paint are common options.
Remember that a nontoxic label does not mean a product is edible.
Do not allow children to taste or swallow paint.
Supervise Painting Tools and Materials
Choose brushes, sponges, and stamps that are suitable for each child’s abilities.
Avoid tools with sharp edges, fragile parts, or small detachable pieces.
Inspect materials before use.
If a sponge begins to tear or another tool becomes damaged, remove it from the activity.
Provide continuous supervision when children use unfamiliar materials.
Avoid Unsafe Household Paints and Chemicals
Do not substitute industrial paints, spray paints, solvents, or ordinary household coatings for products intended for preschool art.
Some paints contain ingredients unsuitable for young children.
Use only materials appropriate for the specific activity.
Follow product instructions for application and cleanup.
Protect Skin, Clothing, and Work Surfaces
Provide suitable aprons or clothing that can tolerate paint.
Cover tables with washable mats.
For finger and hand painting, choose products specifically suitable for that contact.
Be aware of known skin sensitivities.
If a child develops irritation, stop the activity and clean the affected area according to the product guidance.
Keep Paint and Small Items Away from Mouths
Young children may put objects into their mouths.
Avoid loose small items, detachable pieces, and materials that can break into choking hazards.
Remind children that paint and painting tools are not food.
Supervise the activity closely and help children wash their hands afterward.
Common Mistakes During Preschool Painting Activities
Preschool painting should be simple and enjoyable, but some common mistakes can make activities more difficult than necessary.
A few adjustments can improve the experience for both children and adults.
Giving Children Too Many Paint Colors at Once
Providing numerous colors can make it difficult for beginners to choose.
Start with two or three colors.
Introduce more options when children become comfortable with the activity.
This can also reduce unnecessary paint waste.
Using Paper That Becomes Wet Too Quickly
Thin paper may wrinkle or tear when children apply wet paint.
Choose sturdy paper suitable for the technique.
For watercolor activities, use appropriate painting paper when possible.
Avoid adding excessive water or paint.
Expecting Children to Paint Perfect Shapes
Preschoolers are still learning to control different art tools.
Their circles may be uneven, and their brush strokes may overlap.
These results are normal.
Encourage exploration instead of correcting every small detail.
Choosing Tools That Are Difficult to Hold
Tools that are too small, heavy, or complicated can make painting frustrating.
Choose comfortable brushes, large sponges, and suitable rollers.
Allow children to practice simple movements before trying more detailed techniques.
Not Preparing for Paint Spills and Cleanup
Painting can become messy when materials are not organized.
Cover tables before starting.
Use small paint quantities and stable trays.
Keep cloths and cleaning supplies nearby.
Prepare a safe drying area for finished artwork.
Rushing Children Through Their Artwork
Some children enjoy painting quickly, while others prefer taking more time.
Avoid forcing every child to finish at the same moment.
Provide enough time to explore colors and complete the activity comfortably.
Let children decide when their artwork feels finished.
Frequently Asked Questions
What Are the Easiest Painting Activities for Preschoolers?
Some of the easiest activities include finger painting, sponge printing, broad brush painting, shape stamping, and rainbow painting. These projects use simple movements and a small selection of materials.
What Can a 3 Year Old Paint?
Depending on their abilities, a 3 year old may enjoy making colorful finger marks, simple sponge prints, broad brush strokes, and large painted circles. Use suitable washable paint and provide close adult supervision.
What Painting Activities Are Good for 4 Year Olds?
Many 4 year olds enjoy sponge painting, leaf printing, simple color mixing, and broad stamp patterns. Choose activities that use comfortable tools and allow children to experiment with shapes and colors.
What Painting Activities Are Suitable for 5 Year Olds?
Some 5 year olds may enjoy tape resist painting, simple animal prints, watercolor mixing, and folded paper paint prints. Adults can demonstrate the steps and allow children to personalize their artwork.
What Paint Is Best for Preschoolers?
Washable paint specifically intended for children’s art activities is usually a practical choice. Select products suitable for the child’s age and the planned technique. Follow manufacturer instructions and remember that nontoxic does not mean edible.
Is Finger Painting Suitable for Preschool Children?
Finger painting can be suitable when the product is specifically intended for that type of use and the child can participate safely. Provide close supervision, avoid mouth contact, and prepare appropriate handwashing supplies.
Can Preschoolers Paint Without Brushes?
Yes. Children can use suitable large sponges, stamps, rollers, and supervised finger painting techniques. Each tool creates different patterns and offers opportunities to experiment with paint.
How Do You Introduce Painting to Preschoolers?
Begin with one simple tool, a sturdy sheet of paper, and two paint colors. Demonstrate how to make a mark and allow the child to explore. Keep instructions short and provide help when needed.
What Are Some Easy Preschool Painting Ideas at Home?
Sponge painted flowers, watercolor color mixing, finger painting, and rainbow brush strokes are simple options for home activities. Prepare a protected workspace and keep cleanup materials nearby.
How Do You Make Preschool Painting Less Messy?
Use small amounts of paint, stable shallow trays, and a washable table cover. Provide aprons and keep cleaning materials ready. Choose activities that suit the available workspace.
How Can Teachers Organize Painting Activities for Groups?
Teachers can prepare supplies in advance, provide separate painting spaces, and introduce one technique at a time. Small groups may be easier to supervise, particularly when unfamiliar tools are involved.
What Can Children Learn While Exploring Paint?
Painting provides opportunities to explore colors, shapes, textures, and different hand movements. Children can also practice making creative choices and describing their artwork. Individual experiences and abilities will vary.
How Long Should a Preschool Painting Activity Last?
There is no single ideal duration. Some children may enjoy painting for only a few minutes, while others prefer longer sessions. Consider the child’s interest, attention, and comfort rather than requiring a fixed amount of time.
How Do You Dry and Store Preschool Paintings?
Place wet artwork flat in a protected drying area and follow the paint manufacturer’s instructions. Once completely dry, paintings can be displayed or stored in folders. Avoid stacking wet sheets because they may stick together.
Final Thoughts
Simple painting activities for preschoolers offer an enjoyable way to explore colors, shapes, and creative ideas using everyday art materials.
From sponge painted flowers and finger painting to colorful stamps, nature pictures, and rainbow brush strokes, there are many activities suitable for home and classroom settings.
Start with washable paint, sturdy paper, and tools that children can handle comfortably.
Provide appropriate supervision and allow children to experiment at their own pace.
Remember that preschool painting is about enjoying the creative process rather than producing perfect pictures.
With simple preparation and a little imagination, painting can become a fun part of everyday learning and play.