
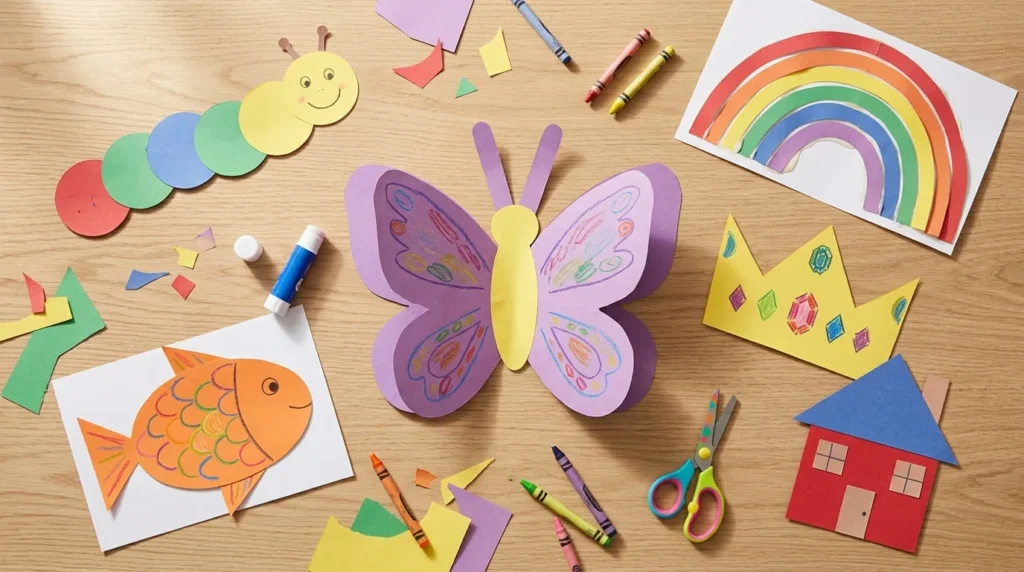
Easy paper crafts for kids are a fun and affordable way to keep children busy while encouraging creativity and imagination. With simple supplies such as colored paper, glue, crayons, and scissors, children can turn ordinary sheets of paper into colorful animals, butterflies, rainbows, and other exciting creations.
You do not need expensive craft supplies or complicated instructions to get started. Many paper projects are simple enough for young children to enjoy with a little help from parents, teachers, or caregivers.
Paper crafting also gives children opportunities to practice cutting, folding, coloring, and arranging shapes while exploring different creative ideas.
Whether you need an activity for a rainy afternoon, a classroom craft session, or a fun weekend project, paper crafts offer plenty of possibilities.
In this guide, you will discover 15 easy paper craft ideas, learn how to make a colorful paper butterfly step by step, and find helpful tips for choosing activities that suit different ages and abilities.
Why Are Paper Crafts Great Activities for Kids?
Paper crafts are enjoyable activities that allow children to explore colors, shapes, and different ways of making things.
A simple sheet of construction paper can become a colorful animal, a paper crown, or a creative picture.
Children can also work independently on suitable steps while adults provide help with cutting, gluing, or assembling more difficult parts.
Paper Crafts Encourage Creativity
One of the best things about paper crafting is that children can make their own creative decisions.
They can choose their favorite colors, combine different paper shapes, and decorate projects in unique ways.
For example, one child might make a butterfly with bright orange wings, while another chooses purple and blue.
Both butterflies can look beautiful even when the designs are completely different.
Paper crafts also allow children to experiment with patterns, drawings, and simple decorations.
Instead of asking children to copy every detail exactly, encourage them to add their own ideas.
This makes crafting feel more enjoyable and personal.
Paper Crafts Help Children Practice Hand Skills
Many paper craft activities involve simple hand movements such as folding, cutting, tearing, coloring, and gluing.
These activities give children opportunities to practice using their hands and coordinating different movements.
For example, cutting along a simple line requires a child to hold the paper while using scissors.
Folding paper involves matching edges and pressing along a crease.
Gluing shapes onto a background requires positioning pieces carefully.
Children develop these abilities at different rates, so choose activities that match their individual skills.
Younger children may need adults to prepare the paper shapes, while older children may complete more steps independently.
Paper Crafts Are Affordable and Easy to Prepare
Paper crafting does not usually require expensive materials.
You may already have useful supplies at home, including colored paper, glue sticks, crayons, and pencils.
Clean leftover paper from previous projects can also be used for collages and simple decorations.
For example, small pieces of colored paper can become leaves, fish scales, or patterns on a butterfly.
Teachers can prepare several paper craft activities using basic classroom supplies.
Parents can also keep a small craft box ready for weekends or rainy afternoons.
Start with simple projects that use only a few materials.
Paper Crafts Can Be Enjoyed Together
Paper crafts provide opportunities for children and adults to spend time creating something together.
Parents can help younger children fold paper, prepare shapes, and attach different pieces.
Teachers can organize simple classroom projects where children choose colors and create their own designs.
Siblings may enjoy making matching paper animals or decorating separate paper crowns.
The activity does not need to become a competition.
Allow children to work at a comfortable pace and appreciate the different results.
The shared experience of making something can be just as enjoyable as displaying the finished craft.
What Supplies Do You Need for Easy Paper Crafts?
Most easy paper crafts for kids require only a few everyday materials.
You do not need special machines, expensive cutting equipment, or professional art supplies.
The best approach is to prepare a small collection of materials that children can use comfortably.
Choose supplies that are appropriate for each child’s age and abilities, and follow the safety information provided by the manufacturers.
Colored Paper and Construction Paper
Colored paper is one of the most useful materials for children’s crafts.
You can use it to create animals, rainbows, flowers, houses, crowns, and other simple projects.
Construction paper is available in many colors and is often easy for children to handle.
For folding activities, choose paper that bends without tearing too easily.
For crafts that need more support, such as paper crowns or bookmarks, slightly thicker cardstock may be useful.
You can also reuse clean paper scraps from previous activities.
Organize the paper by color so children can find the shades they want.
Glue Sticks and Child Appropriate Adhesives
Glue sticks are useful for attaching lightweight paper shapes.
They are often easier to control than liquid glue for simple paper projects.
Choose products intended for children’s crafts and suitable for the child’s age.
Show children how to apply a small amount of glue to the back of a paper shape.
Too much glue can make the paper wrinkled or difficult to handle.
For younger children, an adult may need to help with gluing.
Keep glue containers closed when they are not being used.
Scissors and Safe Cutting Tools
Scissors are useful for cutting circles, rectangles, triangles, and other paper shapes.
Choose scissors appropriate for the child’s age, abilities, and level of supervision.
Children who are still learning to cut may need adults to prepare the shapes.
Start with simple straight lines before introducing curved outlines.
For preschool activities, adults can cut larger pieces in advance.
Teach children to remain seated while cutting and to use scissors only for their intended purpose.
Keep sharper craft tools for adult use.
Crayons, Colored Pencils, and Washable Markers
Crayons and colored pencils are useful for decorating paper crafts.
Children can draw eyes, smiles, patterns, windows, and other details.
Washable markers are another option for adding bright colors.
Choose materials that are appropriate for children and suitable for the paper being used.
For example, children can draw colorful circles on butterfly wings or add stripes to a paper fish.
You do not need to buy a large collection of art supplies.
A few basic colors are enough for many creative activities.
Paper Plates and Recycled Paper
Plain paper plates can become animal faces, suns, and other simple decorations.
They provide a sturdy surface for gluing paper shapes and coloring.
Clean recycled paper can also be useful for children’s crafts.
Old magazines, unused paper scraps, and suitable packaging paper may provide interesting colors and patterns.
Check recycled materials before giving them to children.
Avoid paper with sharp staples, unsuitable coatings, dirty surfaces, or other hazards.
Choose materials that are clean and comfortable to handle.
Optional Craft Templates and Decorations
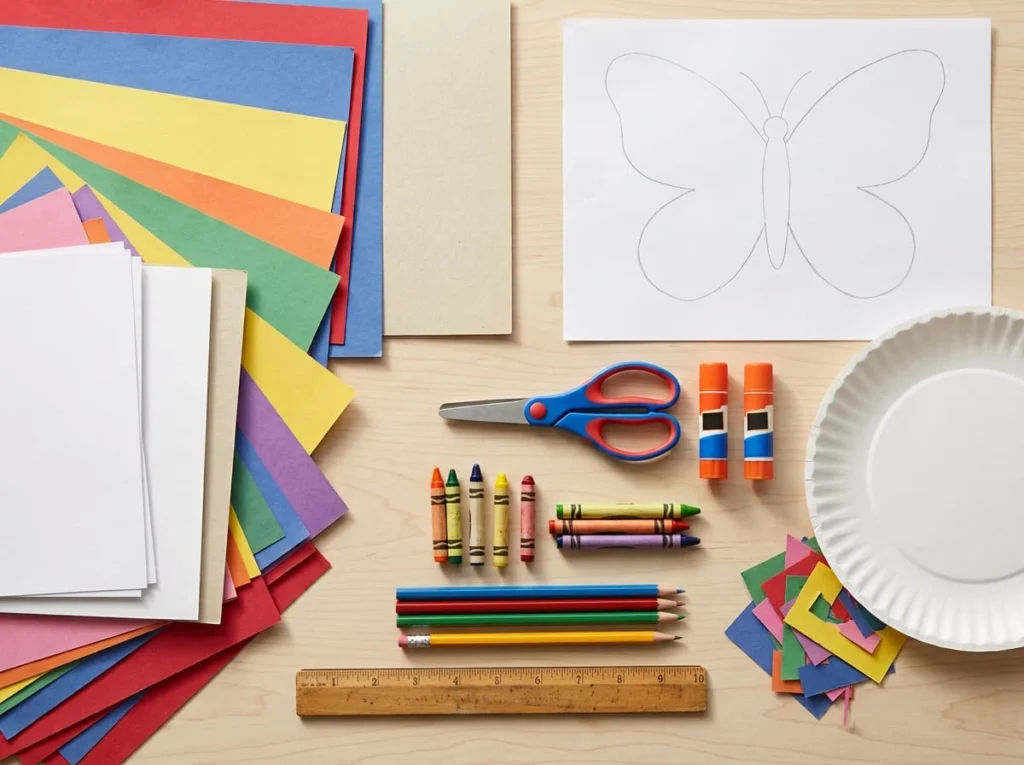
Simple craft templates can make certain projects easier.
For example, an adult can draw a large butterfly outline or prepare a basic circle shape for children to cut.
Templates do not need to be complicated.
You can use a pencil and ordinary paper to prepare simple outlines.
Children may also enjoy decorating their crafts with extra paper shapes.
Avoid small loose decorations that could create choking hazards for younger children.
Instead of attaching tiny plastic eyes or beads, encourage children to draw facial details using crayons or markers.
How to Choose Paper Crafts for Different Age Groups
Children have different interests, abilities, and levels of experience with craft supplies.
A project that feels easy for one child may be difficult for another.
The best paper craft activities match each child’s abilities while allowing enough freedom to be creative.
The following age ranges are general suggestions rather than strict rules.
Adult supervision should depend on the individual child and the tools being used.
Simple Paper Crafts for Preschoolers
Preschoolers often enjoy crafts involving large paper shapes, bright colors, and simple gluing.
For example, a young child can arrange large colored circles to make a caterpillar.
Another easy activity is attaching prepared paper strips to create a rainbow.
Adults can cut the paper shapes in advance when scissors are not suitable for the child.
Tearing paper into pieces can also be an enjoyable activity.
Children can glue the torn pieces onto a larger sheet to create a colorful collage.
Keep instructions short and demonstrate one action at a time.
Avoid small loose decorations that could be placed in the mouth.
Paper Crafts for Kids Ages 5 to 7
Many children in this age group enjoy activities involving basic cutting, folding, and assembling.
Simple paper fish, crowns, houses, and butterflies can be good choices.
Children may be able to cut larger shapes using suitable scissors with supervision.
They can also practice folding paper in half and following a simple outline.
For example, a child might fold colored paper, cut a butterfly shape with help, and decorate both wings.
Provide assistance whenever a step becomes difficult.
The goal is to make the activity enjoyable rather than expecting perfect results.
Paper Crafts for Kids Ages 8 to 12
Older children may enjoy paper projects that involve more planning and several steps.
Simple paper weaving, paper bag puppets, and layered collage pictures can provide interesting challenges.
They may also enjoy designing their own templates instead of using prepared outlines.
For example, a child could make a paper puppet with movable features or create a colorful weaving pattern using paper strips.
Encourage experimentation with colors, patterns, and shapes.
Even when children can complete most steps independently, provide appropriate supervision when scissors, adhesives, or other tools are involved.
Adjust Activities to Each Child’s Skills
Age alone does not determine whether a paper craft is suitable.
Some younger children enjoy detailed activities, while some older children prefer simpler projects.
Consider the child’s comfort with scissors, ability to follow instructions, and interest in the craft.
If cutting is difficult, provide prepared shapes.
If folding is challenging, demonstrate the movement slowly or help create the crease.
You can also simplify a project by reducing the number of pieces.
Allow children to take breaks when needed.
Crafting should remain a positive activity that encourages participation and creativity.
How to Make an Easy Paper Butterfly Craft Step by Step
A colorful paper butterfly is one of the easiest paper crafts for kids because it uses simple shapes, bright colors, and basic folding techniques.
For this project, children will fold a piece of colored paper, cut out butterfly wings, and decorate them with crayons or additional paper shapes.
The butterfly will have two matching wings, a simple paper body, and optional antennae.
This craft is suitable for children who can use appropriate scissors with supervision. Younger children can participate by choosing colors, decorating wings, and gluing pieces that an adult has prepared.
You can display the finished butterfly on another sheet of paper or use it as part of a colorful classroom craft display.
Step 1: Gather the Paper Craft Supplies
Start by preparing a clean table with enough space for folding, cutting, and coloring.
Gather two or three sheets of colored paper, a glue stick, crayons, a pencil, and scissors suitable for the child.
Choose one sheet for the butterfly wings and another color for the body.
You can also prepare a plain sheet of paper if you want to attach the finished butterfly to a background.
Keep extra materials out of the way so the workspace does not become crowded.
If younger children are participating, an adult should prepare any shapes that require cutting beyond their abilities.
Step 2: Choose Colors for the Butterfly
Let the child choose a favorite color for the butterfly wings.
Bright yellow, orange, purple, blue, and pink are all attractive options.
The butterfly does not need to resemble a real insect.
Children can create imaginary butterflies with unusual color combinations.
Choose a second color for the body.
For example, purple wings can look beautiful with a yellow body.
Encourage the child to think about which crayon colors they want to use for decorating the wings.
Giving children simple choices helps make the craft more personal.
Step 3: Fold the Paper for Butterfly Wings
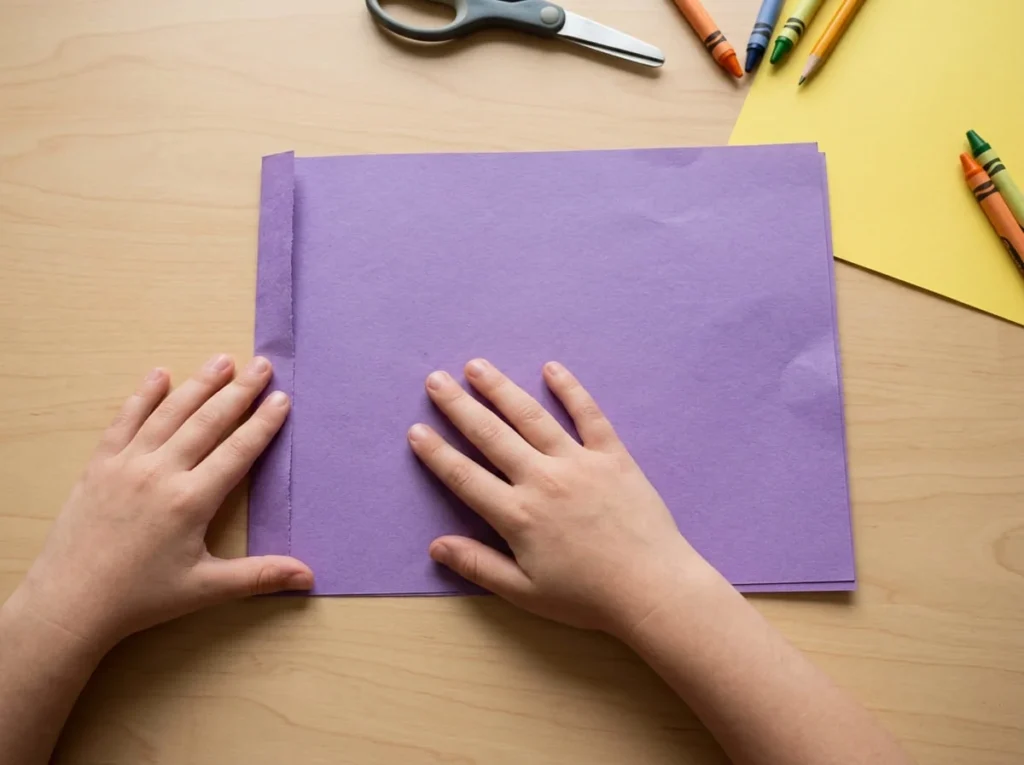
Take the sheet chosen for the wings.
Place it flat on the table.
Fold it in half so the left and right sides meet.
Press gently along the fold to create a visible crease.
The folded edge will become the center of the butterfly.
Explain that both wings will be created from one folded piece of paper.
This simple technique helps make the left and right sides match.
Younger children may need help aligning the paper edges.
Step 4: Draw the Butterfly Wing Shape
Keep the paper folded.
Place the folded edge on the left side of your workspace.
Using a pencil, draw half of a butterfly shape starting and ending at the folded edge.
Begin near the upper section of the fold and draw a broad curved upper wing extending toward the open side of the paper.
Continue into a slightly smaller lower wing.
Bring the outline back toward the folded edge near the bottom.
Keep the curves broad and simple.
Avoid drawing narrow details that may be difficult to cut.
Explain that when the paper is opened, the shape will reveal two connected butterfly wings.
Step 5: Cut Out the Butterfly Wings
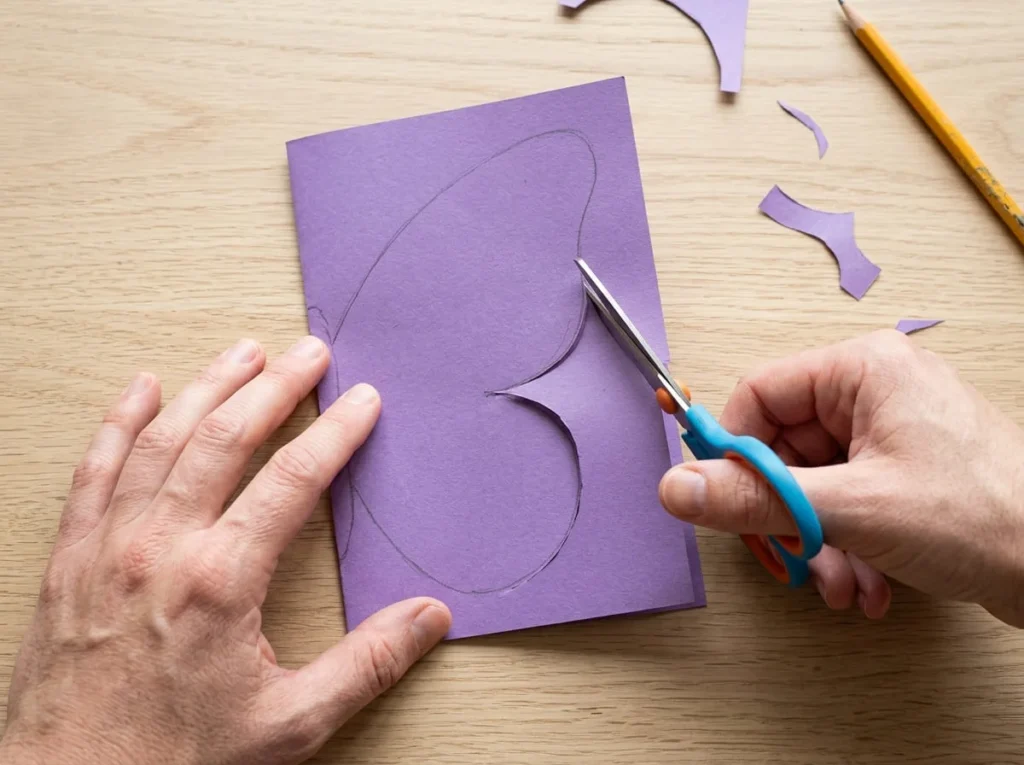
Keep the paper folded while cutting.
Use scissors suitable for the child’s abilities.
Carefully cut along the outside pencil outline.
Do not cut through the folded edge connecting the two sides.
Move slowly around the upper and lower wing curves.
If the child finds the curved sections difficult, an adult can help complete those areas.
Once the cutting is finished, place the scissors aside safely.
Open the folded paper carefully.
You should now have a butterfly shape with two matching sides connected at the center.
Step 6: Open and Decorate the Wings
Place the open butterfly flat on the table.
Use crayons or colored pencils to decorate the wings.
Children can draw circles, stripes, dots, or simple curved patterns.
They can also cut larger paper circles and glue them onto the wings if appropriate.
Encourage the child to use favorite colors and create a unique design.
There is no need to copy the markings of a real butterfly.
The craft should reflect the child’s imagination.
How to Make Both Butterfly Wings Look Balanced
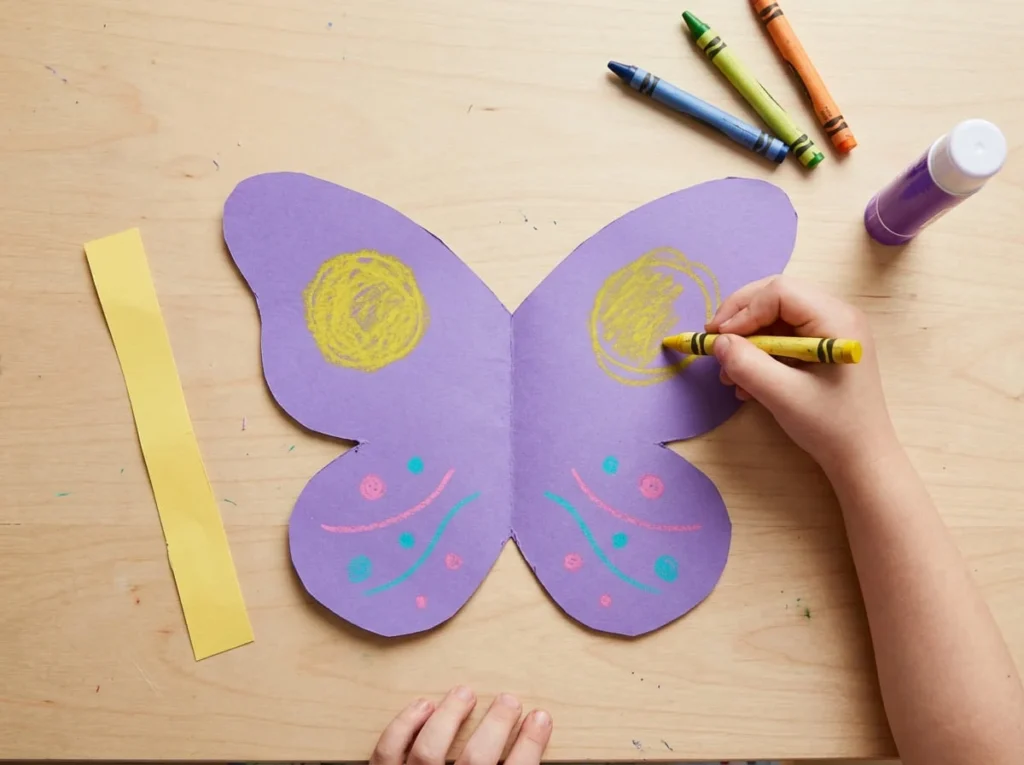
If children want both wings to look similar, they can repeat the same basic decorations on each side.
For example, draw one large circle near the top of the left wing and another in a similar position on the right wing.
Add two smaller dots near the lower sections.
Using the same colors on both sides can also create a balanced appearance.
However, the patterns do not need to be identical.
Some children may prefer different colors or shapes on each wing.
Allow them to decide how their butterfly should look.
Step 7: Cut a Simple Paper Butterfly Body
Choose a contrasting color of paper for the butterfly body.
Draw a long, narrow oval with rounded ends.
Make it large enough to cover the center section where the two wings meet.
Cut along the outline using suitable scissors.
Younger children can ask an adult to prepare this shape.
Place the paper body over the center of the wings to check its position.
The body should extend from near the top of the wings toward the lower center.
If it looks too long, trim it carefully.
Step 8: Attach the Body to the Wings
Place the butterfly wings flat on the table with the decorated side facing upward.
Apply a small amount of glue to the back of the paper body.
Position it along the center fold of the wings.
Press gently so the body attaches securely.
Avoid using too much glue because it may cause thin paper to wrinkle.
Check that the body is centered and that both wings remain visible.
Allow the glue to set according to the product instructions.
Children can draw a small smiling face on the upper part of the body if they want to make a friendly cartoon butterfly.
Step 9: Add Paper Antennae if Appropriate
For an additional detail, you can make two simple paper antennae.
Choose a contrasting piece of paper.
Draw two short, broad strips with rounded ends.
An adult can cut these shapes if they are too narrow for the child to handle safely.
Apply a small amount of glue to the lower ends of the strips.
Attach them behind the upper part of the butterfly body.
If the paper strips are too delicate or difficult to attach, simply draw antennae on a background sheet instead.
Avoid using wire, sharp objects, or tiny loose decorations for this beginner project.
Step 10: Let the Butterfly Dry and Display It
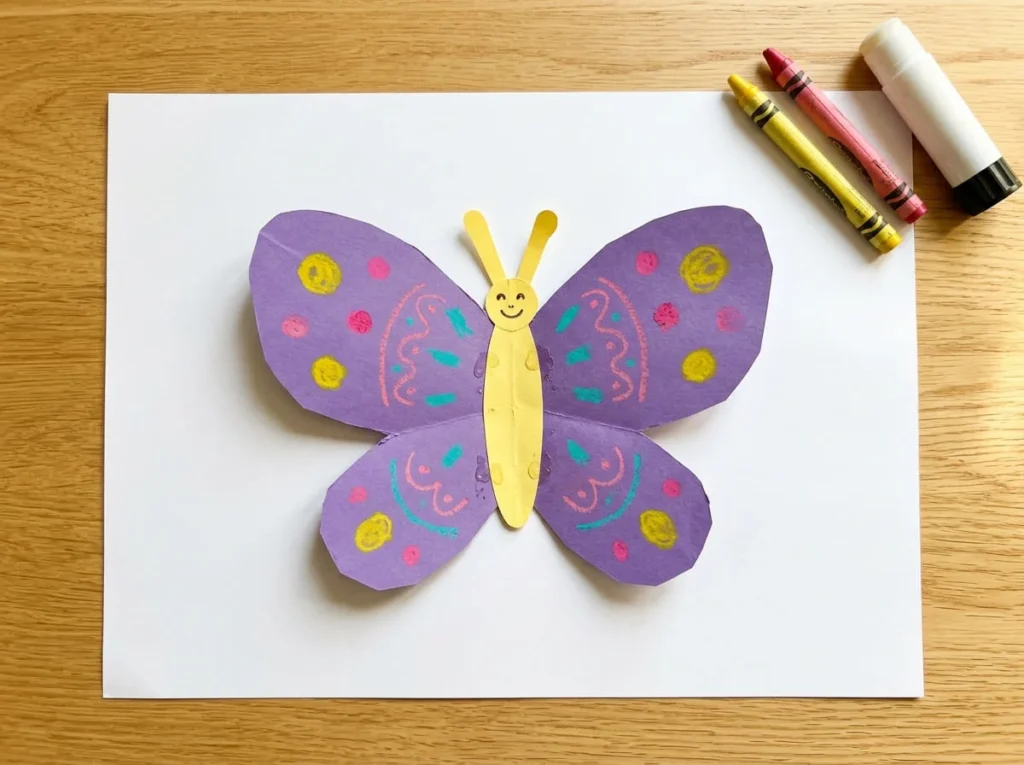
Once the butterfly is assembled, place it flat on a clean surface.
Allow the glue to dry according to the manufacturer’s instructions.
Avoid lifting the butterfly too early because the body or antennae may become loose.
When the craft is dry, children can display it on a bedroom wall using a suitable paper safe mounting method.
Another simple option is to glue the butterfly onto a larger sheet of colored paper.
Children can add drawings of flowers, clouds, and grass around it to create a colorful garden picture.
You can also make several butterflies using different colors and arrange them together for a classroom display.
Your paper butterfly is now complete, with colorful wings, a simple paper body, and a design created through basic folding, cutting, and decorating techniques.
15 Fun and Easy Paper Crafts for Kids
Paper crafting is a wonderful way for children to explore their creativity using simple materials. With colored paper, crayons, glue, and suitable scissors, kids can make colorful animals, rainbows, crowns, and other fun projects.
These easy paper crafts for kids are suitable for home activities, classroom projects, school holidays, and rainy afternoons. Most ideas use supplies that parents and teachers may already have available.
Each project includes simple instructions, suggested age ranges, and a helpful tip to make crafting easier.
The age recommendations are flexible because children develop cutting, folding, and gluing skills at different rates. Adults should provide help and supervision according to each child’s abilities.
Encourage children to choose their own colors and decorate their projects however they like. The goal is to enjoy creating something rather than making every craft look exactly the same.
1. Colorful Paper Caterpillar Craft

Materials: Colored construction paper, glue stick, crayons, pencil, and suitable scissors.
Suggested ages: 3 to 6 years with appropriate adult assistance.
A colorful paper caterpillar is one of the simplest animal crafts children can make.
This project uses overlapping paper circles to create a cheerful caterpillar body. Children can choose different colors for each section or use their favorite color throughout.
It is a good activity for introducing simple shapes and color combinations.
Younger children can arrange circles prepared by an adult, while children who are comfortable with scissors can help cut larger shapes.
How to Make a Paper Caterpillar
- Choose four or five sheets of colored construction paper.
- Draw six large circles on the paper using a pencil.
- Cut out the circles with suitable scissors, providing adult help when needed.
- Arrange the circles in a slightly curved line on a large backing sheet.
- Overlap the edges of the circles to create the caterpillar’s body.
- Apply a small amount of glue to attach each circle.
- Make the first circle the caterpillar’s head.
- Draw two eyes and a smiling mouth using crayons.
- Add short legs beneath the body using crayons or broad paper shapes.
- Allow the glue to dry before displaying the finished caterpillar.
Children can make their caterpillars look different by changing the color order.
For example, one caterpillar might have alternating green and yellow circles, while another uses pink, purple, and blue.
You can also encourage children to count the circles as they arrange them.
Beginner tip: Prepare large circles for younger children. Bigger paper shapes are easier to pick up, position, and glue.
2. Easy Paper Rainbow Craft
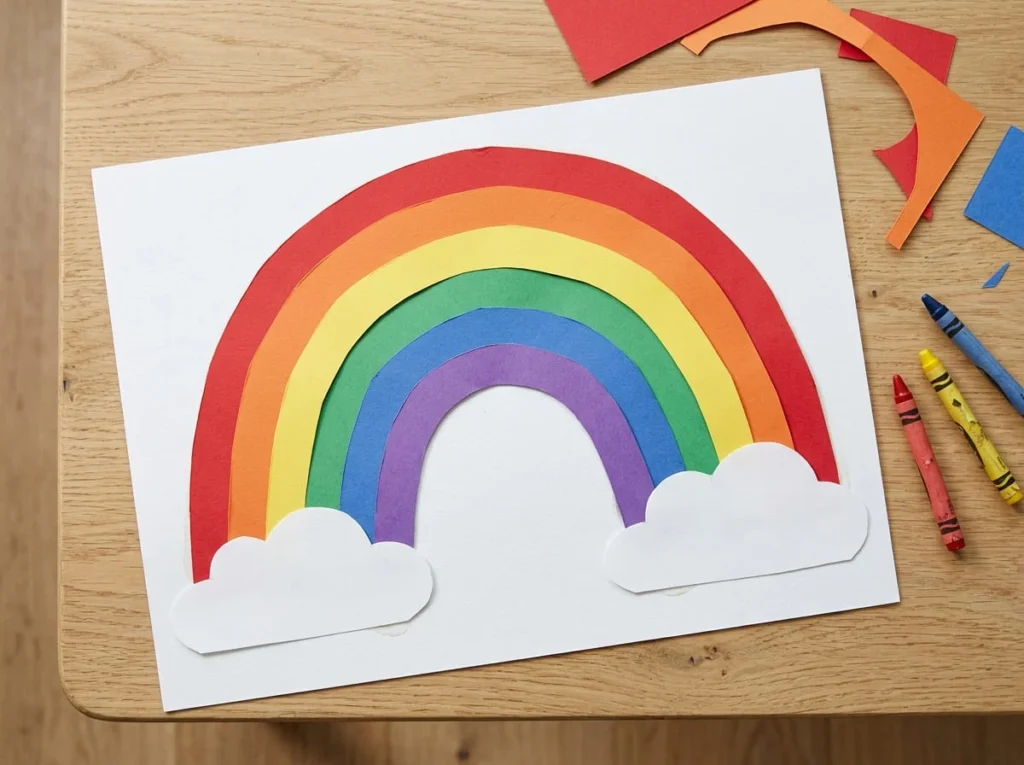
Materials: Red, orange, yellow, green, blue, and purple paper, glue stick, white backing paper, and suitable scissors.
Suggested ages: 3 to 7 years with appropriate assistance.
A paper rainbow is a bright and cheerful craft that children can make using colorful paper strips.
The project is simple because it does not require complicated drawing or folding.
Children can arrange the strips into curved rainbow bands and glue them onto a background.
This activity also gives children an opportunity to explore colors and different arrangements.
The finished rainbow can be displayed in a bedroom or classroom.
How to Make a Paper Rainbow
- Gather several sheets of colored paper.
- Choose a large white sheet for the background.
- Cut broad strips from the colored paper, making each strip a suitable length for its rainbow band.
- Arrange the strips into curved bands, with longer strips on the outside and shorter strips toward the center.
- Start by placing the red strip near the top of the planned rainbow.
- Add orange, yellow, green, blue, and purple strips beneath it.
- Adjust the paper curves until the rainbow looks balanced.
- Attach each strip carefully using a glue stick.
- Draw two simple clouds at the ends of the rainbow, or use large white paper cloud shapes.
- Allow the glue to dry before displaying the picture.
Children can add a sun, birds, or flowers around the rainbow using crayons.
If they want to use a different color order, allow them to experiment.
The activity is about creativity rather than following a perfect pattern.
Beginner tip: Adults can prepare the paper strips before starting. Younger children can focus on choosing colors and gluing them onto the background.
3. Simple Paper Fish Craft

Materials: Colored paper, crayons, glue stick, pencil, and suitable scissors.
Suggested ages: 4 to 8 years with appropriate assistance.
A colorful paper fish is an easy animal craft that children can personalize using different shapes and patterns.
The main body can be a large oval, while the tail and fins can be made from simple triangles.
Children can decorate their fish with stripes, circles, or colorful scales.
This project can also become part of a larger underwater scene.
How to Make a Colorful Paper Fish
- Choose a bright sheet of construction paper for the fish body.
- Draw one large oval shape using a pencil.
- Cut out the oval with suitable scissors.
- Choose another paper color for the tail and fins.
- Draw one large triangle for the tail and two smaller triangles for the fins.
- Cut out the shapes carefully.
- Glue the tail behind one end of the oval body.
- Attach the fins near the upper and lower sections of the fish.
- Use crayons to draw an eye, a smiling mouth, and simple scales.
- Allow the glue to dry before displaying the finished fish.
You can make several fish in different colors and attach them to a large blue sheet of paper.
Children can draw bubbles, seaweed, and small underwater plants around them.
This creates a simple ocean picture without requiring complicated materials.
Beginner tip: Use large fins and a simple oval body. Small details can be drawn with crayons instead of cutting tiny paper pieces.
4. DIY Paper Crown for Kids
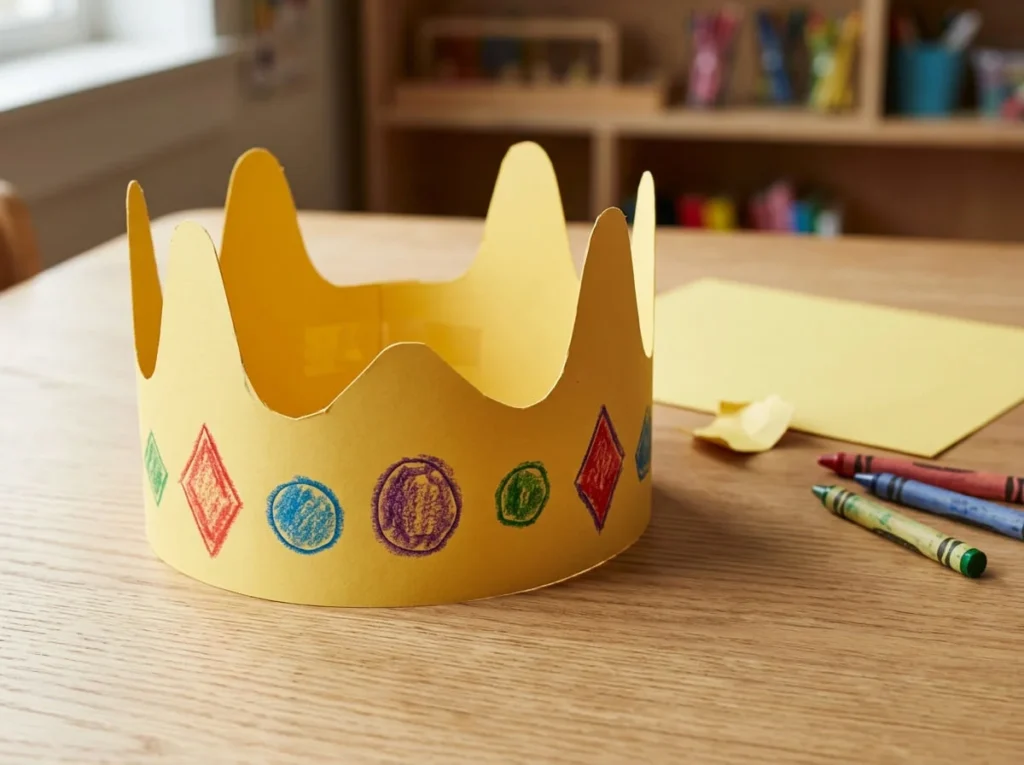
Materials: Sturdy colored cardstock, crayons, glue stick or suitable tape, pencil, and scissors.
Suggested ages: 5 to 9 years with appropriate assistance.
Making a paper crown is a fun activity because children can wear their finished craft during imaginative play.
They can pretend to be kings, queens, explorers, or characters from their favorite stories.
The crown can be decorated with colorful shapes, patterns, and drawings.
Sturdy cardstock is useful because it helps the crown hold its shape.
How to Make a Paper Crown
- Choose a sheet of colored cardstock.
- Cut a broad strip long enough to form part of a crown band.
- If one strip is not long enough, prepare another strip that can be joined to it.
- Draw several broad crown peaks along the upper edge of the paper.
- Cut around the peaks carefully using suitable scissors.
- Use crayons to decorate the crown with circles, stars, or colorful patterns.
- Wrap the paper strip loosely around the child’s head to check the fit.
- Adjust the length so the crown rests comfortably without being tight.
- Secure the ends using suitable tape or glue, allowing any adhesive to set before wearing.
- Check that the crown has no sharp points or uncomfortable edges.
Children can make crowns in yellow, purple, blue, or any color they prefer.
Instead of attaching small plastic gems, encourage children to draw colorful jewel shapes.
This keeps the project simple and avoids unnecessary loose decorations.
Beginner tip: Use broad crown peaks and a comfortable paper band. Avoid narrow pointed details that may bend or feel uncomfortable.
5. Easy Paper Handprint Art
Materials: Colored paper, pencil, crayons, glue stick, backing paper, and suitable scissors.
Suggested ages: 3 to 7 years with appropriate adult assistance.
Paper handprint art is a personal craft that children can create using the outline of their own hands.
The handprint can become part of a flower, tree, animal, or colorful picture.
For this project, children will turn a paper handprint into a simple tree with colorful leaves.
Younger children may enjoy tracing and decorating while an adult handles the cutting.
How to Make Paper Handprint Art
- Choose a sheet of brown construction paper.
- Place the child’s hand flat on the paper with fingers comfortably spread apart.
- Trace around the hand carefully using a pencil.
- Cut out the handprint shape using suitable scissors.
- Choose a large white or light blue sheet for the background.
- Position the handprint with the wrist section at the bottom and fingers pointing upward.
- Glue the handprint onto the background to form the tree trunk and branches.
- Cut or prepare several large green paper leaves.
- Arrange and glue the leaves around the paper fingers.
- Use crayons to add grass, clouds, or a smiling sun.
The finished project becomes a simple handprint tree picture.
Children can use orange and yellow leaves to create an autumn tree or bright green leaves for a spring scene.
Each handprint will be slightly different, making the artwork personal.
Beginner tip: Adults can cut the traced handprint for younger children. Allow children to choose and arrange the leaves themselves.
6. Simple Paper Chain Craft
Materials: Colored construction paper, glue stick, ruler, pencil, and suitable scissors.
Suggested ages: 4 to 8 years with appropriate assistance.
Paper chains are simple decorations made by connecting loops of colored paper.
They are fun to create because children can watch the chain become longer with every new loop.
Children can make chains using one color or alternate different colors to create a pattern.
The completed craft can be used for suitable supervised room or classroom decorations.
How to Make Colorful Paper Chains
- Choose several sheets of colored construction paper.
- Use a ruler and pencil to mark broad paper strips.
- Cut the strips using suitable scissors.
- Take one strip and curve it into a circle.
- Overlap the two ends slightly.
- Attach the ends using a glue stick or suitable tape.
- Take a second strip and pass it through the first paper loop.
- Curve the second strip into another loop and secure its ends.
- Continue adding connected loops using different colors.
- Stop when the chain reaches a manageable length and allow any glue to dry.
Children can alternate red and blue loops or create a repeating rainbow pattern.
You can also make several short chains and arrange them together.
Keep hanging paper chains away from cribs, young children’s sleeping areas, heat sources, and places where they could become tangled.
Beginner tip: Use broad paper strips and make a short chain first. Larger loops are easier for children to handle and connect.
7. Paper Plate Animal Face Craft
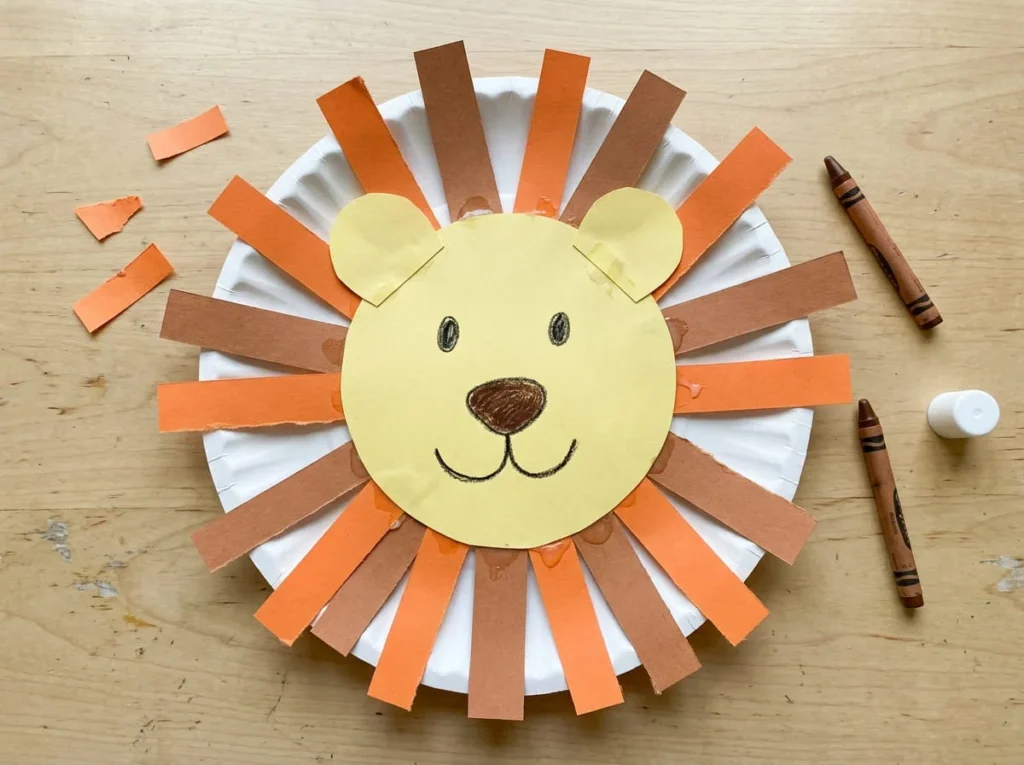
Materials: Plain paper plate, colored construction paper, crayons, glue stick, pencil, and suitable scissors.
Suggested ages: 4 to 8 years with appropriate assistance.
Paper plate animal faces are fun because the round plate provides a ready made base for different animal designs.
Children can create a lion, bear, cat, or another favorite animal.
For this project, the paper plate will become a cheerful lion face.
The main features can be made from simple paper shapes.
Children can draw smaller details instead of attaching tiny decorations.
How to Make a Paper Plate Animal Face
- Choose a plain, clean paper plate.
- Place the plate on a protected craft table.
- Select yellow or light brown paper for the lion’s face.
- Cut a large circle and glue it onto the center of the plate.
- Choose orange or brown paper for the lion’s mane.
- Cut several broad paper strips or rounded shapes.
- Glue the strips around the edge of the face to create the mane.
- Use crayons to draw two eyes, a nose, and a smiling mouth.
- Add two large rounded paper ears near the top of the plate.
- Allow the glue to dry before displaying the finished lion.
Children can change the colors to create different animal characters.
For example, a brown face with rounded ears could become a bear.
A gray face with pointed ears could become a cat.
The basic plate design can be reused for many animal crafts.
Beginner tip: Draw small facial features instead of attaching tiny loose pieces. This makes the project easier and more appropriate for younger children.
8. Easy Paper House Craft
Materials: Construction paper, white backing paper, glue stick, crayons, pencil, and suitable scissors.
Suggested ages: 5 to 9 years with appropriate assistance.
A paper house craft is a simple way for children to explore geometric shapes while creating a colorful picture.
The house can be made using a large square or rectangle, a triangle roof, and smaller paper shapes for the door and windows.
Children can choose their favorite colors and decorate the surrounding scene with crayons.
This project works well for home activities and classroom craft sessions.
How to Make a Simple Paper House
- Choose a large white or light blue sheet for the background.
- Select a colored sheet of construction paper for the house.
- Draw a large square or rectangle and cut it out.
- Glue the house shape near the lower center of the background.
- Choose another paper color for the roof.
- Cut a large triangle that fits across the top of the house.
- Attach the roof using a glue stick.
- Cut one rectangle for the door and two smaller shapes for the windows.
- Glue the door and windows onto the house.
- Use crayons to draw grass, a pathway, clouds, trees, or a sun around the house.
Children can make houses with red roofs, yellow walls, blue windows, or any other color combination.
They can also create several small houses on one background to make a neighborhood scene.
Encourage children to add details that make their houses unique.
Beginner tip: Start with large squares, rectangles, and triangles. Simple geometric shapes are easier to cut and arrange than complicated building designs.
9. Paper Bag Puppet Craft
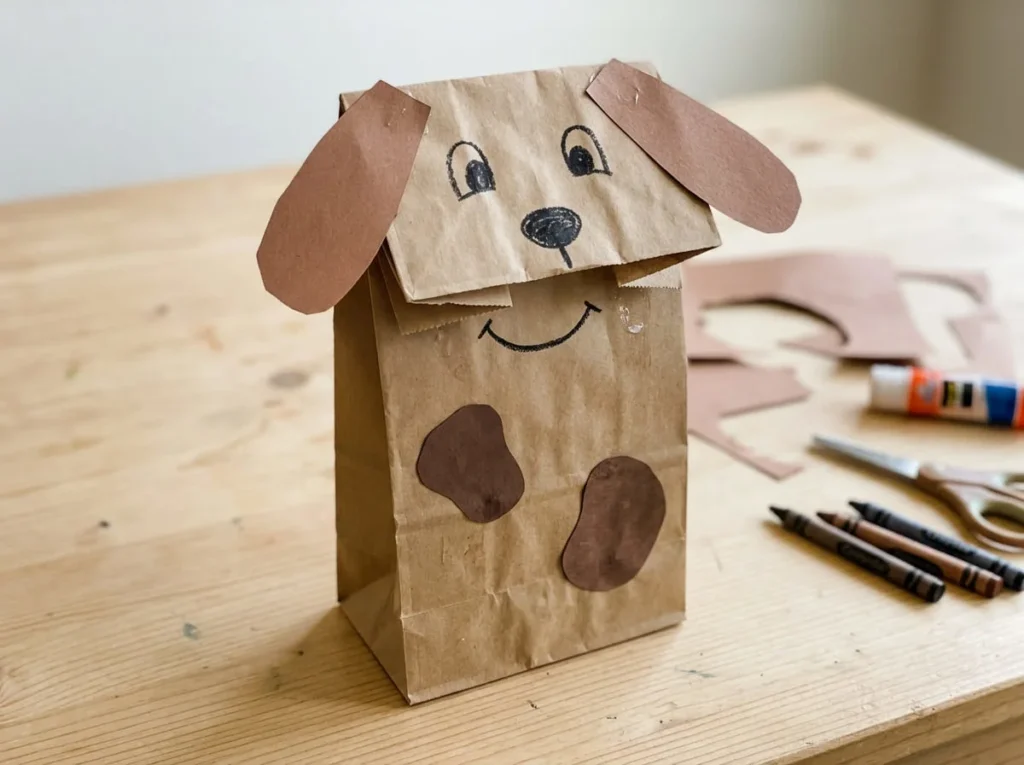
Materials: Clean paper bag, colored construction paper, crayons, glue stick, pencil, and suitable scissors.
Suggested ages: 5 to 10 years with appropriate adult assistance.
Making a paper bag puppet is a fun activity that combines crafting with imaginative play. Children can transform an ordinary paper bag into a friendly animal or a character from their imagination.
One of the easiest options is a paper bag puppy. The folded bottom flap becomes the puppet’s moving mouth area, while paper ears and a simple face give it personality.
After completing the craft, children can use their puppets to create stories, perform short plays, or act out conversations.
This project is particularly enjoyable for classroom activities because every child can create a different character.
How to Make a Paper Bag Puppet
- Choose a clean paper bag with a folded bottom flap.
- Place the bag on a table with the flap facing upward.
- Choose brown, cream, or another color of construction paper for the puppy’s features.
- Draw two large floppy ears and cut them out using suitable scissors.
- Glue the ears near the upper sides of the folded flap.
- Use crayons to draw two eyes and a rounded nose on the flap.
- Draw a simple smiling mouth beneath the flap so the mouth appears to open when the puppet moves.
- Add large paper spots to the body of the bag if desired.
- Allow the glue to dry completely.
- Place a hand inside the bag and gently move the flap to bring the puppy puppet to life.
Children can make different characters using the same basic technique. A gray puppy, orange cat, or colorful imaginary creature can all begin with an ordinary paper bag.
Encourage children to invent names and personalities for their puppets.
Beginner tip: Use large paper features that are easy to attach. Keep the folded flap free to move, and avoid placing glue where it could seal the puppet’s mouth.
10. Easy Paper Bookmark Craft
Materials: Colored cardstock, crayons, glue stick, pencil, and suitable scissors.
Suggested ages: 5 to 10 years with appropriate assistance.
A paper bookmark is a simple and useful craft that children can make for themselves or give as a handmade gift.
Unlike bulky paper decorations, a bookmark should remain relatively flat so it fits comfortably between book pages.
Children can decorate bookmarks with colorful stripes, flowers, stars, or their favorite animal drawings.
This project is especially suitable for classroom reading activities because children can use their finished crafts when reading books.
How to Make a Paper Bookmark
- Choose a sheet of sturdy colored cardstock.
- Use a ruler and pencil to draw a long rectangle.
- Cut out the rectangle using suitable scissors.
- Round the corners slightly if needed to remove sharp paper points.
- Choose two or three crayon colors for decorating.
- Draw a simple pattern such as colorful stripes, stars, or small flowers.
- Add a favorite animal or a smiling sun near the upper section.
- If desired, attach one flat paper decoration using a small amount of glue.
- Allow the bookmark to dry completely.
- Place the finished bookmark between the pages of a book.
Children can make matching bookmarks for friends or family members.
For example, one bookmark could feature a rainbow, while another has a colorful fish.
Avoid adding thick paper layers or bulky accessories that might damage book pages.
Beginner tip: Keep the bookmark flat and simple. Crayon drawings are often easier to use than multiple glued decorations.
11. Simple Paper Collage Art
Materials: Colored paper scraps, white backing paper, glue stick, crayons, and suitable scissors if needed.
Suggested ages: 3 to 9 years with appropriate adult assistance.
Paper collage art allows children to create pictures by arranging and gluing different pieces of paper.
The pieces do not need to be perfectly shaped or matched.
Children can tear paper into larger pieces or use shapes prepared by an adult.
For this project, children will create a colorful garden picture using green, blue, yellow, and other paper colors.
The activity provides plenty of freedom because every collage can look different.
How to Make a Paper Collage Picture
- Choose a large white sheet for the background.
- Gather clean paper scraps in different colors.
- Select blue paper for the sky and green paper for the grass.
- Tear or cut the paper into suitable pieces.
- Arrange the blue pieces across the upper part of the background.
- Place the green pieces along the lower section.
- Choose yellow paper to create a simple sun.
- Add larger colorful paper pieces to represent flowers and leaves.
- Glue the pieces into place one section at a time.
- Allow the collage to dry before displaying it.
Children can add birds, butterflies, or other garden details using crayons.
Encourage them to experiment with overlapping paper pieces and mixing colors.
The finished picture does not need straight edges or perfectly shaped flowers.
Beginner tip: Let children arrange their paper pieces before gluing. This gives them a chance to change their designs without wasting materials.
12. Easy Paper Weaving Craft

Materials: Two colors of sturdy construction paper, pencil, ruler, glue stick, and suitable scissors.
Suggested ages: 7 to 12 years with appropriate assistance.
Paper weaving is an interesting activity for children who are ready to try a slightly more detailed craft.
The project involves passing paper strips over and under one another to create a colorful pattern.
Children can explore repeating colors and simple weaving movements without using yarn or special equipment.
A basic paper weaving design can be completed using two sheets of sturdy paper.
Adults should prepare the cutting lines or slots when necessary.
How to Make a Simple Paper Weaving Pattern
- Choose one sheet of construction paper for the base.
- Fold the base paper in half.
- Draw several straight cutting lines starting from the folded edge and stopping before the opposite edge.
- With suitable supervision, cut along the marked lines without cutting through the outer border.
- Open the paper to reveal parallel slots.
- Choose a second paper color and cut several broad strips.
- Take the first strip and pass it over one base section and under the next.
- Continue alternating over and under until the strip reaches the opposite side.
- Add another strip, starting with the opposite weaving pattern.
- Continue weaving and secure the loose strip ends neatly with glue if needed.
The finished paper will show a colorful woven pattern.
Children can try different combinations such as yellow and purple or blue and orange.
They can also create wider or narrower patterns as their cutting and weaving skills improve.
Beginner tip: Start with broad paper strips and only a few slots. This makes the weaving process easier to understand and helps prevent tearing.
13. Paper Sun and Cloud Craft
Materials: Yellow, white, and blue construction paper, glue stick, crayons, pencil, and suitable scissors.
Suggested ages: 3 to 7 years with appropriate adult assistance.
A paper sun and cloud craft is a cheerful activity that children can make using simple circles and rounded shapes.
The bright yellow sun and soft white clouds create a colorful weather picture.
This project is especially suitable for younger children because the main shapes can be prepared in advance.
Children can arrange the pieces on a blue background and add their own creative details.
How to Make a Paper Weather Picture
- Choose a large sheet of blue construction paper.
- Draw a large circle on yellow paper.
- Cut out the circle using suitable scissors.
- Prepare several broad yellow paper strips for the sun’s rays.
- Arrange the strips around one side of the yellow circle.
- Glue the strips behind the circle.
- Attach the completed sun near the upper corner of the blue background.
- Draw and cut two large rounded cloud shapes from white paper.
- Glue the clouds onto the background, leaving some space around the sun.
- Add simple details using crayons and allow the glue to dry.
Children can draw a smiling face on the sun or add small birds in the sky.
They can also create a rainy weather picture by adding blue paper raindrops beneath the clouds.
Beginner tip: Use large paper shapes that children can handle comfortably. Adults can prepare the smaller pieces when needed.
14. Easy Paper Rocket Craft
Materials: Colored construction paper, white or dark blue backing paper, crayons, glue stick, pencil, and suitable scissors.
Suggested ages: 5 to 9 years with appropriate assistance.
A paper rocket craft is a fun project for children who enjoy space, planets, and imaginary adventures.
The rocket can be assembled using simple shapes such as rectangles, triangles, and circles.
Children can decorate the rocket with their favorite colors and create a background filled with stars.
This activity allows children to practice arranging shapes while designing their own spacecraft.
How to Make a Paper Rocket Picture
- Choose a dark blue sheet of paper for the background.
- Select a bright paper color for the rocket body.
- Draw a long rectangle with slightly rounded corners if desired.
- Cut out the shape using suitable scissors.
- Draw a triangle on another colored sheet to create the rocket’s nose.
- Cut two smaller triangles for the side fins.
- Arrange the rocket body, nose, and fins on the background.
- Glue the shapes into place.
- Add two or three paper circles for the rocket windows.
- Use crayons to draw stars, planets, and colorful flames beneath the rocket.
Children can create rockets in red, silver gray, green, or any other colors they enjoy.
They can also draw an imaginary planet where their rocket might land.
The craft does not need to represent a real spacecraft.
Beginner tip: Encourage children to experiment with their own rocket colors and shapes. Simple large pieces are easier to cut and assemble.
15. Paper Garden Scene Craft
Materials: Colored paper, glue stick, crayons, white backing paper, pencil, and suitable scissors.
Suggested ages: 5 to 10 years with appropriate assistance.
A paper garden scene combines several simple craft ideas into one colorful picture.
Children can create grass, leaves, flowers, butterflies, and other garden details using colored paper.
Unlike a detailed paper flower tutorial, this project focuses on arranging basic shapes to build a complete outdoor scene.
Children can decide what their imaginary gardens should contain.
This makes the activity suitable for creative classroom projects and relaxed crafting at home.
How to Make a Paper Garden Picture
- Choose a large white or light blue sheet for the background.
- Cut a broad strip of green paper for the grass.
- Glue the green strip along the bottom of the background.
- Prepare several simple paper stems using narrow green rectangles.
- Attach the stems above the grass.
- Cut large colored circles or rounded shapes for the flower heads.
- Glue the flower heads onto the stems.
- Add broad green paper leaves beside the flowers.
- Create a simple butterfly using two paper wing shapes and a small body.
- Use crayons to add a sun, clouds, insects, or other garden details.
Children can create gardens filled with different colors and imaginary plants.
They may choose to add a pond, a pathway, or a small paper house.
Encourage them to make the scene their own rather than copying a fixed design.
Beginner tip: Focus on arranging the complete picture instead of making complicated individual flowers. Large paper shapes help keep the project manageable.
How to Make Paper Craft Activities Fun for Kids
Paper craft activities are often more enjoyable when children have enough freedom to make creative decisions.
A relaxed environment, simple instructions, and suitable materials can help children feel comfortable trying new ideas.
Let Children Choose Their Own Colors
Allow children to select the colors they want to use.
A paper fish does not have to be blue, and a butterfly does not need realistic wing patterns.
Children may enjoy creating purple suns, orange houses, or rainbow colored animals.
These choices make the projects more personal.
Prepare Materials Before Starting
Gather paper, crayons, glue, and other materials before beginning the activity.
For younger children, prepare shapes that require more difficult cutting.
Keep the workspace organized so supplies are easy to reach.
This allows children to focus on creating rather than searching for materials.
Keep Instructions Simple and Clear
Explain one step at a time.
Instead of giving children a long list of instructions, demonstrate the first action and allow them to complete it.
For example, show how to glue one paper circle before asking them to attach the remaining shapes.
Provide help when needed without taking over the entire project.
Encourage Creativity Instead of Perfect Results
Children’s crafts do not need to look identical.
Some children may place shapes differently or choose unusual colors.
That is part of the creative experience.
Focus on their effort, ideas, and enjoyment rather than expecting perfectly straight cuts or balanced patterns.
Use Finished Crafts for Games and Displays

Finished paper crafts can become part of other enjoyable activities.
Children can use paper bag puppets for storytelling or wear paper crowns during imaginative play.
Paper butterflies, rainbows, and garden pictures can become classroom displays.
Bookmarks can be used during reading time.
Choose display methods that are appropriate for the child’s age and the surrounding environment.
Easy Paper Craft Ideas for Home and Classroom Activities
Paper crafting can be adapted to many different settings.
Some activities are ideal for a quiet afternoon at home, while others work well with groups of children.
Choose projects based on the available time, materials, and children’s abilities.
Paper Crafts for Rainy Days at Home
Rainy afternoons are a good opportunity to try simple paper activities.
Paper caterpillars, fish, and collages are easy to prepare with everyday supplies.
Choose one or two projects rather than planning too many activities at once.
Allow children to work at their own pace.
A small craft box with paper, crayons, and glue can make preparation easier.
Paper Crafts for Preschool Classrooms
Preschool classroom crafts should use simple steps and easy to handle materials.
Teachers can prepare large circles, strips, and animal shapes before the activity begins.
Paper rainbows, caterpillars, and collage pictures are suitable options when adapted to the children’s abilities.
Avoid tiny loose decorations and provide appropriate supervision.
Paper Crafts for Elementary School Activities
Elementary school students may enjoy activities that involve more cutting, folding, and assembling.
Paper weaving, rockets, puppets, and bookmarks can provide interesting creative opportunities.
Teachers can demonstrate the main steps and allow students to personalize their projects.
The difficulty can be adjusted for different skill levels.
Paper Crafts for Birthday Parties and Playdates
Paper crowns, animal faces, and simple puppets can be enjoyable group activities.
Prepare materials before guests arrive.
Choose crafts that do not require complicated equipment or lengthy drying periods.
Provide enough workspace and adult supervision for the group.
Allow children to decorate their projects with individual colors and patterns.
Safety Tips for Paper Crafts with Kids
Paper crafting can be a simple activity, but choosing appropriate materials and supervising children remain important.
The safest approach depends on each child’s age, abilities, and understanding of the tools involved.
Choose Scissors Suitable for Each Child
Use scissors designed for the child’s age and abilities.
Children who are still learning should practice with simple cutting activities under adult supervision.
Adults can prepare shapes that require difficult or precise cutting.
Keep sharp craft blades and other unsuitable tools out of children’s reach.
Use Child Appropriate Glue and Craft Supplies
Choose glue, markers, and other materials intended for children’s crafts.
Read age recommendations and product safety instructions before use.
Avoid strong household adhesives, solvents, and materials not designed for children’s activities.
Teach children to use glue only on craft materials and to wash their hands when appropriate.
Avoid Tiny Loose Decorations for Younger Children
Small beads, plastic eyes, sequins, and similar objects may create choking hazards for younger children.
Choose large paper shapes instead.
Children can draw eyes, buttons, and other small details with crayons.
Keep unsuitable decorations away from children who may place objects in their mouths.
Keep Craft Areas Clean and Organized
Choose a stable table with enough space for the activity.
Keep scissors, glue, and paper scraps organized.
Remove unnecessary objects before starting.
Clean up small scraps and unused supplies after crafting.
An organized workspace can make the activity easier to manage.
Supervise Children During Cutting and Assembly
Provide supervision whenever children use scissors, adhesives, or other craft tools.
Show children how to use materials correctly.
Help with difficult steps and check that completed projects do not contain sharp edges or loose hazardous pieces.
Adapt each activity to the child’s individual abilities rather than relying only on suggested age ranges.
Common Mistakes When Making Paper Crafts with Kids
Simple paper crafts can become frustrating when projects are too complicated or materials are difficult to handle.
A few adjustments can make craft time more enjoyable.
Choosing Crafts That Are Too Complicated
Projects involving many tiny pieces or difficult folding techniques may overwhelm beginners.
Start with simple shapes and a small number of steps.
Choose more detailed projects as children become comfortable with basic techniques.
Giving Younger Children Pieces That Are Too Small
Tiny paper shapes can be difficult for younger children to handle and may create safety concerns.
Prepare larger circles, rectangles, and triangles instead.
Use crayons for details that would otherwise require small loose pieces.
Using Too Much Glue
Excess glue can wrinkle paper and make projects messy.
Show children how to apply a small amount to the back of each shape.
Glue sticks are often convenient for lightweight paper projects.
Allow children time to practice controlling the amount they use.
Expecting Every Craft to Look Perfect
Children may cut uneven shapes, choose unusual colors, or arrange pieces differently from the example.
These differences are normal.
Avoid correcting every small detail.
Encourage children to enjoy making their own designs.
Rushing Through Instructions
Giving too many instructions at once can make a project confusing.
Demonstrate one step and let children complete it before moving forward.
Offer additional help when needed.
Allow enough time for children to explore the materials.
Not Allowing Enough Time for Drying
Paper pieces may move or separate when glue has not dried sufficiently.
Place finished crafts on a clean, flat surface.
Follow the adhesive manufacturer’s drying instructions.
Avoid folding or displaying glued projects before they are ready.
Frequently Asked Questions
What Are the Easiest Paper Crafts for Kids?
Some of the easiest paper crafts include paper caterpillars, rainbows, fish, handprint pictures, and simple collages. These projects use basic shapes and everyday supplies. Adults can prepare cutouts for younger children.
What Can Kids Make with Just Paper and Glue?
Children can make paper chains, collages, simple houses, rainbows, and colorful animal pictures using paper and glue. For projects requiring cutting, adults can prepare the shapes in advance or provide suitable scissors and supervision.
What Paper Crafts Are Suitable for Preschoolers?
Preschoolers may enjoy paper collages, large paper caterpillars, simple rainbows, and paper plate animal faces. Activities should use large pieces and age appropriate materials. Adults should help with cutting and supervise gluing.
What Can a 5 Year Old Make with Paper?
Depending on their abilities, a 5 year old may enjoy making paper fish, colorful rainbows, simple crowns, and paper houses. Choose projects with large shapes, manageable steps, and suitable supervision.
What Paper Crafts Are Good for Kids Ages 8 to 12?
Children ages 8 to 12 may enjoy paper weaving, paper bag puppets, bookmarks, detailed collages, and rocket pictures. These crafts offer opportunities for planning, cutting, arranging, and personalizing designs.
Can Kids Make Paper Crafts Without Scissors?
Yes. Children can create collages using torn paper, decorate prepared shapes, arrange large paper pieces, and draw designs with crayons. Adults can cut any necessary pieces before the activity begins.
What Is the Best Paper for Children’s Crafts?
Construction paper is useful for many children’s crafts because it comes in different colors and is generally easy to handle. Ordinary drawing paper works well for coloring and collages, while cardstock provides additional support for crowns and bookmarks.
How Do You Make Paper Craft Time Less Messy?
Prepare a clear workspace and provide only the supplies needed for the activity. Use a container for paper scraps and demonstrate how to apply glue carefully. Clean up tools and leftover materials after each project.
Are Paper Crafts Good Classroom Activities?
Yes. Paper crafts can provide opportunities for creativity, following instructions, and practicing basic craft skills. Teachers can adapt activities for group work and prepare difficult cutting steps when necessary.
What Can Kids Make with Recycled Paper?
Children can create paper collages, colorful chains, simple animal pictures, and decorative scenes using clean recycled paper. Check materials carefully and remove staples or other unsuitable items before crafting.
How Can You Help Kids Who Find Cutting Difficult?
Start with simple straight lines and larger shapes. Use scissors appropriate for the child’s abilities and provide adult assistance. You can also prepare shapes in advance so the child can focus on coloring, arranging, and gluing.
How Do You Store Children’s Finished Paper Crafts?
Allow glued projects to dry completely before storing them. Flat crafts can be placed in folders or between clean sheets of paper. Larger projects can be kept in suitable storage boxes to reduce bending or damage.
Final Thoughts
Easy paper crafts for kids provide an affordable and enjoyable way for children to explore colors, shapes, and creative ideas.
From cheerful paper caterpillars and colorful rainbows to paper puppets, bookmarks, and garden pictures, there are many projects to try using simple supplies.
Start with activities that match each child’s abilities and provide appropriate help with cutting and assembly.
Encourage children to choose their own colors, experiment with designs, and enjoy the creative process.
With a little paper, glue, and imagination, an ordinary afternoon can become a fun opportunity to create something special.